

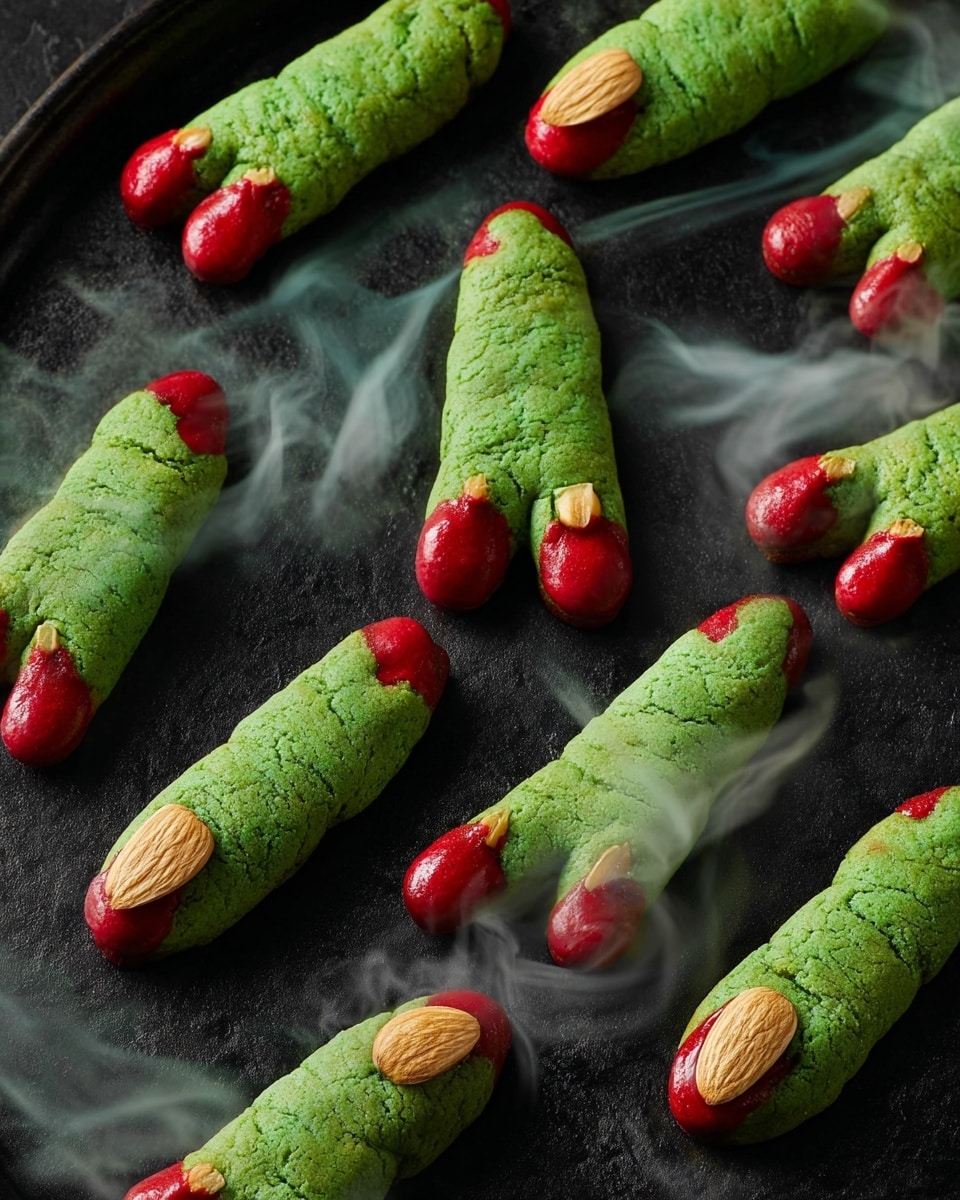
If you’re looking for a wildly fun and slightly spooky treat this season, you’ve hit the jackpot with this Witch Finger Cookies Recipe. These cookies aren’t just delicious—they’re full of personality! I absolutely love how they look so eerily realistic, with the almond “fingernails” and a bit of jam that looks like creepy oozing blood. Trust me, once you make these, your family and friends will be asking for them every Halloween (or even just for a quirky snack). Plus, they’re surprisingly easy to pull off, and I’m here to guide you step-by-step to nail it perfectly.
Why You’ll Love This Recipe
- Fun and Festive: These cookies are the perfect blend of spooky and cute, making them a Halloween party hit or a whimsical treat any time.
- Deliciously Nutty: With pistachios and almonds, the texture and flavor are far from ordinary sugar cookies.
- Easy to Customize: You can tweak the jam or nuts to match your taste or dietary needs without losing any magic.
- Perfect Make-Ahead: The dough can chill for up to two days, so it’s great for prepping early.

Ingredients You’ll Need
The ingredients for this Witch Finger Cookies Recipe come together beautifully to create a cookie that’s tender, buttery, and nutty, with that pop of fruity jam to balance it all out. When shopping, fresh nuts and good-quality extracts make all the difference.
- Confectioners’ sugar: This helps make the cookie dough silky smooth and tender.
- Unsalted butter: Always go for unsalted so you can control the saltiness; room temperature butter is key.
- Large egg: It binds the dough and adds richness.
- Almond extract: Gives a lovely nutty aroma that pairs perfectly with pistachios.
- Pure vanilla extract: Enhances overall flavor with warmth and depth.
- Green food coloring: Just a few drops give the dough an eerie witchy hue.
- All-purpose flour: The base of the cookie for structure.
- Kosher salt: Balances sweetness and brightens flavors.
- Finely chopped pistachios: Adds crunch and distinctive green color inside the cookie.
- Sliced almonds: These become the witch finger “nails.”
- Cherry, strawberry, or raspberry jam: For that gorgeous “blood” effect—use your favorite.
Variations
One of the best things about this Witch Finger Cookies Recipe is how much fun you can have tweaking it. I love to switch out the nuts or jam based on what I have on hand or to suit who I’m baking for. Don’t be afraid to get creative—you’ll find that the basics are so adaptable.
- Nut-Free Version: I swapped pistachios and almonds for sunflower seeds and pumpkin seeds once, and the cookies still had great texture and flavor for a nut-free crowd.
- Spiced Up: Adding a pinch of cinnamon or pumpkin pie spice gave the cookies a warm fall vibe that my family adored one year.
- Different Color Themes: Instead of green food coloring, I occasionally used purple or blood red to mix up the look for parties.
- Vegan Adaptation: With vegan butter and a flax egg, I got a similar texture, though I recommend chilling the dough longer to firm up.
How to Make Witch Finger Cookies Recipe
Step 1: Cream Butter and Sugar to Fluffy Perfection
Start by beating the confectioners’ sugar and softened butter on medium speed until the mixture is pale and fluffy—this usually takes about 2 minutes. I like to pause and scrape the bowl a couple of times to make sure everything combines evenly. Then add your egg and beat until it’s fully incorporated and light, about a minute more. Finally, mix in the almond extract, vanilla extract, and green food coloring. The dough will get that perfect witchy hue here, setting the spooky tone!
Step 2: Incorporate Flour, Salt, and Pistachios
Whisk together the flour and kosher salt in a separate bowl—this helps distribute the salt evenly. Add this flour mixture to your butter mix on low speed and mix until just combined; you don’t want to overwork it. Now fold in the finely chopped pistachios gently—this adds amazing texture and a slight crunch inside each finger. At this point, cover your bowl with plastic wrap and chill the dough for at least 30 minutes, or up to two days if you want to prep ahead.
Step 3: Shape Your Witch Fingers
Preheat your oven to 375°F (190°C) and line two rimmed baking sheets with parchment paper. Remove about a quarter of the dough from the fridge and divide it into 12 to 13 tablespoon-sized balls. This is where the fun starts—you’ll roll each ball between your palms into a slim finger shape, approximately 3 inches long and about half an inch thick, just like your pinky finger but a bit slimmer.
Arrange your fingers on the baking sheet. Then press a sliced almond firmly on one end to become the fingernail. Here’s a trick I discovered: gently pinch the dough beneath the almond and halfway down the finger to create knuckles—it makes all the difference in realism. Use a sharp knife to carve small, horizontal lines on the knuckles of varying lengths. Don’t forget to press in a also few pistachio bits randomly to mimic creepy warts on the skin. Freeze the shaped cookies for 30 minutes before baking; this keeps them from spreading too much.
Step 4: Bake to Crispy Edges and Set Tops
Bake your fingers for 7 to 9 minutes, rotating the trays halfway so they bake evenly. You’ll want to see firm edges and dry tops—that’s when you know they’re perfectly done. Be careful not to overbake; you want them crisp but not browned. Let the cookies cool slightly on the baking sheet before handling so they firm up and hold their spooky shapes.
Step 5: Add the “Bloody” Jam Touch
This is my favorite step—gently lift off each almond fingernail, dab a tiny bit of your chosen jam right under the almond on the tip, then carefully replace the almond while pressing down so the jam oozes out just like a wound. I also spread a little jam along the bottom of each finger for extra gooey drama. Let your Witch Finger Cookies cool completely, and then watch the reactions when people see these spooky delights!
Pro Tips for Making Witch Finger Cookies Recipe
- Use Room Temperature Butter: This makes creaming the sugar and butter much easier and results in a fluffier dough that’s easier to shape.
- Don’t Overmix Flour: Once the flour is added, mix just until combined to keep the cookies tender, not tough.
- Freeze Before Baking: It prevents spreading and helps the details on your witch fingers stay sharp and defined.
- Handle “Fingernails” Gently: Press the almonds firmly but carefully to avoid breaking, and use a small knife for carving knuckle lines precisely.
How to Serve Witch Finger Cookies Recipe
Garnishes
I usually keep garnishes simple—extra pistachios scattered around the serving platter look fantastic and echo the nuts inside the cookies. Sometimes I sprinkle a little powdered sugar over them for a frosty effect. If you want to amp up the “gross-out” factor, a tiny drizzle of extra jam here and there simulates “fresh wounds” and kids love that messy look!
Side Dishes
These Witch Finger Cookies go perfectly with a big mug of hot cocoa or warm apple cider—both add cozy counterpoints to the spookiness. For Halloween parties, I serve them alongside a platter of candy corn and pumpkin-shaped sugar cookies for a fun variety everyone can enjoy.
Creative Ways to Present
One Halloween, I arranged these cookies stuck upright in a “ghoul’s hand” made from empty black paper cups, peeking out from beneath a tattered Halloween cloth. Another time, I piled them on a cake stand with fake spider webs and plastic spiders—which really dazzled my guests. Don’t hesitate to get playful: think finger salads on Halloween charcuterie boards for a unique touch that really impresses.
Make Ahead and Storage
Storing Leftovers
These cookies stay fresh in an airtight container at room temperature for up to 4 days, though I have to admit they rarely last that long in my house! For best texture, keep them in a single layer separated by parchment paper so they don’t stick together.
Freezing
I’ve frozen both the dough and the baked cookies. For dough, shape the fingers, lay them on a parchment-lined tray, freeze until solid, then transfer to a zip-top bag. Bake from frozen, just add a minute or two to baking time. Baked cookies freeze well in airtight containers too—thaw at room temp before serving.
Reheating
If you want to re-crisp frozen or stored cookies, pop them into a 300°F oven for 5 minutes. Keep an eye on them so they don’t burn. This little trick freshens up the texture beautifully.
FAQs
-
Can I use different types of nuts for this Witch Finger Cookies Recipe?
Absolutely! While pistachios and almonds give a great classic look and texture, you can swap pistachios for walnuts or pecans and almonds for sliced hazelnuts or even pepitas. Just make sure to chop the nuts finely so they incorporate well into the dough and don’t overpower the shapes.
-
How do I keep the cookies from spreading and losing their finger shape?
Chilling the dough shaped into fingers before baking is essential. The recipe calls for a 30-minute freeze of the formed shapes, which helps the cookies hold their detailed features. Also, avoid over-softened butter and don’t overmix the dough, as warmth and too much mixing can cause spreading.
-
Is it okay to substitute jam with something else?
You can definitely use any thick, red-colored spread like strawberry preserves or even a mix of raspberry with a bit of honey. If you want to avoid sugar, consider natural fruit purees or low-sugar jams, just keep in mind the consistency needs to be thick enough to hold under the almond nails.
-
Can I make these cookies without food coloring?
Sure! The green food coloring adds a fun spooky vibe, but the cookies taste just as amazing without it. If you skip it, your fingers will be a natural buttery color, which still looks great especially if you emphasize the jam and nut details.
Final Thoughts
Making this Witch Finger Cookies Recipe was a total game-changer for my holiday baking—it’s such a clever way to combine fun, flavor, and a little spooky flair! I hope you find as much joy making (and munching) them as I do. They’re great for getting the whole family involved, and trust me, the compliments will roll in. So go ahead, gather your ingredients, shape those creepy fingers, and watch your kitchen transform into a magical (and slightly eerie) baking haven!
Print
Witch Finger Cookies Recipe
- Prep Time: 15 mins
- Cook Time: 9 mins
- Total Time: 1 hr 50 mins
- Yield: 50 cookies
- Category: Dessert
- Method: Baking
- Cuisine: American
Description
Witch Finger Cookies are spooky and delicious treats perfect for Halloween. These cookies feature buttery, almond-flavored dough colored green and shaped like creepy fingers, adorned with almond slices as fingernails and pistachio pieces for warts. A dollop of fruit jam oozes from under the almond nails, adding a sweet and slightly tart finish. Crunchy nuts and a soft crumb make these cookies a fun and festive dessert.
Ingredients
Cookie Dough
- 1 1/4 cups (145 g) confectioners’ sugar
- 1 cup (2 sticks) unsalted butter, softened
- 1 large egg
- 1 tsp almond extract
- 1 tsp pure vanilla extract
- 5 to 6 drops green food coloring
- 2 3/4 cups (330 g) all-purpose flour
- 1 tsp kosher salt
- 1/2 cup finely chopped pistachios (about 70 g), plus more for decorating
Decorations
- 3/4 cup sliced almonds (about 85 g)
- 1/2 cup (135 g) cherry, strawberry, or raspberry jam
Instructions
- Prepare the Butter and Sugar Mixture: In the large bowl of a stand mixer fitted with the whisk attachment (or in a large bowl using a handheld mixer), beat confectioners’ sugar and softened butter on medium speed until pale and fluffy, about 2 minutes. Add the egg and continue beating until fully incorporated and fluffy, about 1 minute more. Then add almond extract, vanilla extract, and green food coloring, beating until evenly combined.
- Mix in Dry Ingredients and Nuts: In a small bowl, whisk together the flour and kosher salt. Gradually add this mixture to the butter mixture and beat on low speed until just combined. Gently fold in the finely chopped pistachios. Cover the bowl with plastic wrap and refrigerate the dough for at least 30 minutes or up to 2 days to firm up.
- Shape the Fingers: Preheat your oven to 375°F (190°C). Line two rimmed baking sheets with parchment paper. Remove one-quarter of the chilled dough and divide it into 12 to 13 portions of about 1 tablespoon each. Roll each portion between your palms into a finger shape approximately 3 inches long and 1/2 inch wide—slightly thinner than a pinky finger. Place the fingers on the prepared baking sheets. Press a sliced almond into the tip of each finger to resemble a nail. Pinch the dough just below the almond and midway down the finger to form knuckles. Using a sharp knife, carve horizontal lines of varying lengths into the knuckles to add detail. Add 1 or 2 pistachio pieces onto the surface of the finger to create wart-like textures. Repeat until all dough is shaped. Freeze the shaped cookies for 30 minutes before baking.
- Bake the Cookies: Bake the frozen cookies in the preheated oven for 7 to 9 minutes, rotating the trays front to back halfway through baking, until the edges are firm and the tops are dry. Remove from the oven and let the cookies cool slightly on the baking sheets.
- Add Jam and Final Touches: Carefully lift off the almond fingernail from each cookie. Dab a small amount of your chosen jam onto the tip of each finger, then press the almond nail back into place, gently squeezing to allow the jam to ooze out around the edges for a creepy effect. Spread additional jam onto the bottom of each finger as desired. Allow the cookies to cool completely before serving.
Notes
- Refrigerating or freezing the dough before shaping helps the cookies hold their finger shape and makes them easier to handle.
- Feel free to substitute the jam flavor to suit your taste or use any red-colored jelly to enhance the spooky appearance.
- For extra spooky detail, add a drop of red food coloring to the jam or paint thin lines on the fingers with melted chocolate.
- Store cookies in an airtight container at room temperature for up to 3 days or freeze for longer storage.
Nutrition
- Serving Size: 1 cookie
- Calories: 110
- Sugar: 6 g
- Sodium: 55 mg
- Fat: 7 g
- Saturated Fat: 3.5 g
- Unsaturated Fat: 3 g
- Trans Fat: 0 g
- Carbohydrates: 12 g
- Fiber: 1 g
- Protein: 2 g
- Cholesterol: 20 mg


