

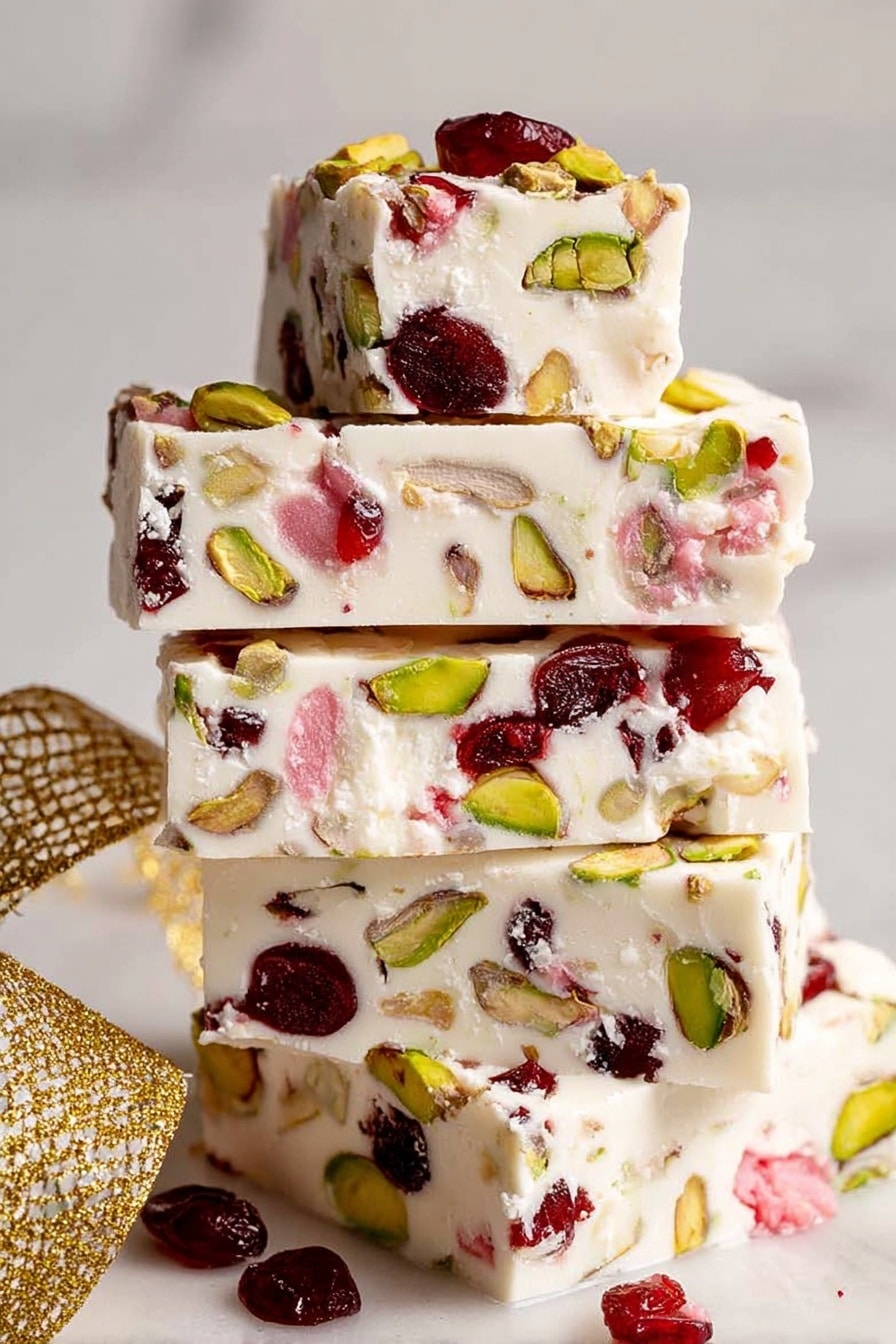
If you’re looking for a festive treat that’s as delightful to make as it is to eat, you’re in for a real treat with this White Christmas Rocky Road Bars Recipe. I absolutely love how these bars come together with the lovely creaminess of white chocolate, the chewiness of marshmallows, and that pop of color and crunch from pistachios and glacé cherries. Once you try this, you’ll see why it quickly became a holiday favorite in my kitchen!
Why You’ll Love This Recipe
- Festive Flavors: The combination of white chocolate, pistachios, cherries, and coconut feels just right for holiday celebrations.
- So Easy to Make: No baking required—just melt, stir, chill, and your bars are ready.
- Flexible Ingredient Options: You can easily swap add-ins to suit your tastes or dietary needs.
- Perfect for Gifting or Treating Yourself: These bars look beautiful wrapped up, but honestly, you might just want to keep them all!

Ingredients You’ll Need
Every ingredient here plays a special part in making the White Christmas Rocky Road Bars Recipe shine—the white chocolate brings sweetness and creaminess, while the pistachios and cherries add that festive crunch and color. When shopping, look for good-quality white chocolate and fresh nuts to really elevate the final bars.

- White chocolate melts/discs: These melt smoothly and make your rocky road silky—chips or chopped block work too, but melts are my go-to for ease.
- Grapeseed oil or neutral oil: This helps keep the melted chocolate glossy and easier to cut once set; don’t skip it!
- Marshmallows: Regular-sized ones cut in half are perfect to distribute chewiness evenly.
- Pistachios: Unsalted and toasted for that fresh nutty flavor and crunch.
- Glacé cherries: They add beautiful bursts of red and a sweet contrast; choose the nicest ones for toppings.
- Desiccated coconut: Unsweetened and finely shredded or desiccated works best—not flakes—to blend well in the bars.
Variations
I love experimenting with these bars because the base recipe is so adaptable. Sometimes I swap out the cherries for dried cranberries or add a handful of crushed biscuits for extra texture. Feel free to make it your own—you really can’t go wrong with this one.
- Nut-Free Version: I’ve swapped pistachios for more marshmallows and coconut for parties with nut allergies, and it’s just as tasty.
- Tropical Twist: Adding dried pineapple or mango pieces creates a fun tropical vibe that I discovered guests adore.
- Chocolate Blend: Mixing in some milk or dark chocolate melts along with white chocolate gives a marbled effect that’s stunning and delicious.
How to Make White Christmas Rocky Road Bars Recipe
Step 1: Prep Your Pan and Ingredients
Start by lightly greasing an 8-inch square pan with butter—this helps the parchment stay put. Then, line it with baking paper, ensuring you have enough overhang on the sides. This little trick made it so much easier for me to lift out the bars later without a mess. Next, pick out about eight of the nicest glacé cherries to reserve for topping and finely chop a tablespoon of pistachios for an eye-catching finish.
Step 2: Melt Your Chocolate and Oil
Pop the white chocolate melts and grapeseed oil into a heatproof bowl, then microwave in 30-second bursts, stirring well after each interval until you have a smooth, glossy mixture. I discovered this incremental melting process prevents any scorching and keeps the chocolate silky and perfect for coating the mix-ins.
Step 3: Mix in the Marshmallows and Nuts
Gently fold the marshmallows, pistachios, glacé cherries, and desiccated coconut into the melted chocolate. The mix will be thick but keep stirring until everything is nicely coated. This is the kind of moment where you’ll get that satisfying “chunky” look, with all that texture peeking through.
Step 4: Transfer and Top
Pour the mixture into your prepared pan and spread it evenly. I like to bang and shake the pan assertively on the counter—it helps settle the bars and feels oddly satisfying too! Then, scatter your reserved cherries and chopped pistachios on top, pressing them lightly into the chocolate so they stick and look beautiful once set.
Step 5: Chill and Slice
Refrigerate the bars for at least 3 hours, or until firm. When ready, use the parchment overhang to lift the slab out of the pan, then slice into whatever sizes you prefer—whether chunkier for gifting or smaller for sharing (or sneaking a few yourself!). I usually cut five evenly spaced lines one way, then divide into smaller chunks.
Pro Tips for Making White Christmas Rocky Road Bars Recipe
- Use Quality Chocolate: I found that investing in good white chocolate melts really makes the texture and flavor pop.
- Don’t Skip the Oil: The oil helps keep the chocolate smooth and stops the bars from being too brittle when cut.
- Trim Your Marshmallows: Cutting them in half ensures they’re evenly distributed so every bite has that perfect chewy hit.
- Let It Chill Fully: Patience is key—rushing to slice before it’s firm will just make your bars crumble.
How to Serve White Christmas Rocky Road Bars Recipe
Garnishes
I like to add some extra chopped pistachios and a few whole glacé cherries right on top for presentation—they make the bars look extra special for holiday gatherings. Sometimes, a light dusting of edible glitter or coconut on top adds that festive sparkle I adore.
Side Dishes
These bars are sweet and rich, so I often serve them alongside a cup of robust coffee or a mug of peppermint hot chocolate. They’re also great paired with fresh fruit for a balanced holiday dessert spread.
Creative Ways to Present
For gifting or parties, I like to stack the bars in a pretty tin layered with parchment paper, tied with a festive ribbon. You could also cut them into bite-sized pieces and serve on a decorative platter with sprigs of fresh rosemary or holly for a Christmas touch.
Make Ahead and Storage
Storing Leftovers
I store leftover bars in an airtight container in the fridge to keep them fresh and firm. They stay good for up to a week, but honestly, they rarely last that long around here! Keeping them chilled also helps the bars hold their shape.
Freezing
When freezing, wrap individual bars tightly in plastic wrap, then place them in a freezer-safe container. From my experience, freezing doesn’t affect the taste or texture much, making it a perfect make-ahead option for holiday prep.
Reheating
Because these bars are best served chilled, I usually just thaw them in the fridge overnight after freezing. If you want to enjoy them at room temperature, leave them out for about 20 minutes—warm enough to soften but still firm.
FAQs
-
Can I use dark or milk chocolate instead of white chocolate in this recipe?
Absolutely! While this White Christmas Rocky Road Bars Recipe shines with white chocolate’s creamy sweetness, you can substitute milk or dark chocolate melts if you prefer a richer or more intense chocolate flavor. Just keep in mind that the color and taste will change, but the method stays the same.
-
Why do I need to add oil to the melted chocolate?
Adding a bit of neutral oil like grapeseed helps keep the melted chocolate smooth and glossy. It also prevents the rocky road bars from becoming too hard or brittle once set, making them easier to cut and giving a nicer mouthfeel.
-
How do I prevent the marshmallows from sinking to the bottom?
Coating the marshmallows and other add-ins evenly in the melted white chocolate before transferring to the pan helps them stay suspended throughout the bars. Gently folding rather than stirring vigorously will also keep everything evenly distributed.
-
Can I make this recipe vegan or dairy-free?
Yes! Use dairy-free white chocolate melts (available at most health food stores) and a plant-based oil. Make sure your marshmallows and other add-ins are also vegan-friendly. The process remains the same, and it’s just as delicious.
Final Thoughts
This White Christmas Rocky Road Bars Recipe is one of those rare festive treats that’s as joyful to make as it is to share. I remember the first time I whipped it up for a holiday party—and how everyone dug right in, asking for seconds! It’s an easy, forgiving recipe that packs so much flavor and texture with minimal fuss. Whether you’re gifting it or keeping it all for yourself (no judgment here!), it’s bound to add a little extra sparkle to your celebrations. So go ahead, grab those ingredients, and let these bars become your new holiday tradition!
Print
White Christmas Rocky Road Bars Recipe
- Prep Time: 15 minutes
- Cook Time: 0 minutes
- Total Time: 3 hours 15 minutes
- Yield: 20 servings
- Category: Dessert
- Method: No-Cook
- Cuisine: Western
- Diet: Vegetarian
Description
This festive White Christmas Rocky Road is a delightful no-bake treat combining smooth white chocolate with crunchy pistachios, sweet marshmallows, tangy glacé cherries, and fragrant desiccated coconut. Perfect for holiday gifting or indulgent snacking, it features a creamy texture and Christmassy colors that brighten up any celebration.
Ingredients
Chocolate Mixture
- 500g (1 lb) white chocolate melts/discs (chips or chopped block)
- 2 tbsp grapeseed oil or other neutral flavoured oil
Add-ins
- 2 1/2 cups regular size marshmallows, mostly cut in half
- 1 cup unsalted pistachios, toasted
- 1 cup glacé cherries
- 1/2 cup unsweetened desiccated coconut (or finely shredded, not flakes)
Instructions
- Prepare the Pan: Lightly grease a 20cm (8″) square pan with butter, then line it with baking paper leaving an overhang to make lifting the rocky road out easier later.
- Reserve Toppings: Set aside about 8 of the nicest glacé cherries for decoration and finely chop 1 tablespoon of the pistachios to sprinkle on top later.
- Melt Chocolate: Place the white chocolate and grapeseed oil in a heatproof bowl. Microwave in 30-second increments, stirring well between each, until the chocolate is completely melted and smooth.
- Mix Add-ins: Stir the marshmallows, pistachios, glacé cherries, and desiccated coconut into the melted chocolate until evenly combined.
- Pour and Spread: Pour the mixture into the prepared pan, spreading it out evenly. Firmly bang and shake the pan to help the mixture settle and remove any air pockets.
- Decorate: Arrange the reserved glacé cherries on top and sprinkle with the chopped pistachios for a festive finish.
- Chill: Refrigerate for about 3 hours or until the rocky road is firm.
- Cut and Serve: Use the baking paper overhang to lift the rocky road out of the pan. Cut into 5 lines across, then cut pieces into chunks suitable for gifting or snacking.
Notes
- This recipe is customizable – feel free to swap add-ins with dried fruits, biscuits, other nuts, raspberries, or Turkish delight depending on your preference.
- The oil is important to make the chocolate meltier and easier to spread and cut.
- Using toasted pistachios enhances the nutty flavor and crunch.
- Glacé cherries and coconut provide festive flavor and color ideal for Christmas celebrations.
- The recipe yields about 20 servings, perfect for sharing or gifting.
Nutrition
- Serving Size: 1 piece (approximate)
- Calories: 254 kcal
- Sugar: 25 g
- Sodium: 31 mg
- Fat: 14 g
- Saturated Fat: 7 g
- Unsaturated Fat: 7 g
- Trans Fat: 0.01 g
- Carbohydrates: 32 g
- Fiber: 1 g
- Protein: 3 g
- Cholesterol: 5 mg


