

If you’re on the hunt for the ultimate comfort food, you’ve just found it with this Viral Mac and Cheese Recipe. Trust me, I’ve tried countless versions of mac and cheese over the years, but this one from creator Tini has a magical way of turning simple ingredients into something totally irresistible. Whether you’re cooking for family or just craving a cozy, cheesy hug in a bowl, this recipe delivers every single time. Stick with me—I’ll walk you through all the tips and tricks I’ve learned, so you get it just right!
Why You’ll Love This Recipe
- Melt-In-Your-Mouth Creaminess: The combination of evaporated milk, heavy cream, and three cheeses creates a silky, dreamy sauce that clings perfectly to every noodle.
- Perfect Cheese Blend: Using mozzarella, Colby Jack, and sharp cheddar gives you the right balance of gooey stretch, creamy texture, and bold flavor.
- Baked to Golden Perfection: The double layer of cheese on top browns beautifully in the oven, adding an irresistible crust that makes every bite unforgettable.
- Proven Popularity: With over 100 million views on TikTok, this Viral Mac and Cheese Recipe is a crowd-pleaser that’ll wow friends and family alike.

Ingredients You’ll Need
Each ingredient in this Viral Mac and Cheese Recipe plays a vital role in building that creamy, cheesy masterpiece you’ll want seconds of. I always recommend grabbing fresh, good-quality cheeses for the best melt and flavor. If you can, shred your cheeses yourself—it makes such a difference!
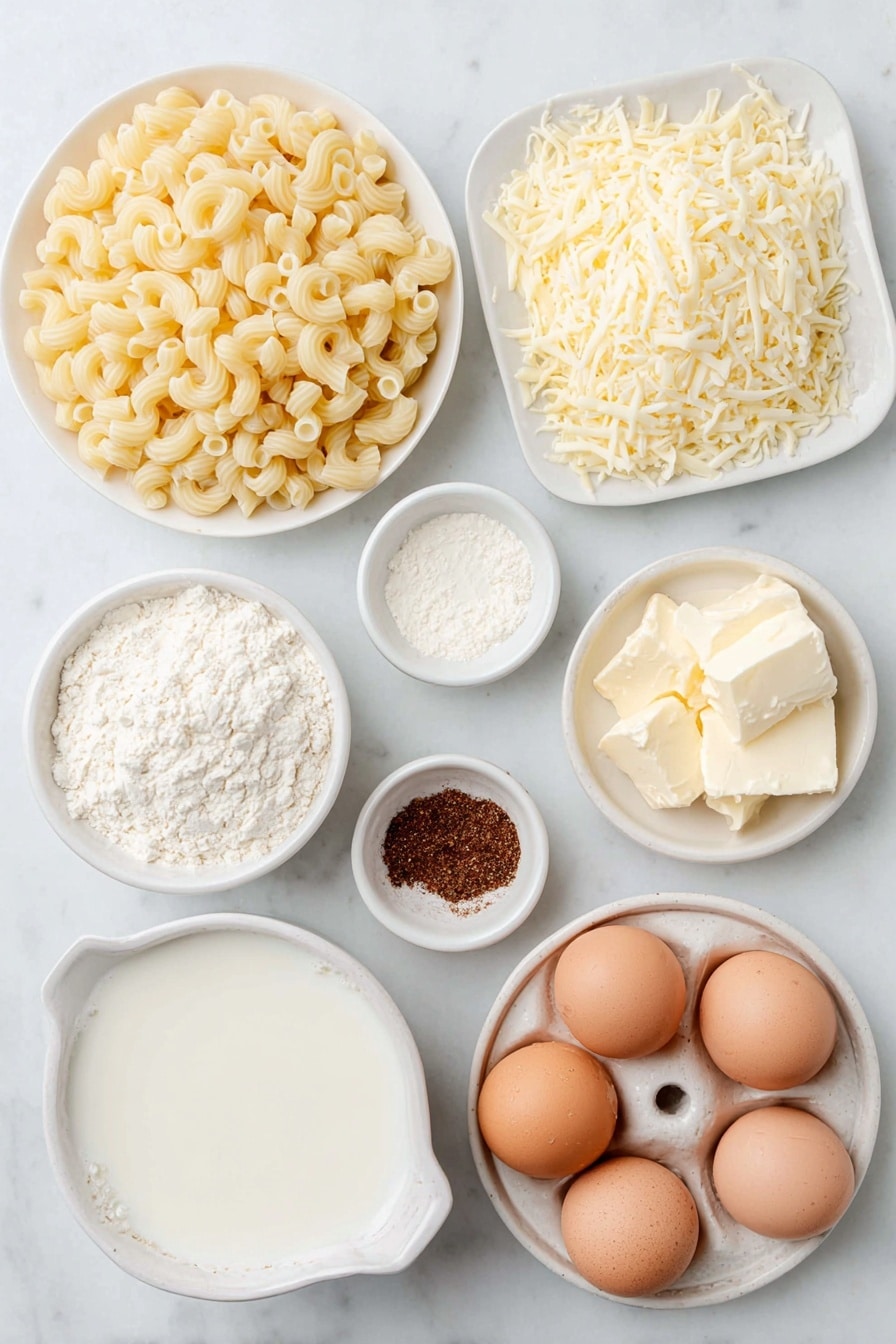
- Cavatappi pasta: This curly pasta holds onto the sauce beautifully, but elbow macaroni works well too if you can’t find it.
- Mozzarella: Go for whole milk mozzarella if possible for creamier melt; shredded pre-packaged works fine in a pinch.
- Colby Jack cheese: Adds a gentle, buttery flavor and creaminess to the blend.
- Sharp cheddar: Vital for that classic mac and cheese tang and depth—don’t substitute with mild!
- Evaporated milk: This gives the sauce richness without being too heavy; it also helps with that smooth texture.
- Heavy whipping cream: The secret to luscious, velvety sauce that coats each pasta twist perfectly.
- Salt: Enhances every flavor, so don’t be shy with it.
- White pepper: Milder than black pepper, it blends into the sauce without affecting color.
- Garlic powder: Adds subtle warmth that makes all the difference in comfort food.
- Smoked paprika: Brings a smoky depth that elevates the cheesy goodness to new heights.
- Dijon mustard: A tiny kick that brightens the entire sauce and balances the richness.
- Unsalted butter: Needed to start the roux—the base of your cheese sauce.
- All purpose flour: Thickens the sauce for that perfect creamy consistency.
Variations
One of the things I love about this Viral Mac and Cheese Recipe is how adaptable it is. Once you know the basics, you can easily tweak it to suit your tastes or dietary needs. Here’s how I like to switch things up:
- Add protein: I often stir in crispy bacon bits or shredded rotisserie chicken for an extra savory boost that my family raves about.
- Spice it up: A pinch of cayenne or some diced jalapeños adds a delicious kick, perfect for those who like a little heat.
- Make it gluten-free: Use gluten-free pasta and substitute the all-purpose flour with a gluten-free blend; the sauce still comes out creamy and smooth.
- Veggie boost: Stir in cooked broccoli, roasted red peppers, or caramelized onions for extra color and flavor.
How to Make Viral Mac and Cheese Recipe
Step 1: Cook the Pasta Perfectly
Start by boiling your cavatappi pasta (or elbow macaroni) in plenty of salted water. I like to use a big pot and plenty of salt because it seasons the pasta from the inside out. Cook it just shy of al dente—about 7 minutes for cavatappi—because you’ll bake it later and don’t want mushy noodles. Once done, drain the pasta, but don’t rinse it; the starch helps the sauce cling beautifully.
Step 2: Make the Creamy Cheese Sauce Base
This is where the magic begins! Melt the butter over medium-high heat in a heavy-bottomed pan, then whisk in the flour to create a smooth paste, called a roux. Keep whisking for a couple of minutes so the flour cooks through and doesn’t taste raw. Slowly add the evaporated milk while whisking continuously until the sauce bubbles and thickens slightly. Lower the heat and gradually whisk in the heavy cream, creating a silky base for the cheese to melt into.
Step 3: Incorporate the Cheese Slowly
Combine all the shredded cheeses and split the mixture in half. Add a handful of cheese at a time to the sauce, whisking vigorously until each addition is fully melted and smooth before adding more. This gradual method is what makes the sauce perfectly creamy and prevents clumping. Plan on about 20 minutes here, which may seem long, but trust me, it’s worth the patience.
Step 4: Season and Combine
Once all the cheese has melted smoothly, stir in the salt, white pepper, garlic powder, smoked paprika, and Dijon mustard. These seasonings elevate the flavor beyond simple cheddar goodness—they bring a subtle complexity that makes this Viral Mac and Cheese Recipe so memorable. Now fold in the cooked pasta until every noodle is luxuriously coated in that velvety cheese sauce.
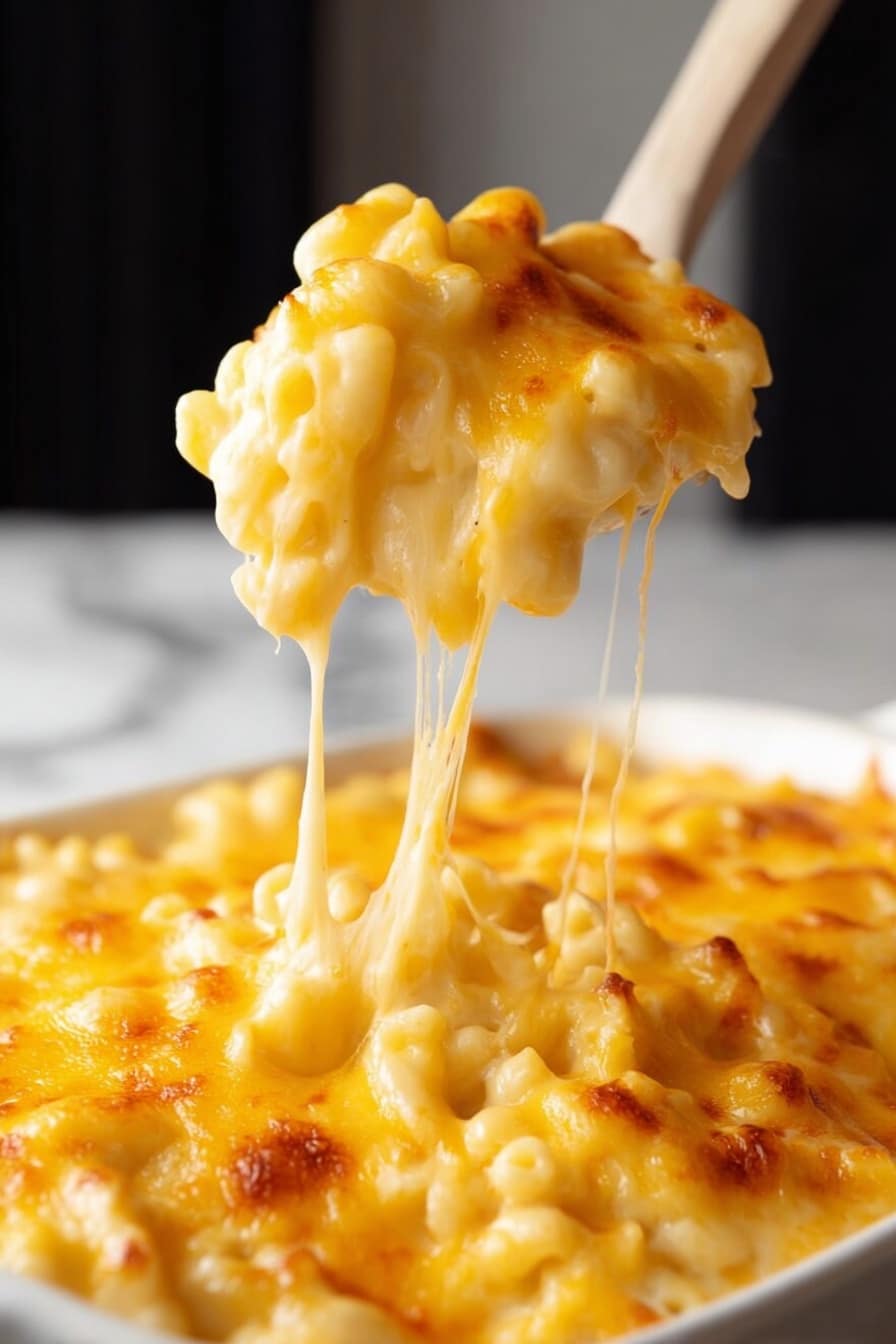
Step 5: Layer and Bake to Perfection
Preheat your oven to 375°F (190°C). In a 9×13 baking dish, spread half of the cheesy pasta. Sprinkle half of the reserved shredded cheese over it, then add the remaining pasta and top with the rest of the cheese. Bake uncovered for about 20 minutes until the cheese melts and bubbles. If you want that golden, slightly crisp top, switch on your broiler for 1-2 minutes—but keep a close eye to avoid burning. Let it rest for 10 minutes before diving in; this allows the sauce to settle and thickens it just right.
Pro Tips for Making Viral Mac and Cheese Recipe
- Whisk Constantly: Keeping the sauce moving while you add the milk and cheese prevents lumps and ensures silky smoothness.
- Low and Slow for Cheese: Patience is key—melting cheese over low heat avoids graininess and oily separation.
- Use a Heavy-Bottomed Pan: It distributes heat evenly, helping the sauce thicken without scorching.
- Reserve Cheese for Topping: Layering cheese on top before baking gives you that gorgeous golden crust everyone loves.
How to Serve Viral Mac and Cheese Recipe
Garnishes
I love sprinkling freshly chopped parsley or chives on top for a pop of color and a mild freshness that balances the richness. Sometimes, I add a few crispy fried onions or extra smoked paprika for a smoky crunch that really elevates the dish.
Side Dishes
This mac pairs wonderfully with simple sides like garlicky roasted broccoli, a crisp green salad with lemon vinaigrette, or even some honey-glazed carrots. When we have this on the table, a light side helps cut through the creamy goodness so you can enjoy bigger portions without feeling weighed down.
Creative Ways to Present
For gatherings, I like to bake individual portions in ramekins or mini cast-iron skillets—everyone feels special, and the crust edges get perfectly crispy. I’ve also layered mac and cheese between slices of crispy bacon for a fun “mac and cheese grilled cheese” spin that’s an instant hit at parties.
Make Ahead and Storage
Storing Leftovers
Once your Viral Mac and Cheese Recipe cools completely, store it in an airtight container in the fridge. I usually find it keeps well for about 3-4 days without the sauce getting too thick or dry. Before reheating, sprinkle a little extra cheese or milk to refresh it.
Freezing
I’ve frozen leftovers of this mac successfully a few times. Just portion it into freezer-safe containers and thaw overnight in the fridge before reheating. Keep in mind the texture may be a bit softer after freezing, but it still tastes delicious and comforting.
Reheating
Reheat leftover mac in a covered baking dish at 350°F (175°C) for about 15-20 minutes, stirring halfway through and adding a splash of cream or milk if it looks dry. Alternatively, I’ll microwave it in short bursts, stirring to distribute heat evenly. Either way, you’ll get creamy leftovers that taste almost as good as fresh!
FAQs
-
Can I use different pasta shapes for this Viral Mac and Cheese Recipe?
Absolutely! While cavatappi is ideal because its curls trap sauce, you can use elbow macaroni, shells, or even penne. Just adjust cooking time to ensure pasta is al dente before baking.
-
Why is the sauce thickening so slowly?
Cheese sauce thickens gradually as the flour cooks and cheese melts smoothly. Make sure to whisk constantly over medium-low heat and be patient; rushing or high heat can cause clumping or separation.
-
Can I prepare the cheese sauce ahead of time?
Yes, you can make the cheese sauce a few hours ahead and refrigerate it. Before combining with pasta and baking, gently warm the sauce while whisking to restore silky texture and then proceed with the recipe.
-
How do I get a crunchy topping without burning the cheese?
Broil on low for just 1-2 minutes and watch closely. You want the cheese to bubble and gain a light golden color, not turn black. Alternatively, sprinkle panko crumbs mixed with melted butter for a crunchy topping before baking.
Final Thoughts
This Viral Mac and Cheese Recipe has quickly become one of my favorites—not just because it’s insanely delicious but because it brings people together. I still remember the first time I made it; the whole kitchen smelled like warm cheesy heaven, and my family didn’t stop asking for more. I promise, once you try it, you’ll understand why it’s taken over TikTok and countless dinner tables everywhere. Give it a shot, tweak it for your style, and enjoy every creamy, cheesy forkful. You’re going to love it as much as I do.
Print
Viral Mac and Cheese Recipe
- Prep Time: 10 minutes
- Cook Time: 50 minutes
- Total Time: 1 hour
- Yield: 8 servings
- Category: Main Dish
- Method: Baking
- Cuisine: American
Description
Tini Mac and Cheese is a rich, creamy, and decadent baked macaroni and cheese recipe that combines a trio of cheeses with evaporated milk and heavy cream for a perfectly smooth cheese sauce. Pasta is cooked al dente, coated in a luscious homemade cheese sauce, layered with extra cheese, and baked to golden perfection. This iconic viral recipe delivers a comforting and satisfying dish ideal for gatherings or cozy dinners.
Ingredients
Pasta
- 1 Lb Cavatappi pasta (or elbow macaroni)
Cheese
- 1 Lb Mozzarella (16 OZ shredded)
- 1 Lb Colby Jack (16 OZ shredded)
- 1/2 Lb Sharp cheddar (8 OZ shredded)
Milk & Cream
- 12 Ounces Evaporated milk (1 Can)
- 2 Cups Heavy whipping cream
Seasonings & Condiments
- 1 teaspoon Salt
- 1 teaspoon White pepper
- 1 teaspoon Garlic powder
- 1 teaspoon Smoked paprika
- 1 Tablespoon Dijon mustard
Thickening & Fat
- 3 Tablespoons Unsalted butter
- 3 Tablespoons All purpose flour
Instructions
- Cook the pasta: Boil salted water and cook the cavatappi pasta according to package instructions for about 7 minutes until al dente. Drain well and set aside, reserving some pasta water if needed later.
- Make the roux: In a heavy-bottomed pan over medium-high heat, melt the unsalted butter. Once melted, add the all-purpose flour and whisk continuously until fully incorporated into a smooth paste, about 1-2 minutes, to cook out the raw flour taste.
- Add milk and cream: Slowly pour in the evaporated milk while whisking to prevent lumps. Continue whisking until the sauce begins to bubble gently. Reduce heat to medium-low and slowly add the heavy whipping cream, stirring continuously to maintain a smooth consistency.
- Prepare cheese mixture: In a separate bowl, combine the shredded mozzarella, Colby Jack, and sharp cheddar cheeses. Divide the cheese into two equal halves—one half to melt into the sauce, the other half reserved for layering on top before baking.
- Incorporate cheese into sauce: Add a handful of cheese from the reserved half into the sauce and whisk vigorously until fully melted and smooth. Repeat this process gradually, adding cheese only after the previous addition is melted and the sauce is smooth. This slow incorporation takes about 20 minutes to ensure a creamy, lump-free cheese sauce and fully cooked roux.
- Season the sauce: Once all the cheese is melted in the sauce, stir in salt, garlic powder, white pepper, smoked paprika, and Dijon mustard to enhance flavor and depth.
- Combine pasta and sauce: Add the cooked pasta to the cheese sauce and stir gently to coat all noodles evenly with the creamy sauce.
- Layer in baking dish: Preheat oven to 375°F and position the oven rack in the center. Using a 9×13 baking dish, spread half of the cheesy pasta mixture evenly. Sprinkle half of the reserved shredded cheese on top. Add the remaining pasta mixture as a second layer, then top with the remaining shredded cheese.
- Bake: Place the baking dish in the preheated oven and bake for about 20 minutes until the cheese on top is melted and slightly browned.
- Optional broil for crust: For a golden brown and slightly crispy top, broil on low for 1 to 2 minutes, watching carefully to prevent burning.
- Rest and serve: Remove from oven and let the mac and cheese rest for 10 minutes before serving to allow the sauce to set and flavors to meld.
Notes
- This viral Mac and Cheese recipe by creator Tini has over 100 million views on TikTok, making it a popular and must-try comfort food classic for holidays and family meals.
- Using a mix of mozzarella, Colby Jack, and sharp cheddar creates a perfectly balanced melt and flavor.
- Slowly melting the cheese into the sauce over about 20 minutes ensures no lumps and a silky cheese sauce.
- Broiling briefly at the end is optional but recommended for a nicely browned cheesy crust.
- Use a heavy-bottomed pan for the roux and sauce to avoid scorching.
Nutrition
- Serving Size: 1 cup
- Calories: 480
- Sugar: 3g
- Sodium: 600mg
- Fat: 32g
- Saturated Fat: 18g
- Unsaturated Fat: 10g
- Trans Fat: 0.5g
- Carbohydrates: 35g
- Fiber: 2g
- Protein: 20g
- Cholesterol: 100mg


