
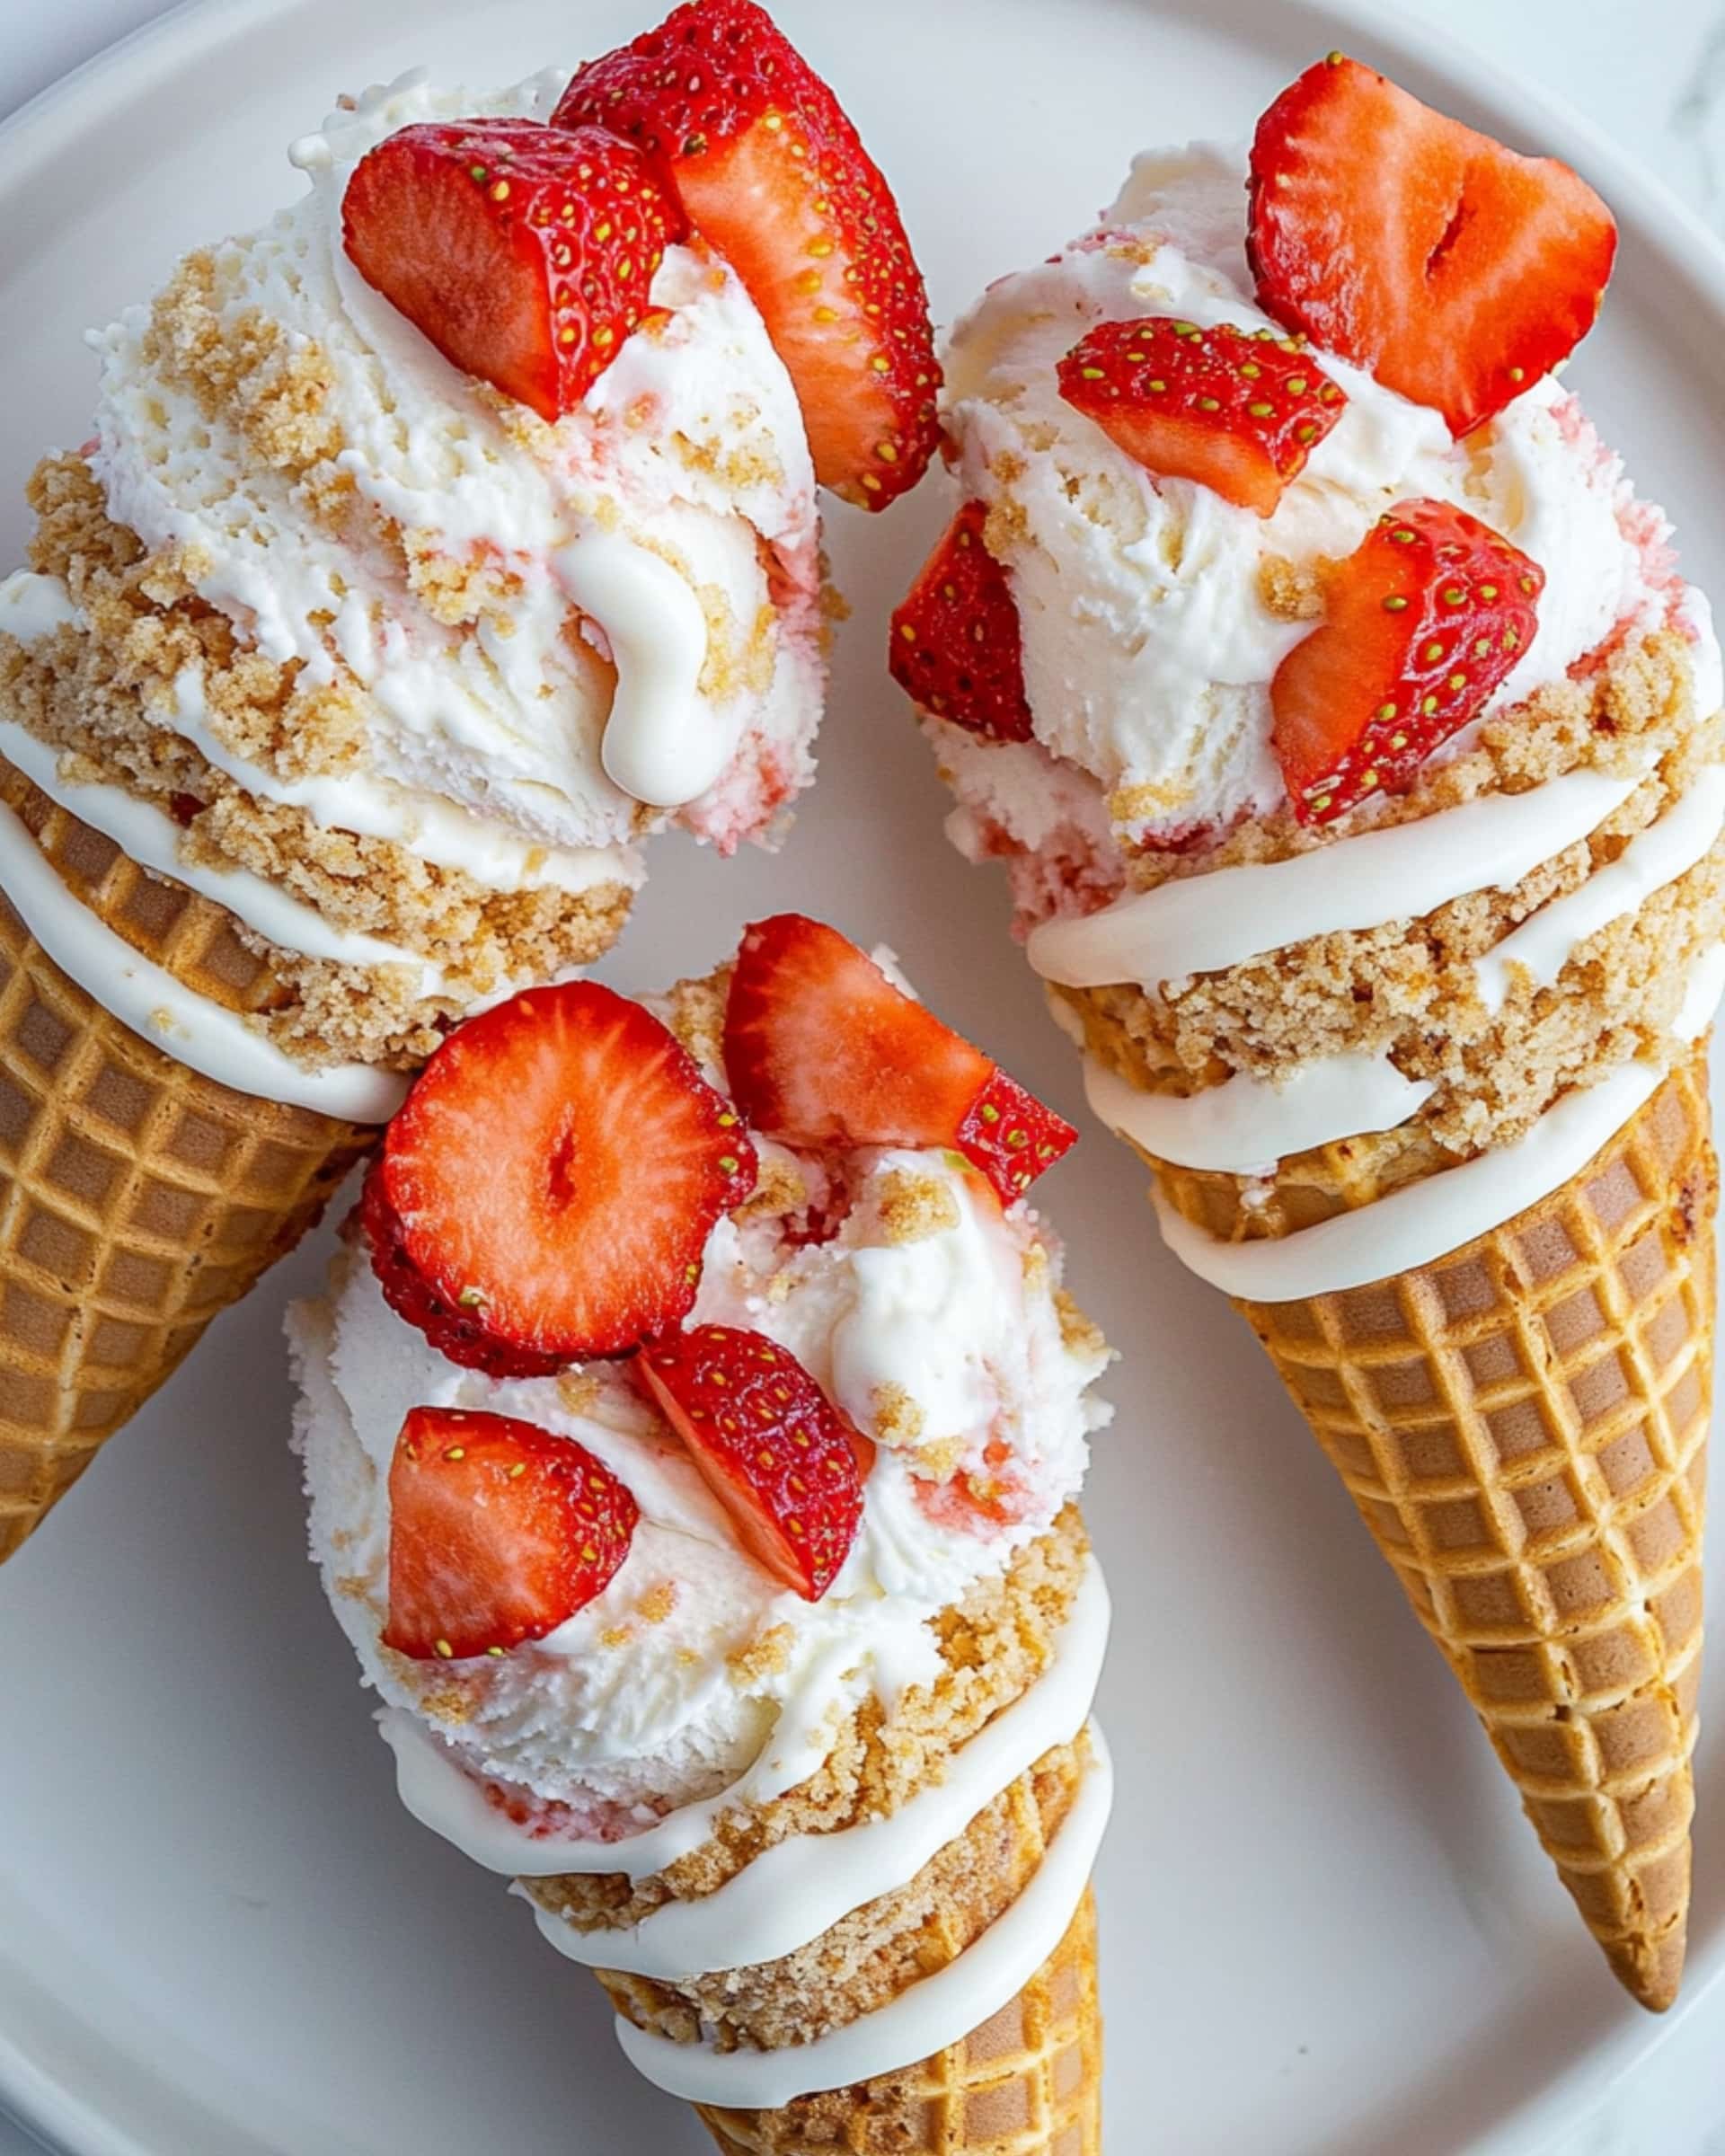
Here’s a dessert you’re absolutely going to fall in love with: Strawberry Crunch Cheesecake Cones. Imagine golden waffle cones, coated with a buttery golden Oreo-strawberry crumble, then stuffed with creamy cheesecake filling, juicy strawberries, and drizzled with sweet vanilla icing. It tastes like summer, looks gorgeous, and, best of all, it’s surprisingly fast and easy to put together—perfect for those busy days when you want a wow-worthy treat without a ton of work. If you’re craving homemade dessert that feels seriously special but doesn’t take hours in the kitchen, this recipe is for you.
Why You’ll Love This Recipe
- Super Easy and Fast: From start to finish, you’re only about 35 minutes away from a fantastic treat. No baking skills needed—just a little mixing, assembling, and drizzling.
- Irresistible Flavors and Textures: Between the crunchy crumble, silky cheesecake, tart strawberries, and creamy drizzle, every bite is a little explosion of happiness.
- Customizable: Swap in your favorite fruits, change up the crumble, or play with the drizzle. Dessert should be fun!
- Portable: Individual cones mean no slicing or plating—perfect for parties, picnics, or just treating yourself.

Ingredients You’ll Need
Here’s what makes these cones shine, and a few helpful notes for best results:
- Waffle cones: Sturdy, slightly sweet cones create the perfect edible “bowl” for cheesecake filling.
- Fresh strawberries: The star of the show! Their sweet-tart brightness balances out the richness of the cheesecake.
- White cake icing: Acts as the “glue” for the crumb coating, and adds an extra layer of vanilla flavor.
- Golden Oreos: Used for that incredible crunchy, sweet crumble—don’t skip these!
- Melted butter: Helps bind the crumbled cookies and carry their rich flavor.
- Strawberry Jello mix: Infuses the crumble with punchy, nostalgic strawberry flavor and gorgeous color.
- Softened cream cheese: The base for that luscious, tangy cheesecake filling.
- Cool Whip: Keeps the filling light, fluffy, and easy to scoop without a lot of effort.
- Sugar: Adds just the right sweetness to the filling.
- Vanilla extract: This makes the cheesecake filling taste like your favorite bakery cake.
- Flour: A little helps stabilize the filling so it’s perfectly creamy and not too soft.
- Powdered sugar: Key to a smooth, sweet drizzle that finishes the cones.
- Heavy whipping cream: Thins out the drizzle to the perfect consistency—pourable, but not runny.
- Tip: Use real vanilla for the best flavor, and make sure your cream cheese is properly softened to avoid lumps.
Note: You’ll find the complete list of ingredients, along with their exact measurements, in the printable recipe card at the bottom of this post.
Variations
Let’s talk about how you can make these your own:
- Switch the Fruit: Try diced peaches, blueberries, or raspberries for a twist.
- Chocolate Lovers: Swap Golden Oreos for chocolate sandwich cookies, and use chocolate syrup or drizzle on top.
- Nutty Crunch: Stir some finely chopped toasted nuts (like pecans or almonds) into the crumble or sprinkle on top.
- Mini Cones: Use mini cones for bite-sized party treats—adorable and perfect for kids.
- Berry Mix: Go wild with a mix of berries for extra color and flavor.
How to Make Strawberry Crunch Cheesecake Cones
Step 1: Prepare the Crunchy Crumble
Start by preheating your oven to 350°F. In a food processor, crush the Golden Oreos into small crumbs—think sandy, not dust. Stir in the melted butter until everything is moistened, then spread the mixture on a parchment-lined baking sheet. Bake for 10 minutes to get them extra crisp. Once they’re out of the oven, sprinkle and mix in the strawberry Jello powder while the crumbs are still warm. This gorgeous coating not only tastes like strawberries, but the color pops too.
Step 2: Coat the Cones
Take your white cake icing and use an offset spatula or butter knife to spread a thick layer around the top half of each cone—don’t be shy! Carefully press the strawberry crunch mixture into the icing so it sticks and covers each cone evenly. The more coating, the more flavor (and crunch) you get.
Step 3: Make the Cheesecake Filling
In a medium bowl, beat the softened cream cheese until it’s completely smooth (no lumps, please). Add sugar, flour, and vanilla, and blend until fluffy and well combined. Gently fold in the Cool Whip—you want it light and airy.
Step 4: Assemble the Cones
Carefully spoon or pipe the cheesecake filling into each prepared cone, right up to the edge. Add a generous handful of fresh chopped strawberries to the top of each cone—don’t skimp, this is what makes these so good.
Step 5: Mix and Drizzle
In a small bowl, whisk together powdered sugar, whipping cream, and a touch of vanilla until you have a smooth, pourable (but not runny) glaze. Drizzle this over the top of the filled cones.
Step 6: Enjoy
Serve right away for the crispiest cones, and watch them disappear!
Pro Tips for Making the Recipe
- Chill the Filling: For the creamiest texture (and less drippage), let the cheesecake filling chill in the fridge for 15-20 minutes before assembling.
- Don’t Overwork the Cool Whip: Gently fold it in to keep your filling thick and mousse-like.
- Use Fresh, Dry Strawberries: Wash and dry very well before chopping to avoid soggy cones.
- Serve Immediately: These taste best the same day, while the cones are still crunchy and the strawberries are super fresh.
How to Serve

- On a cute platter: Arrange the cones upright in glasses or a cone holder for a playful, eye-catching presentation.
- With extra crumble: Set out some extra strawberry crunch for sprinkling on top.
- For parties: Offer a “cone bar” so everyone can choose their own toppings—extra fruit, mini chocolate chips, or sprinkles.
- Pair with: Iced coffee, lemonade, or a glass of sparkling wine for grown-up gatherings.
Make Ahead and Storage
Storing Leftovers
If you somehow have extras, store them in the fridge, loosely covered—they’ll keep for about a day before the cones start to soften.
Freezing
The cheesecake filling (without fruit) can be made ahead and frozen for up to a month. Thaw in the fridge, give it a good stir, then fill fresh cones when ready to serve.
Reheating
No reheating needed, but once assembled, these cones are at their best within hours. If the cones get too soft, consider crumbling them and layering everything in small cups for a “cheesecake parfait.”
FAQs
-
Can I use other cookies besides Golden Oreos for the crunch?
Absolutely! Chocolate or vanilla sandwich cookies both work great, though the flavor will change a bit. Graham crackers also provide a classic cheesecake vibe.
-
Is there a way to make this recipe lighter?
Yes! You can swap the cream cheese for light cream cheese and use light or sugar-free Cool Whip. Just know the filling might be a bit softer, so chill it well before filling the cones.
-
Do these cones get soggy if made ahead?
They might soften a little after a few hours in the fridge. For max crunch, assemble the cones just before serving, or store components separately and combine when you’re ready to eat.
-
Can I prepare any parts of the recipe in advance?
Definitely. The crunch coating and the cheesecake filling can both be prepped a day ahead and kept separately. Chop your strawberries and assemble everything right before serving for the freshest taste.
Final Thoughts
There’s something magical about Strawberry Crunch Cheesecake Cones—fun to make, easy to customize, and pure joy to eat. Whether you’re a seasoned home cook or just learning your way around the kitchen, this is the kind of treat that brings big smiles with very little effort. So go on—gather your ingredients, experiment with flavors, and treat yourself and your loved ones to a dessert that’s as delightful to make as it is to eat. You’ll be so glad you did!
Print
Strawberry Crunch Cheesecake Cones Recipe
- Prep Time: 25 minutes
- Cook Time: 10 minutes
- Total Time: 35 minutes
- Yield: 6 cones
- Category: Desserts
- Method: Baking
- Cuisine: American
- Diet: Vegetarian
Description
These Strawberry Crunch Cheesecake Cones combine the nostalgic flavors of strawberry shortcake and creamy cheesecake in a fun, hand-held dessert! Crunchy Golden Oreo and strawberry crumb-coated waffle cones are filled with a rich cream cheese filling, fresh strawberries, and topped with a luscious vanilla drizzle. Perfect for summer gatherings, kid-friendly treats, or anytime you crave a delightful no-fuss dessert.
Ingredients
For the Cones:
- 6 waffle cones
- Fresh chopped strawberries (for topping)
For the Crumb Coating:
- 16 Golden Oreos
- 3 Tbsp. melted butter
- 3 oz. box strawberry Jello mix
- White cake icing
For the Cheesecake Filling:
- 16 oz. softened cream cheese
- 1/2 cup sugar
- 2 tsp. vanilla extract
- 2 Tbsp. flour
- 8 oz. Cool Whip
For the Drizzle:
- 1 cup powdered sugar
- 3-4 Tbsp. heavy whipping cream
- 1/2 tsp. vanilla extract
Instructions
- Prepare the Crumb Coating: Place the Golden Oreos into a food processor or blender and pulse until crumbled. Mix the crumbs with melted butter until well combined. Spread the crumb mixture onto a parchment-lined baking sheet and bake at 350°F (175°C) for 10 minutes. Once cooled, mix the strawberry Jello powder into the crumbs until thoroughly combined.
- Coat the Cones: Spread white cake icing over the outside of each waffle cone, covering about halfway down the cone. Press the prepared crumb coating onto the icing so it adheres evenly.
- Make the Cheesecake Filling: In a large mixing bowl, beat the softened cream cheese until smooth and creamy. Add the sugar, flour, and vanilla extract, and mix thoroughly. Fold in the Cool Whip until the mixture is light and fluffy.
- Fill and Top the Cones: Spoon or pipe the cheesecake filling into the prepared cones. Top each cone with a generous amount of fresh chopped strawberries.
- Prepare the Drizzle: In a small bowl, whisk together the powdered sugar, vanilla extract, and enough heavy whipping cream (start with 3 Tbsp., add more as needed) to form a pourable glaze.
- Finish and Serve: Drizzle the glaze over the filled cones. Serve immediately and enjoy!
Notes
- You can make the crumb coating and cheesecake filling ahead of time and assemble the cones just before serving for optimal crunch.
- Store assembled cones in the refrigerator if not serving right away, but best enjoyed fresh for crunchy texture.
- Swap Golden Oreos for regular Oreos or another vanilla sandwich cookie if preferred.
Nutrition
- Serving Size: 1 cone
- Calories: 470
- Sugar: 36g
- Sodium: 330mg
- Fat: 25g
- Saturated Fat: 13g
- Unsaturated Fat: 8g
- Trans Fat: 0g
- Carbohydrates: 55g
- Fiber: 1g
- Protein: 6g
- Cholesterol: 55mg


