
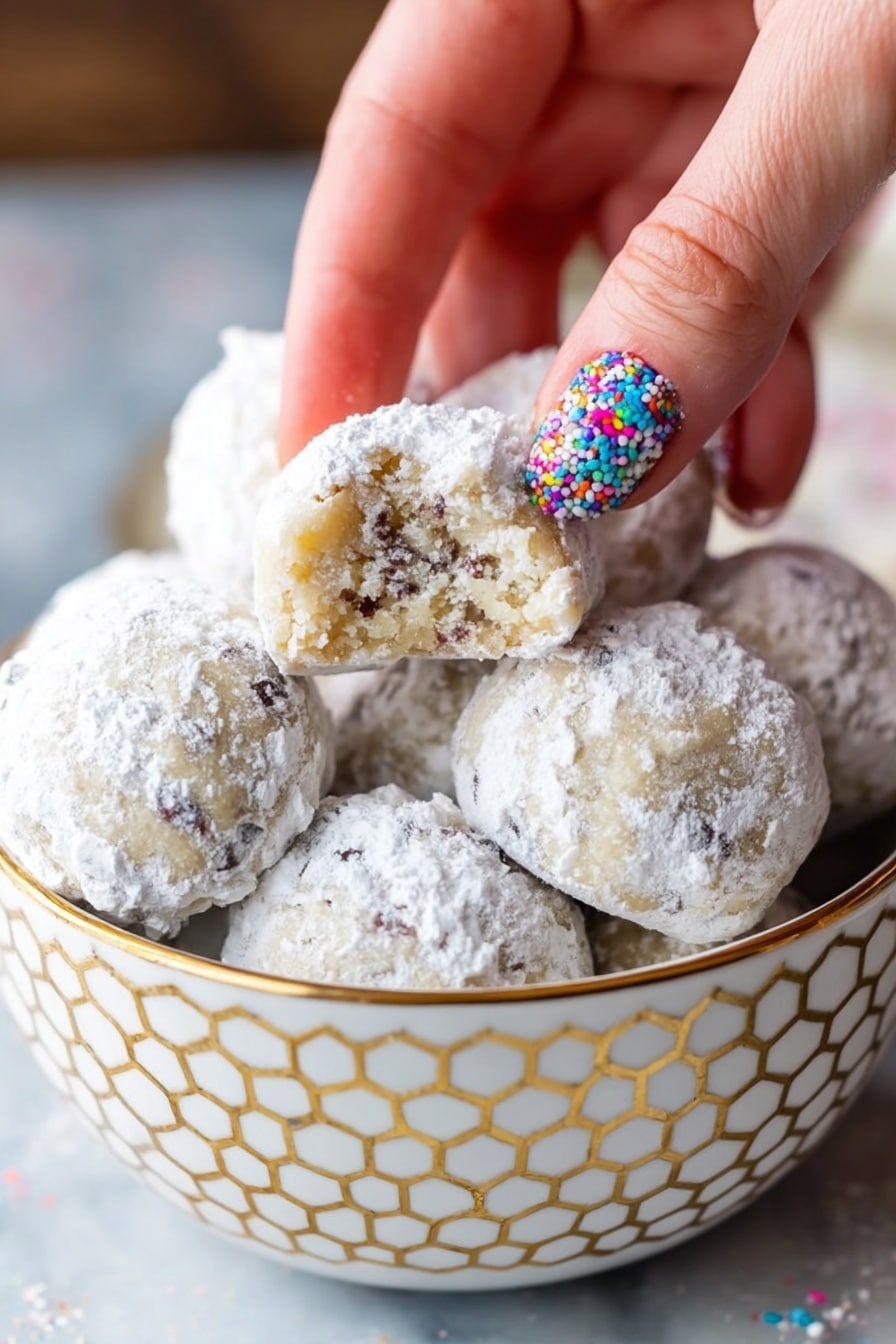
If you’ve ever wanted a melt-in-your-mouth treat that feels like a warm hug from your childhood, this Russian Tea Cakes Recipe is here to brighten your day. They’re buttery, nutty, and generously coated in powdered sugar — a perfect little indulgence for afternoon tea or holiday gatherings. I absolutely love how these delicate cookies turn out every single time, and I’m excited to share all my tips so you can make them just right too.
Why You’ll Love This Recipe
- Classic Comfort Food: These cookies bring back cozy memories with every bite.
- Simple Ingredients: You probably already have everything you need in your pantry.
- Great for Gifting: Their beautiful powdered sugar coating makes them perfect for holiday packages.
- Versatile and Easy: With just a few steps, you’ll have bakery-worthy cookies everyone raves about.

Ingredients You’ll Need
This Russian Tea Cakes Recipe relies on simple pantry staples that blend into a rich, tender dough studded with crunchy nuts. I always make sure to use fresh nuts and softened butter to get that perfect dough texture that’s easy to roll and bake evenly.

- Unsalted butter: Softening it at room temperature helps the dough come together smoothly without melting too fast.
- Powdered sugar: It’s used both inside the dough and on the outside for that signature sweet dusting.
- Vanilla extract: Just a teaspoon adds a warm, inviting aroma to the cookies.
- All-purpose flour: This creates the tender, crumbly structure you expect from Russian Tea Cakes.
- Salt: A pinch to balance sweetness and enhance flavor.
- Finely chopped nuts: Pecans, walnuts, or almonds work beautifully—toast them lightly for extra depth.
Variations
One of the things I love most about this Russian Tea Cakes Recipe is how easy it is to tailor it to your taste buds. Over time, I’ve experimented with different nuts and little flavor twists that make these cookies feel fresh and exciting every time I bake them.
- Nut swaps: I sometimes use toasted hazelnuts instead of pecans for a slightly different, richer flavor that my family really digs.
- Flavored sugar coating: Try adding a pinch of cinnamon or cocoa powder to the powdered sugar for a fun twist on the classic.
- Nut-free option: Substitute the nuts with finely chopped dried fruit or seeds – it’s a great option if nut allergies are a concern.
- Gluten-free version: I’ve had great results replacing the all-purpose flour with a 1:1 gluten-free baking blend – just mind the dough consistency as it might need a bit less or more flour.
How to Make Russian Tea Cakes Recipe
Step 1: Cream the Butter and Sugar
Start by preheating your oven to 375°F (190°C) and lining two baking sheets with parchment paper — this keeps clean-up easy, and the cookies from sticking. Then, with your electric mixer, beat the softened butter together with half a cup of powdered sugar and the vanilla extract until the mix is light and fluffy. This step is key for that melt-in-your-mouth texture, so don’t rush it.
Step 2: Combine Dry Ingredients and Nuts
Next, add the all-purpose flour and salt to the butter mixture, mixing gently until the dough just comes together. Be careful not to over mix here—overworking it can make the cookies tough. Stir in your finely chopped nuts; toasting them beforehand intensifies their flavor, but it’s totally optional.
Step 3: Chill if Needed and Shape the Cookies
If your dough feels too soft to handle, pop it in the fridge for a bit until it firms up just enough to roll. This little trick saved me from messy cookies more than once! Then scoop out tablespoon-sized balls and arrange them evenly on your prepared sheets, leaving space as they’ll spread just a touch.
Step 4: Bake and Coat in Powdered Sugar
Bake the cookies for 7-8 minutes or until the bottoms are just starting to brown. As soon as they’re out, wait a minute to cool just enough to handle without falling apart, then roll each cookie in powdered sugar until it’s beautifully coated. Let them cool completely on a wire rack, then if you want that extra snowy look, roll them again in sugar once cooled.
Pro Tips for Making Russian Tea Cakes Recipe
- Soft Butter is Key: Let your butter come to room temperature naturally; don’t microwave it or you’ll risk melting it.
- Don’t Overbake: Watch for just a hint of golden on the cookie bottoms – overbaking makes them dry and crumbly.
- Double Sugar Coating: Rolling twice in powdered sugar really gives these cookies that iconic snowy finish.
- Keep Them Cool: If your kitchen is warm, chilling the dough helps keep the shape and texture just right.
How to Serve Russian Tea Cakes Recipe

Garnishes
I usually stick with the classic powdered sugar coating as a garnish because it’s so iconic and gives the cookies a festive, snowy look. Sometimes, for a little color, I sprinkle a pinch of cinnamon sugar on top—especially around the holidays. It adds a subtle warmth and makes these treats irresistible.
Side Dishes
Russian Tea Cakes are lovely alongside a steaming cup of tea (go figure!), coffee, or even hot cocoa. I’ve also served them at brunch with fresh fruit and gouda cheese — it’s an unexpected but delightful pairing that my friends always remember.
Creative Ways to Present
For family celebrations, I like arranging these cookies in a pyramid on a pretty platter, dusted with extra powdered sugar to resemble a fresh snowfall. I’ve also packaged them in clear jars tied with ribbon for gifts, which always makes people smile.
Make Ahead and Storage
Storing Leftovers
I store leftover Russian Tea Cakes in an airtight container at room temperature, and they usually keep beautifully for about 4 days. Just be sure the container seals well to keep the powdered sugar coating intact and the cookies from drying out.
Freezing
If you want to make these ahead of time, freezing works wonderfully. I freeze the unbaked dough balls on a sheet pan, then once firm, transfer them to a freezer-safe bag. When you’re ready, bake them directly from frozen, adding an extra minute or two to the bake time.
Reheating
These cookies don’t really need reheating, but if you want that fresh-baked feel, a few seconds in a microwave or a quick warm-up in a low oven (300°F for 5 minutes) works perfectly. Just don’t overheat them or they’ll dry out.
FAQs
-
Can I use any type of nuts for Russian Tea Cakes?
Absolutely! Pecans, walnuts, and almonds are traditional choices, but you can also try hazelnuts or even pistachios for a unique twist. Just make sure to chop them finely so they mix well into the dough.
-
How do I prevent my Russian Tea Cakes from cracking while baking?
Using softened butter and not overbaking helps keep them tender and smooth. Also, chilling the dough if it’s too soft makes shaping easier and reduces cracking.
-
Can I make Russian Tea Cakes gluten-free?
Yes! Swap the all-purpose flour for a gluten-free baking blend. Just be mindful that dough consistency might change slightly, so adjust by adding a little extra flour if needed.
-
How long do Russian Tea Cakes last?
Stored in an airtight container, these cookies stay fresh for about 4 days at room temperature. They also freeze well if you want to keep them longer.
Final Thoughts
When I first tried this Russian Tea Cakes Recipe from my mom’s cookbook, I was hooked immediately — they’re just that good. The buttery crumbly texture combined with toasted nuts and the sweet powdered sugar coating is pure comfort. Whether you’re baking to celebrate a holiday or just want a simple sweet pick-me-up, these cookies won’t disappoint. I’m telling you, once you try this recipe, you’ll be making Russian Tea Cakes for all your special moments just like I do.
Print
Russian Tea Cakes Recipe
- Prep Time: 25 minutes
- Cook Time: 8 minutes
- Total Time: 33 minutes
- Yield: 48 cookies
- Category: Dessert
- Method: Baking
- Cuisine: Russian
- Diet: Vegetarian
Description
Mom’s Classic Russian Tea Cakes are tender, buttery cookies with a delightful nutty crunch, lovingly rolled in powdered sugar. This traditional recipe, also known as snowballs or wedding cookies, is a timeless family favorite perfect for holidays and celebrations.
Ingredients
Cookie Dough
- 1 cup (226g) unsalted butter, softened
- ½ cup (57g) powdered sugar
- 1 teaspoon vanilla extract
- 2 ¼ cups (279g) all-purpose flour
- ¼ teaspoon salt
- ¾ cup finely chopped nuts (pecans, walnuts, or almonds)
For Rolling
- Powdered sugar, for coating
Instructions
- Preheat Oven: Preheat your oven to 375°F (190°C) and line two cookie sheets with parchment paper to prevent sticking and to ensure even baking.
- Make Dough: Using an electric mixer, cream together the softened butter, ½ cup powdered sugar, and vanilla extract until the mixture becomes fluffy. Gradually add the all-purpose flour and salt, mixing until the dough forms a cohesive ball. Stir in the finely chopped nuts evenly. If the dough feels too soft for handling, chill it in the refrigerator until firm enough to scoop.
- Shape Cookies: Scoop approximately 1 tablespoon of dough per cookie and roll into balls. Place them spaced evenly on the prepared cookie sheets to allow room for baking.
- Bake: Bake the cookies for 7-8 minutes, or until the bottoms just begin to turn a light golden brown. Remove them from the oven and allow to cool for about a minute until cool enough to handle without breaking.
- Roll in Sugar: Fill a small bowl with powdered sugar and gently roll each warm cookie in the sugar until fully coated. This gives them their signature snowy appearance.
- Cool and Re-roll: Place the coated cookies on a wire rack to cool completely. Once cooled, you may want to re-roll the cookies in powdered sugar for an extra thick sugary coating.
- Storage: These cookies can be frozen for longer storage or made up to 4 days ahead of serving, keeping them fresh and delicious.
Notes
- This recipe is a beloved family classic, often called Russian Tea Cakes, snowballs, or wedding cookies.
- Chilling the dough helps if it’s too soft to handle easily, ensuring perfect cookie shapes.
- Use any of pecans, walnuts, or almonds for a nutty flavor—choose your favorite or mix them.
- Re-rolling in powdered sugar after cooling enhances the sweetness and appearance.
- Cookies freeze well—wrap tightly to maintain freshness for later enjoyment.
Nutrition
- Serving Size: 1 cookie
- Calories: 71 kcal
- Sugar: 1 g
- Sodium: 13 mg
- Fat: 5 g
- Saturated Fat: 3 g
- Unsaturated Fat: 2 g
- Trans Fat: 0 g
- Carbohydrates: 6 g
- Fiber: 1 g
- Protein: 1 g
- Cholesterol: 10 mg

