

If you’re looking for a festive treat that’s both fun to make and absolutely delicious, you’ve got to try this Reindeer Cookies with Jam and Chocolate Recipe. These adorable cookies combine buttery, melt-in-your-mouth dough with a burst of strawberry jam and a touch of milk chocolate for the cutest reindeer noses and eyes you’ll ever see. I promise, they’re not just a feast for the eyes—the taste will have your family begging for more!
Why You’ll Love This Recipe
- Adorable Presentation: These cookies look like little reindeer, making them perfect for holiday gatherings or as gifts.
- Perfect Balance of Flavors: The buttery cookie base is perfectly complemented by the sweet jam and rich chocolate details.
- Simple and Fun to Make: Even if you’re not an expert baker, this recipe guides you step-by-step for guaranteed success.
- Great for All Ages: Kids love helping with the jam and chocolate decorating, making it a great family activity.

Ingredients You’ll Need
Each ingredient in this Reindeer Cookies with Jam and Chocolate Recipe works harmoniously to create that perfect festive flavor and texture. I’ll share some of my favorite choices and tips to make this process a breeze when you’re shopping.
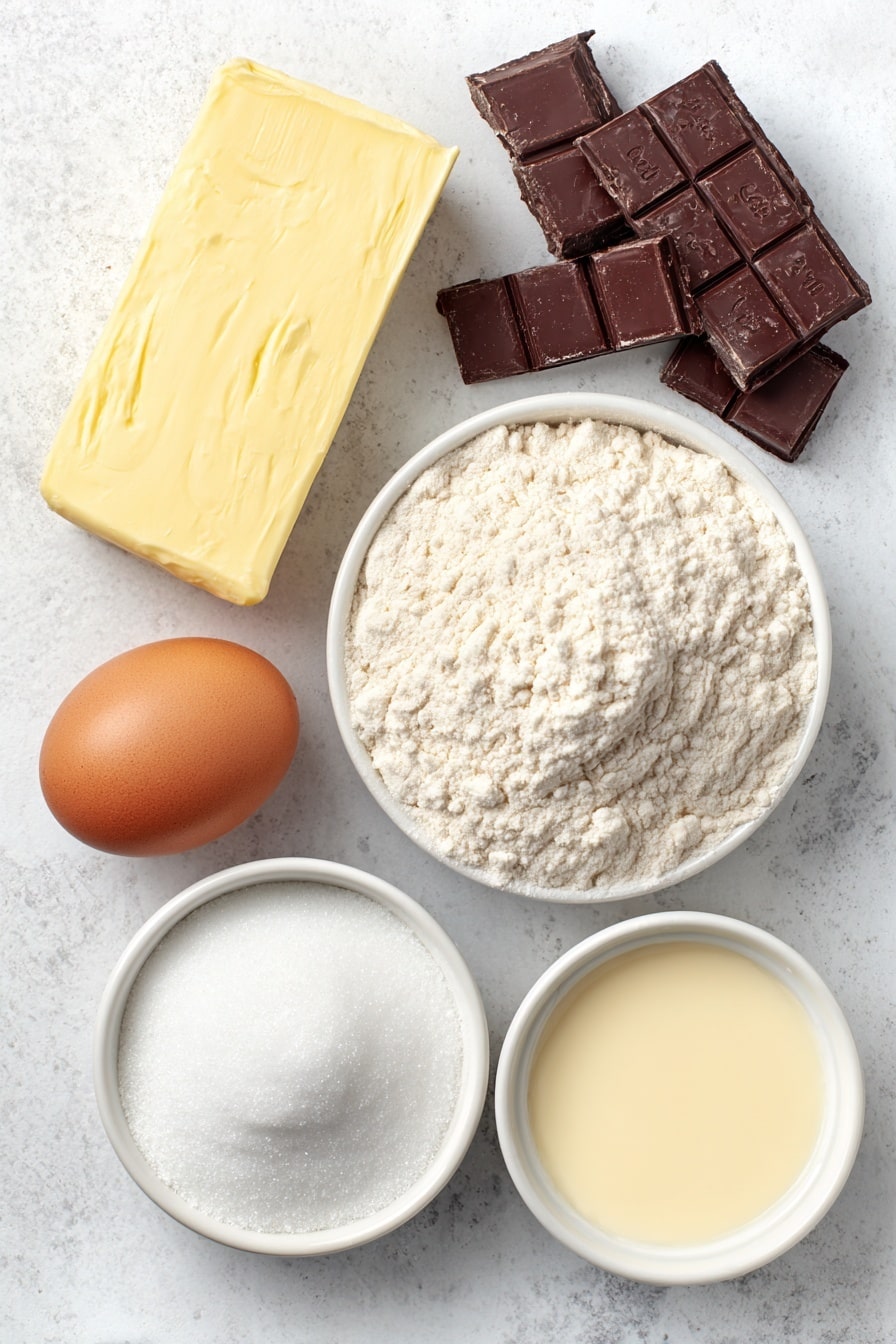
- Unsalted Butter: Make sure it’s at room temperature for easy beating and a smooth dough texture.
- Icing/Confectioners Sugar: Provides just the right amount of sweetness and helps create that tender cookie crumb.
- Egg Yolk: Adds richness and binds the dough without making it too cakey.
- Vanilla Extract: A classic flavor enhancer that brings warmth to the cookie base.
- Salt: Just a pinch to balance sweetness and enhance flavors.
- Plain/All Purpose Flour: Gives structure to the cookies; measure carefully for the best results.
- Strawberry Jam: Choose a smooth jam for easy piping and bright color for the noses.
- Milk Chocolate: Melts beautifully and adds a creamy finish for eyes and antlers.
Variations
I love how flexible this Reindeer Cookies with Jam and Chocolate Recipe can be. Once you’ve nailed the basics, feel free to make tweaks that suit your taste or celebration style. Experimenting makes baking so much more fun!
- Jam Swap: I’ve tried raspberry or apricot jam instead of strawberry for a different fruity note, and each one brings its own charm.
- Chocolate Type: Dark chocolate works well if you prefer a less sweet contrast, but milk chocolate stays the family favorite here.
- Vegan Version: You can try plant-based butter and egg substitutes, just know the texture might shift slightly.
- Spiced Cookies: Adding a pinch of cinnamon or ginger to the dough gives a warm holiday vibe that’s pretty irresistible.
How to Make Reindeer Cookies with Jam and Chocolate Recipe
Step 1: Whip Up the Dough
Start by placing the butter, icing sugar, egg yolk, vanilla extract, and a pinch of salt in your stand mixer bowl. Beat everything together until the mixture is light, fluffy, and almost pale in color—this usually takes around 3 to 5 minutes. Trust me, this step makes the dough so soft and tender. Once that’s done, slowly add your flour and fold it in gently. When it gets tough to mix, take it out and knead it briefly with your hands until it forms a smooth, soft dough.
Step 2: Roll and Cut Your Reindeer Shapes
Now, get two sheets of baking paper and sandwich your dough between them. Roll out evenly to about 6mm thick. This ensures your cookies bake evenly, so don’t skip the baking paper—it’s a game-changer for rolling and clean-up. Use a 6cm round cookie cutter to cut full circles for half your batch. For the other half, take a small 1cm cutter and cut a little “nose” hole off-center on each circle—this hole will let the jam peek through later, giving that adorable reindeer nose effect.
Step 3: Chill and Bake
Arrange your cookie cutouts on a lined baking tray and pop them in the fridge to chill for at least 30 minutes—this step is crucial. It helps the cookies hold their shape during baking and prevents spreading. Meanwhile, preheat your oven to 180ºC (or 170ºC fan / 356ºF). Bake the cookies for about 11 to 13 minutes, keeping an eye on them—they should be lightly golden around the edges but still soft in the center. Let them rest on the tray for a couple of minutes before transferring to a wire rack to cool completely.
Step 4: Jam Time!
In a small bowl, stir the strawberry jam briefly to soften it and make it easier to pipe. Pour the jam into a disposable piping bag, snip the end so the jam flows smoothly, and carefully pipe circles onto each full cookie (the ones without nose holes). Don’t overfill or squeeze too close to the edge, or it might spill out during assembly.
Step 5: Sandwich and Decorate
Place a cookie with a nose hole gently on top of each jam-covered full cookie, aligning them so the jam peeks through the little hole perfectly. You want a small, rounded “red nose” effect—so be gentle to avoid jam oozing out the sides.
Next, melt the milk chocolate in a microwave-safe bowl, heating in short 10-second bursts and stirring in between. When it’s two-thirds melted, stir until smooth and fully melted. Pour the chocolate into another piping bag, snip the tip, and get ready to decorate:
- Pipe two small dots above the jam nose for the eyes.
- Create the antlers by piping main lines and then adding little details. I found making a series of downward-pointing arrows makes the antlers look perfectly intricate.
Once you’re happy with your decorating masterpiece, let everything set on a wire rack before storing.
Pro Tips for Making Reindeer Cookies with Jam and Chocolate Recipe
- Room Temperature Butter: I learned that butter too cold or too melted changes your dough texture, so always soften it but don’t melt.
- Chill Time is Key: Skipping chilling meant my cookies spread too much—chilling stops that and keeps shapes crisp.
- Use Baking Paper for Rolling: It prevents the dough from sticking and makes transferring shapes to trays easier—huge time saver!
- Chocolate Piping Patience: If the chocolate cools too much and thickens, rewarm gently; consistent flow makes decorating smoother.
How to Serve Reindeer Cookies with Jam and Chocolate Recipe

Garnishes
I like to sprinkle a light dusting of powdered sugar over these cookies just before serving—it adds a snowy winter vibe that’s just irresistible. Sometimes, I’ll also place a tiny edible silver or gold star near the antlers for a little festive sparkle, especially for holiday parties.
Side Dishes
These Reindeer Cookies go wonderfully alongside a cup of hot cocoa or mulled cider. If you’re serving them at a gathering, pairing with a cheese board or a fresh fruit platter balances the sweetness and keeps things refreshing.
Creative Ways to Present
One of my favorite presentations is arranging these cookies on a large wooden board with pine sprigs or holly leaves tucked underneath—they turn a simple cookie platter into a festive centerpiece. Wrapping a few in clear cellophane tied with twine makes for charming homemade gifts that everyone raves about.
Make Ahead and Storage
Storing Leftovers
I store leftover cookies in a metal tin at room temperature, lined with parchment paper between layers. They keep beautifully fresh like this for up to 4-5 days. Try to avoid airtight plastic containers with moisture, as that can make the biscuits lose their crispness.
Freezing
If I want to prep ahead, I freeze baked and decorated cookies in a single layer on a tray first. Once solid, I transfer them to an airtight freezer bag. When thawed, they retain their flavor and texture surprisingly well—great for batch baking before the holidays.
Reheating
I usually enjoy these cookies at room temperature, but if you prefer a slightly warm cookie, pop one in the microwave for about 8-10 seconds. This brings out the softness and melts the chocolate slightly—just be careful not to overheat or the chocolate will lose that perfect shine.
FAQs
-
Can I use a different type of jam for this Reindeer Cookies with Jam and Chocolate Recipe?
Absolutely! While strawberry jam is traditional and offers a vibrant color, raspberry, apricot, or even cherry jam make delicious alternatives. Just choose a jam with a smooth consistency for easier piping and a neat look.
-
How thick should I roll the cookie dough?
Rolling your dough to about 6mm is ideal. It’s thick enough to hold shape and not too thick to bake evenly. I recommend using two sheets of baking paper to help you roll out uniformly.
-
What’s the secret to getting the perfect “red nose” look?
Cutting a small off-center 1cm hole in half your cookies lets the jam show through beautifully when sandwiched. Be sure not to overfill with jam or squish too hard when assembling so you get that perfect little rounded nose poking through.
-
Can I make the dough ahead of time?
Yes! You can prepare the dough and chill it for up to 24 hours before rolling and cutting. Just wrap it tightly in plastic wrap to keep it fresh.
Final Thoughts
I absolutely love how these Reindeer Cookies with Jam and Chocolate Recipe brighten up holidays and family moments. I remember the first time I made them with my kids—their joy decorating those little antlers and noses was priceless. Baking these cookies feels like sharing a bit of festive magic, and once you try them, I know they’ll become a favorite tradition in your home too. So grab your rolling pin, turn on some holiday tunes, and let’s make some joyful memories!
Print
Reindeer Cookies with Jam and Chocolate Recipe
- Prep Time: 20 minutes
- Cook Time: 12 minutes
- Total Time: 1 hour 2 minutes
- Yield: 11 cookies
- Category: Baking
- Method: Baking
- Cuisine: Western
- Diet: Vegetarian
Description
These Easy Reindeer Cookies are a delightful holiday treat featuring buttery cookies sandwiched with strawberry jam and decorated with milk chocolate to create adorable reindeer faces. Perfect for Christmas celebrations, they combine a tender, buttery base with sweet jam and whimsical chocolate detailing, sure to bring joy to your festive gatherings.
Ingredients
Cookie Dough
- 140g (1/2 Cup + 1/8 Cup) Unsalted Butter, room temperature
- 60g (1/2 Cup) Icing/Confectioners Sugar
- 1 Egg Yolk
- 1 tsp Vanilla Extract
- Pinch of Salt
- 210g (1 + 2/3 Cup) Plain/All Purpose Flour
Filling and Decoration
- 200g (1/2 Cup + 2 tbsp) Strawberry Jam
- 75g (2.6 oz) Milk Chocolate
Equipment
- Electric Stand Mixer or Large Bowl with Electric Hand Whisk
- Rolling Pin
- 6cm Round Cookie Cutter
- 1cm Circle Cutter
- Baking Tray
- 2 x Small Bowls
- 2 x Disposable Piping Bags
Instructions
- Prepare the Dough: Place the butter, icing sugar, egg yolk, vanilla extract, and a pinch of salt into the stand mixer bowl. Beat on medium speed until the mixture is light and fluffy, creating a creamy base for the cookie dough.
- Add Flour and Form Dough: Gradually add the plain flour to the creamed mixture and gently fold it through until a soft dough forms. Remove the dough from the bowl and briefly knead it together by hand to ensure uniform consistency.
- Roll and Cut Cookies: Place the dough between two sheets of baking paper and roll out evenly to a thickness of 6mm. Use a 6cm round cookie cutter to cut out circles. Then, on half the cookies, use a 1cm circle cutter to cut out an off-centre small circle that will serve as the ‘nose’ hole.
- Chill the Cookies: Arrange the cut cookies on a baking tray lined with baking paper. Chill them in the refrigerator for 30 minutes to firm up the dough, which helps maintain shape during baking.
- Bake the Cookies: Preheat your oven to 180ºC (356ºF) or 170ºC fan-forced. Space the chilled cookies evenly on lined baking trays. Bake each batch for 11-13 minutes or until the edges turn golden brown.
- Cool the Cookies: Remove from the oven and let the cookies firm on the tray for 1-2 minutes to avoid breakage. Then transfer them onto a wire rack to cool completely before decorating.
- Prepare Jam Filling: Soften the strawberry jam by stirring it in a small bowl until it is pourable. Transfer the jam into a disposable piping bag and snip the tip to create a small opening.
- Assemble the Cookie Sandwiches: Pipe a small circle of jam onto each whole cookie (those without nose holes), making sure not to pipe too much jam or to place it too close to the edge. Carefully place the cookies with the nose holes on top, aligning them so the jam fills the nose hole, creating a bright red ‘nose’ effect.
- Melt the Chocolate: Chop or break the milk chocolate into pieces and place in a microwave-safe bowl. Heat in 10 second intervals, stirring in between, until two-thirds melted. Then stir until completely smooth.
- Decorate the Reindeer: Pour the melted chocolate into a piping bag, snip the end, and pipe small eyes above each red nose on the cookie sandwiches. Next, pipe the main antler lines on each reindeer cookie, followed by detailed strokes resembling downward-pointing arrows to create antler texture.
- Set and Store: Allow the chocolate decorations to set completely on a cooling rack. Once set, store the cookies in a metal tin at room temperature. Consume within 4-5 days for optimal freshness and taste.
Notes
- CRAZY cute, these easy reindeer cookies are guaranteed to bring joy to everyone you love this Christmas!
- Be careful not to overfill the jam to prevent it from leaking out the nose holes.
- Chilling the dough before baking is crucial to help maintain cookie shape.
- Use a fan-forced oven setting if available for even baking.
- Allow chocolate decorations to fully set before storing to avoid smudging.
Nutrition
- Serving Size: 1 cookie
- Calories: 275
- Sugar: 18g
- Sodium: 26mg
- Fat: 13g
- Saturated Fat: 8g
- Unsaturated Fat: 4g
- Trans Fat: 0g
- Carbohydrates: 37g
- Fiber: 1g
- Protein: 3g
- Cholesterol: 46mg


