

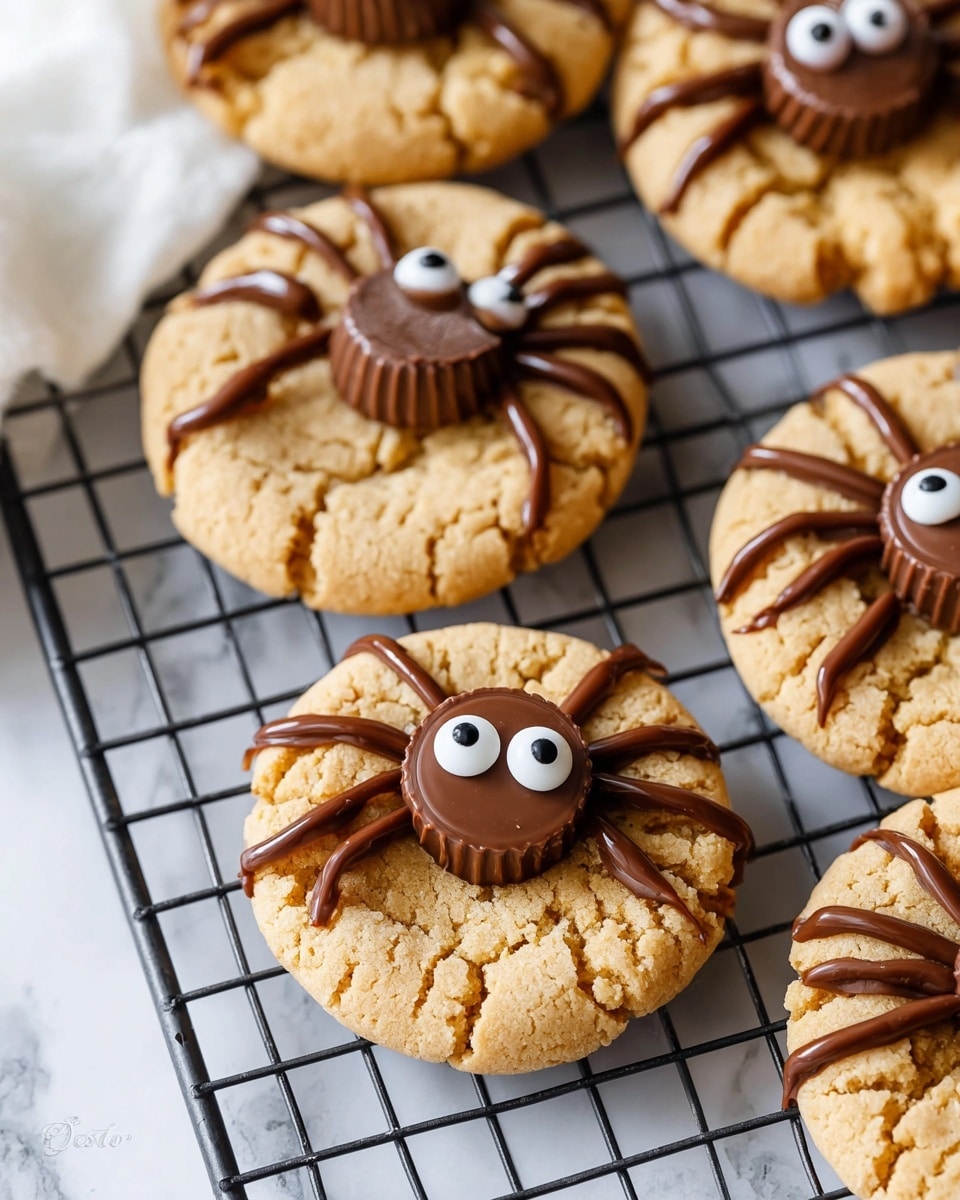
If you’re looking for a fun, festive treat that’s as adorable as it is delicious, you’ve got to try this Peanut Butter Spider Cookies Recipe. These little critters are not only perfect for Halloween or any spooky occasion, but they also pack that rich, nutty peanut butter flavor everyone loves. I promise you, once you make them, your family and friends will be asking for these creepy-cute cookies all year round!
Why You’ll Love This Recipe
- Super Easy to Make: The dough comes together quickly and the decorating is a fun, simple step anyone can do.
- Perfect Combo of Flavors: Peanut butter, chocolate, and that little extra crunch from the sugar coating make these cookies irresistible.
- Great for All Ages: Kids adore decorating their own spider cookies, and adults love gobbling them up!
- Cute Presentation: The mini Reese’s and candy eyes turn these cookies into playful little spiders that spark smiles.

Ingredients You’ll Need
The magic here is the balance between creamy peanut butter and buttery cookie dough, with just the right hint of sweetness thanks to sugars and chocolate. When shopping, keep an eye out for no-stir creamy peanut butter to make mixing effortless and some fun candy eyes to bring your spiders to life!
- All-purpose flour: The backbone of your cookie dough; it gives a perfect chewy texture.
- Baking soda: Helps your cookies rise just enough without spreading too thin.
- Salt: Enhances all the flavors, especially peanut butter and chocolate.
- Granulated sugar: Adds crispness and helps the cookies get a nice golden color.
- Light brown sugar: Brings a subtle caramel flavor and moisture to the dough.
- No-stir creamy peanut butter: I like using Skippy’s all natural variety—it mixes smoothly and tastes fantastic.
- Unsalted butter: Room temperature butter makes it easier to cream with the sugars for a fluffy dough.
- Large egg: Binds the dough together and adds richness.
- Pure vanilla extract: A splash enhances all the flavors and adds warmth.
- Mini Reese’s cups: The spider’s body—chocolate and peanut butter rolled into one little candy.
- Chocolate chips: Melted for piping on the spider legs and attaching candy eyes.
- Candy eyes: These bring your peanut butter spiders to life and are usually found at craft or grocery stores.
Variations
I love making this Peanut Butter Spider Cookies Recipe my own by switching up the toppings or adding little twists here and there—it’s fun to play around, and you can adapt it perfectly to your mood or dietary needs.
- Peanut Butter Variations: I’ve tried it with natural peanut butter with a bit of stirring, which works fine but changes the texture slightly—feel free to experiment based on your brand preferences.
- Chocolate Swap: Dark chocolate chips instead of regular semi-sweet add a richer flavor that my husband really appreciates.
- Nut-Free Version: Use sunflower seed butter in place of peanut butter, and swap Reese’s for allergy-friendly candies.
- Seasonal Spins: Around Christmas, I swap candy eyes for mini red candies and create “reindeer” cookies instead!
How to Make Peanut Butter Spider Cookies Recipe
Step 1: Prepare Your Dry Ingredients
Start by whisking together the all-purpose flour, baking soda, and salt in a medium bowl. This ensures your leavening and seasoning are evenly distributed. I like to do this first while the mixer bowl is clean so I can move smoothly onto the wet ingredients next.
Step 2: Cream Butter, Sugars, and Peanut Butter
In your mixer bowl, combine the softened unsalted butter with the granulated and brown sugars and the creamy peanut butter. Beat on medium speed until everything turns light and fluffy, about 2 minutes. Scraping down the sides halfway helps everything incorporate evenly.
Step 3: Add Egg and Vanilla
Next, add your egg and vanilla extract, then mix just until combined. You’ll see the dough come together smoothly and get slightly glossy. Don’t overbeat here—just enough to mix in those flavors well.
Step 4: Combine Dry and Wet Ingredients
With your mixer on low speed, slowly add the flour mixture you combined earlier. Beat just until everything is mixed—overworking the dough might make your cookies tough, and we want them soft and chewy.
Step 5: Shape and Sugar-Coat Your Dough Balls
Scoop out full tablespoons of dough and roll them into roughly 1-inch balls. Then roll each ball in some extra granulated sugar—this gives your cookies a subtle crunch and pretty sparkle once baked. Place them on your parchment-lined baking sheet, giving them about 1 ½ inches space so they don’t stick together.
Step 6: Bake and Add Reese’s Body
Bake your cookies at 375ºF for about 10 minutes or until they’re lightly golden around the edges. When you take them out, wait just 3 minutes before gently pressing an unwrapped mini Reese’s cup in the center of each cookie. This timing helps the cookie be soft enough for the candy to stick but firm enough to hold shape.
Step 7: Melt Chocolate and Create Spider Legs
Melt your chocolate chips in the microwave at 50% power, stirring every 15 seconds until silky smooth. Pour the melted chocolate into a plastic baggie and snip a tiny corner to pipe on spider legs around each mini Reese’s body. Then, dab some chocolate on the back of a candy eye and place it onto the Reese’s cup — these little eyes make all the difference in the presentation! Let everything set completely before diving in.
Pro Tips for Making Peanut Butter Spider Cookies Recipe
- Use No-Stir Peanut Butter: It prevents the dough from becoming too oily and makes mixing smoother, ensuring better cookie texture.
- Don’t Overbake: Pull your cookies right when the edges turn light golden—you want soft centers that hold their shape when you press the Reese’s cup in.
- Roll in Extra Sugar: That little step adds a lovely crunch and makes your cookies look extra pretty with a sparkling finish.
- Pipe Spider Legs Carefully: Use a small snip in your baggie tip for delicate legs, and don’t rush—chocolate setting too fast can cause broken legs!
How to Serve Peanut Butter Spider Cookies Recipe
Garnishes
I tend to stick with classic candy eyes for these cookies because they’re just pure fun and so expressive. Sometimes, for a quirky twist, I add tiny red sprinkles around the edges for a “spooky blood” effect that’s perfect for Halloween parties.
Side Dishes
For a cozy dessert spread, I like pairing these spider cookies with a cold glass of milk, hot cocoa, or even a scoop of vanilla ice cream on the side. The creamy drinks balance the rich peanut butter and chocolate perfectly.
Creative Ways to Present
At my last Halloween bash, I arranged these Peanut Butter Spider Cookies Recipe on a dark-colored platter lined with fake spider webs and plastic spiders for an over-the-top creepy vibe. Kids loved picking their own “creepy crawly” treat! For a less spooky gathering, placing the cookies on colorful plates with matching napkins makes them pop as a fun centerpiece.
Make Ahead and Storage
Storing Leftovers
I store these spider cookies in an airtight container at room temperature, and they stay soft and fresh for up to 5 days. If you need to make them ahead for a party, I recommend adding the Reese’s and decorating right before serving so the chocolate looks its best.
Freezing
You can freeze the cookie dough balls for up to 3 months. When you’re ready, just pop them on a baking sheet straight from the freezer and add a couple of extra minutes to the baking time. This has saved me more than once when I wanted freshly baked cookies on short notice!
Reheating
If you have leftover baked cookies that have gone a bit firm, a quick 10-15 second zap in the microwave brings back their soft chewiness—just don’t overdo it or they’ll become tough!
FAQs
-
Can I use crunchy peanut butter instead of creamy for this Peanut Butter Spider Cookies Recipe?
Yes, you can use crunchy peanut butter, but keep in mind it will change the texture slightly by adding bitty peanut pieces to your cookies. They’ll still taste great, just less smooth and a bit crunchier.
-
What’s the best way to get the spider legs looking neat?
Use a small piping bag or a plastic baggie with a tiny corner snipped off. Pipe slowly and steadily onto a parchment or wax paper first to practice if you want, then move to the cookies. Let the chocolate cool but not harden before piping for smooth lines.
-
Can these cookies be made gluten-free?
Absolutely! Swap the all-purpose flour with a 1:1 gluten-free baking flour blend. Be aware that texture might shift a little, but they still hold up wonderfully and taste delicious.
-
How do I prevent the cookies from spreading too much in the oven?
If you live in a warm or humid climate, chilling your cookie dough balls for about 30 minutes before baking really helps prevent spreading. Also, avoid using melted butter as it can cause the dough to flatten out.
-
Can I make these cookies without Reese’s cups?
Definitely! You could use small chocolate or peanut butter candies, or even skip the candy body altogether and just pipe chocolate legs and add candy eyes directly on the cookie.
Final Thoughts
I absolutely love how this Peanut Butter Spider Cookies Recipe brings together playful presentation and classic comfort-food flavors. When I first made these with my kids, their eyes lit up at the little peanut butter spider result—and it’s been a go-to treat for us ever since. Whether you’re baking for a party, holiday, or just a fun afternoon snack, these cookies are easy to make and endlessly delightful. Give them a try—I have a feeling you’ll be smitten too!
Print
Peanut Butter Spider Cookies Recipe
- Prep Time: 15 minutes
- Cook Time: 10 minutes
- Total Time: 25 minutes
- Yield: 30 cookies
- Category: Dessert
- Method: Baking
- Cuisine: American
Description
These Peanut Butter Spider Cookies are a fun and festive treat perfect for Halloween or any spooky occasion. Crispy on the edges and soft in the center, they combine creamy peanut butter with sweet Reese’s cups and candy eyes to create adorable spider-shaped cookies with chocolate legs. Easy to make and great for sharing, these cookies bring a playful twist to classic peanut butter cookies.
Ingredients
Dry Ingredients
- 1 ¾ cup (218 g) all-purpose flour
- 1 teaspoon baking soda
- ¼ teaspoon salt
Wet Ingredients
- ½ cup (100 g) granulated sugar, plus more for rolling cookies in
- ½ cup (100 g) light brown sugar
- ½ cup (128 g) no-stir creamy peanut butter
- ½ cup (113 g or 1 stick) unsalted butter, room temperature
- 1 large egg, room temperature
- 1 teaspoon pure vanilla extract
Toppings
- 30 mini Reese’s cups, unwrapped
- ¼ cup chocolate chips
- Candy eyes
Instructions
- Preheat Oven: Preheat your oven to 375º F (190º C). Line a baking sheet with parchment paper and set it aside to prepare for baking.
- Mix Dry Ingredients: In a medium bowl, whisk together the all-purpose flour, baking soda, and salt until well combined. Set this mixture aside.
- Cream Sugars and Fats: In the bowl of a stand mixer or using a hand mixer and large mixing bowl, combine the granulated sugar, light brown sugar, unsalted butter, and creamy peanut butter. Beat on medium speed until the mixture is fluffy and combined, about 2 minutes. Scrape down the sides to ensure even mixing.
- Add Egg and Vanilla: Add the egg and pure vanilla extract to the creamed mixture. Beat until fully incorporated, roughly 30 seconds.
- Incorporate Dry Ingredients: With the mixer on low speed, slowly add the flour mixture to the wet ingredients. Mix just until the flour is fully combined, taking care not to overmix.
- Form Cookie Dough Balls: Scoop a heaping tablespoon of dough and roll into 1-inch balls. Roll each dough ball in additional granulated sugar for a sweet crunch. Place the balls on the prepared baking sheet, spacing them about 1 ½ inches apart to allow room for spreading.
- Bake Cookies: Bake in the preheated oven for 10 minutes, or until the edges are light golden brown. Remove from the oven and let cool on the baking sheet for 3 minutes.
- Add Reese’s Cups: While cookies are still slightly warm, press one mini Reese’s cup into the center of each cookie. This will help them adhere as the cookies cool.
- Cool Completely: Carefully transfer the cookies to a wire rack to cool completely to prevent them from becoming soggy.
- Melt Chocolate Chips: Melt chocolate chips in the microwave at 50% power, stirring every 15 seconds until smooth and fully melted.
- Decorate Spider Legs: Transfer melted chocolate to a small plastic baggie. Snip a tiny corner and pipe spider legs onto the cookies around the Reese’s cup, creating a fun spider effect.
- Attach Candy Eyes: Place a small dab of melted chocolate on the back of each candy eye and press onto the Reese’s cups to give your spiders eyes.
- Set Chocolate: Let the decorated cookies sit until the chocolate sets and hardens before serving or storing.
Notes
- Use creamy no-stir peanut butter such as Skippy All Natural for the best texture and consistency.
- Candy eyes can be found at most grocery or craft stores; if unavailable, small chocolate chips or icing dots can substitute.
- In warm climates, chill the cookie dough for 30 minutes before baking to prevent spreading.
- Store baked cookies in an airtight container at room temperature for up to 5 days to maintain freshness.
- You can freeze cookie dough for up to 3 months; thaw before baking.
Nutrition
- Serving Size: 1 cookie
- Calories: 152 kcal
- Sugar: 12 g
- Sodium: 104 mg
- Fat: 8 g
- Saturated Fat: 3 g
- Unsaturated Fat: 4 g
- Trans Fat: 0.1 g
- Carbohydrates: 18 g
- Fiber: 1 g
- Protein: 3 g
- Cholesterol: 14 mg


