
If you’ve ever dreamt of the ultimate frozen treat that combines creamy peanut butter bliss and silky dark chocolate, these Peanut Butter Ice Cream Bars are about to make your dessert dreams come true. They’re rich, luscious, surprisingly easy to make, and 100% guaranteed to disappear the moment they hit the table.
Why You’ll Love This Recipe
- Irresistible Combination: Creamy peanut butter and velvety dark chocolate meld together for a bar that tastes just like your favorite chocolate-peanut butter cup in ice cream form.
- Easy and Fun to Make: Every step is straightforward — no ice cream maker required — making these bars perfect for both seasoned home cooks and kitchen newbies.
- Customizable and Vegan: Naturally vegan and super simple to adapt for nut-free, gluten-free, or even sugar-free diets with a few quick swaps.
- Perfect Make-Ahead Treat: These Peanut Butter Ice Cream Bars are freezer-friendly and always ready for dessert cravings, cookouts, or midday pick-me-ups.

Ingredients You’ll Need
What I adore about these bars is how a handful of straightforward ingredients come together to create magic. Each one brings something important, from the creamy coconut base to the bold peanut butter and that decadent chocolate shell—it all adds up to a seriously swoon-worthy dessert!
- Canned Full-Fat Coconut Milk: Be sure to use the thick cream from the top of chilled cans—this gives the bars their luxurious, scoopable texture and dairy-free richness.
- Smooth Peanut Butter: The star flavor—go for natural and unsweetened for the best balance of salty-sweet nostalgia and creamy melt-in-your-mouth quality.
- Vegan Yogurt: Adds subtle tang and makes the filling ultra-creamy (dairy yogurt works too if you’re not vegan).
- Pure Maple Syrup: A natural sweetener that pairs beautifully with peanut butter while keeping the mixture smooth and pourable.
- Dark Chocolate: The bittersweet coating that crackles when you bite in—choose a high-quality vegan chocolate if needed.
- Sea Salt: Just a sprinkle over the top intensifies all the flavors and adds a touch of gourmet flair.
Variations
One of my favorite things about Peanut Butter Ice Cream Bars is how customizable they are—so feel free to make them your own! Whether you have dietary preferences or just love to experiment, these bars are total chameleons.
- Nut-Free: Swap in sunflower seed butter or tahini for peanut butter—perfect for allergy-friendly treats.
- Different Nut Butters: Try almond, cashew, or even hazelnut butter for fun flavor twists that keep things interesting.
- Mini Bars: Use smaller molds or slice into bite-sized pieces and drizzle instead of dipping for easy entertaining.
- Ultimate Chocoholic: Stir mini chocolate chips or a fudge swirl right into the ice cream base before freezing for extra decadence.
How to Make Peanut Butter Ice Cream Bars
Step 1: Prep Your Molds and Gather Ingredients
Start by placing your ice cream bar molds on a tray that will fit in your freezer—this makes moving the filled molds much less stressful. Lay out all your ingredients for easy assembly and ensure your coconut milk has been chilled so the cream is set and scoopable.
Step 2: Blend the Ice Cream Base
Add the coconut cream, peanut butter, vegan yogurt, and maple syrup to a high-speed blender. Blitz until you have an ultra-smooth, dreamy mixture. Scrape down the sides with a spatula as needed to ensure everything is perfectly combined.
Step 3: Fill and Freeze the Bars
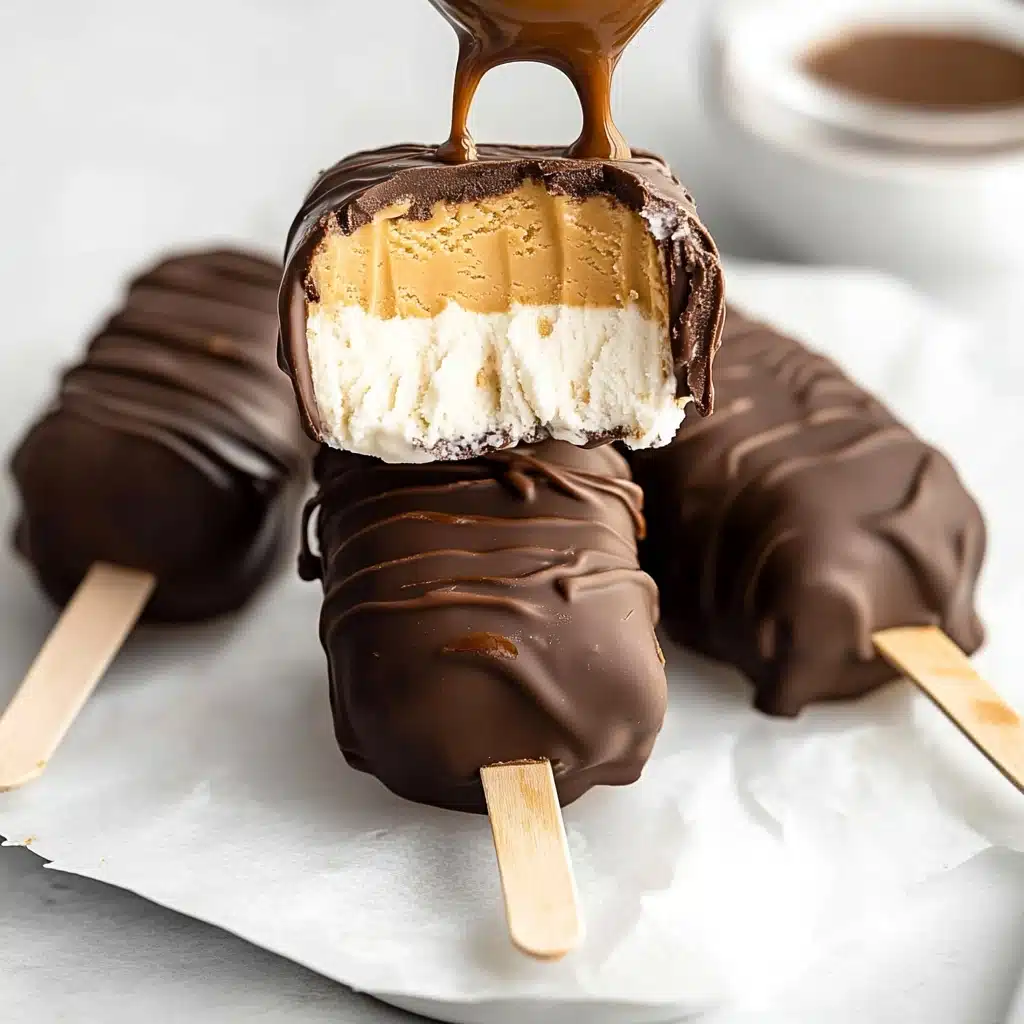
Transfer the blended mixture into a piping bag for mess-free filling, or simply spoon it into your molds (embrace the mess—it’s worth it!). Insert a wooden stick into each bar. Freeze for 4–6 hours, or until the bars are completely firm and set.
Step 4: Unmold and Prep for Coating
Once frozen solid, gently remove the Peanut Butter Ice Cream Bars from their molds. Place them back in the freezer on a tray lined with parchment paper so they’re ready for dipping without starting to melt.
Step 5: Dip in Peanut Butter and Chocolate
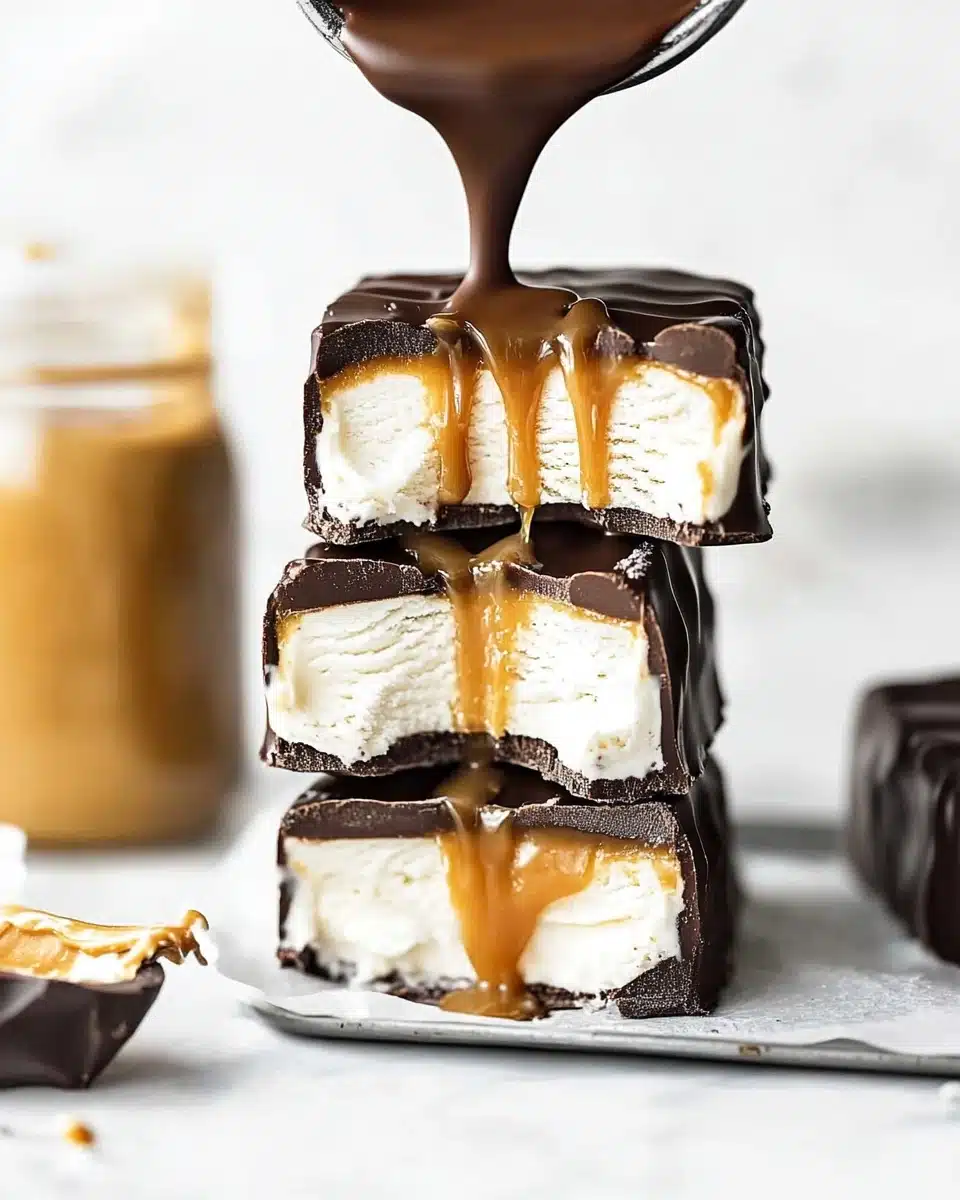
Melt peanut butter over a double-boiler until runny, then pour into a tall glass for easy dipping. Coat each bar evenly and refreeze for 10 minutes to set the peanut layer. Next, melt the dark chocolate, transfer to a clean tall glass, and dip the bars again. Place them back in the freezer to set, then give each one a final drizzle of remaining chocolate and a sprinkle of sea salt just before serving.
Pro Tips for Making Peanut Butter Ice Cream Bars
- Chill Your Coconut Milk: For the creamiest, richest base, refrigerate your coconut milk cans overnight and scoop out only the solid white cream—no watery liquid!
- Perfect Dipping Depth: Use a tall glass for the melted peanut butter and chocolate to make dipping the bars super easy (and way less messy than shallow bowls).
- Pop Your Tray Before Dipping: Give your unmolded bars a quick chill in the freezer before the coating steps—this keeps them firm and stops melting mid-dip.
- Customize the Crunch: Add a sprinkle of roasted chopped peanuts or crushed pretzels on top of the wet chocolate for irresistible texture and a salty-sweet vibe.
How to Serve Peanut Butter Ice Cream Bars
Garnishes
Though gorgeous as-is, a finishing touch elevates these beauties—a generous sprinkle of flaky sea salt, a drizzle of leftover chocolate, or a dusting of crushed roasted peanuts instantly makes each Peanut Butter Ice Cream Bar feel extra special and irresistible.
Side Dishes
For a truly decadent dessert platter, serve these bars alongside fresh berries, a scattering of sweet cherries, or even a citrusy fruit salad to balance the richness and offer a bright, refreshing contrast.
Creative Ways to Present
A fun way to wow guests? Arrange the bars upright in a tall glass filled with ice cubes for a frosty centerpiece, or slice them to create “ice cream bar sandwiches” layered with extra peanut butter and banana coins. Kids love decorating their own bars with sprinkles or crushed cookies, too!
Make Ahead and Storage
Storing Leftovers
Leftover Peanut Butter Ice Cream Bars (if you manage to hide any!) should be stored in an airtight container with parchment paper between layers. This prevents them from sticking together and keeps them tasting as delicious as the day they were made.
Freezing
These bars are made for the freezer! They keep beautifully for up to 3 months; just make sure they’re sealed tight and kept away from foods with strong odors. When you need a treat, let them sit out for 2–3 minutes before enjoying—just enough to get perfectly creamy.
Reheating
While you won’t want to “reheat” these frozen treats, if your bars have gotten too hard, just leave one out at room temperature for 5–10 minutes. This softens the ice cream center and brings out all that nutty, melt-in-your-mouth goodness.
FAQs
-
Can I make these Peanut Butter Ice Cream Bars nut-free?
Absolutely! Swap out the peanut butter for sunflower seed butter or tahini to make a delicious, allergy-friendly version that still has all the creamy richness and a toasty, slightly savory note.
-
What if I don’t have ice cream molds?
No problem! Pour the ice cream base into a loaf pan lined with parchment. Freeze until solid, slice into bars, then spoon the coatings over each piece instead of dipping—the flavor is just as fabulous.
-
Can I make mini or bite-sized Peanut Butter Ice Cream Bars?
Definitely! Use smaller silicone molds or make thinner layers for bite-sized pops. You may need a little extra chocolate and peanut butter for coverage, but they’re perfect for parties or portion control.
-
Will any brand of coconut milk work for the ice cream base?
For the creamiest result, choose a thick, full-fat coconut milk brand (like Biona or Nature’s Charm) and refrigerate overnight. Skim off only the solid cream from the top—some brands yield more cream than others, so you may need 1–2 cans.
Final Thoughts
I truly can’t wait for you to try these Peanut Butter Ice Cream Bars—they’re everything you want in a frozen summer treat: easy, indulgent, a little bit nostalgic, and guaranteed to put smiles on everyone’s faces. Let me know how you customize yours and don’t forget to share the joy!
Print
Peanut Butter Ice Cream Bars Recipe
- Prep Time: 20 minutes
- Total Time: 6 hours 20 minutes
- Yield: 4 large or 8 small bars
- Category: Dessert
- Method: Freezing, Mixing
- Cuisine: American
- Diet: Vegetarian
Description
These Peanut Butter Ice Cream Bars are a delightful treat for peanut butter lovers. Creamy coconut milk, smooth peanut butter, and vegan yogurt create a luscious ice cream filling, coated in a rich layer of dark chocolate and peanut butter. Finished with a sprinkle of sea salt, these bars are a perfect balance of sweet and salty.
Ingredients
Ice cream
- 180 g (7.05 oz) chilled canned full-fat coconut milk
- 100 g (1/2 cup) smooth peanut butter
- 60 g (1/4 cup) vegan yogurt
- 60 ml (1/4 cup) pure maple syrup
Coating
- 100 g (1/3 cup) smooth peanut butter
- 140 g (4.95 oz) dark chocolate
- sea salt to garnish
Instructions
- Ice cream – Place ice cream molds on a tray. Blend all ice cream ingredients until smooth. Pipe or spoon mixture into molds, insert lolly sticks, and freeze for 4-6 hours.
- Coating – Melt peanut butter and dip frozen bars. Melt chocolate, dip bars again, and freeze. Serve or store in the freezer.
Notes
- Refrigerate coconut milk cans overnight and use only the cream. Choose high-yield coconut cream brands.
- For miniature bars, prepare extra chocolate and peanut butter for coating.
- Experiment with different nut butters or nut-free alternatives like sunflower seed butter.
- If you don’t have molds, use a loaf pan for a different shape.
Nutrition
- Serving Size: 1 bar
- Calories: 320
- Sugar: 15g
- Sodium: 120mg
- Fat: 25g
- Saturated Fat: 15g
- Unsaturated Fat: 8g
- Trans Fat: 0g
- Carbohydrates: 20g
- Fiber: 3g
- Protein: 6g
- Cholesterol: 0mg
