

If you’re someone who lives for that perfect dessert bite where rich chocolate meets creamy peanut butter in a molten embrace, you’re in for a treat. This Peanut Butter Chocolate Lava Cakes Recipe is one of those divine desserts that feel fancy but come together quickly—perfect for impressing guests or indulging your sweet tooth on a weeknight. I absolutely love how each cake oozes that gooey center, making every forkful feel like a warm hug. Stick with me, and I’ll walk you through every detail so your lava cakes come out spot on every time.
Why You’ll Love This Recipe
- Decadently Simple: This recipe feels gourmet but comes together in under 30 minutes.
- Perfect Peanut Butter & Chocolate Balance: Neither flavor overwhelms the other, making each bite irresistibly rich.
- Impress Without Stress: You’ll get rave reviews that feel like you’ve been baking all day, but it’s surprisingly easy.
- Great for All Skill Levels: Even if you’re new to lava cakes, I’ve packed in tips to help you nail it every time.

Ingredients You’ll Need
The magic of this Peanut Butter Chocolate Lava Cakes Recipe really starts with quality ingredients. You’ll want to use semi-sweet chocolate that melts smoothly and that creamy peanut butter that makes this dessert stand out. Just a few pantry staples come together and create this over-the-top treat.

- Semi-sweet chocolate: Go for a good brand like Ghirardelli or Lindt to get that luscious melt and rich flavor.
- Unsalted butter: Helps control the saltiness and blends perfectly with the chocolate for silky texture.
- All-purpose flour: Spoon and level it for accuracy—this keeps the cake tender but sturdy enough to hold that molten center.
- Confectioners’ sugar: Adds sweetness and helps with the delicate crumb.
- Salt: Just a pinch to balance out all the sweetness and enrich flavors.
- Large eggs and egg yolks: Eggs make the cake rich and help with that fudgy texture that’s key to good lava cakes.
- Creamy peanut butter: Use smooth peanut butter for a silky molten center that oozes out perfectly when you cut into the cake.
- Optional toppings: Ice cream, melted peanut butter, or chocolate syrup take these cakes over the top if you want to get fancy.
Variations
I love playing around with this recipe depending on my mood or who I’m sharing it with. Feel free to tweak the fillings or adjust the chocolate for a personal twist. You’ll find that little changes can make the recipe your own without losing that gooey perfection.
- Swap peanut butter for almond butter: When I needed a nut-free house safe option, almond butter gave a totally different nutty flavor that my family surprisingly loved.
- Add a pinch of cinnamon or cayenne: I once sprinkled a little cayenne in the batter—wow, that subtle heat paired with chocolate blew my mind.
- Use dark chocolate or milk chocolate: Depending on how rich or sweet you want it, swapping your chocolate can change the flavor profile nicely.
- Make mini lava cakes: By using smaller ramekins, you can create adorable portion-controlled desserts that cook faster and dazzle guests.
How to Make Peanut Butter Chocolate Lava Cakes Recipe
Step 1: Prep Your Ramekins Like a Pro
Start by spraying four 6-ounce ramekins with nonstick cooking spray, then dust them lightly with cocoa powder. This step sounds minor but it saves you a headache when releasing the cakes later. I learned the hard way once leaving sticky cakes behind—don’t skip this! It ensures your beautiful lava cakes come out cleanly without stuck edges or crumbled sides.
Step 2: Melt Chocolate and Butter
Coarsely chop the semi-sweet chocolate so it melts evenly. Place the butter in a heatproof bowl, add the chocolate on top, then microwave in 10-second bursts, stirring in between until silky smooth. This slow melting method prevents scorching. Once melted and smooth, set it aside to cool slightly while you prep the rest.
Step 3: Mix Your Dry Ingredients
Whisk the flour, confectioners’ sugar, and salt together in a small bowl. This helps to evenly distribute the sugar and salt and avoid lumps. Taking this extra moment upfront makes mixing in the wet ingredients a breeze later.
Step 4: Beat the Eggs
In a separate bowl, whisk together the whole eggs and egg yolks until just combined. I don’t recommend over-whipping here — just enough to blend them smoothly. This step is essential for getting that fudgy but airy lava cake texture.
Step 5: Bring It All Together
Slowly pour both the dry ingredients and the beaten eggs into the bowl with your melted chocolate. Use a silicone spatula or wooden spoon to gently fold everything together until smooth. Don’t worry if the batter feels a bit thick—that’s exactly what you want. If you see any stubborn lumps, a quick whisking gently works them out without destabilizing the batter.
Step 6: Assemble the Cakes
Divide the chocolate batter evenly among the prepared ramekins. Next, drop about two teaspoons of creamy peanut butter on top of each and gently press it in slightly with a spoon. Don’t worry if some peanut butter peeks through—the slight exposure adds to the molten effect when baked.
Step 7: Bake and Serve
Set the ramekins on a baking sheet and bake in your preheated 425°F oven for 12-13 minutes. You’ll know they’re ready when the sides look firm and set but the tops still look a little soft and jiggly. Let them cool about a minute, then carefully invert each cake onto a plate using an oven mitt—those ramekins will be hot! The cakes should slide out easily, revealing that luscious molten center. For an extra indulgence, serve immediately topped with ice cream and drizzles of melted peanut butter or chocolate syrup.
Pro Tips for Making Peanut Butter Chocolate Lava Cakes Recipe
- Use Quality Chocolate: I once tried baking with a baking bar and ended up with a grainy texture—invest in good chocolate for silky results.
- Mind Your Bake Time: Those extra 30 seconds in the oven can turn lava cake into a dense brownie; set a timer and keep an eye through the oven window.
- Peanut Butter Placement: Press the peanut butter just slightly into the batter but don’t cover it completely; this helps create those fun molten pockets.
- Inverting Ramekins: Warm ramekins release cakes more smoothly—make sure to invert promptly after a brief cool down to avoid sticking.
How to Serve Peanut Butter Chocolate Lava Cakes Recipe

Garnishes
I’m a sucker for a scoop of vanilla ice cream melting on top—it beautifully contrasts the warm, gooey cake. Sometimes I drizzle a bit of extra melted peanut butter or chocolate syrup for that added glossy finish and richness. A sprinkle of flaky sea salt on top never hurts either—it amps up the flavors.
Side Dishes
Honestly, this dessert holds its own, but when I’m serving it after a lighter meal, I like pairing it with fresh berries or a simple mixed green salad to balance the richness. A glass of cold milk or a cup of strong coffee also complements the decadent flavors beautifully.
Creative Ways to Present
For a special dinner party, I’ve served these mini lava cakes inside pretty glass plates with edible flowers and a dusting of powdered sugar around the rim. Another time, I layered the cake into martini glasses with whipped cream and crushed peanuts for a fun twist that wowed my guests.
Make Ahead and Storage
Storing Leftovers
If you happen to have leftovers (which rarely happens in my house!), you can store baked lava cakes covered tightly in the fridge for up to 2 days. They won’t have quite the same molten center once refrigerated, but they’re still delicious warmed up.
Freezing
I’ve successfully frozen unbaked lava cakes in ramekins wrapped well in plastic wrap and foil. When ready to enjoy, I thaw them in the fridge overnight and bake as directed, adding a minute or two extra if needed. Freezing is a lifesaver when you want to prep ahead for guests!
Reheating
To reheat, I usually pop the lava cakes back in a 350°F oven for about 8-10 minutes to warm through gently. Microwaving tends to cook unevenly and toughen the edges, so the oven’s definitely my go-to for preserving that luscious gooey texture.
FAQs
-
Can I use natural peanut butter in this recipe?
Natural peanut butter has a thinner consistency and can make the lava center runnier, so it’s best to use creamy, smooth peanut butter with a stable texture to ensure the filling holds up well during baking.
-
How do I know when my lava cakes are done baking?
Look for firm and set edges with a slightly soft and jiggly center on top—these signs mean the outside is cooked while the center remains molten. Overbaking will make cakes dense instead of gooey.
-
Can I make these vegan or gluten-free?
Yes! You can substitute eggs with flax or chia egg replacements and use gluten-free flour blend instead of all-purpose flour. Vegan butter and dairy-free chocolate will help keep the recipe entirely plant-based.
-
Why do my lava cakes stick to the ramekins?
Make sure to thoroughly grease and dust ramekins with cocoa powder before baking. Also, invert the cakes promptly after resting for just a minute so they release easily. Residue or skipping these steps cause sticking problems.
-
Can I prepare the batter in advance?
You can prepare the batter and keep it in the fridge for a few hours, but I recommend adding the peanut butter and baking fresh for best texture and molten center.
Final Thoughts
This Peanut Butter Chocolate Lava Cakes Recipe holds a special place in my dessert arsenal—it’s that go-to recipe that makes everyone feel like they just stepped into a fancy bakery, but without the fuss. I remember sharing it with friends who normally shy away from baking, and they were amazed at how achievable and delicious it was. Give it a try next time you want to indulge or wow someone special. I promise, once you nail this, it’ll become a beloved signature dessert in your kitchen too!
Print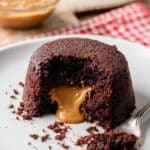
Peanut Butter Chocolate Lava Cakes Recipe
- Prep Time: 15 minutes
- Cook Time: 12-13 minutes
- Total Time: 35 minutes
- Yield: 4 individual lava cakes
- Category: Dessert
- Method: Baking
- Cuisine: American
Description
Indulge in rich, molten chocolate lava cakes infused with creamy peanut butter centers. This recipe yields four individual cakes featuring a luscious semi-sweet chocolate batter that bakes to perfection with a gooey peanut butter core. Perfect for a special dessert, these lava cakes are topped optionally with ice cream and drizzled with melted peanut butter or chocolate syrup for added decadence.
Ingredients
Chocolate Lava Cake Batter
- 6 ounces (170g) high quality semi-sweet chocolate, such as Ghirardelli or Lindt
- 1/2 cup (8 Tbsp; 113g) unsalted butter
- 1/4 cup (31g) all-purpose flour (spooned & leveled)
- 1/2 cup (60g) confectioners’ sugar
- 1/8 teaspoon salt
- 2 large eggs
- 2 large egg yolks
Filling & Serving
- 8 teaspoons (42g) creamy peanut butter (about 2 teaspoons per cake)
- Optional for serving: ice cream, melted peanut butter and/or chocolate syrup for drizzling
Instructions
- Prepare Ramekins: Spray 4 six-ounce ramekins with nonstick cooking spray and dust with cocoa powder to ensure the cakes release easily after baking.
- Preheat Oven: Set your oven to 425°F (218°C) so it reaches the right temperature by the time your batter is ready.
- Melt Chocolate and Butter: Coarsely chop the semi-sweet chocolate. Place the butter in a medium heat-proof bowl, add the chopped chocolate on top, and microwave in 10-second increments, stirring between each until smooth and fully melted. Set aside to cool slightly.
- Mix Dry Ingredients: In a small bowl, whisk together the flour, confectioners’ sugar, and salt until combined.
- Mix Eggs: In another small bowl, whisk together the eggs and egg yolks until well blended.
- Combine Batter: Slowly add the flour mixture and eggs into the melted chocolate mixture. Stir gently with a silicone spatula or wooden spoon until smooth, working out any lumps with a whisk. The batter will be thick and rich.
- Assemble Cakes: Evenly spoon the chocolate batter into the prepared ramekins. Dollop peanut butter on top of each batter-filled ramekin, pressing it slightly down into the batter. Some peanut butter may remain exposed on top.
- Bake: Place ramekins on a baking sheet and bake in the preheated oven for 12-13 minutes. The edges should appear firm and set, though the tops might still look slightly soft.
- Invert and Serve: Let the cakes cool for 1 minute. Carefully cover each ramekin with an inverted plate and flip over using oven mitts to avoid burns. The lava cakes should release easily from the ramekins.
- Finishing Touch: Top each cake with ice cream and drizzle melted peanut butter or chocolate syrup as desired. Serve immediately to enjoy the molten center at its best.
Notes
- This easy recipe delivers ultimate dessert decadence combining rich chocolate and creamy peanut butter.
- Use quality semi-sweet chocolate for the best flavor and smooth melting.
- Dust ramekins well with cocoa powder to prevent sticking and ease cake removal.
- Serve immediately for a molten, gooey center; the lava effect diminishes as the cakes cool.
Nutrition
- Serving Size: 1 lava cake (approx. 130g)
- Calories: 420
- Sugar: 30g
- Sodium: 150mg
- Fat: 28g
- Saturated Fat: 14g
- Unsaturated Fat: 12g
- Trans Fat: 0g
- Carbohydrates: 40g
- Fiber: 3g
- Protein: 7g
- Cholesterol: 130mg

