
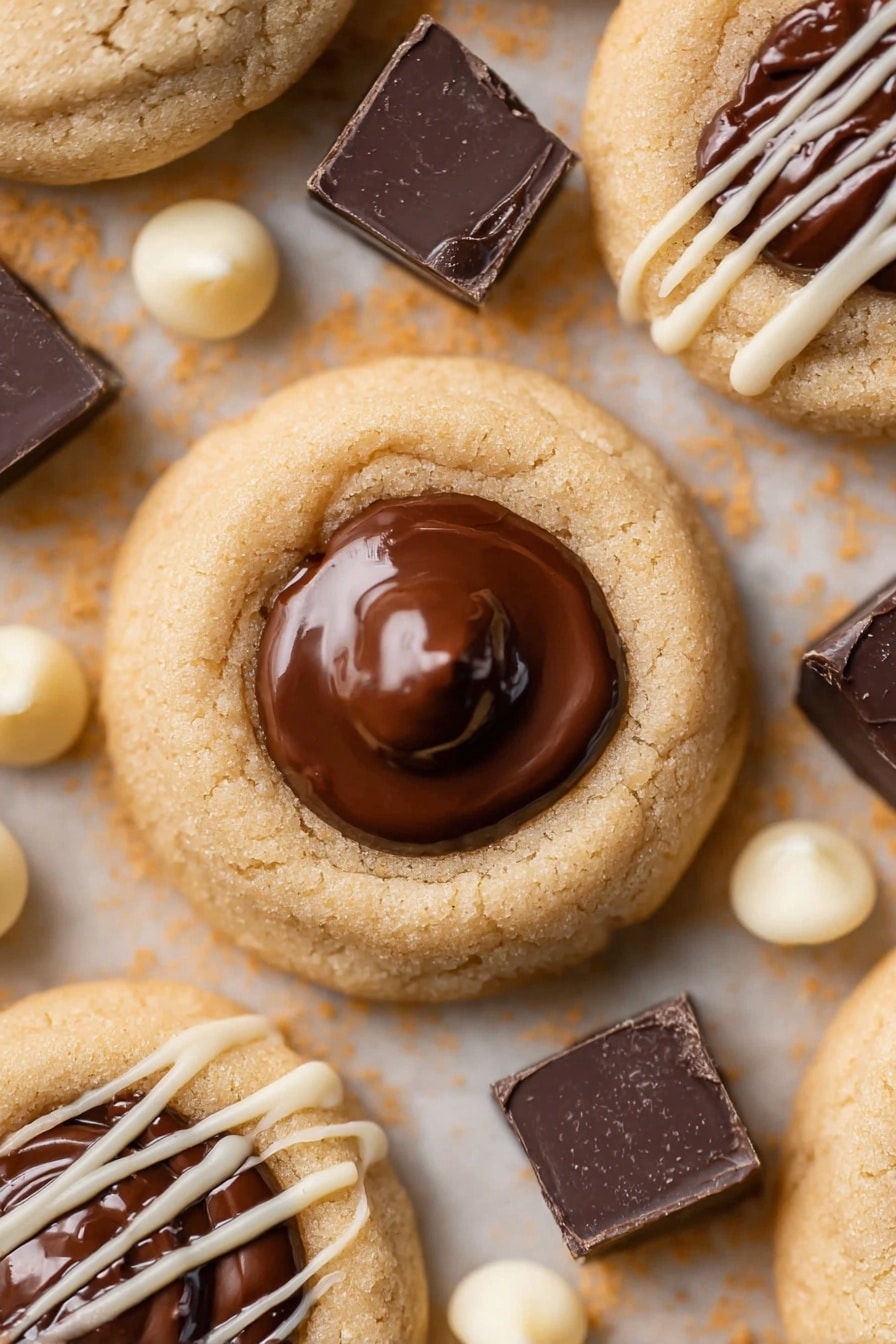
If you’re looking for a cookie that’s buttery, soft, and just downright irresistible, let me introduce you to this Nutella Thumbprint Cookies Recipe. I absolutely love how these cookies come out every single time — tender little pillows of dough with that perfect Nutella center that oozes chocolatey hazelnut goodness. Whether you’re baking for a crowd or just treating yourself, you’ll find these cookies super easy to make and even easier to love. Grab your apron and let’s dive in!
Why You’ll Love This Recipe
- Soft & Chewy Texture: These thumbprint cookies stay tender and melt-in-your-mouth with just the right amount of chew.
- Easy to Make: With simple ingredients and straightforward steps, you’ll have a batch ready in no time.
- Nutella-Filled Goodness: The star of the show is that luscious Nutella center that takes these cookies to the next level.
- Perfect for Any Occasion: Whether it’s a holiday, a gift, or a cozy treat, these cookies fit right in.

Ingredients You’ll Need
This Nutella Thumbprint Cookies Recipe relies on a balance of buttery richness and just the right amount of flour for softness, plus a hit of vanilla and almond extract for extra flavor depth. I always recommend using high-quality Nutella because it makes all the difference when it comes to the final taste.
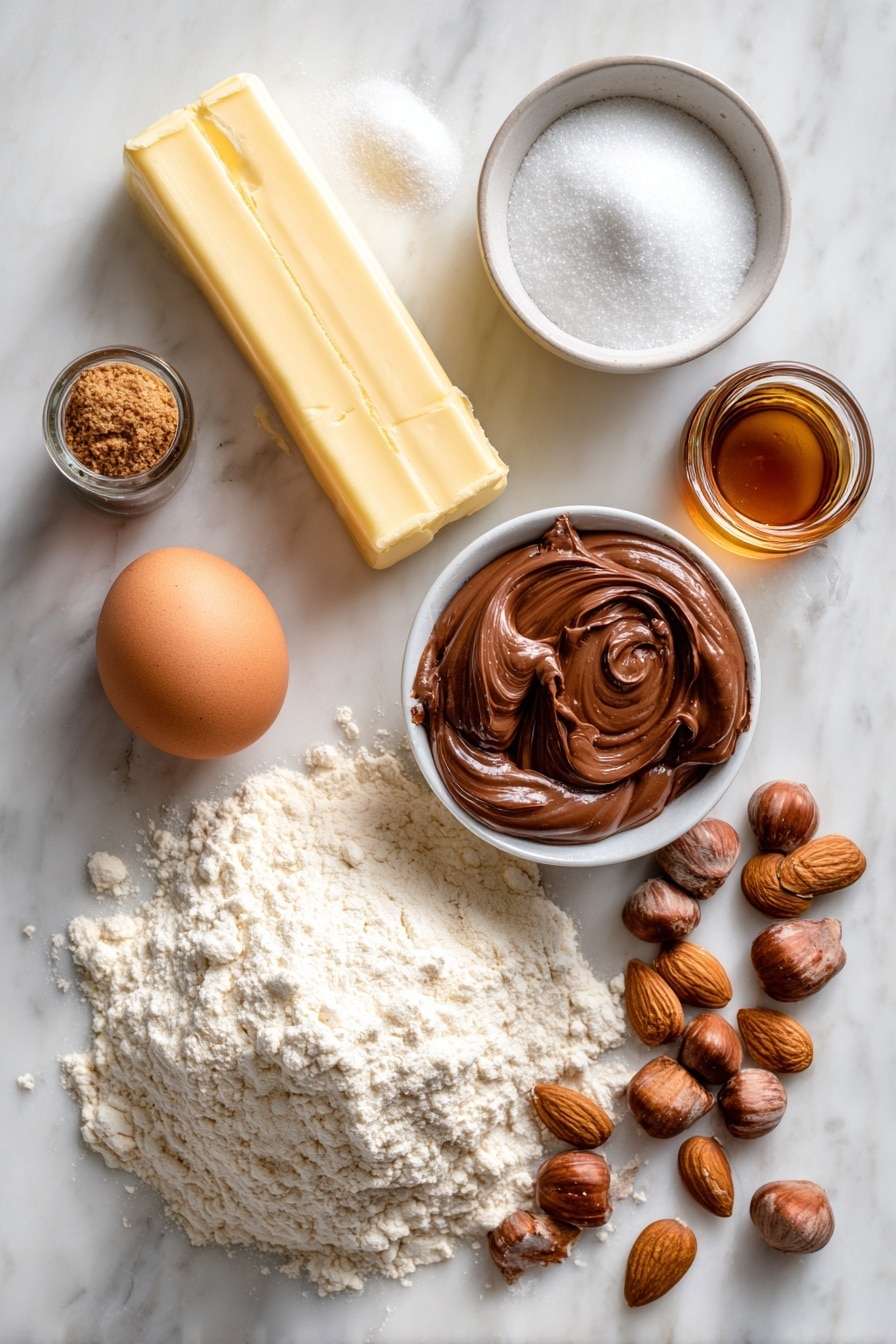
- Unsalted Butter: Using softened butter helps the dough cream nicely with the sugars, creating a light texture.
- White Sugar: Adds the perfect sweetness and helps with cookie structure.
- Brown Sugar: Keeps the cookies moist and gives a subtle caramel undertone.
- Egg: Binds the dough and adds richness.
- Vanilla Extract: Gives warmth and a lovely aromatic hint.
- Almond Extract: A small amount gives a surprising, delightful boost of flavor.
- Corn Starch: Helps keep the cookies tender and soft.
- Flour: Spoon and level it for accuracy to avoid dry or dense cookies.
- Baking Powder: Adds a little lift and helps that perfect cookie shape.
- Salt: Enhances all the flavors and balances the sweetness.
- Nutella: The gooey, chocolate-hazelnut star that goes right in the center of each cookie.
Variations
I love playing around with this Nutella Thumbprint Cookies Recipe to keep things interesting. Sometimes, I swap out the almond extract for a little orange zest or add chopped toasted hazelnuts into the dough for extra crunch. Don’t be afraid to make this recipe your own!
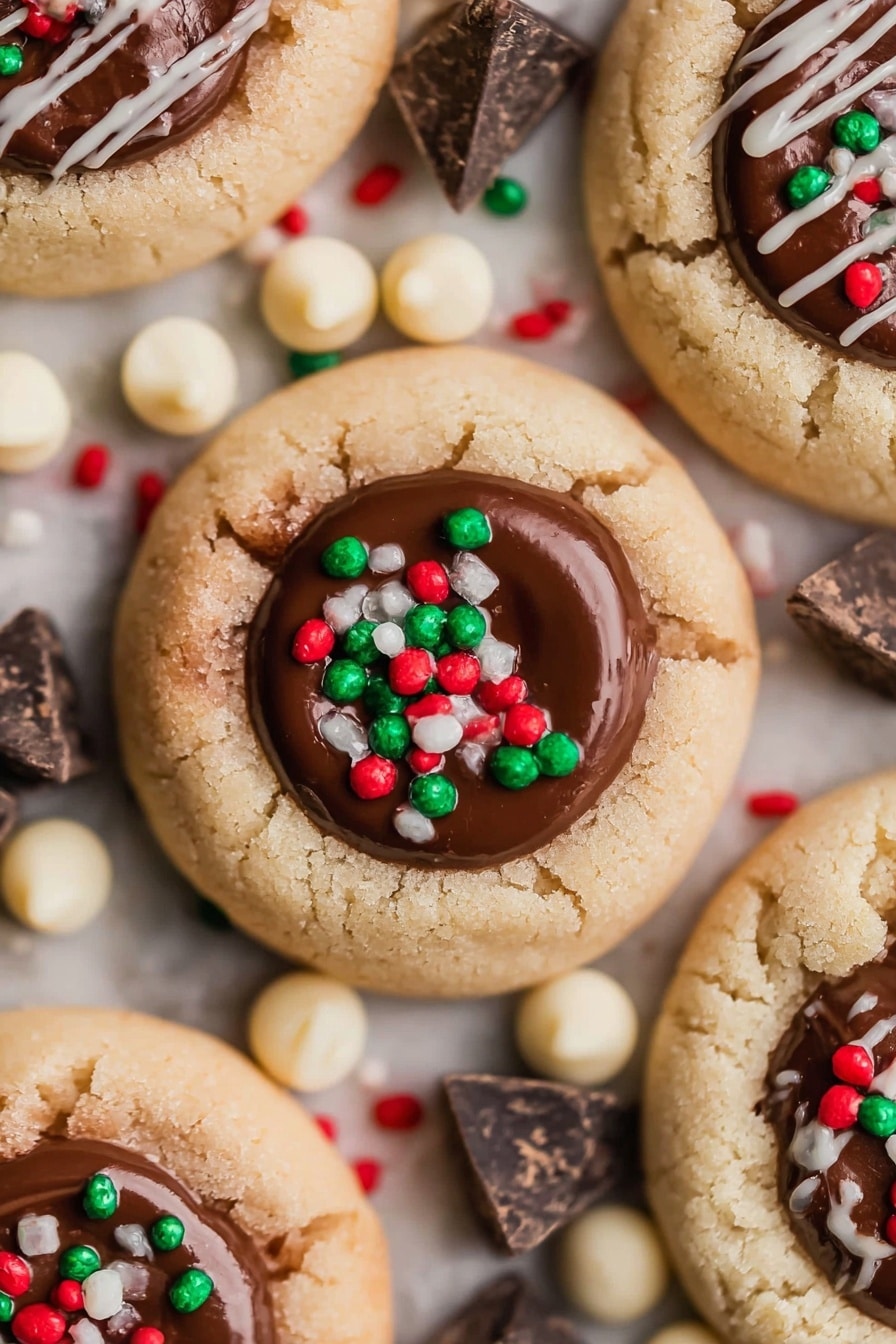
- Add a Nutty Twist: I sprinkled chopped toasted hazelnuts on top of the Nutella dollop before baking once, and my family went crazy for it.
- Flavor Swap: If you’re not a fan of almond extract, vanilla alone works beautifully or try a drop of peppermint for a festive twist.
- Gluten-Free Option: I’ve successfully subbed regular flour with a gluten-free blend, just be sure to check the mix ratios for your brand.
- Make It Mini: These cookies are delicious bite-sized, perfect for parties or gift trays.
How to Make Nutella Thumbprint Cookies Recipe
Step 1: Cream the Butter and Sugars
Start by beating the softened butter with both the white and brown sugars until the mixture is light and fluffy — this usually takes about 3 minutes with an electric mixer. This step is key because it gives your cookies that tender, melt-in-your-mouth texture. I learned that skipping this or rushing through it can make your cookies flat or dense, so take your time here!
Step 2: Add the Wet Ingredients
Next, beat in the egg, vanilla extract, and almond extract until fully incorporated. These are the flavor boosters that bring warmth to the dough, so don’t skimp out on good vanilla — it makes a big difference.
Step 3: Combine the Dry Ingredients
In a separate bowl, whisk together the flour, corn starch, baking powder, and salt. Adding corn starch is my little trick — it really helps keep the cookies soft. Then, gradually add the dry mix to the wet ingredients about a third at a time, beating just until combined to avoid overmixing. You can finish by pulling the dough together by hand if it feels a bit crumbly.
Step 4: Shape and Chill the Dough Balls
For the best results, scoop out about 1 ½ tablespoons of dough (roughly 22 grams each) and roll them into smooth balls. Then, roll each ball in sugar — this gives a slight crunch and a little sparkle to your cookies once baked. Press a thumbprint indentation in the center using the back of a teaspoon or your thumb. Chilling these dough balls in the fridge for about 30 minutes really cuts down on spreading and cracking while baking.
Step 5: Bake and Fill
Bake your chilled cookie dough balls on a parchment-lined baking sheet at 350°F (175°C) for 9-10 minutes. You want the edges to be set but the cookies should remain soft and barely golden on the bottom. Let them cool for 5-7 minutes — this is important so the cookies don’t disintegrate when you add the Nutella. Once slightly cooled, spoon about a teaspoon of Nutella into each thumbprint indentation. If you’re feeling fancy, add some sprinkles or drizzle melted white or dark chocolate on top.
Pro Tips for Making Nutella Thumbprint Cookies Recipe
- Use Room Temperature Butter: Softened butter creams better with sugar, giving your dough the perfect texture.
- Don’t Overmix: Once you add the dry ingredients, mix just enough to combine to keep cookies tender.
- Chill Those Dough Balls: I promise this stops your cookies from spreading too much and cracking as they bake.
- Careful with Nutella Filling: Add the Nutella after a short cooling so it doesn’t melt off the cookie and creates a nice thick dollop instead.
How to Serve Nutella Thumbprint Cookies Recipe
Garnishes
I often keep things simple by just dusting the cookie balls in granulated sugar before baking, but I love adding mini chocolate chips or rainbow sprinkles on top of Nutella for a festive vibe. Another favorite is drizzling a bit of melted white chocolate — it’s these small touches that make you feel like a pro baker.
Side Dishes
These cookies pair wonderfully with a cup of coffee, hot chocolate, or even a cold glass of milk. For brunch, I like to serve them alongside fresh fruit and a light yogurt parfait — a sweet finish to a cozy meal.
Creative Ways to Present
For holiday parties, I like to arrange these Nutella Thumbprint Cookies on a pretty platter with edible gold dust sprinkled lightly on top. Wrapping them individually in translucent cellophane bags tied with a cute ribbon makes a wonderful homemade gift. I even once baked mini versions for a cookie swap and they disappeared instantly!
Make Ahead and Storage
Storing Leftovers
I store leftover cookies in an airtight container at room temperature, layering them with parchment paper to prevent sticking. They stay perfectly soft and fresh for about four days—though honestly, they never last that long at my house!
Freezing
You can absolutely freeze the cookie dough balls before baking or freeze the baked cookies. For the dough, I shape and chill first, then freeze them on a tray before transferring to a zip-top bag. When baking from frozen, just add a couple of extra minutes to the baking time. Baked cookies freeze beautifully too — thaw for a few minutes at room temperature.
Reheating
To bring a leftover cookie back to life, I warm it in the microwave for about 10-15 seconds. It softens the cookie and makes the Nutella gooey again—not that I recommend reheating more than a couple at a time because who can resist fresh ones?
FAQs
-
Can I use a different chocolate spread instead of Nutella?
Absolutely! You can swap Nutella for any chocolate hazelnut spread or even a flavored almond or peanut butter spread for a unique twist. Just make sure the spread is thick enough to hold its shape in the thumbprint.
-
Do I need to chill the cookie dough before baking?
Chilling the cookie dough is highly recommended. It prevents the cookies from spreading too much, helps maintain the shape for that perfect indentation, and avoids cracks on the surface. Plus, chilling improves flavor and texture.
-
Can I make these cookies gluten-free?
Yes! Replace the all-purpose flour with a gluten-free flour blend that measures cup-for-cup. Be sure the blend contains xanthan gum or a similar binder for best results. Texture might be slightly different, but they’ll still taste amazing.
-
Why do my thumbprint cookies crack when baking?
Cracking usually happens if the dough is too dry or warmed up too much before baking. Using enough butter, chilling the dough balls properly, and being gentle when making the indentation helps prevent cracks. Rolling cookie dough balls in sugar also creates a nice barrier.
-
Can I make these cookies ahead of time for a party?
Definitely! You can prepare the dough balls and freeze them, then bake fresh the day of the party. Or bake the cookies ahead, fill with Nutella, and store them airtight at room temperature. They hold up well and taste freshly made.
Final Thoughts
This Nutella Thumbprint Cookies Recipe has become one of those treats I always keep in my regular baking rotation because it hits that sweet spot of simple yet special. I remember the first time I shared these at a family gathering—they disappeared so fast! I hope you enjoy baking and eating them as much as I do. Trust me, once you try these, you’ll have a new favorite cookie to make again and again.
Print
Nutella Thumbprint Cookies Recipe
- Prep Time: 10 minutes
- Cook Time: 10 minutes
- Total Time: 40 minutes
- Yield: 36 cookies
- Category: Dessert
- Method: Baking
- Cuisine: American
- Diet: Vegetarian
Description
Delightfully soft and chewy Nutella Thumbprint Cookies featuring a buttery dough filled with a rich, chocolatey Nutella center. These cookies are perfect for any occasion, providing a delightful combination of textures and a sweet treat that’s sure to satisfy Nutella lovers.
Ingredients
Cookie Dough
- 1 cup unsalted butter, softened (228 g, 2 sticks)
- 3/4 cup white sugar (166 g)
- 1/4 cup brown sugar (53 g)
- 1 large egg
- 1 tsp vanilla extract
- 1/4 tsp almond extract
- 1 tsp corn starch
- 2 3/4 cups all-purpose flour, spooned and leveled (343 g)
- 1/2 tsp baking powder
- 1/4 tsp salt
Filling
- 3/4 cup Nutella (or preferred chocolate hazelnut spread)
Instructions
- Cream Butter and Sugars: Using an electric hand mixer or stand mixer, beat the softened butter along with white and brown sugars until the mixture becomes light and fluffy, which should take about 3 minutes. This step ensures a smooth and airy cookie base.
- Add Eggs and Extracts: Mix in the egg, vanilla, and almond extract until fully incorporated into the creamed butter and sugar mixture, creating a uniform dough.
- Combine Dry Ingredients: In a separate bowl, whisk together the flour, corn starch, baking powder, and salt. Gradually add this flour mixture to the wet ingredients in thirds, mixing just until combined each time. Avoid overmixing to keep the cookies tender.
- Form Cookie Dough Balls: Shape the dough into approximately 1 1/2 tablespoon (22 grams) balls. Roll each ball into sugar to coat, then use the back of a rounded teaspoon to press a thumbprint indentation in the center. You may also use your thumb directly for this step.
- Chill the Dough: Refrigerate the prepared cookie dough balls on a parchment-lined baking sheet for about 30 minutes. Chilling helps prevent cracking and maintains shape during baking.
- Bake Cookies: Preheat the oven to 350°F (175°C). Bake the chilled cookie dough on the lined sheet for 9-10 minutes, or until the edges are set and bottoms turn a light golden brown while centers remain soft.
- Add Nutella Filling: Allow the cookies to cool for 5-7 minutes on the baking sheet, then spoon about 1 teaspoon of Nutella into each thumbprint indentation. Optionally, decorate with sprinkles or drizzle with white or dark chocolate for added flair.
- Cool Completely: Transfer the cookies to a wire rack to cool completely before serving to allow the filling to set properly.
Notes
- These soft and chewy cookies are an ideal treat for Nutella enthusiasts.
- The buttery cookie base pairs perfectly with the rich, chocolate-hazelnut center.
- Add sprinkles or chocolate drizzle for a festive touch.
- Perfect for holiday exchanges, gifts, or just a sweet indulgence anytime.
Nutrition
- Serving Size: 1 cookie
- Calories: 138 kcal
- Sugar: 9 g
- Sodium: 22 mg
- Fat: 7 g
- Saturated Fat: 5 g
- Unsaturated Fat: 1.3 g
- Trans Fat: 0.2 g
- Carbohydrates: 17 g
- Fiber: 1 g
- Protein: 2 g
- Cholesterol: 18 mg


