

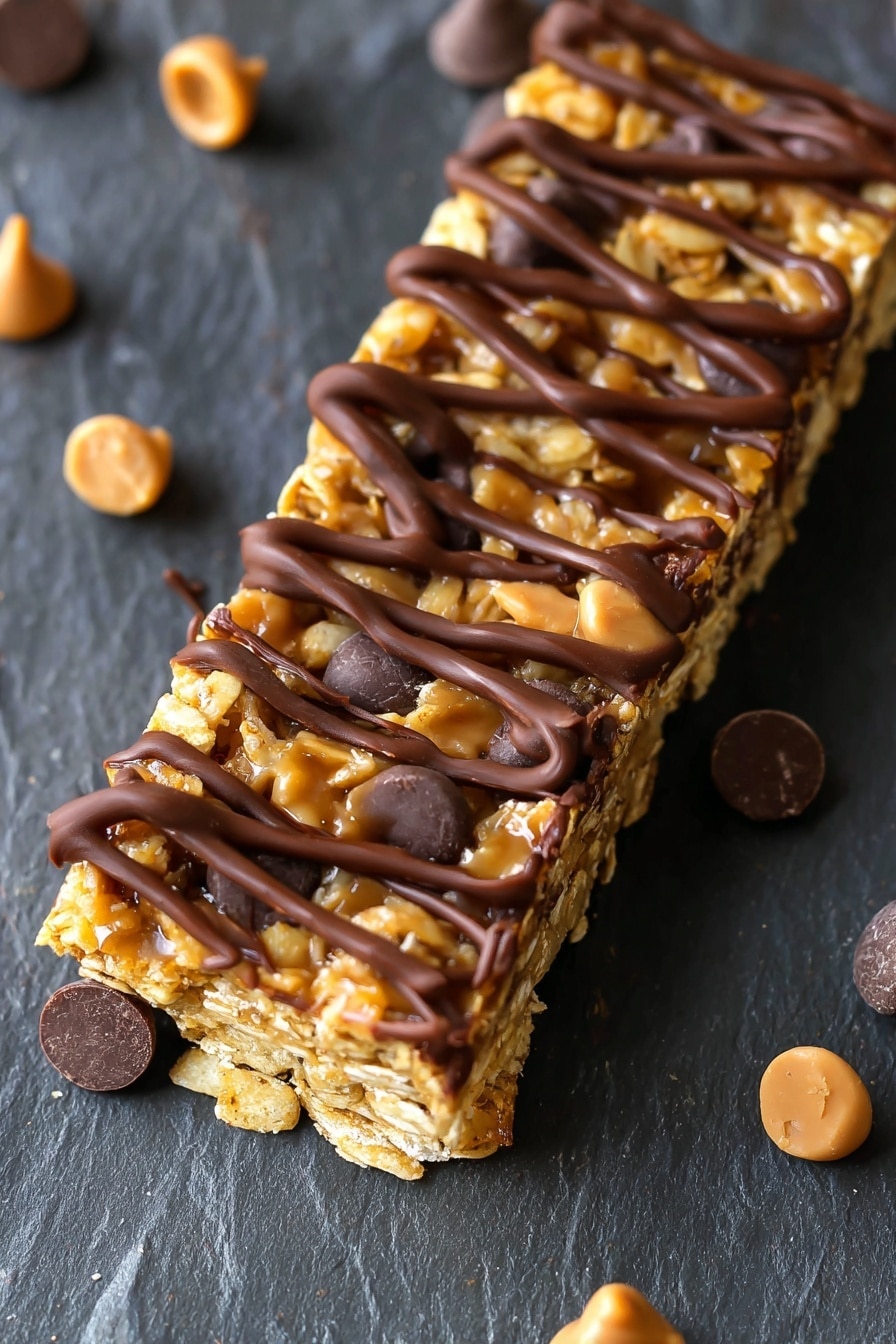
If you’re like me and sometimes crave a delicious, wholesome snack without firing up the oven, you’re going to adore this No Bake Peanut Butter Granola Bars Recipe. It’s a total game changer when you want something quick, satisfying, and packed with flavor. Trust me, once you try these chewy, chocolatey bars loaded with peanut butter and oats, they’ll become your go-to for breakfast on the run or an afternoon pick-me-up.
Why You’ll Love This Recipe
- Super Simple: You don’t need an oven or fancy equipment, just mix, chill, and cut.
- Customizable: Swap out add-ins to fit your taste — chocolate chips, nuts, or even dried fruit.
- Great for On-the-Go: These bars hold up well and make a perfect portable snack or breakfast.
- Kid- and Adult-Approved: My family goes crazy for these, and I bet yours will too!

Ingredients You’ll Need
One of the best parts about this No Bake Peanut Butter Granola Bars Recipe is how straightforward the ingredients are — pantry staples come together to create something truly satisfying. I always recommend using natural peanut butter for the best flavor and health benefits, but I’ll share some tips on what else works.

- Peanut butter: I usually go creamy because it blends smoothly, but chunky adds a lovely texture if you like a bit of crunch.
- Honey: Acts as the perfect natural sweetener and helps bind everything together.
- Old fashioned rolled oats: Give these bars their hearty chew — instant oats won’t work as well here.
- Shredded coconut: Adds subtle richness and a hint of tropical flavor; unsweetened usually fits best.
- Mini chocolate chips: These little bits make every bite a treat — or swap in your favorite add-ins like nuts or dried fruit.
- Melted chocolate (optional): For drizzling on top, adding a luscious finish that makes these bars feel extra special.
Variations
I’m a big fan of tweaking recipes to keep things fresh, and this No Bake Peanut Butter Granola Bars Recipe is super forgiving when it comes to swaps. I encourage you to make it your own based on what you have on hand and what your taste buds are craving.
- Swap nut butters: I once tried almond butter instead of peanut butter for a milder taste, and it was a hit with guests who have peanut allergies.
- Change up the add-ins: Try chopped nuts, dried cranberries, or sunflower seeds for added texture and flavor.
- Make it vegan: Use maple syrup or agave instead of honey, and pick dairy-free chocolate chips.
- Boost protein: Stir in a tablespoon of chia seeds or hemp seeds for an extra health kick.
How to Make No Bake Peanut Butter Granola Bars Recipe
Step 1: Melt the Peanut Butter and Honey Together
Start by placing your peanut butter and honey into a microwave-safe bowl. Heat them in 20-second bursts, stirring in between until everything is smooth and melted. This is my favorite part because I love watching those sticky, golden ingredients blend into a lush sauce. Just don’t overheat — you want it warm and runny, not scorched.
Step 2: Mix in Oats and Coconut
Once your peanut butter-honey mixture is silky, add in the rolled oats and shredded coconut. Stir everything up until the oats are completely coated. You’ll notice how the coconut adds a bit of chewiness and subtle flavor that complements the peanut butter so well.
Step 3: Fold in the Chocolate Chips
Next, toss in your mini chocolate chips (or any add-ins you chose). I once used a mix of mini peanut butter chips and chocolate chips, which gave these bars an irresistible peanut butter chocolate combo — highly recommend! Just stir gently so the chips distribute evenly without melting prematurely.
Step 4: Press the Mixture into a Pan
Line an 8×8-inch square baking pan with wax paper, then dump your mixture inside. The fun part is pressing it down firmly — I use the flat bottom of a measuring cup or just my hands. Tightly packing it down not only helps the bars hold together but makes them so dense and satisfying. Don’t be shy about applying good pressure here.
Step 5: Chill Overnight
This step requires patience, but it’s worth it: cover your pan with plastic wrap or foil and refrigerate it overnight, or at least for a few hours until the mixture firms up. I learned this the hard way — trying to slice these bars too soon leads to crumbly messes, so don’t skip the chill time!
Step 6: Slice and Optional Chocolate Drizzle
After your bars are firm, use a sharp knife to cut them into squares or rectangles. For a decadent finish, melt a bit of chocolate and drizzle it over each bar. Let the chocolate set for about 15-20 minutes in the fridge, then you’re ready to enjoy that perfect bite of peanut butter, oats, and chocolate. I absolutely love how this drizzle takes the bars from simple snack to a delightful treat.
Pro Tips for Making No Bake Peanut Butter Granola Bars Recipe
- Use Natural Peanut Butter: It melts smoother and keeps the bars from tasting too oily or artificial.
- Press Firmly: The denser you pack the mixture, the less crumbly your bars will be after slicing.
- Don’t Skip the Chill: Refrigerate long enough so the bars set perfectly — cutting too early is a recipe for mess.
- Customize Mix-ins Carefully: If you add wetter ingredients (like dried fruits), reduce honey slightly to avoid sogginess.
How to Serve No Bake Peanut Butter Granola Bars Recipe
Garnishes
I like to garnish these bars with just a simple drizzle of melted chocolate or a sprinkle of flaky sea salt — it amps up the sweet-salty combo beautifully. Sometimes I dust a little cocoa powder on top when serving to guests for a fancier touch.
Side Dishes
Pair these granola bars with a cold glass of milk or a cup of your favorite coffee for a quick breakfast. They’re also fantastic alongside fresh fruit or a yogurt parfait if you want a more substantial snack time.
Creative Ways to Present
For parties or gifting, I like wrapping each bar in parchment paper tied with twine — it looks charming and keeps them fresh. Layering colorful parchment in a pretty box makes a thoughtful homemade gift that always gets rave reviews.
Make Ahead and Storage
Storing Leftovers
I keep these granola bars stored in an airtight container in the fridge to maintain their firmness and freshness. They’ll stay good for up to a week, which is perfect for me because they tend to disappear fast in my house!
Freezing
Freezing works great too — I wrap individual bars in plastic wrap and pop them in a freezer-safe bag. When I want a quick snack, I just thaw one on the counter for 15-20 minutes or enjoy it straight from the freezer for a chilly treat.
Reheating
Sometimes I like to warm a bar slightly — just 10-15 seconds in the microwave softens the peanut butter and makes it taste freshly made. Just don’t microwave too long or the bars can get oily or lose their shape.
FAQs
-
Can I use natural peanut butter in this No Bake Peanut Butter Granola Bars Recipe?
Absolutely! I actually prefer natural peanut butter because it tends to melt more smoothly and gives the bars a cleaner, richer peanut flavor. Just make sure it’s well-stirred before you melt it.
-
How long do no bake peanut butter granola bars last?
When stored in an airtight container in the fridge, these bars stay fresh for about a week. If you want them to last longer, freezing is a great option, and individually wrapped bars will keep well for up to 3 months.
-
Can I substitute honey for another sweetener?
Yes! Maple syrup or agave nectar work well as vegan alternatives. Just keep in mind they might make the bars a bit softer, so chilling longer helps.
-
What’s the best way to cut these bars without them crumbling?
Make sure the bars are completely chilled and firm before cutting. Using a sharp knife and pressing down in one steady motion rather than a sawing action will give you neat edges.
Final Thoughts
This No Bake Peanut Butter Granola Bars Recipe has been a true kitchen lifesaver for me. Whether I’m juggling a busy morning or need a quick snack the kids will actually eat without complaints, these bars deliver every time. I hope you enjoy making them as much as I enjoy sharing them — they’re simple, flexible, and just darn tasty. Give them a try, and I promise they’ll become one of your favorite easy homemade snacks too!
Print
No Bake Peanut Butter Granola Bars Recipe
- Prep Time: 10 minutes
- Cook Time: 0 minutes
- Total Time: 2 hours 10 minutes
- Yield: 10 bars
- Category: Snack
- Method: No-Cook
- Cuisine: American
- Diet: Gluten Free
Description
These Easy Homemade Granola Bars are a no-bake, chewy snack made with creamy peanut butter, honey, rolled oats, shredded coconut, and mini chocolate chips. Perfect for a quick breakfast or on-the-go snack, they require minimal prep and refrigeration to firm up.
Ingredients
Main Ingredients
- 1 cup Peanut butter (creamy or chunky)
- 1/2 cup Honey
- 2 1/2 cups Old fashioned rolled oats
- 1/4 cup Shredded coconut
- 1/3 cup Mini chocolate chips (or other add-ins of your choice)
Optional
- 1/4 cup Melted chocolate (for drizzling)
Instructions
- Heat Peanut Butter and Honey: In a microwave-safe mixing bowl, combine the peanut butter and honey. Heat in 20-second increments in the microwave until the peanut butter has fully melted. Stir everything together until the mixture is smooth.
- Add Dry Ingredients: Add the rolled oats and shredded coconut to the peanut butter and honey mixture. Mix until thoroughly combined.
- Incorporate Chocolate Chips: Stir in the mini chocolate chips (or your chosen add-ins) evenly throughout the mixture.
- Transfer to Pan: Dump the mixture into an 8×8 inch square pan lined with wax paper.
- Press Down Mixture: Use your hands or the flat base of a measuring cup to flatten the oat mixture tightly and evenly in the pan.
- Refrigerate: Cover the pan with saran wrap or foil and refrigerate overnight or until the mixture is firm to the touch.
- Cut into Bars: Remove from fridge and use a sharp knife to cut the mixture into 10 bars.
- Optional Chocolate Drizzle: Drizzle melted chocolate over each bar, let the chocolate set and harden before serving.
Notes
- This recipe is quick and easy, requiring no baking.
- Gluten-free friendly if using gluten-free oats.
- Peanut butter choice can be creamy or chunky per preference.
- Customize add-ins like nuts, dried fruits, or different chips as desired.
- Store bars in refrigerator to keep firm and fresh.
Nutrition
- Serving Size: 1 bar
- Calories: 343 kcal
- Sugar: 23 g
- Sodium: 130 mg
- Fat: 18 g
- Saturated Fat: 5 g
- Unsaturated Fat: 13 g
- Trans Fat: 0 g
- Carbohydrates: 40 g
- Fiber: 4 g
- Protein: 9 g
- Cholesterol: 0 mg

