
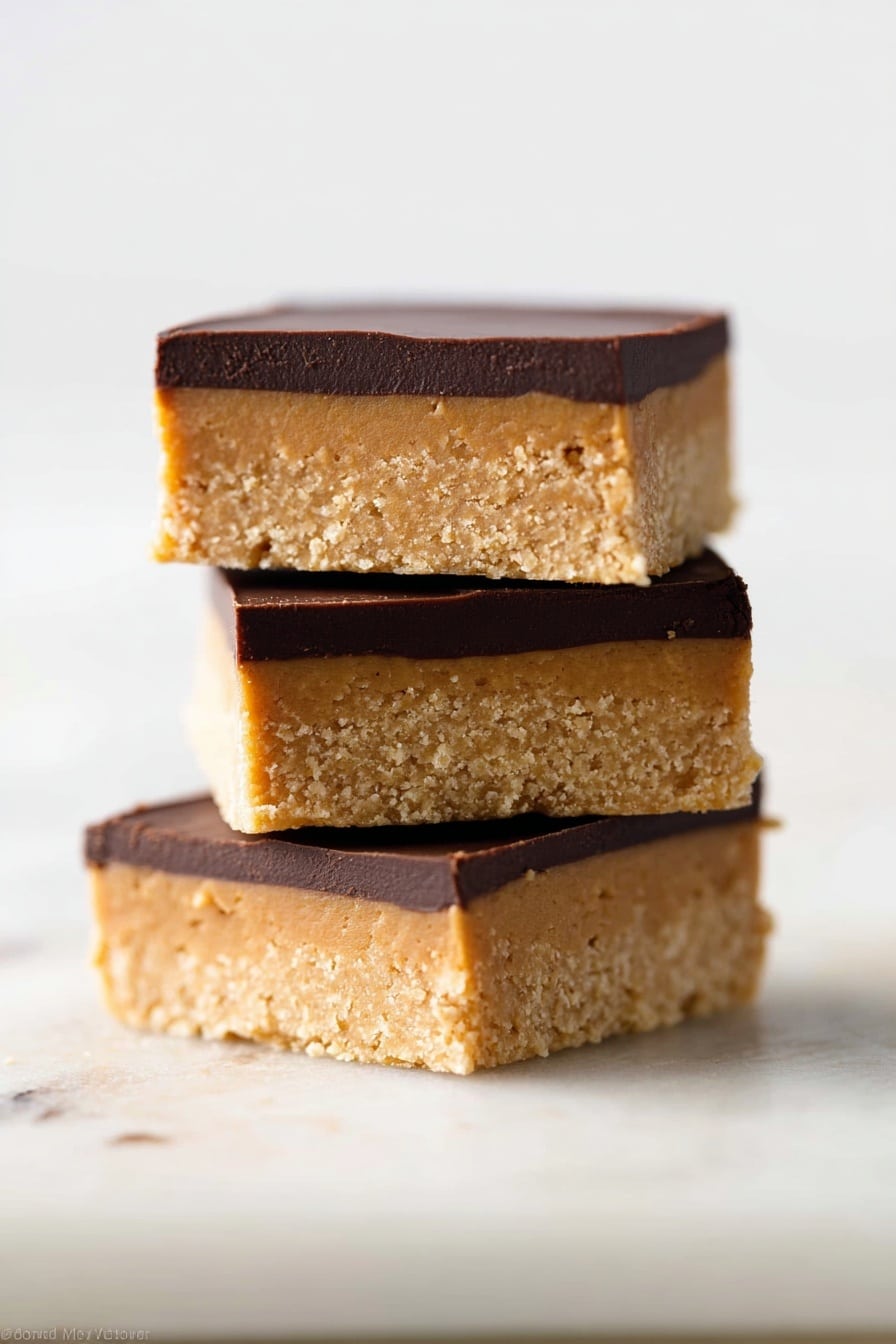
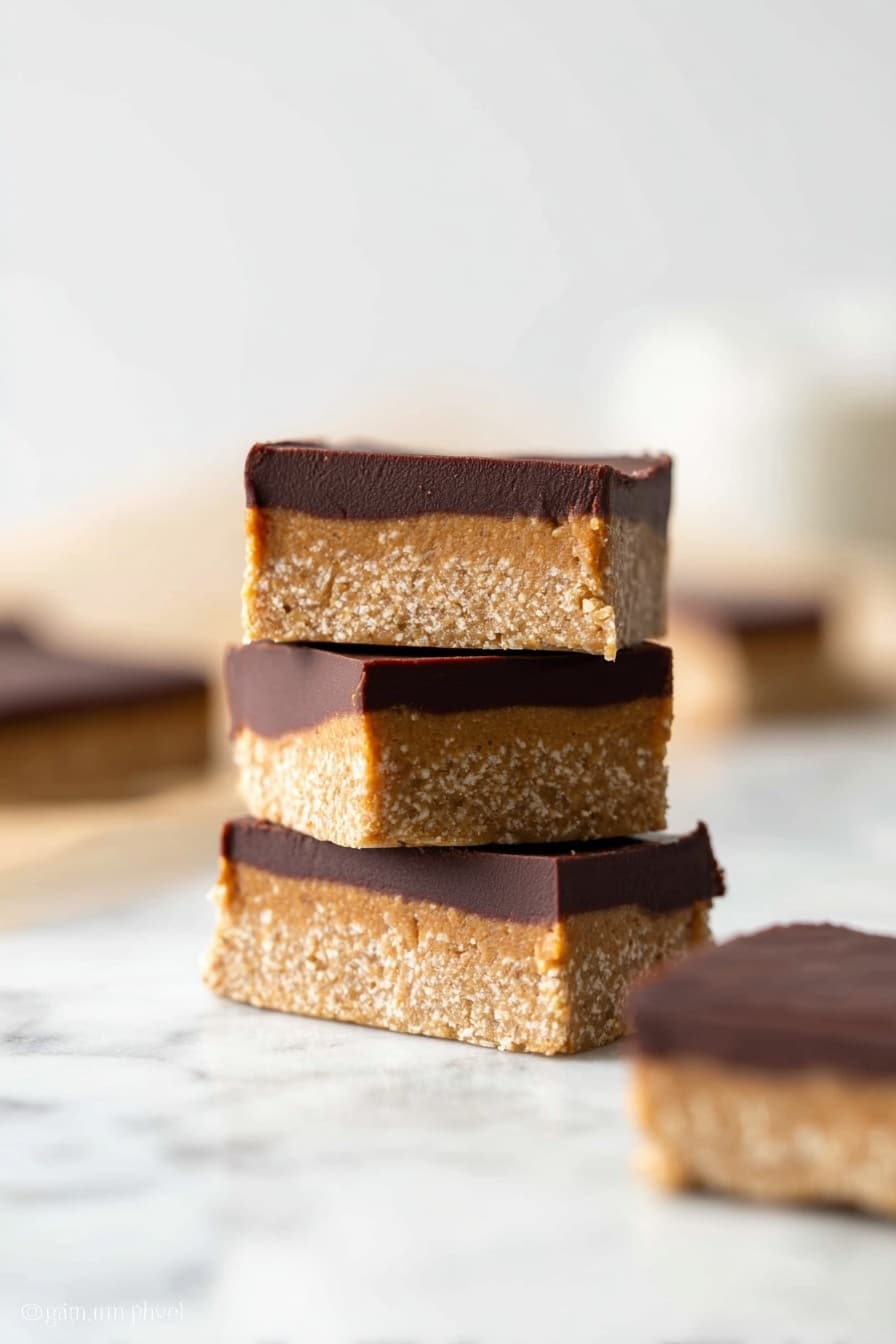
If you love the classic combo of peanut butter and chocolate but want something quick and utterly satisfying, you’re in the right place. I absolutely adore this No-Bake Chocolate Peanut Butter Bars Recipe because it’s incredibly easy, requires just a handful of ingredients, and doesn’t even need an oven—perfect for those lazy afternoons or last-minute dessert cravings. Trust me, once you try these bars, you’ll wonder why you ever fussed with complicated recipes!
Why You’ll Love This Recipe
- Super Quick Prep: You can get these bars ready in just 10 minutes, making them my go-to when time’s tight.
- No Oven Needed: Perfect for when it’s hot outside or you want to avoid heating up the kitchen.
- Crowd-Pleaser: My family goes crazy for these sweet, peanut buttery bars every single time.
- Simple Ingredients: Five easy-to-find pantry staples come together for a decadent treat.

Ingredients You’ll Need
The beauty of this No-Bake Chocolate Peanut Butter Bars Recipe is that the ingredients all work harmoniously to create layers of texture and flavor. The buttery graham cracker crust balances perfectly with the creamy peanut butter and silky chocolate topping. When I shop for these, I always grab good quality peanut butter and chocolate chips because they truly elevate the final taste.
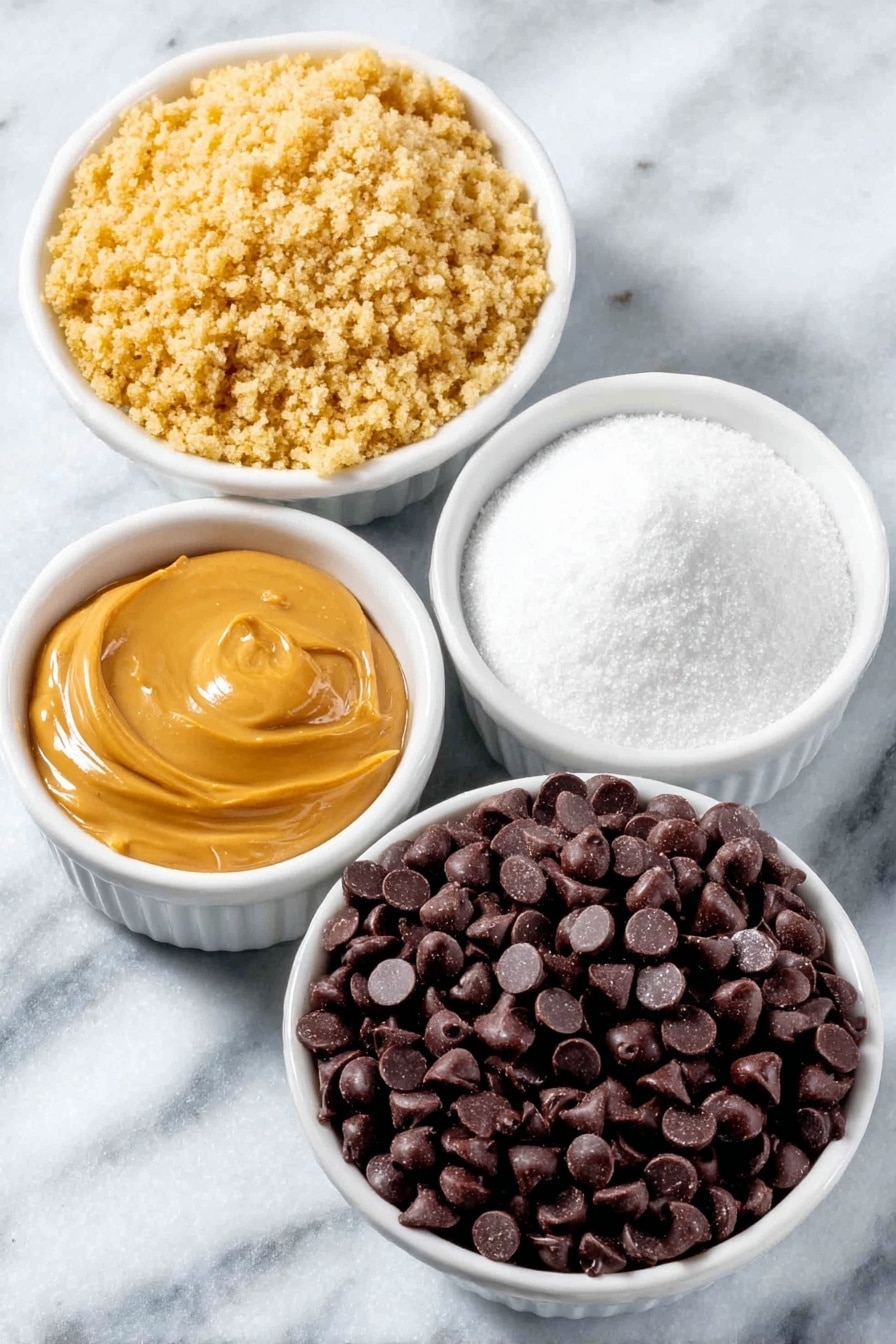
- Salted butter: Melting it adds richness and helps bind the crust uniquely—don’t skip the salted version for that slight savory contrast.
- Graham cracker crumbs: I like to crush whole sheets myself for freshness and better texture, but store-bought crumbs work, too.
- Confectioners’ sugar: This fine sugar sweetens evenly without graininess, making your bars super smooth.
- Creamy peanut butter: Use creamy for that perfect spreadable consistency; natural peanut butter with oil separation can change texture.
- Semi-sweet chocolate chips: They give the perfect bittersweet chocolate layer, balancing the peanut butter’s sweetness without being overpowering.
Variations
I love making this recipe my own by switching things up based on mood or who I’m serving. You’ll enjoy playing around with different nut butters or even adding a flair with mix-ins. Here’s what’s worked for me.
- Almond Butter Swap: If peanut butter isn’t your thing, almond butter adds a nice slightly sweeter twist my friends have loved.
- Chunky Peanut Butter: Adding some texture with chunky peanut butter is a game-changer—adds a lovely crunch inside the rich bars.
- Dark Chocolate Chips: For a richer, less sweet chocolate layer, try dark chocolate chips instead of semi-sweet. I once made this for a dinner party, and everyone asked for seconds.
- Sea Salt Topping: Sprinkle a tiny pinch of flaky sea salt on top before chilling to balance the sweetness with a subtle salty punch.
How to Make No-Bake Chocolate Peanut Butter Bars Recipe
Step 1: Prepare Your Pan and Crust Mixture
First things first, line your 8-inch or 9-inch square baking pan with foil or parchment paper. This step is a lifesaver because it allows you to lift out bars easily once they’re set. Next, mix the melted salted butter, graham cracker crumbs, and confectioners’ sugar in a bowl. Stir in one cup of creamy peanut butter until everything is combined evenly. Press this mixture firmly and evenly into your lined pan—think of it like creating a solid base for the magic on top. I like to use the bottom of a glass to pack it down nicely.
Step 2: Melt Chocolate and Remaining Peanut Butter
Now, melt the final two tablespoons of peanut butter with the semi-sweet chocolate chips. I usually do this in the microwave in short bursts (20 seconds at a time) stirring in-between, or you can melt them gently on the stove using a double boiler. Stir until smooth and glossy. Pour this heavenly chocolate-peanut butter mixture over the crust layer, spreading it evenly with a spatula. This step feels like magic—after a bit of stirring, two simple ingredients become rich, silky frosting!
Step 3: Chill and Serve
Pop the pan into your fridge and chill for at least two hours so the bars can set firmly. I learned the hard way that cutting too soon means a messy crumble. When ready, let the bars sit out for about 10 minutes to soften just enough, then slice into squares. These bars are best served chilled but are perfectly enjoyable at room temp for a couple of hours, especially if you’re entertaining.
Pro Tips for Making No-Bake Chocolate Peanut Butter Bars Recipe
- Use Room Temperature Butter: I find melting room temp butter evenly prevents lumps and helps the crust bind better.
- Press Crust Firmly: Using a glass or your fingers to pack the crust tightly keeps the bars from falling apart.
- Microwave Chocolate Gently: Patience really pays off here—I heat chocolate in short bursts to avoid burning and get that smooth texture.
- Cut Bars After Chilling: I always wait until fully chilled—cutting early means crumbly bars, and no one wants that mess.
How to Serve No-Bake Chocolate Peanut Butter Bars Recipe
Garnishes
When I serve these bars, I like to sprinkle a tiny pinch of flaky sea salt on top right after spreading the chocolate layer—it brings out the flavors beautifully. Sometimes I add chopped roasted peanuts or even a drizzle of melted white chocolate on top for a fancy look. These simple touches make a big impression, especially if you’re gifting or bringing them to a party.
Side Dishes
These bars are pretty rich, so I usually pair them with something light and fresh, like some crisp apple slices or a simple berry salad. It’s a perfect balance to the decadent chocolate peanut butter combo. My family also loves a scoop of vanilla ice cream on the side for an indulgent treat.
Creative Ways to Present
For special occasions, I’ve cut the bars into bite-sized squares and arranged them on a tiered dessert tray—it’s eye-catching and perfect for sharing. Another fun idea is layering them in clear jars as individual desserts, topped with a little whipped cream and a sprinkle of cocoa powder. Your guests will think you spent hours on presentation!
Make Ahead and Storage
Storing Leftovers
I store leftover bars tightly wrapped in plastic wrap or in an airtight container in the fridge. They last up to a week this way and stay just as delicious. I’ve found they keep their texture better when chilled, so don’t skip refrigerating, especially in warm climates.
Freezing
If you want to make a big batch ahead, these bars freeze amazingly well. I cut them into squares, place parchment between layers, and freeze in an airtight container. When I’ve defrosted them, they held their texture and tasted fresh—just let them thaw in the fridge overnight for best results.
Reheating
Since these bars are best eaten chilled or at room temperature, reheating isn’t usually necessary. But if you prefer them a bit softer, I pop a bar in the microwave for about 10 seconds—just enough to soften without melting the chocolate layer too much.
FAQs
-
Can I use natural peanut butter in this recipe?
You can use natural peanut butter, but keep in mind it tends to separate and may change the texture of your bars, making them a bit less firm. If you do choose natural, mix it well beforehand and be prepared for a slightly softer result.
-
Do I need to use salted butter?
Salted butter adds a nice contrast to the sweetness and enriches the flavor, but if you only have unsalted, you can use it and just add a tiny pinch of salt to the crust mixture. I find this helps balance the taste nicely.
-
Can I substitute graham cracker crumbs with another crumb?
Absolutely! While graham crackers give that classic flavor, you can try digestive biscuits, vanilla wafers, or even crushed pretzels for a salty twist. Just keep in mind the flavor and texture will vary slightly.
-
How long do these bars keep?
Stored properly in the fridge in an airtight container, these bars stay fresh for up to one week. For longer storage, freezing is your best bet.
-
Can I make mini versions of these bars?
You definitely can! Use a mini muffin tin lined with paper cups to portion out the crust and chocolate layers for bite-sized treats. Just watch the chilling time—they may set a bit quicker.
Final Thoughts
This No-Bake Chocolate Peanut Butter Bars Recipe has become a staple in my dessert lineup because it’s fuss-free, insanely delicious, and perfect for any occasion. I love sharing it with friends because they can’t believe how decadent it tastes with so little effort. Give it a try—you’ll have a new favorite in no time, and I’m sure your family and friends will be asking you to make them again and again!
Print
No-Bake Chocolate Peanut Butter Bars Recipe
- Prep Time: 10 minutes
- Cook Time: 0 minutes
- Total Time: 2 hours 10 minutes
- Yield: 20 to 24 squares
- Category: Dessert
- Method: No-Cook
- Cuisine: American
Description
These No-Bake Chocolate Peanut Butter Bars are a rich and indulgent treat made with a simple combination of melted butter, graham cracker crumbs, confectioners’ sugar, creamy peanut butter, and semi-sweet chocolate chips. Perfect for those who want a quick, no-bake dessert that doesn’t compromise on flavor, these bars feature a crunchy peanut butter base topped with a smooth chocolate layer, chilled to firm perfection.
Ingredients
Base Layer
- 1/2 cup (8 Tbsp; 113g) salted butter, melted
- 1 cup (120g) graham cracker crumbs (about 8 full sheet graham crackers)
- 2 cups (240g) confectioners’ sugar
- 1 cup (250g) creamy peanut butter
Chocolate Topping
- 1 cup + 2 Tablespoons (280g) creamy peanut butter, divided (use 2 tablespoons for topping)
- 1 cup (180g) semi-sweet chocolate chips
Instructions
- Prepare the pan: Line an 8-inch or 9-inch square baking pan with aluminum foil or parchment paper to prevent sticking and make removal easier. Set aside.
- Make the base layer: In a medium bowl, mix the melted butter, graham cracker crumbs, and confectioners’ sugar together until evenly combined. Stir in 1 cup (250g) of creamy peanut butter until the mixture is uniform. Press this mixture evenly into the prepared baking pan to form a firm base layer.
- Prepare the chocolate topping: Melt the remaining 2 tablespoons of peanut butter with the semi-sweet chocolate chips either in the microwave or on the stove. Stir continuously until the mixture is smooth and fully combined.
- Assemble the bars: Spread the melted chocolate and peanut butter mixture evenly over the peanut butter base layer in the pan.
- Chill and set: Refrigerate the bars until completely firm, which takes at least 2 hours. For best cutting and serving, let the bars sit at room temperature for about 10 minutes before slicing into 20-24 squares. You may also leave them out for a few hours at room temperature while serving.
- Store leftovers: Cover any leftover bars tightly and keep refrigerated for up to 1 week to maintain freshness.
Notes
- These no-bake bars require no oven and come together quickly with simple ingredients.
- You can substitute salted butter with unsalted and add a pinch of salt if desired.
- Ensure the bars are fully chilled before slicing for cleaner cuts.
- Store bars in an airtight container to maintain texture and flavor.
- For a nut-free version, substitute peanut butter with sunflower seed butter.
Nutrition
- Serving Size: 1 bar (approx. 1/24th of recipe)
- Calories: 220 kcal
- Sugar: 18 g
- Sodium: 110 mg
- Fat: 14 g
- Saturated Fat: 5 g
- Unsaturated Fat: 8 g
- Trans Fat: 0 g
- Carbohydrates: 22 g
- Fiber: 1 g
- Protein: 4 g
- Cholesterol: 15 mg


