
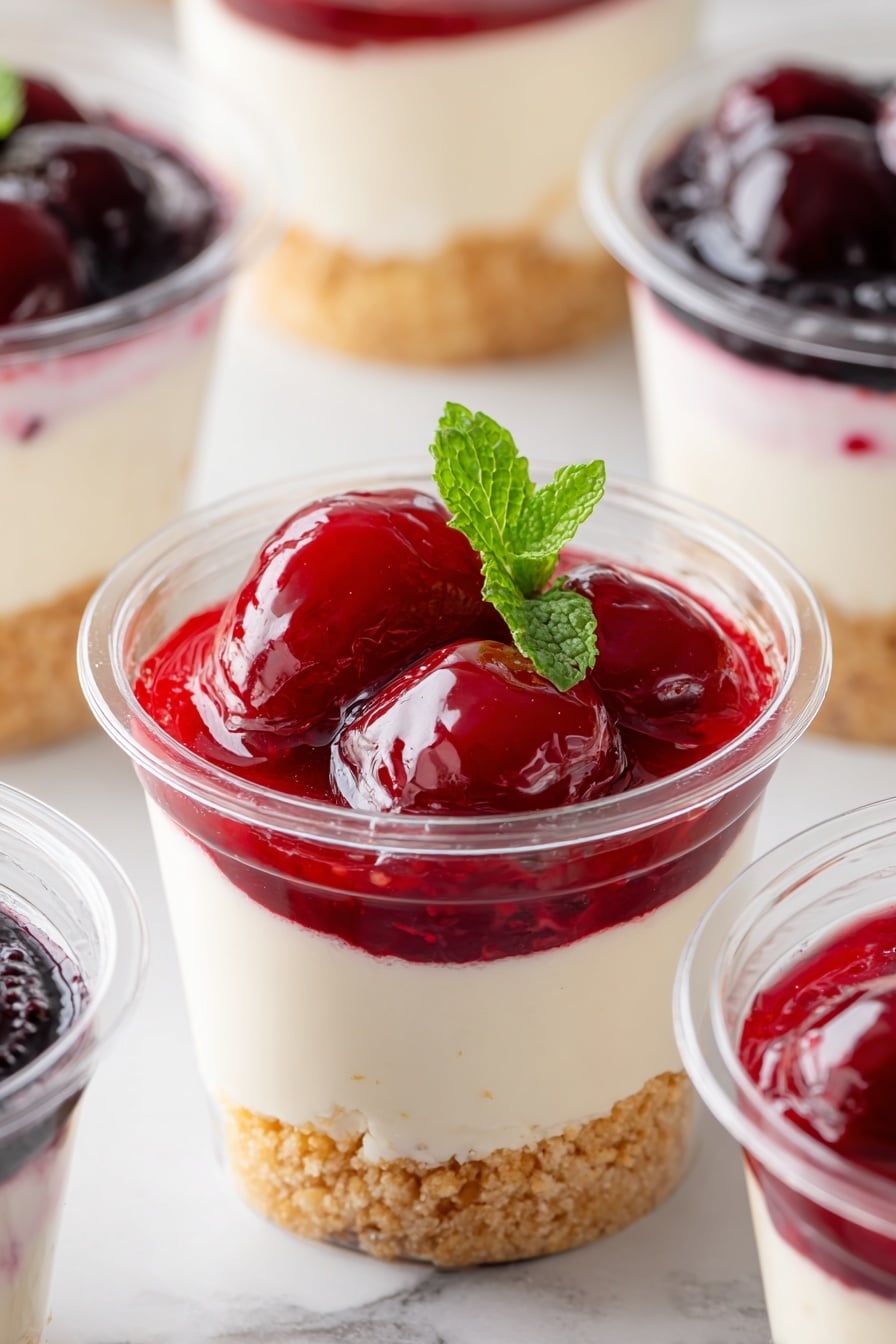
If you’re anything like me and love desserts that come together quickly without firing up the oven, you’re going to adore this No-Bake Cheesecake Cups Recipe. It’s a simple, fuss-free way to enjoy that classic creamy cheesecake flavor with a delightful graham cracker base, all portioned perfectly into cute little cups. Whether you’re hosting a last-minute get-together or just want a sweet treat without the hassle, these cheesecake cups are my go-to fix – and they always impress!
Why You’ll Love This Recipe
- No oven needed: This recipe skips baking entirely, making it perfect for warm days or quick desserts.
- Simple ingredients: You only need six everyday ingredients that come together beautifully.
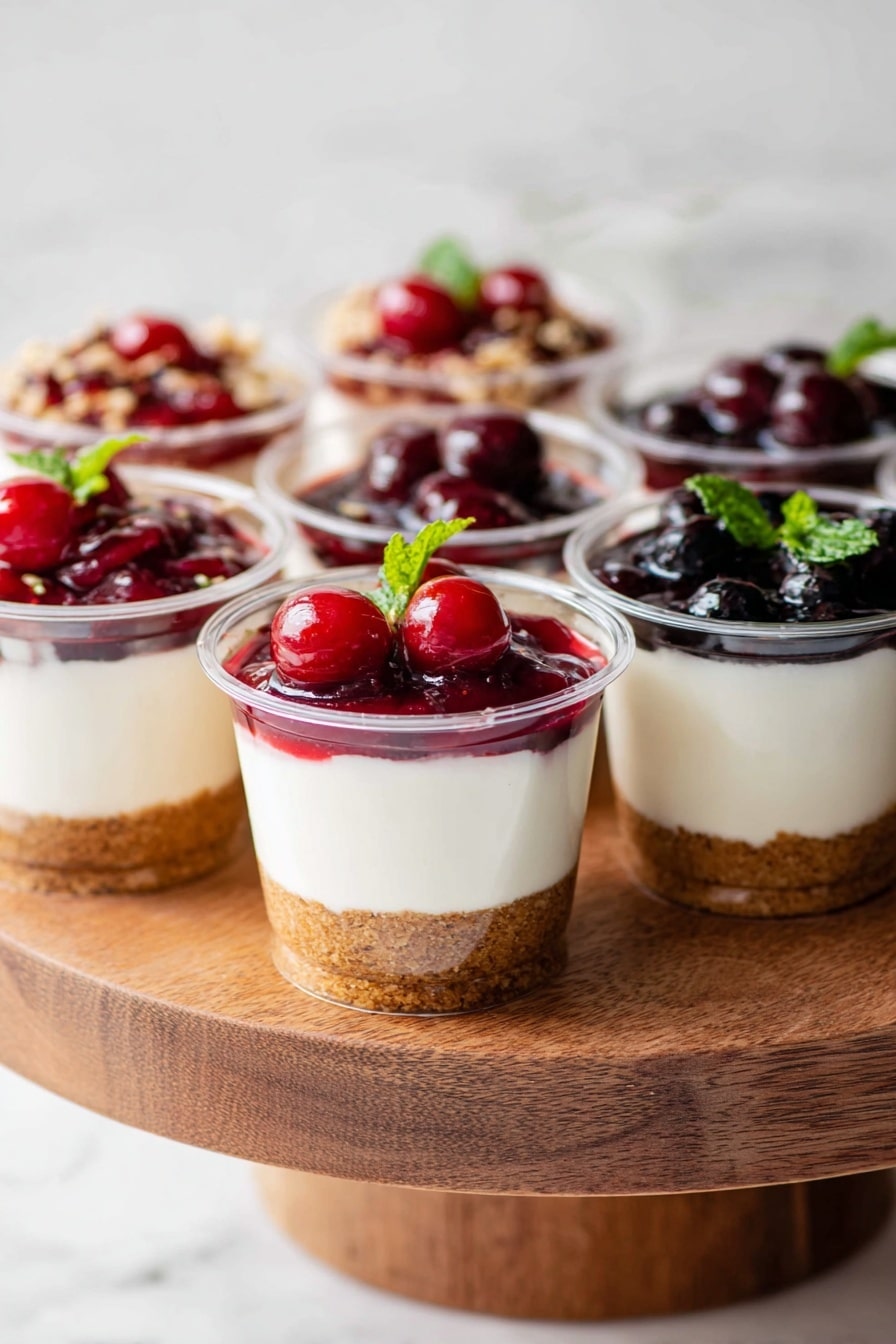
- Perfectly portioned: Individual cups mean no cutting or messy servings, just grab and enjoy.
- Versatile toppings: Customize with your favorite fruit toppings or chocolate for endless variations.

Ingredients You’ll Need
The magic of this No-Bake Cheesecake Cups Recipe lies in the synergy of fresh cream cheese, fluffy whipped cream, and the crunch of graham cracker crumbs. Each ingredient plays its part to create a rich, smooth, yet airy dessert that’s incredibly satisfying.
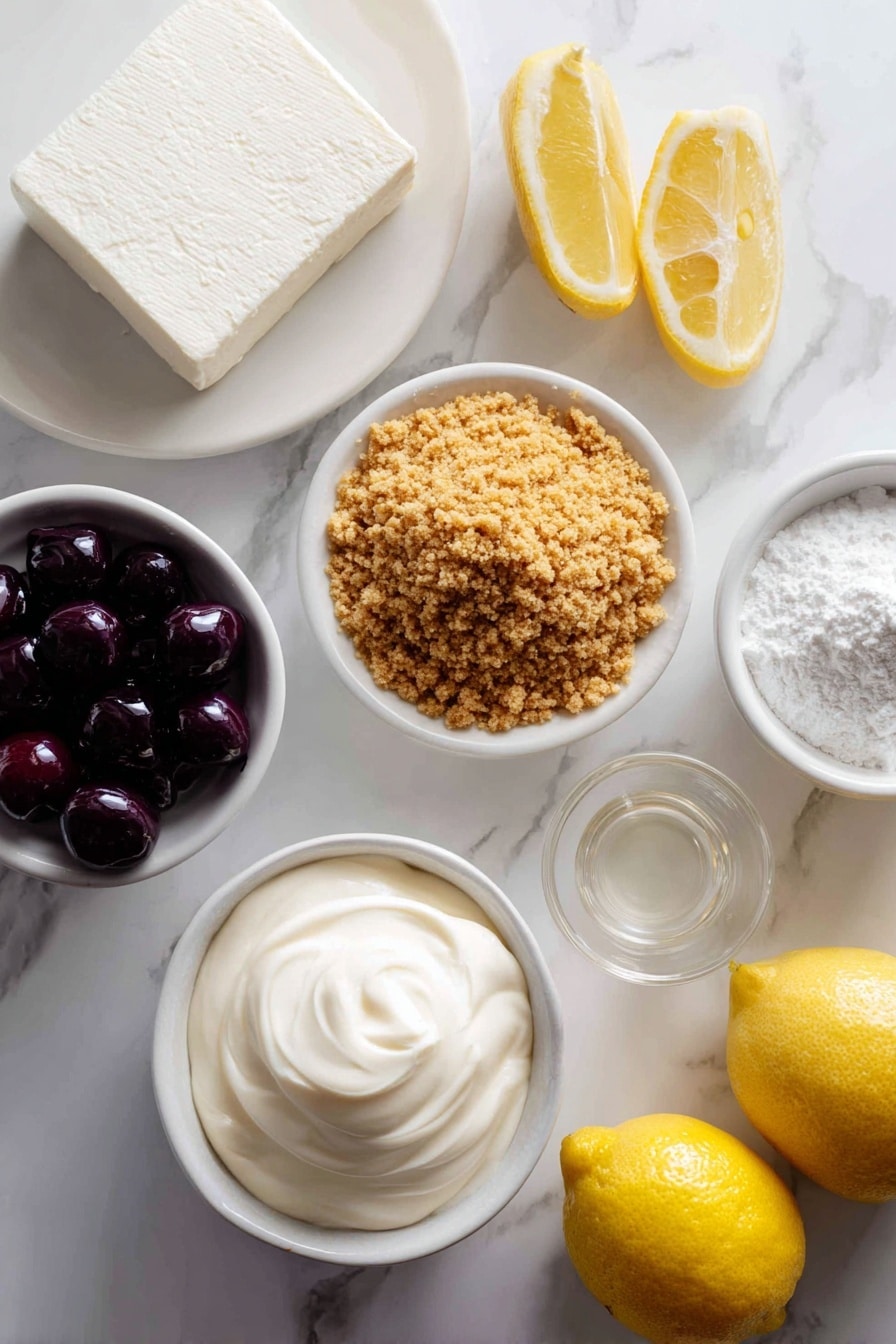
- Graham cracker crumbs: Provides a crunchy, slightly sweet base that balances the creamy filling perfectly.
- Full fat cream cheese: Room temperature cream cheese blends smoothly and lends that classic cheesecake tang.
- Heavy whipping cream: Whipped to stiff peaks for a light and airy texture that lifts the rich cream cheese.
- Powdered sugar: Divided for sweetness in both the cream cheese and whipped cream layers.
- Fresh lemon juice: Adds a subtle zing, brightening up the cheesecake flavor.
- Vanilla extract: Rounds out the flavor with warm, comforting notes.
Variations
I love mixing things up with this No-Bake Cheesecake Cups Recipe depending on the season or occasion. Feel free to personalize it—you can’t go wrong! Here are a few of my favorite twists.
- Berry Bliss: Swirl fresh or frozen mixed berries into the filling or top with a homemade berry compote for a fresh, fruity delight.
- Chocolate Dream: Add a tablespoon of cocoa powder to the cream cheese mixture or drizzle with warm chocolate ganache before serving.
- Lemon Zest Boost: Grate some lemon zest into the filling for an extra citrus punch that’s bright and refreshing.
- Nutty Crunch: Sprinkle toasted chopped nuts like pecans or almonds on top for added texture and flavor contrast.
- Diet-Friendly: Use a sugar substitute suited for baking and opt for light cream cheese to reduce calories without sacrificing too much creaminess.
How to Make No-Bake Cheesecake Cups Recipe
Step 1: Prep Your Cups and Base
First things first—choose your serving cups. I like using 9-ounce cups for a generous dessert, but smaller 4-6 ounce cups work perfectly too if you want more portions or lighter servings. Add 2 tablespoons of graham cracker crumbs to the bottom of each large cup or 1 tablespoon for smaller cups. This crunchy base is the foundation, so press it down gently but don’t compact it too much—this keeps the texture light.
Step 2: Chill Your Mixing Bowl
This might sound like a small detail, but it makes a big difference! Pop your metal or glass mixing bowl into the freezer for about 15 minutes before whipping the cream. Chilled bowls help the cream whip faster and hold stiff peaks better, so your filling stays airy and fluffy.
Step 3: Beat the Cream Cheese Mixture
In a separate bowl, beat the room temperature cream cheese with 1 cup of powdered sugar until smooth and creamy. That usually takes me about 1-2 minutes with my electric mixer. Make sure there are no lumps left—that smooth texture is key for dreamy cheesecake cups!
Step 4: Whip the Cream and Fold in Flavors
Take your chilled bowl out of the freezer and add the heavy cream, remaining ½ cup powdered sugar, fresh lemon juice, and vanilla extract. Beat at medium-high speed until you get stiff peaks—this usually takes 4-5 minutes. When you lift the whisk, the peaks should hold firmly without drooping. This is my favorite step because watching the whipping cream transform is almost magical!
Step 5: Combine Cream Cheese and Whipped Cream
Now, gently mix the cream cheese mixture into the whipped cream. I usually do this on low speed for 1-2 minutes, just until the two are fully combined and you can’t tell them apart. Be careful not to overmix or the filling could lose its fluffiness. This blending step is where the creamy dreaminess really comes alive.
Step 6: Pipe or Spoon Into Cups and Chill
Transfer the cheesecake filling into a piping bag or a ziplock bag with a corner snipped off. Piping is my go-to because it’s clean and looks pretty, but spooning works fine too. Fill each cup about three-quarters full, then cover and refrigerate for 1-2 hours to let the cheesecake firm up. If you plan on making them ahead, I highly recommend covering with plastic wrap to prevent drying out. Overnight chilling is perfectly fine and enhances the flavors.
Step 7: Add Your Favorite Toppings
This is where you get to have fun! I love topping my cheesecake cups with cherry pie filling, blueberry preserves, or even homemade strawberry sauce. Sometimes, I sprinkle crushed Oreos or chopped candies for a playful crunch. The sky’s the limit. Just add toppings right before serving to keep the crust crunchy and the cheesecake fresh.
Pro Tips for Making No-Bake Cheesecake Cups Recipe
- Room Temperature Cream Cheese: Be sure to let your cream cheese soften to room temp to avoid lumps and achieve that smooth filling.
- Chilled Mixing Bowl: Using a cold bowl for whipping cream stabilizes your whipped cream and speeds up the process.
- Don’t Overmix Filling: Fold the mixtures gently to keep the cheesecake light and airy instead of dense.
- Timing Your Chill: At least one hour in the fridge is essential, but overnight chilling intensifies flavors and firms the texture beautifully.
How to Serve No-Bake Cheesecake Cups Recipe
Garnishes
I usually stick with simple, fresh fruit toppings like ripe strawberries or blueberries because they add vibrant color and natural sweetness. Sometimes, I sprinkle a little toasted coconut or shaved chocolate on top for some extra flair. These garnishes not only look pretty but bring a lovely texture contrast that makes every bite exciting.
Side Dishes
While these cups shine as a dessert on their own, I like pairing them with a light cup of coffee or a refreshing iced tea. For a fuller dessert spread, consider serving alongside fresh fruit salad or lemon bars to complement the creamy richness.
Creative Ways to Present
For special occasions, I’ve dressed up these cheesecake cups in clear glass cups with layers of crushed graham crackers and colorful berry compote for a pretty parfait effect. You can also serve them in small mason jars for an adorable rustic touch or mini mason jars tied with twine for festive parties. Adding edible flowers or gold leaf gives a luxurious vibe if you’re really wanting to impress!
Make Ahead and Storage
Storing Leftovers
I usually store leftover cheesecake cups covered tightly with plastic wrap or lids directly in the refrigerator. They’ll keep well for up to 3 days, retaining their creamy texture and fresh taste, but you’ll want to add fresh toppings just before serving again to avoid sogginess.
Freezing
I’ve frozen these cheesecake cups successfully by covering them tightly with plastic wrap and then a layer of foil to prevent freezer burn. They freeze well for up to 1 month. When you’re ready, thaw overnight in the fridge and add fresh toppings before serving for best results.
Reheating
Since this is a no-bake cheesecake, I recommend serving it chilled, so there’s no need to reheat. If you want to soften the texture slightly, let it sit at room temperature for about 15 minutes before eating.
FAQs
-
Can I use low-fat cream cheese for this No-Bake Cheesecake Cups Recipe?
Yes, you can substitute low-fat cream cheese, but keep in mind that the cheesecake cups might be less creamy and rich. Full-fat cream cheese gives the best texture and flavor, so I recommend it if you want that classic cheesecake indulgence.
-
How long do the No-Bake Cheesecake Cups stay fresh in the fridge?
They usually stay fresh for up to 3 days when properly covered. For the best taste and texture, enjoy them within that timeframe.
-
Can I make these cheesecake cups gluten-free?
Absolutely! Just swap out the graham cracker crumbs for gluten-free graham crumbs or crushed gluten-free cookies. The rest of the recipe stays the same and tastes just as delicious.
-
What toppings work best with No-Bake Cheesecake Cups?
Fresh fruits like berries, fruit compotes, chocolate ganache, crushed Oreos, or even a drizzle of caramel sauce all pair wonderfully. Pick what suits your mood or the occasion!
Final Thoughts
I absolutely love how this No-Bake Cheesecake Cups Recipe turns out every single time—light, creamy, and perfectly sweet. When I first tried making no-bake cheesecake cups, I was surprised by how easy and quick it was, yet it felt like a more sophisticated dessert than my effort suggested. Whether you’re feeding a crowd or craving a personal treat, these cups are sure to be a hit. I can’t wait for you to try them and add your own special touches!
Print
No-Bake Cheesecake Cups Recipe
- Prep Time: 15 minutes
- Cook Time: 0 minutes
- Total Time: 75 minutes
- Yield: 8 servings (using 9 oz cups)
- Category: Dessert
- Method: No-Cook
- Cuisine: American
Description
Easy Cheese Cake Cups are a delightful no-bake dessert featuring a creamy, smooth cheesecake filling atop a crunchy graham cracker crust. Perfect for entertaining, these individual portions allow you to customize with your favorite toppings such as cherry pie filling, blueberry pie filling, or chocolate ganache. With just six ingredients and minimal preparation, these cheesecake cups are a quick and impressive treat.
Ingredients
Crust
- Graham cracker crumbs (2 tablespoons per 9 oz cup or 1 tablespoon per 4-6 oz cup)
Cheesecake Filling
- 16 oz full fat cream cheese (2 packages, room temperature)
- 2 cups (473 ml) heavy whipping cream (1 pint)
- 1 ½ cups (169 g) powdered sugar (divided: 1 cup and ½ cup)
- 1 tablespoon fresh lemon juice
- 2 teaspoons vanilla extract
Instructions
- Prepare Cups: Select your desired cup size; 9 oz cups yield 8 servings, while 4-6 oz cups yield 12-16 servings. Add graham cracker crumbs to the bottom of each cup—2 tablespoons for 9 oz cups or 1 tablespoon for smaller ones.
- Chill Mixing Bowl: Place a metal or glass mixing bowl in the freezer for 15 minutes to chill in preparation for whipping cream.
- Mix Cream Cheese and Sugar: In a separate bowl, beat the cream cheese with 1 cup of powdered sugar using an electric mixer until smooth and creamy, about 1-2 minutes. Set aside.
- Whip Cream: Remove the chilled bowl from the freezer. Add the heavy whipping cream, remaining ½ cup powdered sugar, lemon juice, and vanilla extract. Beat with an electric mixer on medium-high speed until stiff peaks form, approximately 4-5 minutes.
- Combine Mixtures: Gently fold the cream cheese mixture into the whipped cream on low speed for 1-2 minutes until fully combined, with no visible separation.
- Fill Cups: Transfer the cheesecake filling to a piping bag or a ziplock bag with a corner cut off. Pipe the filling into the prepared cups, filling about three-quarters full.
- Refrigerate: Chill the cheesecake cups in the refrigerator for 1-2 hours. For longer storage, cover the cups with plastic wrap and refrigerate overnight if desired.
- Add Toppings: Before serving, garnish with your favorite toppings such as cherry pie filling, blueberry pie filling, homemade strawberry sauce, chocolate ganache, Oreo crumbs, or chopped candies.
Notes
- These cheesecake cups require no baking, making them a quick and easy dessert option for entertaining.
- Adjust the amount of graham cracker crumbs based on cup size to keep the crust balanced.
- Be sure the cream cheese is at room temperature for a smooth filling.
- Chilling the mixing bowl helps achieve the perfect whipped cream consistency.
- Customize with diverse toppings to suit different tastes and occasions.
Nutrition
- Serving Size: 1 cheesecake cup
- Calories: 491 kcal
- Sugar: 26 g
- Sodium: 194 mg
- Fat: 41 g
- Saturated Fat: 25 g
- Unsaturated Fat: 12 g
- Trans Fat: 0 g
- Carbohydrates: 28 g
- Fiber: 0.01 g
- Protein: 5 g
- Cholesterol: 124 mg

