

If you’re anything like me, you’ll find it hard to resist this dreamy, creamy delight. This No-Bake Biscoff Cheesecake Recipe is seriously one of my all-time favorite desserts to whip up when I want something indulgent but fuss-free. The luscious Biscoff spread and crunchy biscuit base come together in a no-bake wonder that’s perfect for any occasion – trust me, your friends and family are going to ask for seconds!
Why You’ll Love This Recipe
- No Baking Required: You’ll love how easy it is to make a stunning cheesecake without turning on the oven, saving time and effort.
- Rich Biscoff Flavor: The creamy Biscoff spread adds that signature caramelized spice sweetness that makes this cheesecake unforgettable.
- Crunchy, Buttery Base: The crushed Lotus biscuits mixed with melted butter create the perfect textured foundation for the filling.
- Versatile and Impresses Every Time: Whether it’s for a casual treat or a show-stopping dessert, this cheesecake always impresses without the stress.

Ingredients You’ll Need
The magic of this No-Bake Biscoff Cheesecake Recipe comes from combining simple ingredients that you might already have in your pantry. The Biscoff flavors pair perfectly with the creamy cheese and whipped cream, while the biscuit base brings in just the right crunch. Here’s my go-to shopping tips and ingredient insights.

- Biscoff Biscuits: These iconic cookies give that signature caramelized crunch; crushing them finely is a breeze with a food processor.
- Unsalted Butter: Melting it and mixing with the biscuits creates a sturdy yet tender base; unsalted lets you control salt levels perfectly.
- Cream Cheese (full fat): It gives richness and tanginess that balance the sweet Biscoff flavor beautifully, so go for full fat for the best texture.
- Icing Sugar: Adds a subtle sweetness that blends smoothly without any gritty texture.
- Biscoff Spread (smooth or crunchy): Feel free to use whichever you have; crunchy adds a little texture surprise in the cheesecake filling.
- Vanilla Extract: Just a splash to deepen the flavor profile and lift the cheesecake filling.
- Double Cream: Whipped to soft peaks, it lightens the cheesecake filling and makes everything silky smooth.
Variations
I love experimenting with this no-bake cheesecake, and over time I’ve gathered a few ways to make it your own. Don’t hesitate to tweak this recipe to fit your taste buds or dietary needs — it’s all about making it yours!
- Crunchy vs Smooth Biscoff Spread: I personally enjoy mixing crunchy Biscoff spread into the filling for an added texture surprise, but smooth works just as well for a silky finish.
- Gluten-Free Option: Swap the Lotus biscuits with gluten-free speculoos or ginger snaps to enjoy this without the gluten fuss.
- Chocolate Drizzle: For an extra indulgence, drizzle melted dark or white chocolate over the top instead of (or with) the Biscoff drizzle—my family goes crazy for the combo.
- Mini Cheesecakes: I’ve tried making this in individual jars or ramekins, which is perfect for parties or gifting.
How to Make No-Bake Biscoff Cheesecake Recipe
Step 1: Crush and Press the Biscuit Base
Start by blitzing those Biscoff biscuits in a food processor until you have fine crumbs. If you don’t have a processor, popping them in a sealed bag and crushing with a rolling pin works perfectly too. Mix the crumbs with the melted unsalted butter until everything feels like damp sand. Press this mixture into the base of an 8” (20cm) deep springform tin, making sure to compact it firmly and evenly. I usually use the bottom of a glass or measuring cup to get a nice, solid base that holds together when you slice the cheesecake.
Step 2: Whip Up the Cream Cheese Mixture
Grab an electric mixer for this next part – it really makes the process smooth and quick. Beat together the cream cheese, icing sugar, vanilla extract, and Biscoff spread until you get a smooth, lump-free mixture. When I first tried this, I skipped sifting the icing sugar and ended up with little bits—so I recommend sifting if you want that perfect velvety texture.
Step 3: Whip and Fold in the Double Cream
Now it’s time to whip your double cream to thick peaks. The trick I discovered is to whip on a medium speed and keep an eye on it so it doesn’t turn buttery by accident. You can either fold the whipped cream into the cream cheese mixture gently or whip the cream right into the filling slowly until it holds its shape well. Go slow and steady here — rushing this step can cause the filling to deflate, and you want that light, airy texture!
Step 4: Assemble and Chill
Spread the luscious mixture evenly over your biscuit base, smoothing the top with a spatula. Place it in the fridge and be patient—it needs at least 5-6 hours to set properly, but overnight is best (trust me on this one; it totally amps up the flavor and texture!).
Step 5: Decorate and Serve
Once set, remove your cheesecake from the tin carefully. I like to whip up a little extra double cream with icing sugar, pipe it on top, then garnish each slice with a Biscoff biscuit and a drizzle of melted Biscoff spread. It’s those simple touches that make it feel so special and elegant.
Pro Tips for Making No-Bake Biscoff Cheesecake Recipe
- Pressing the Base Firmly: Don’t be shy when pressing the biscuit base—it helps the cheesecake hold its shape perfectly when slicing.
- Slow Whipping of Cream: Mix the cream gently to avoid over-whipping, which can cause lumps or a gritty texture.
- Chill Time is Key: The longer you chill (preferably overnight), the firmer and more flavorful your cheesecake will be—patience pays off!
- Use a Warm Knife to Slice: Running your knife under hot water and wiping dry before slicing makes for clean, perfect slices every time.
How to Serve No-Bake Biscoff Cheesecake Recipe

Garnishes
I’m all about that classic look for this cheesecake — a light cloud of whipped cream with a single Biscoff biscuit perched on each slice. Sometimes I swirl in a melted Biscoff drizzle or even scatter a few crunchy biscuit crumbs on top for a touch of texture that pops. It’s these little garnishes that make serving feel like a celebration.
Side Dishes
This cheesecake stands tall on its own, but I love pairing it with fresh berries, like raspberries or strawberries, to cut through the richness. A simple cup of strong coffee or a black tea pairs beautifully if you want to keep things classic and comforting.
Creative Ways to Present
For birthdays or holidays, I’ve popped this cheesecake into a clear glass trifle bowl layered with extra biscuit crumbs and whipped cream for an impressive parfait effect. Mini versions in individual jars also delight guests and are great for gifting — plus, they’re easy to carry around to parties.
Make Ahead and Storage
Storing Leftovers
Once you’ve enjoyed the first slice (or two!), the rest of the No-Bake Biscoff Cheesecake keeps wonderfully covered in the fridge for up to 4 days. I wrap mine with cling film or store it in an airtight container to lock in moisture and prevent the base from going soggy.
Freezing
If you want to save leftovers longer, you can freeze this cheesecake (unfrosted) without losing too much texture. Just wrap it tightly in plastic wrap and foil, then thaw overnight in the fridge before serving. I learned to avoid freezing the whipped cream topping as it doesn’t always thaw well.
Reheating
Since this is a no-bake, chilled dessert, reheating isn’t necessary (or recommended). Just serve chilled straight from the fridge for that perfect creamy bite.
FAQs
-
Can I use a different type of biscuit for the base?
Absolutely! While Lotus/Biscoff biscuits are traditional and bring that distinctive caramelized flavor, you can swap in ginger snaps, graham crackers, or digestive biscuits depending on your taste and what you have available.
-
Do I need a food processor to crush the biscuits?
Not at all! If you don’t own a food processor, place your biscuits in a heavy-duty plastic bag and crush them with a rolling pin or even the bottom of a glass. Just aim for a fine crumb for the best base texture.
-
Can I make this cheesecake dairy-free?
You can! Try substituting cream cheese and double cream with plant-based versions like coconut cream and dairy-free cream cheese. Keep in mind that textures and flavors might slightly differ but still delicious.
-
How long should I chill the cheesecake?
Chilling it for at least 5-6 hours is essential to let it set properly, but chilling overnight is my personal recommendation for the best texture and flavor.
-
Can I prepare this recipe in advance for a party?
Yes! This No-Bake Biscoff Cheesecake is fantastic for making ahead — prepare it the day before your event and keep it chilled until serving. It’s a crowd-pleaser that’s stress-free.
Final Thoughts
I absolutely love how this No-Bake Biscoff Cheesecake Recipe always feels like a treat, but without the usual hassle of baking. It’s my go-to dessert when I want to impress friends or just spoil myself with something sweet and silky. Once you try it, I’m sure you’ll find yourself making it again and again — it’s that good. So grab your Biscoff spread, your mixer, and let’s get chilling!
Print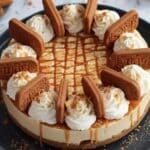
No-Bake Biscoff Cheesecake Recipe
- Prep Time: 10 min
- Cook Time: 10 min
- Total Time: 5 hr 20 min
- Yield: 12 slices
- Category: Dessert
- Method: No-Cook
- Cuisine: British
Description
This No-Bake Biscoff Cheesecake is a luscious dessert featuring a crunchy Lotus biscuit base and a creamy, smooth Biscoff-infused cream cheese filling. Topped with lightly whipped cream, extra Biscoff biscuits, and a drizzle of melted Biscoff spread, it’s a delightful treat perfect for any occasion that requires no oven baking.
Ingredients
Base
- 300 g Lotus/Biscoff biscuits
- 125 g unsalted butter, melted
Cheesecake Filling
- 500 g full fat cream cheese
- 100 g icing sugar
- 250 g Biscoff spread (smooth or crunchy)
- 1 tsp vanilla extract
- 300 ml double cream
Topping
- 150 ml double cream
- 2 tbsp icing sugar
- 75 g Biscoff spread, melted
- Biscoff biscuits, for decoration
Instructions
- Prepare the Base: Blitz the 300 g Lotus/Biscoff biscuits in a food processor until they become fine crumbs. Combine these crumbs with 125 g melted unsalted butter, then press the mixture firmly into the base of an 8″/20 cm deep springform tin to form the crust.
- Make the Cheesecake Filling: Using an electric mixer, mix 500 g cream cheese, 1 tsp vanilla extract, 100 g icing sugar, and 250 g Biscoff spread together until smooth and fully combined.
- Whip the Cream: Add 300 ml double cream to the cream cheese mixture and whisk slowly and steadily until the mixture thickens and holds its shape. Alternatively, whip the cream separately to stiff peaks and gently fold it into the cream cheese mixture.
- Assemble and Chill: Spread the creamy filling evenly over the prepared biscuit base in the springform tin. Cover and chill in the refrigerator for at least 5 to 6 hours, though preferably overnight, to allow it to set properly.
- Prepare the Topping: Whip 150 ml double cream with 2 tbsp icing sugar until soft peaks form. Melt 75 g Biscoff spread gently for drizzling.
- Decorate and Serve: Remove the cheesecake from the tin. Pipe or spread the whipped cream on top, place a Biscoff biscuit on each slice, and drizzle with the melted Biscoff spread for an elegant finish.
Notes
- This cheesecake requires no baking, making it an easy and convenient dessert option.
- The base can be pressed firmly to ensure a sturdy crust that holds the creamy filling well.
- For best results, chill the cheesecake overnight to develop flavors and set the texture.
- You can use smooth or crunchy Biscoff spread according to your preference.
- Decorate creatively with extra biscuits and drizzles for a beautiful presentation.
Nutrition
- Serving Size: 1 slice
- Calories: 490 kcal
- Sugar: 18 g
- Sodium: 268 mg
- Fat: 39 g
- Saturated Fat: 22 g
- Unsaturated Fat: 17 g
- Trans Fat: 0 g
- Carbohydrates: 31 g
- Fiber: 1 g
- Protein: 5 g
- Cholesterol: 119 mg


