
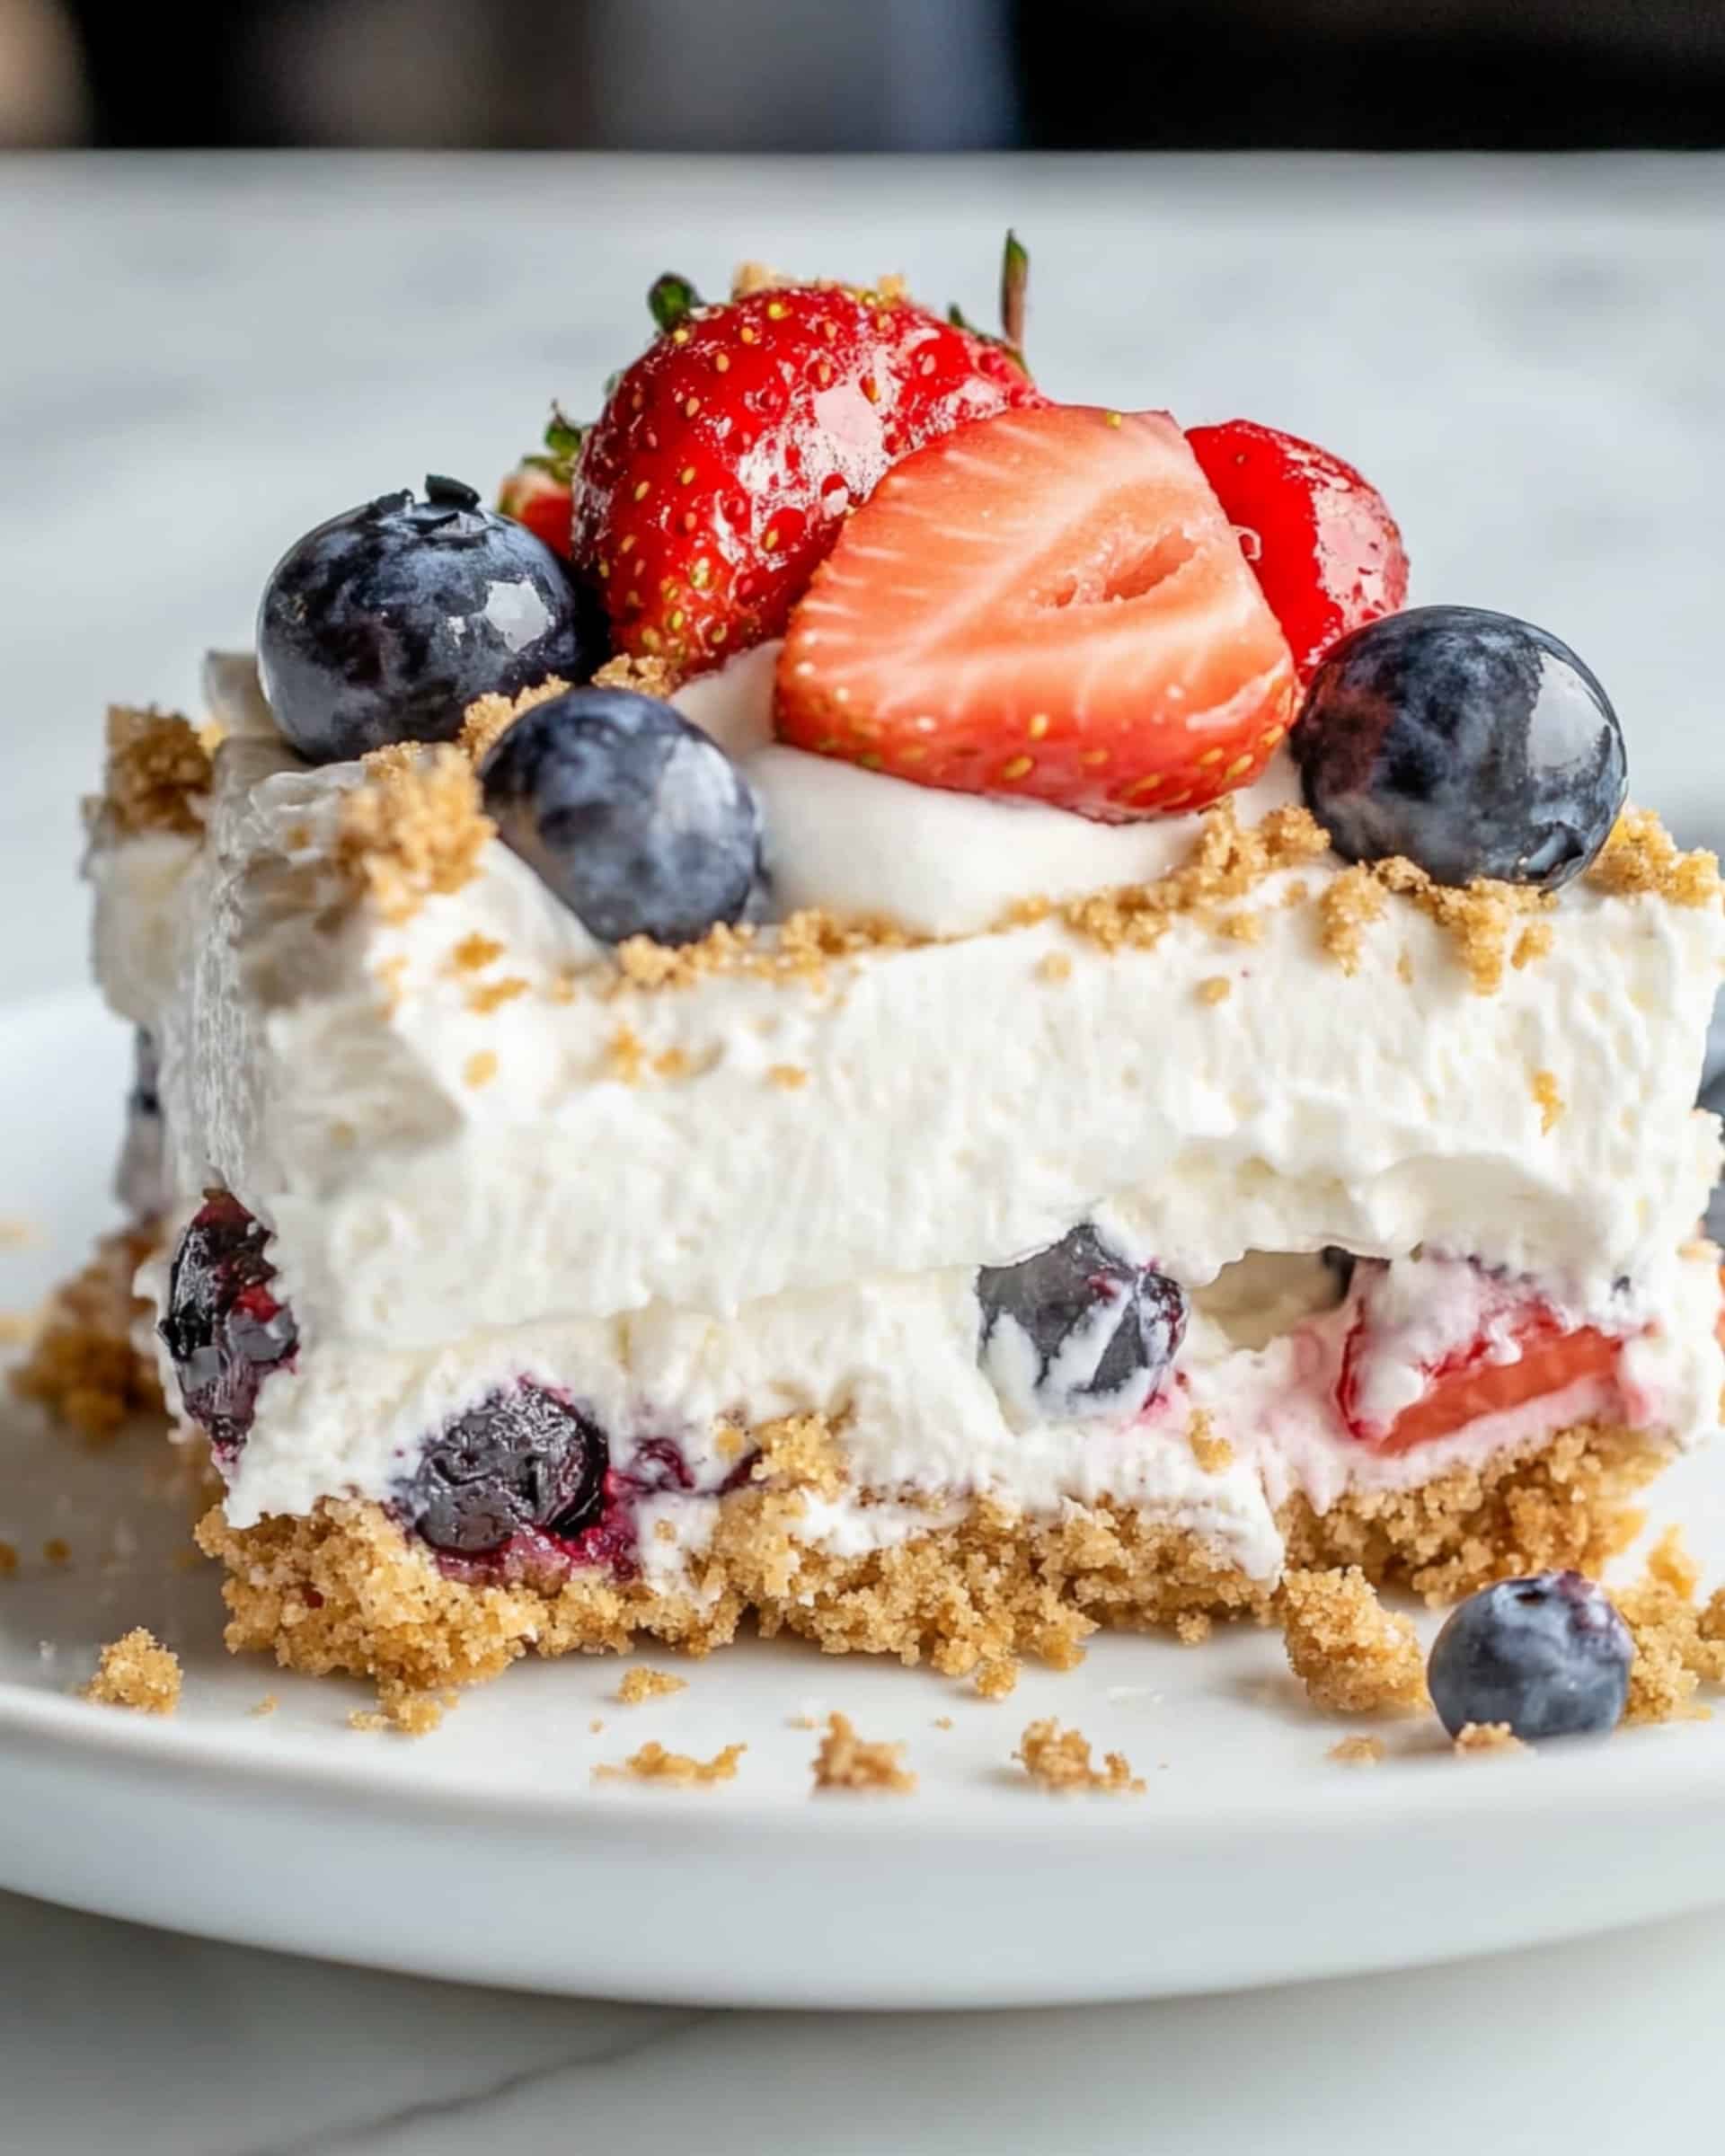
Get ready to meet your new go-to dessert for busy weeknights, family gatherings, and those moments when you want something show-stopping, but just don’t have the time (or desire!) to turn on your oven. This No-Bake Berry Lush is irresistibly creamy, bright with fresh berries, and beautifully simple—exactly what every dessert table needs. Whether you’re a kitchen newbie or an experienced baker looking for a quick fix, this dreamy, berry-loaded treat is pure joy in every bite.
Why You’ll Love This Recipe
- No Oven Required: Skip the heat and the hassle—everything comes together in one pan, right in your fridge.
- Fast and Foolproof: Start to finish, you need less than 20 minutes of hands-on time. The hardest part is waiting for it to chill!
- Crowd Pleaser: Lush layers of rich cream, sweet vanilla cookies, and juicy berries offer unbeatable flavor and texture.
- Versatile: Use whatever berries are in season or on sale; it works with strawberries, blueberries, raspberries, blackberries—truly any combo.
- Stress-Free Prep: You can absolutely make it ahead, and it’s even better once it’s had a little time to chill.

Ingredients You’ll Need
- Vanilla wafer cookies: These create the perfect, buttery base and add delightful crunch. Graham crackers or digestive biscuits work if you want a different flavor.
- Butter: Melted butter binds the cookie crumbs together for the crust; salted or unsalted both work.
- Cream cheese: Softened for easy mixing; its creaminess balances the fruit’s tartness beautifully.
- Powdered sugar: Dissolves easily and sweetens the cream cheese layer without adding grit.
- Vanilla extract: Choose pure vanilla for the best aroma—this adds warmth and depth.
- Whipped topping: The key for a light, fluffy texture. If you love to whip your own cream, that works, too!
- Fresh berries: Strawberries, blueberries, raspberries, and blackberries are all delicious here. Slice large berries for even layers.
- Note: You can top with extra cookie crumbs for a little fancy finish!
Note: You’ll find the complete list of ingredients, along with their exact measurements, in the printable recipe card at the bottom of this post.
Variations
- Use Different Cookies: Try graham crackers, shortbread, or even chocolate wafers for a twist.
- Switch Up the Fruit: Mango, peaches, or even bananas work—just make sure they’re fresh and not too watery.
- Add a Citrus Kick: A bit of lemon or orange zest in the cream cheese layer brightens the whole dessert.
- Make it Lighter: Use reduced fat cream cheese and light whipped topping for a slightly lighter version.
- Nutty Crunch: Sprinkle toasted almonds or chopped pecans between layers for bonus texture.
How to Make No-Bake Berry Lush
Step 1: Crush the Cookies
Place the vanilla wafer cookies into a large ziptop bag. Use a rolling pin to crush them into small, even crumbs (kids love helping with this part!).
Step 2: Mix and Press the Crust
Pour your crumbs into an 8-inch square baking pan. Stir in the melted butter thoroughly, making sure every crumb gets coated. Press this crumb mixture firmly and evenly into the bottom of the pan to form your crust.
Step 3: Whip the Cream Cheese Layer
In a large mixing bowl, add the softened cream cheese, powdered sugar, and vanilla extract. Beat with an electric mixer until the mixture is smooth, creamy, and fluffy. Fold in one container of whipped topping—go gently to keep things airy.
Step 4: Prepare the Fruit
Rinse your berries and slice any large ones, like strawberries. The smaller you slice, the easier the layering.
Step 5: Layer It Up!
Start by spreading half of your cream cheese mixture evenly over the prepared crust. Scatter half of the fresh berries over the cream layer. Repeat the layers with the remaining cream and berries.
Step 6: Finish with Whipped Topping
Dollop on half of the remaining whipped topping, smoothing it out for a pillowy finish. For extra flair, crumble some reserved cookies on top.
Step 7: Chill
Refrigerate the dessert for at least one hour (longer is even better!) before serving. This helps everything set and the flavors meld.
Pro Tips for Making the Recipe
- Softening cream cheese is crucial—cold cream cheese won’t blend smoothly and may leave lumps.
- Use an offset spatula for spreading layers evenly (but a regular spoon totally works if you don’t have one).
- Don’t skimp on the chill time! Overnight is best if you can wait: it tastes even better as the flavors develop.
- For clean slices: use a sharp knife dipped in hot water and wiped dry between cuts.
How to Serve
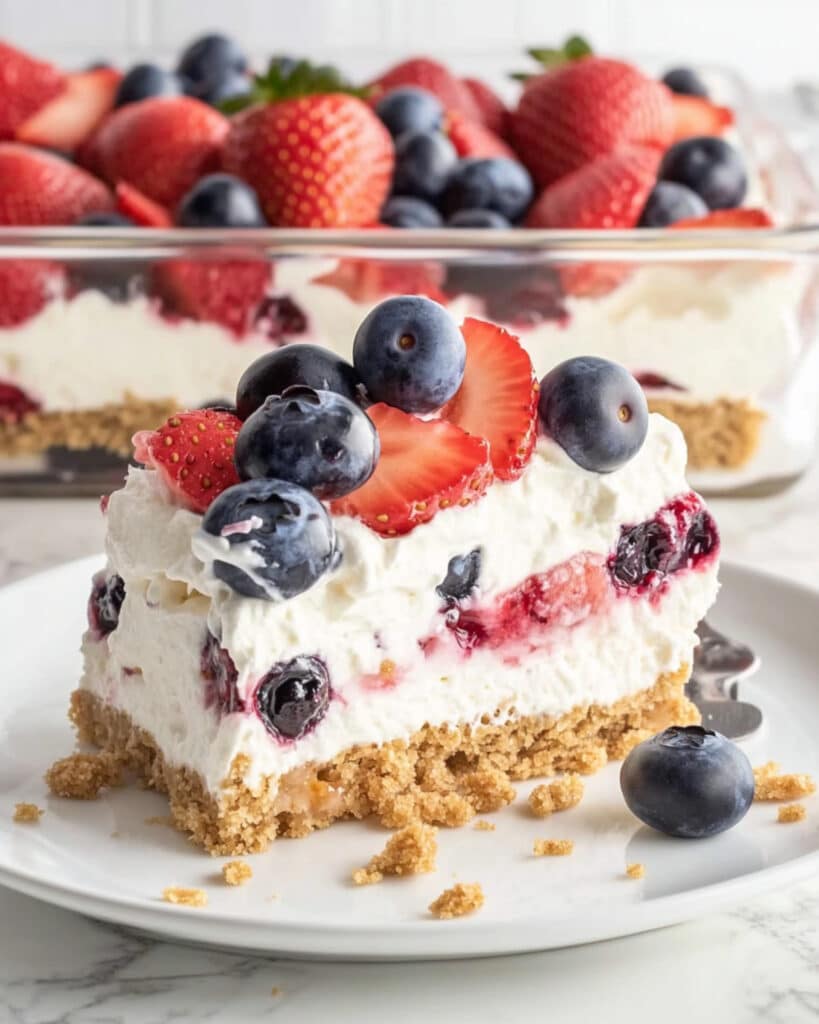
This No-Bake Berry Lush is most spectacular when served cold, straight from the fridge. Cut it into squares and top with a few extra fresh berries or a dusting of icing sugar for a bakery-worthy finish. It pairs wonderfully with a cup of coffee, a glass of bubbly, or a simple pitcher of lemonade for a backyard party. If you want to make it extra fancy, serve each slice with a drizzle of chocolate or berry coulis on the plate.
Make Ahead and Storage
Storing Leftovers
Cover the pan tightly with plastic wrap or transfer leftover squares to an airtight container. Keep them in the fridge for up to three days; the crust will remain nicely firm and the berries fresh.
Freezing
You can freeze berry lush for up to one month. Cover tightly and freeze whole or cut into individual squares for single servings. Thaw overnight in the fridge before serving. Note: The texture of the whipped topping may soften slightly after freezing, but the flavor holds up!
Reheating
There is no need to reheat—this dessert is best enjoyed chilled! If it’s been stored in the freezer, just let it sit in the fridge until it’s fully thawed.
FAQs
-
Can I use frozen berries instead of fresh?
Absolutely! If using frozen berries, thaw them completely and drain off any excess liquid with a paper towel to avoid a soggy dessert. Frozen berries are more economical and can be used year-round, though the texture will be a bit softer than fresh.
-
Can I substitute homemade whipped cream for whipped topping?
Definitely! Whip up heavy cream with a touch of powdered sugar until stiff peaks form and use it in place of the store-bought topping. This adds a richer flavor and lovely homemade touch.
-
What should I do if my crust is too crumbly?
If your crust feels dry or isn’t sticking together, add another tablespoon or two of melted butter and press the mixture into the pan again. It should hold its shape when you press it down firmly.
-
Can I prepare this recipe in advance?
Yes! In fact, prepping it a day before you plan to serve lets the layers set perfectly and improves the flavor. Just be sure to keep it well covered in the fridge until ready to enjoy.
Final Thoughts
No-Bake Berry Lush is the ultimate dessert for anyone craving something vibrant, creamy, and utterly effortless. With its layers of sweetness, tangy berries, and dreamy whipped topping, every mouthful is pure delight—and it couldn’t be simpler to make. Next time you’re short on time but want to impress, give this lush a try. You might just find yourself making it for every occasion, all year long!
Print
No-Bake Berry Lush Recipe
- Prep Time: 20 minutes
- Cook Time: 0 minutes
- Total Time: 1 hour 20 minutes (includes chilling)
- Yield: 6 servings
- Category: Desserts
- Method: No-cook
- Cuisine: American
- Diet: Vegetarian
Description
This No-Bake Berry Lush is a delightfully easy, creamy layered dessert featuring a vanilla wafer crust, a smooth cream cheese layer, light whipped topping, and an abundance of fresh berries. Perfect for summer gatherings or whenever you need a fuss-free, crowd-pleasing treat, this no-bake recipe requires simple ingredients and comes together in just minutes before chilling.
Ingredients
Crust
- 35 vanilla wafer cookies
- 5 tablespoons butter, melted
Cream Cheese Layer
- 8 oz cream cheese, softened
- 1 cup powdered sugar
- 1 1/2 teaspoons vanilla extract
- 1 (8 oz) container whipped topping, thawed
Berry Layer
- 2 lbs fresh berries (such as strawberries, blueberries, raspberries, or a mix)
Topping
- 1 (8 oz) container whipped topping, thawed (remaining half for topping)
- Extra wafer cookies, crumbled (optional, for garnish)
Instructions
- Make the Crust: Place the vanilla wafer cookies in a large ziptop bag and crush them into fine crumbs using a rolling pin. Transfer the crumbs to an 8-inch square baking pan, add the melted butter, and stir until evenly combined. Press the mixture firmly into the bottom of the pan to form a crust.
- Prepare the Cream Cheese Mixture: In a large mixing bowl, add the softened cream cheese, powdered sugar, and vanilla extract. Beat with an electric mixer until the mixture is smooth and creamy. Gently fold in one container of thawed whipped topping until well combined.
- Slice the Berries: If you are using larger berries, such as strawberries, slice them as desired. Leave small berries whole for easy layering.
- Layer the Dessert: Spread half of the cream cheese mixture evenly over the prepared crust. Then add half of the berries in an even layer over the cream cheese. Repeat with the remaining cream cheese mixture and berries, creating a second layer of each.
- Add Final Topping: Spread half of the remaining tub of whipped topping evenly over the berry layer. For a finishing touch, sprinkle crumbled vanilla wafer cookies over the top if desired.
- Chill and Serve: Cover the pan and refrigerate the dessert for at least 1 hour to allow it to set. Slice into portions and serve chilled. Enjoy!
Notes
- You can use any combination of fresh berries depending on preference and seasonal availability.
- For a firmer crust, refrigerate or freeze the crust layer for 10–15 minutes before adding the fillings.
- Allow the dessert to chill for several hours for the best texture and flavor.
- This dessert is best served cold and can be made a day in advance.
- Substitute gluten-free cookies to make this recipe gluten-free.
Nutrition
- Serving Size: 1/6 of recipe
- Calories: 410
- Sugar: 29g
- Sodium: 330mg
- Fat: 22g
- Saturated Fat: 12g
- Unsaturated Fat: 7g
- Trans Fat: 0g
- Carbohydrates: 49g
- Fiber: 5g
- Protein: 4g
- Cholesterol: 40mg


