
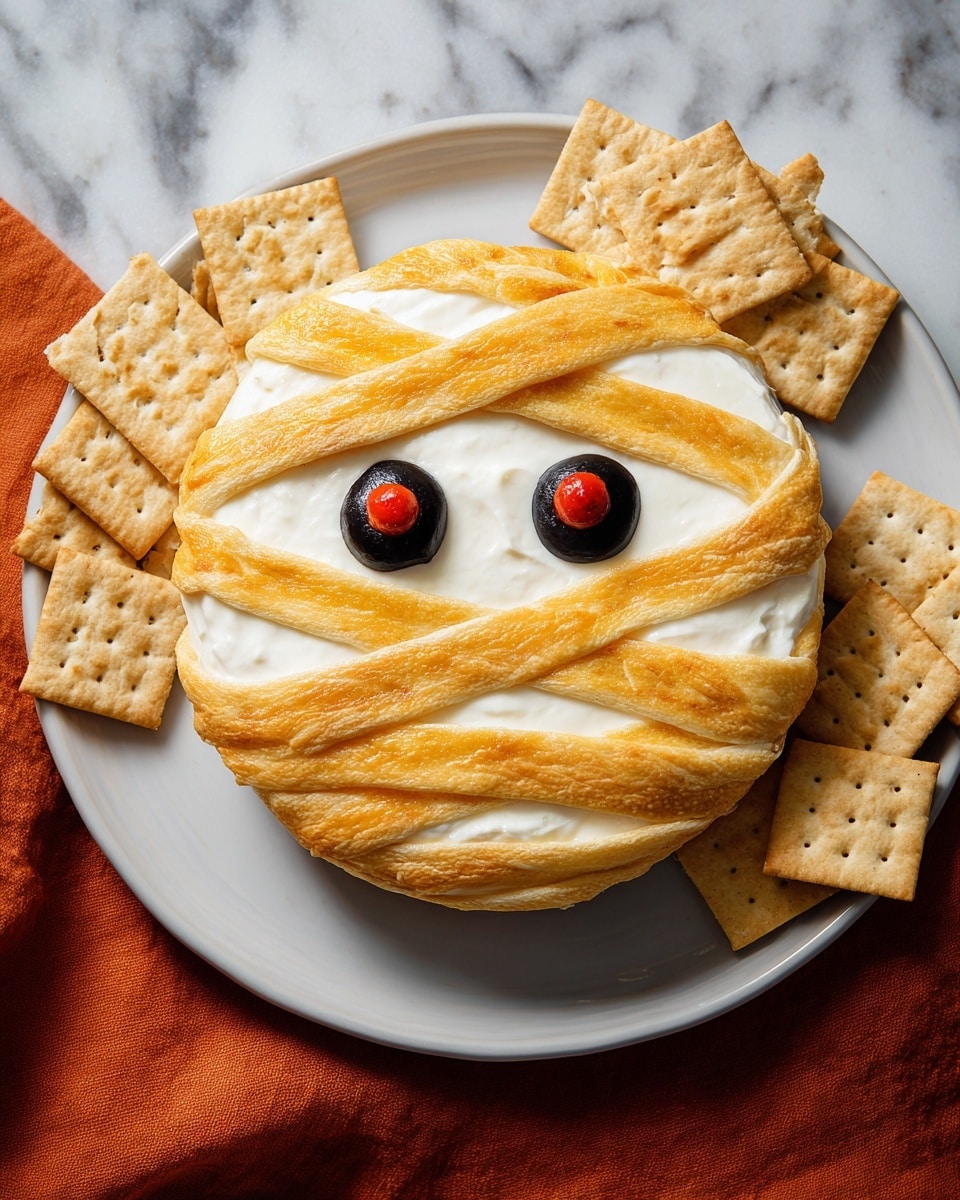
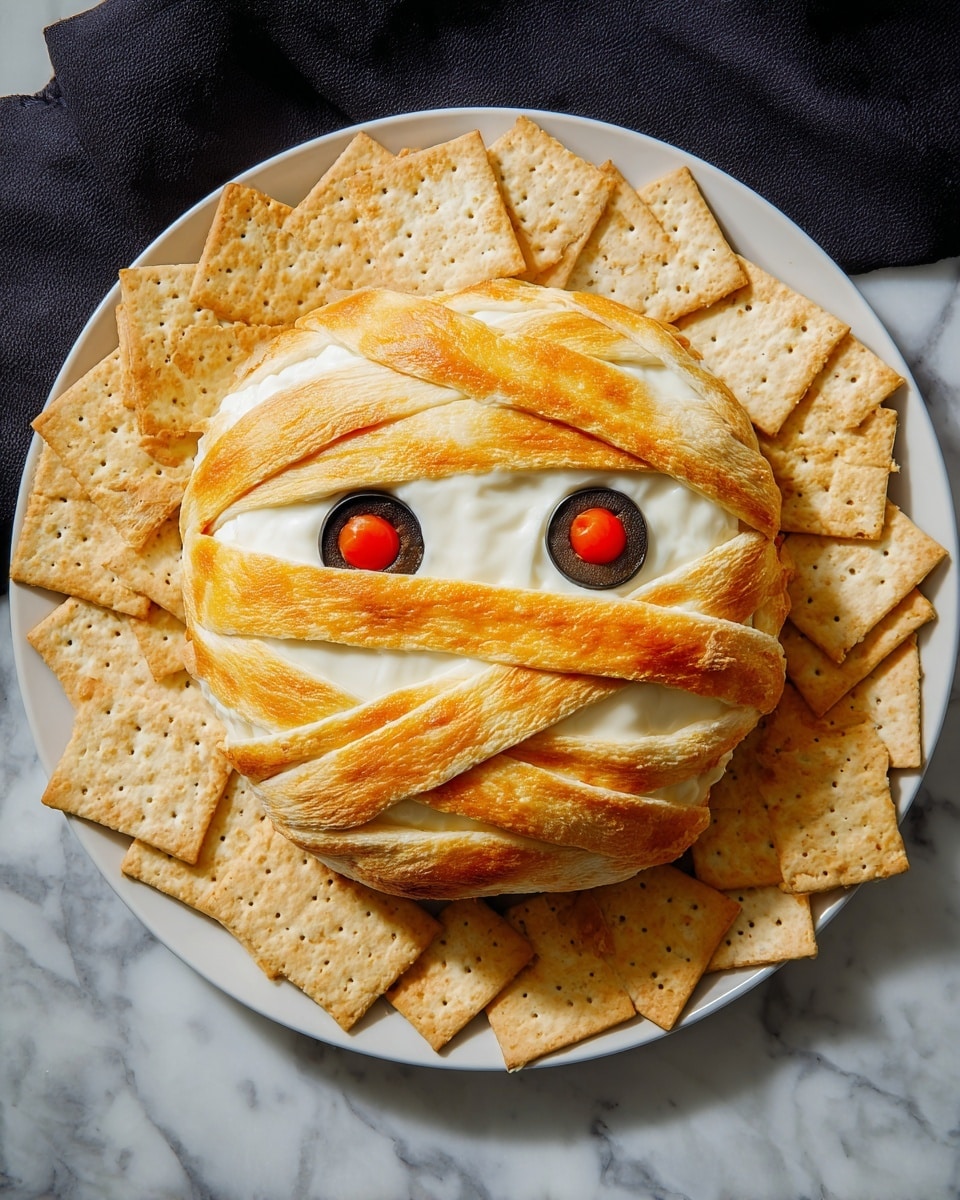
If you’re looking for a fun, crowd-pleasing appetizer that’s as cute as it is delicious, you have to try this Mummy Brie Recipe. It’s perfect for Halloween parties or whenever you want to jazz up your cheese platter with a touch of whimsy. I absolutely love how it combines gooey, warm brie wrapped in crispy puff pastry, all dressed up like a little mummy!
Why You’ll Love This Recipe
- Easy and Quick: It only takes about 10 minutes to prep and 20 minutes to bake, so you’re ready to party fast.
- Kid-Friendly Fun: The little pepperoni and olive eyes always get a giggle from my kids and guests alike.
- Perfect Gooeyness: The warm, melty brie wrapped in crispy puff pastry is a seriously addictive combo.
- Great for Sharing: It’s designed to serve 6, making it ideal for friends and family gatherings.

Ingredients You’ll Need
This Mummy Brie Recipe comes together with just a handful of simple ingredients—you probably already have most of these in your kitchen! Each plays a role in creating that perfect balance of flaky pastry and creamy cheese. When shopping, grab a good-quality puff pastry and a creamy brie wheel for the best results.
- All-purpose flour: Used to dust your work surface so the puff pastry doesn’t stick while you wrap the brie.
- Puff pastry sheet: This is the cozy mummy wrap—make sure it’s thawed but still cold to handle easily.
- Brie wheel: The star of the show; I like a creamy, mild brie that melts beautifully inside.
- Egg: Used to make an egg wash that gives the pastry a gorgeous golden shine.
- Milk: Mixed with the egg to help the wash spread smoothly over the pastry.
- Mini pepperoni: These form the adorable mummy’s eyes—feel free to swap with other small round toppings.
- Black olives: Sliced to pair with the pepperoni for spooky, yet cute mummy eyes.
Variations
One of the best things about this Mummy Brie Recipe is how easy it is to make your own spin on it. I love experimenting with different toppings and even doughs sometimes—don’t be afraid to get creative and make it your own!
- Vegetarian variation: Swap mini pepperoni with sun-dried tomato slices or roasted red peppers for a meat-free yet flavorful eye.
- Herb twist: Sprinkle some fresh rosemary or thyme on the brie before wrapping to add a fragrant note.
- Sweet and savory: Spread a thin layer of fig jam on the brie before wrapping for a subtle sweet surprise that pairs beautifully with the cheese.
- Spicy version: Add a pinch of chili flakes to the egg wash or use spicy pepperoni for some heat.
How to Make Mummy Brie Recipe
Step 1: Prep and Wrap Like a Pro
First things first: preheat your oven to 400°F—this ensures a nice, hot environment to make that puff pastry crisp up beautifully. Lightly flour your work surface so the puff pastry doesn’t stick. I like to unroll the thawed sheet gently and cut it into 1-inch strips. Now comes the fun part—wrap those strips around your wheel of brie to look like a little mummy. I usually start at one end and wrap diagonally, leaving a small gap for those all-important mummy eyes later. Don’t worry if it looks a bit uneven—that’s part of the charm!
Step 2: Brush On That Beautiful Golden Egg Wash
Whisk together your egg and milk to make a smooth wash; this helps the pastry turn that perfect golden brown. Gently brush the entire wrapped brie, making sure the egg wash seeps into the nooks between the strips for a uniform color. This trick also helps the pastry layers puff up gorgeously.
Step 3: Bake to Gooey Perfection
Transfer your wrapped brie onto a parchment-lined baking sheet—this keeps things tidy and prevents sticking. Bake in the oven for about 20 minutes. You’ll know it’s ready when the puff pastry is deeply golden and the brie inside is warm and gooey. The aroma will practically pull you to the kitchen—I swear it’s irresistible!
Step 4: Add Spooky Eyes and Serve
Once out of the oven, use two mini pepperoni slices and place them into two black olive slices to create your mummy’s eyes. I find this really brings the whole look together and is such a cute touch that invites smiles. Serve immediately with your favorite crackers or sliced baguette, and watch as everyone digs in.
Pro Tips for Making Mummy Brie Recipe
- Keep the Pastry Cold: Keeping your puff pastry cold before wrapping makes it much easier to handle and helps it puff up better in the oven.
- Don’t Overwrap: Leave small gaps between strips—not only does it look more mummified, but it also lets steam escape so pastry stays crisp.
- Use Parchment Paper: This makes cleanup easy and prevents sticking without needing extra grease.
- Watch Baking Time Closely: Oven temps vary, so start checking around 18 minutes to avoid overbaking and drying out the brie.
How to Serve Mummy Brie Recipe
Garnishes
I usually keep the garnish simple since the mummy design is the star, but sometimes I sprinkle chopped fresh parsley or thyme around the serving plate for a pop of color and aroma. Adding some thinly sliced green onions can also give a subtle sharpness that contrasts wonderfully with the creamy brie.
Side Dishes
This recipe pairs perfectly with crunchy crackers, sliced baguette, or even some crudité like carrots and celery for a balance of textures. For a fuller spread, a simple charcuterie board with cured meats, nuts, and fruits like grapes or figs turns this into a festive crowd-pleaser.
Creative Ways to Present
One year, I placed the mummy brie on a platter lined with roasted autumn leaves and small pumpkin decorations for Halloween—it was a hit! You can also “dress” your mummy with a tiny witch hat or fabric bow for occasions beyond Halloween. Presentation adds a lot of personality, so have fun with it.
Make Ahead and Storage
Storing Leftovers
If you have leftovers (which might be rare!), I recommend wrapping the brie tightly in plastic wrap and storing it in the fridge. It keeps well for up to 2 days but expect the puff pastry to lose some crispness. To enjoy later, you can reheat it carefully to restore some texture.
Freezing
I haven’t frozen the fully assembled mummy brie, because thawing could affect the pastry texture, but you can freeze leftover puff pastry or the brie separately for future use. If you want to prep ahead, wrapping the brie in puff pastry and freezing before baking works—just add a few extra minutes to the baking time.
Reheating
To reheat, I place the mummy brie on a baking sheet and warm it in a 350°F oven for about 10 minutes. This restores the gooey interior and crisps the pastry a bit. Avoid the microwave—it’ll make the dough soggy and compromise the texture.
FAQs
-
Can I use a different cheese instead of brie?
Absolutely! While brie is classic for its creamy texture and flavor, camembert works great too because it melts similarly. Just avoid harder cheeses that won’t get nice and gooey inside the pastry.
-
How do I prevent the puff pastry from getting soggy?
Make sure your brie is at room temperature, and don’t overlap pastry strips too tightly—leaving small gaps allows moisture to escape and keeps the pastry crisp.
-
Can I make this recipe ahead of time?
You can assemble the wrapped brie a day ahead, keep it wrapped and refrigerated, then add the egg wash and bake just before serving.
-
What’s a good substitute for mini pepperoni for the mummy’s eyes?
If you’re avoiding meat or want vegetarian options, cherry tomato halves, sliced black olives alone, or small pieces of roasted red pepper can work well to create fun eyes.
-
How do I know when the brie is perfectly melted inside?
After baking, the puff pastry should be deeply golden and puffed. You can gently press down on the top—if it feels soft and yielding, the brie inside is gooey and ready to serve.
Final Thoughts
This Mummy Brie Recipe is one of those delightful dishes that brightens up any gathering with minimal effort—seriously, it’s become a favorite in my own family over the years. I hope you’ll enjoy making it as much as I do, and that it brings lots of smiles and happy tummies to your table. Next time you want a fun appetizer that’s both impressive and easy, remember this little cheesy mummy waiting to be wrapped up and baked to perfection!
Print
Mummy Brie Recipe
- Prep Time: 10 mins
- Cook Time: 20 mins
- Total Time: 30 mins
- Yield: 6 servings
- Category: Appetizer
- Method: Baking
- Cuisine: American
Description
Mummy Brie is a fun and festive appetizer perfect for Halloween or any gathering. This recipe features a wheel of creamy brie wrapped in flaky puff pastry strips to resemble a mummy, baked until golden and gooey. Topped with mini pepperoni and sliced black olives to create spooky mummy eyes, it’s a playful and delicious dish that is sure to impress your guests.
Ingredients
Pastry and Cheese
- All-purpose flour, for surface
- 1 sheet puff pastry, thawed
- 1 (7-oz.) wheel of brie
Egg Wash
- 1 large egg
- 1 Tbsp. milk
Decorations
- 2 mini pepperoni slices
- 2 sliced black olives
Instructions
- Preheat and Prepare Workspace: Preheat your oven to 400°F (200°C). Lightly flour a clean work surface to prevent the puff pastry from sticking as you work.
- Wrap Brie with Puff Pastry: Unroll the thawed sheet of puff pastry on the floured surface. Cut the pastry into 1-inch wide strips. Carefully wrap these strips around the entire wheel of brie, leaving small gaps to mimic the appearance of mummy bandages.
- Apply Egg Wash: In a small bowl, whisk together the egg and milk to create an egg wash. Brush this evenly over the wrapped puff pastry to help it bake to a beautiful golden brown.
- Prepare for Baking: Place the wrapped brie onto a baking sheet lined with parchment paper to prevent sticking and ensure even baking.
- Bake: Bake in the preheated oven for about 20 minutes, or until the puff pastry is deeply golden and crispy and the brie inside has warmed through and become gooey.
- Add Mummy Eyes: After removing from the oven, create the mummy’s eyes by placing two mini pepperoni slices into two sliced black olives. Position them on the brie for a fun, festive look.
- Serve: Serve the mummy brie warm with crackers or sliced baguette for dipping.
Notes
- Ensure the puff pastry is fully thawed before working with it to prevent cracking.
- Use parchment paper on the baking sheet to avoid sticking and make cleanup easier.
- Let the baked brie cool slightly to avoid burning your mouth when serving.
- Mini pepperoni and olive eyes can be swapped for other toppings depending on your preference or dietary restrictions.
- This appetizer is best enjoyed warm as the brie is gooey and melty.
Nutrition
- Serving Size: 1 slice (approx. 1/6 of the mummy brie)
- Calories: 196
- Sugar: 0.5g
- Sodium: 150mg
- Fat: 15g
- Saturated Fat: 7g
- Unsaturated Fat: 6g
- Trans Fat: 0g
- Carbohydrates: 8g
- Fiber: 0.5g
- Protein: 6g
- Cholesterol: 35mg


