
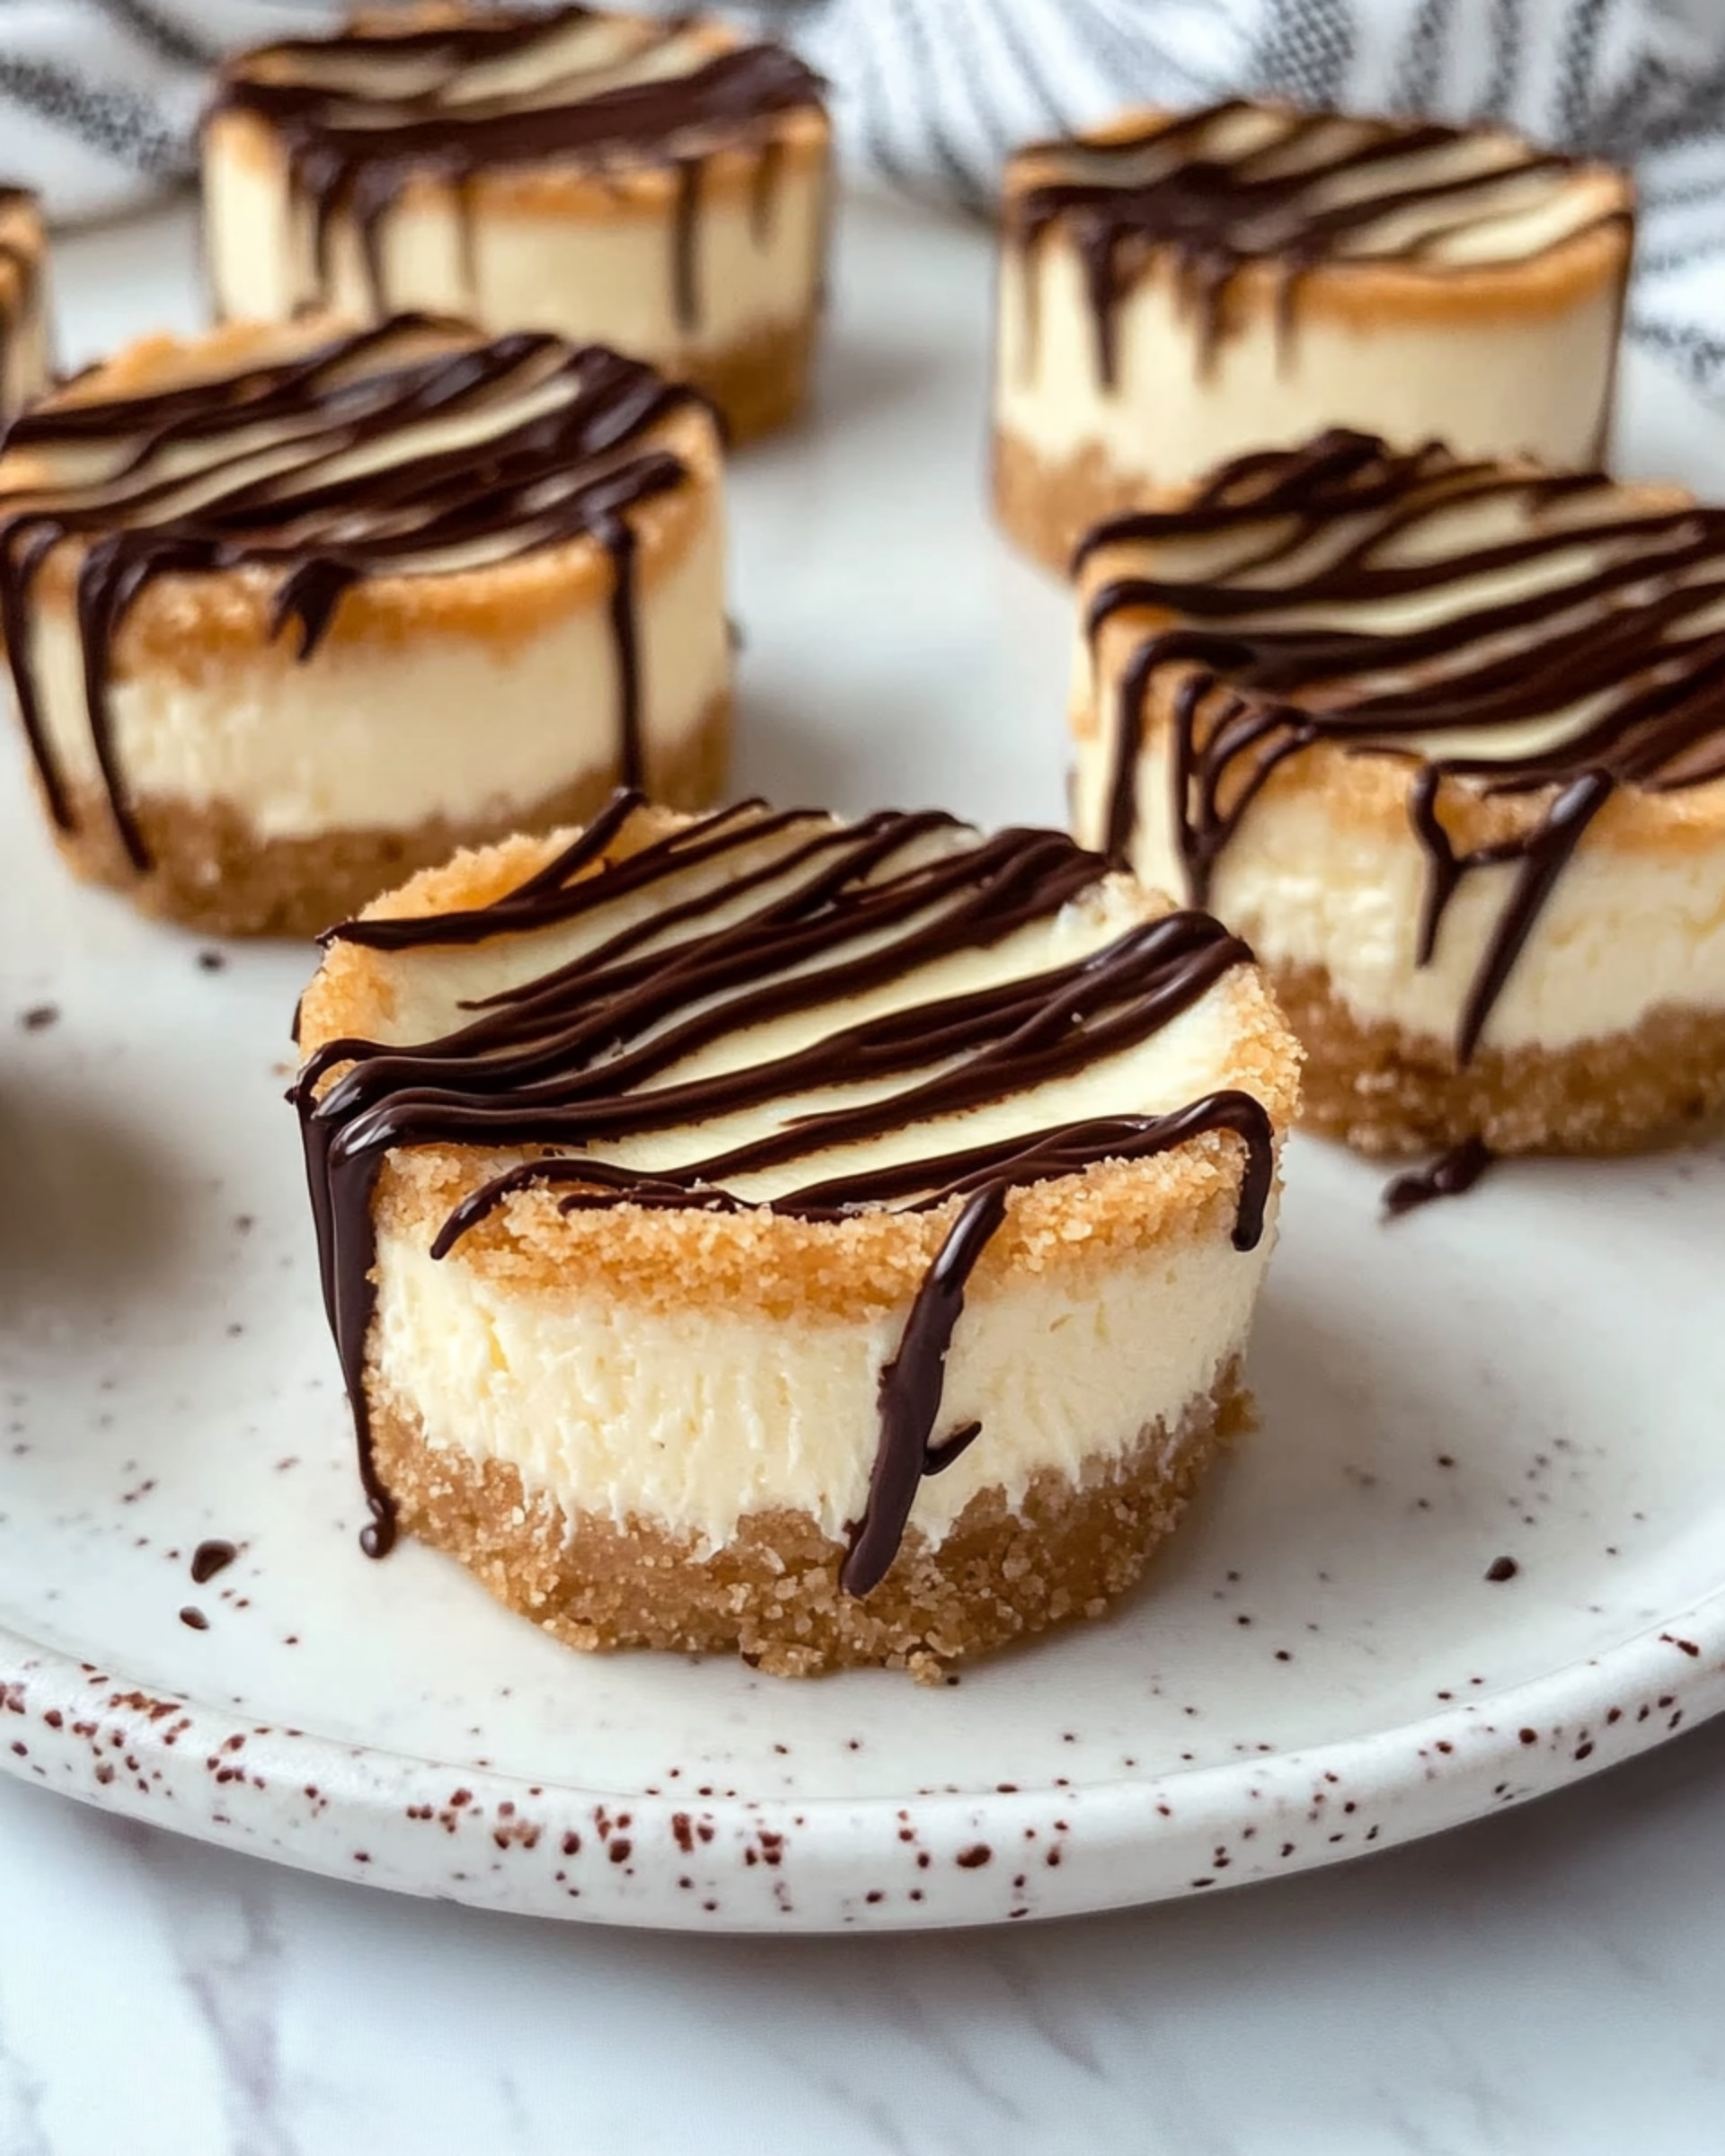
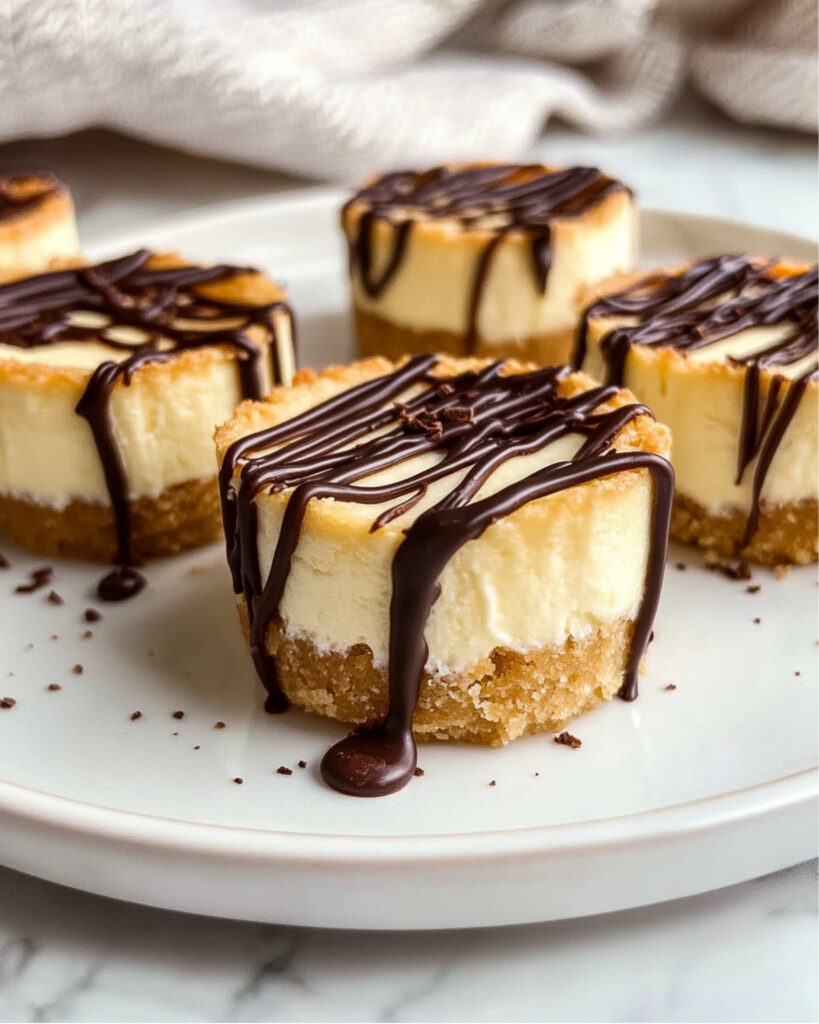
These Mini Cheesecakes are little bites of heaven that combine a nutty almond crust with a creamy, tangy filling. They’re perfectly portioned desserts that deliver all the decadence of a traditional cheesecake without the fuss of a full-sized version. Best of all, they require minimal active time in the kitchen, making them ideal for both special occasions and weeknight treats!
Why You’ll Love This Recipe
- Perfect Portions: These individually-sized cheesecakes help with portion control while still satisfying your sweet tooth completely.
- Make-Ahead Friendly: Prepare these a day before your gathering and simply pull them out when it’s time for dessert – they actually taste better after chilling overnight!
- Healthier Twist: Using almond flour, Greek yogurt, and natural sweeteners gives these treats a nutritional boost compared to traditional versions without sacrificing flavor.
- Customizable: The simple base recipe welcomes endless topping variations to match any season or preference.

Ingredients You’ll Need
For the Bottom Crust:
- Almond flour: Creates a nutty, gluten-free base that adds wonderful texture while being more nutritious than graham crackers.
- Coconut sugar: Provides a caramel-like sweetness with lower glycemic impact than regular sugar.
- Cinnamon: Just a touch adds warmth and complexity to the crust.
- Olive oil: Binds the crust ingredients together; use a light olive oil or substitute any neutral oil if preferred.
For the Cheesecake Layer:
- Cream cheese: The star ingredient that gives that classic tangy cheesecake flavor. Make sure it’s at room temperature for a smooth batter!
- Egg: Provides structure and helps the filling set properly.
- Greek yogurt: Adds protein and creates a lighter texture while maintaining creaminess.
- Maple syrup: Sweetens naturally with a depth of flavor regular sugar can’t match.
- Vanilla extract: Enhances all the other flavors and adds that essential warm note.
Optional Toppings:
- Chocolate chips: Melted for drizzling across the top for a touch of decadence.
- Fresh raspberries: Adds a pop of color and a tart contrast to the creamy cheesecake.
Note: You’ll find the complete list of ingredients, along with their exact measurements, in the printable recipe card at the bottom of this post.
Variations
These mini cheesecakes are incredibly versatile. Here are some exciting ways to mix things up:
- Fruit Lovers: Top with strawberry compote, blueberry sauce, or sliced fresh peaches.
- Chocolate Addicts: Mix mini chocolate chips directly into the batter or add a chocolate ganache layer on top.
- Seasonal Twists: Add pumpkin puree and pumpkin spice in fall, or lemon zest and blueberries in summer.
- Nutty Version: Incorporate chopped nuts into the crust or sprinkle toasted pecans on top.
- Low-Carb Option: Replace the maple syrup with a monk fruit sweetener for a keto-friendly treat.
How to Make Mini Cheesecakes
Step 1: Prepare the Crust
Preheat your oven to 350°F and line a muffin tin with 8 liners. Combine almond flour, coconut sugar, cinnamon, and oil in a bowl until the mixture resembles wet sand. Divide evenly among the liners (about 1 tablespoon each) and press down firmly. Bake for 10-12 minutes until golden, then place on a cooling rack but keep the oven on.
Step 2: Make the Filling
Beat the room temperature cream cheese with an electric mixer until smooth and fluffy, about 2 minutes. Add the egg, Greek yogurt, maple syrup, and vanilla, then beat on low speed until just combined and smooth. Don’t overmix – too much air will cause cracks!
Step 3: Bake the Cheesecakes
Divide the filling evenly among the muffin cups with the pre-baked crusts. Bake for 20 minutes or until the edges are set but the centers still have a slight jiggle. Turn off the oven but leave the cheesecakes inside with the door cracked for about 10 minutes to prevent cracking from sudden temperature changes.
Step 4: Cool and Chill
Allow the cheesecakes to continue cooling in the pan for 30 minutes at room temperature. Then remove them from the pan and refrigerate for at least 2 hours, but preferably overnight for the best flavor and texture.
Step 5: Add Toppings and Serve
Just before serving, drizzle with melted chocolate, add fresh berries, or apply your topping of choice!
Pro Tips for Making the Recipe
- Room Temperature Ingredients: Make sure your cream cheese and egg are at room temperature for the smoothest possible cheesecake filling.
- Don’t Overmix: Beat the filling just until ingredients are incorporated to prevent adding too much air, which can lead to cracks.
- Watch for Doneness: The centers should still be slightly jiggly when you remove them from the oven – they’ll continue to set as they cool.
- Cooling Gradually: Allow the cheesecakes to cool slowly to prevent the tops from cracking.
- Silicone Liners: These work exceptionally well for easy removal without sticking.
How to Serve
These mini cheesecakes are versatile when it comes to serving options:
Elegant Dessert Presentation:
Place each mini cheesecake on a small dessert plate with a drizzle of chocolate sauce, a fresh raspberry, and a mint leaf for a restaurant-worthy presentation.
Dessert Platter:
Arrange several varieties with different toppings on a serving tray for parties, allowing guests to choose their favorite.
Beverage Pairing:
These pair beautifully with coffee, tea, or even a dessert wine like Moscato. For an indulgent treat, serve with a small glass of Bailey’s Irish Cream.
Make Ahead and Storage
Storing Leftovers
Store the mini cheesecakes in an airtight container in the refrigerator for up to 5 days. The flavor actually improves after the first 24 hours as the flavors meld.
Freezing
These cheesecakes freeze beautifully! Place them in a single layer in an airtight container and freeze for up to 3 months. Add toppings only after thawing.
Reheating
No reheating necessary! Simply thaw frozen cheesecakes overnight in the refrigerator or for about 2 hours at room temperature before serving.
FAQs
-
Can I make these mini cheesecakes without almond flour?
Absolutely! You can substitute graham cracker crumbs, crushed cookies, or even crushed nuts mixed with a bit of flour. Just maintain the same ratio with the oil to ensure your crust holds together.
-
Why did my mini cheesecakes crack on top?
Cracks usually happen from overmixing (which incorporates too much air) or rapid temperature changes. Beat ingredients just until combined and allow cheesecakes to cool gradually. A little sour cream topping can cover any cracks beautifully!
-
Can I make these without dairy?
Yes, you can use dairy-free cream cheese and coconut yogurt instead of Greek yogurt. The texture might be slightly different but still delicious. Just be sure your dairy-free products aren’t too watery.
-
How do I know when the mini cheesecakes are done baking?
They’re ready when the edges are set but the centers still have a slight wobble when you gently shake the pan. They’ll continue to set as they cool. If they’re completely firm in the oven, they’re likely overbaked.
Final Thoughts
These Mini Cheesecakes deliver the perfect balance of indulgence and simplicity. They’re easier than a full cheesecake but just as impressive, and their individual portions make them ideal for gatherings or keeping in the freezer for whenever a craving strikes. With their nutty crust and creamy filling, they’re sure to become a regular in your dessert rotation. Give them a try this weekend – your taste buds will thank you!
Print
Mini Cheesecakes Recipe
- Prep Time: 1 hour 20 minutes
- Cook Time: 30 minutes
- Total Time: 3 hours 20 minutes
- Yield: 8 servings
- Category: Desserts
- Method: Baking
- Diet: Vegetarian
Description
Mini cheesecakes made with a nutty almond flour crust and a creamy Greek yogurt-based cheesecake layer, topped optionally with melted chocolate and fresh raspberries. Perfect for a delightful dessert or snack.
Ingredients
Bottom Crust:
-
- 3/4 cup almond flour
- 1 tbs coconut sugar
- 1/4 tsp cinnamon
- 5 1/2 tsp olive oil (or any neutral oil)
Cheesecake Layer:
-
- 4 oz cream cheese, room temperature
- 1 egg
- 1/2 cup Greek yogurt
- 1/4 cup maple syrup (or honey)
- 1/2 tsp vanilla extract
Optional Topping:
- 1 tbs chocolate chips, melted
- A few raspberries
Instructions
- Prepare the Bottom Crust: Preheat your oven to 350℉. Line a 12-slot muffin tray with 8 muffin liners and set aside. In a medium bowl, mix together all the Bottom Crust ingredients until fully incorporated. Transfer about 1 tbs of the mixture to each of the 8 muffin cups and press down with the back of a spoon or rubber spatula to pack it in securely. Bake for 10-12 minutes or until golden brown. Once done, transfer the tray to a wire rack and keep the oven on.
- Prepare the Cheesecake Layer: In a medium bowl, use an electric hand mixer on low speed to beat the cream cheese for about 2 minutes until creamy. Add the egg, Greek yogurt, maple syrup (or honey), and vanilla extract, and mix until smooth and evenly incorporated, about 1 minute. Divide the mixture evenly between the muffin liners on top of the baked crust. Bake for 20 minutes or until the edges are set. Remove the pan from the oven and leave the cheesecakes to sit in the tray for 30 minutes.
- Cool and Refrigerate: After cooling, carefully remove the mini cheesecakes from the tray and refrigerate them for at least 2 hours before serving to allow them to set completely.
- Add Optional Toppings (if desired): Before serving, drizzle melted chocolate on top and garnish with a few raspberries for an elegant touch.
Notes
- Ensure the cream cheese is at room temperature for easier mixing and smoother results.
- If using honey instead of maple syrup, the flavor may vary slightly.
- These mini cheesecakes can be kept in the fridge for up to 3-4 days in an airtight container.
- Feel free to experiment with other toppings like fresh fruit, crushed nuts, or caramel drizzle.
Nutrition
- Serving Size: 1 mini cheesecake


