

If you’ve got a sweet tooth and a soft spot for creamy desserts, you’re going to absolutely adore this Milkybar Cheesecake Recipe. I stumbled upon this no-bake gem a while back, and let me tell you, it’s become my go-to when I want something fuss-free but indulgent. Smooth, sweet, and decadently milky, it’s the kind of cheesecake that wins over everyone – friends, family, and even guests who usually say they “don’t like cheesecake.” Trust me, you’ll want to keep this recipe handy for your dessert arsenal.
Why You’ll Love This Recipe
- No Baking Required: Perfect for when you want a delicious dessert without turning on the oven.
- Creamy and Dreamy Texture: The Milkybar chocolate adds a unique silky sweetness that’s hard to resist.
- Kid-Friendly and Crowd Pleaser: My family goes crazy for this, and it’s an easy win at parties.
- Simple Ingredients: You likely already have most of these in your pantry or fridge!

Ingredients You’ll Need
This Milkybar Cheesecake Recipe strikes the perfect balance with each ingredient playing a vital role, from the crunchy digestives base to the velvety cream cheese and those irresistible Milkybar buttons on top. When I buy ingredients, I always opt for full-fat cream cheese and double cream – it makes a big difference in creaminess.

- Digestives: These make for a buttery, crumbly base that’s sturdy enough to hold the filling.
- Unsalted butter: Use good quality butter for melting into the crumbs, giving the base a rich flavor.
- Milkybar chocolate: The star of the show—its creamy white chocolate makes the cheesecake luxuriously sweet.
- Full-fat cream cheese: For that classic cheesecake tang and smooth texture.
- Icing sugar: Just enough sweetness without overpowering the Milkybar’s delicate flavors.
- Vanilla extract: Adds a subtle warmth and depth to the filling.
- Double cream: Whipped for the filling and topping to keep things light and fluffy.
- Milkybar buttons: Perfect for garnishing, adding both charm and extra bursts of creamy white chocolate.
Variations
One of my favorite things about this Milkybar Cheesecake Recipe is how easy it is to make your own. I’ve played around with a few versions depending on the season or who’s coming for dessert. Don’t be afraid to switch things up to match your taste or dietary preferences!
- Berry Topping: One summer, I added a fresh raspberry compote on top; it cuts through the sweetness and adds a tangy twist that everyone loved.
- Nutty Crust: For a crunchier base, mix crushed pecans or almonds into the digestives before adding butter.
- Vegan Version: Swap cream cheese for a plant-based alternative and use coconut cream instead of double cream – it changes the flavor but keeps the creaminess.
- Chocolate Drizzle: I’ve drizzled melted milk or dark chocolate over the chilled cheesecake for an extra layer of chocolate goodness.
How to Make Milkybar Cheesecake Recipe
Step 1: Prepare the Base with Crunch and Care
Start by crushing the digestives into fine crumbs. I usually pop them into a food processor to save time, but you can place them in a ziplock bag and bash them with a rolling pin. Melt the unsalted butter gently and stir it into the crumbs until everything is evenly coated. Press this mixture firmly into the base of a springform tin to create an even layer. A trick I learned is to use the back of a spoon or the bottom of a glass to really pack it down tight – this helps prevent a crumbly crust later on.
Step 2: Melt the Milkybar Chocolate Smoothly
Break the Milkybar chocolate into chunks and melt it slowly over a bain-marie or gently in the microwave in short bursts, stirring often to avoid burning. I always keep the heat low because white chocolate burns easily and develops a grainy texture if overheated. Once melted, set it aside to cool slightly – you don’t want it so hot that it curdles your cream cheese mixture.
Step 3: Mix the Cream Cheese Filling Just Right
In a bowl, whisk together the full-fat cream cheese, icing sugar, and vanilla extract until smooth and creamy. Gradually pour in your cooled melted Milkybar chocolate, mixing gently to combine. Then, whip 300 ml of double cream to soft peaks and fold it carefully into the filling. This folding technique keeps the mixture airy and light – I learned that the hard way after overmixing and ending up with a dense cheesecake!
Step 4: Assemble and Chill for Patience-Rewarded Perfection
Pour your luscious filling over the prepared base, smoothing the top with a spatula. Whip the remaining 150 ml of double cream with 2 tablespoons of icing sugar until fluffy and spread this gently on top. Pop the cheesecake in the fridge to set — I recommend a minimum of 6 hours, but overnight is ideal. It takes some patience, but that set and creamy texture? Worth every minute.
Step 5: Garnish and Serve with Style
Before serving, drizzle melted Milkybar chocolate over the top and scatter Milkybar buttons for that extra charm. The buttons make it feel extra special, especially if you have kids around—they love picking them off slice by slice!
Pro Tips for Making Milkybar Cheesecake Recipe
- Room Temperature Ingredients: Make sure your cream cheese and double cream are at room temp for easier mixing and smoother texture.
- Gentle Folding: When folding whipped cream, be gentle to keep the mixture light and airy.
- Avoid Overheating Chocolate: Melt the Milkybar chocolate slowly to prevent it from seizing or becoming grainy.
- Use a Springform Tin: It makes removing your cheesecake a breeze without breaking the edges.
How to Serve Milkybar Cheesecake Recipe

Garnishes
I’m a huge fan of keeping garnishes simple but charming. Milkybar buttons add a whimsical touch that’s perfect for parties or family gatherings. Sometimes, I toss on a few fresh mint leaves or some crushed pistachios for a subtle crunch and color contrast that makes the cheesecake look as good as it tastes.
Side Dishes
This cheesecake pairs beautifully with fresh berries—strawberries and raspberries are my go-to. You could also serve it alongside a cup of strong coffee or a light dessert wine to complement the creamy sweetness.
Creative Ways to Present
For birthdays, I’ve decorated this Milkybar Cheesecake Recipe with colorful sprinkles and edible glitter to make it pop. Trimming the edges with a piped border of whipped cream adds a professional look for special occasions. And if you’re feeling extra creative, individual no-bake cheesecake jars with a Milkybar button on top are sure to impress your guests.
Make Ahead and Storage
Storing Leftovers
This cheesecake keeps well in the fridge for up to 3 days. I always cover it tightly with cling film to prevent it from absorbing other fridge odors. Leftovers always taste just as good the next day, sometimes even better as the flavors have had more time to meld.
Freezing
I’ve frozen slices successfully by wrapping them individually in plastic wrap and then placing them in an airtight container. Thaw overnight in the fridge before serving. Note that texture might soften slightly but it’s still delicious and perfect for prepping desserts ahead of time.
Reheating
Since this is a no-bake cheesecake, reheating isn’t necessary. However, if you prefer your cheesecake closer to room temperature, just let it sit out for 15-20 minutes before slicing and serving. This brings out the creamy texture beautifully.
FAQs
-
Can I use a different type of cookie for the base?
Absolutely! While digestives are traditional and provide a lovely buttery crunch, you can swap them for graham crackers, shortbread, or even ginger snaps for a spicier twist. Just make sure to adjust the sugar if your cookies are particularly sweet or savory.
-
Is it necessary to use full-fat cream cheese and double cream?
For the creamiest, richest texture, I recommend using full-fat versions. Low-fat alternatives may work, but the cheesecake could end up less smooth and more watery.
-
How long does the cheesecake need to set?
It should chill for at least 6 hours, but overnight is best. This ensures it sets properly and the flavors have time to develop fully.
-
Can I make this cheesecake ahead for a party?
Yes, this cheesecake is perfect for making a day or two in advance. Just keep it covered in the fridge and add garnishes right before serving for a fresh look.
Final Thoughts
This Milkybar Cheesecake Recipe is one of those magical desserts that’s as enjoyable to make as it is to eat. I love how simple ingredients come together to create something truly special – creamy, sweet, and satisfying. Whether you’re serving it on a weeknight or bringing it to a dinner party, it’s sure to get rave reviews. Give it a try and let me know how your cheesecake turns out—I’m betting you’ll fall in love with it just like I did.
Print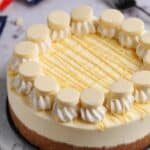
Milkybar Cheesecake Recipe
- Prep Time: 10 minutes
- Cook Time: 10 minutes (including melting chocolate and mixing)
- Total Time: 6 hours 20 minutes (including chilling time)
- Yield: 14 slices
- Category: Dessert
- Method: No-Cook
- Cuisine: British
Description
A sweet, creamy, and indulgent no-bake Milkybar Cheesecake featuring a crunchy digestive biscuit base topped with a smooth Milkybar and cream cheese filling, finished with whipped cream and chocolate buttons. Perfect for Milkybar lovers looking for an easy and delicious dessert.
Ingredients
Base
- 300 g digestives
- 150 g unsalted butter
Filling
- 300 g Milkybar chocolate
- 500 g full-fat cream cheese
- 75 g icing sugar
- 1 tsp vanilla extract
- 300 ml double cream
Topping
- 150 ml double cream
- 2 tbsp icing sugar
- 50 g melted Milkybar chocolate
- Milkybar buttons for decoration
Instructions
- Prepare the base: Crush the digestives into fine crumbs and melt the unsalted butter. Mix the crumbs and melted butter together until well combined. Press the mixture firmly and evenly into the base of a springform cake tin to form the crust. Chill in the refrigerator.
- Melt the chocolate: Break the Milkybar chocolate into pieces and gently melt them using a microwave in short bursts or a heatproof bowl over simmering water, stirring until smooth.
- Make the filling: In a large bowl, beat the full-fat cream cheese until smooth. Add the icing sugar and vanilla extract and mix well. Pour in the melted Milkybar chocolate and combine thoroughly.
- Whip the cream: In a separate bowl, whip the 300 ml double cream until soft peaks form. Gently fold the whipped cream into the cream cheese and chocolate mixture until fully incorporated and smooth.
- Assemble the cheesecake: Pour the filling over the chilled digestive base and smooth the top with a spatula. Cover and refrigerate for at least 6 hours or preferably overnight to set properly.
- Prepare the topping: Whip the remaining 150 ml double cream with 2 tablespoons of icing sugar until stiff peaks form. Spread or pipe this whipped cream over the set cheesecake.
- Decorate: Drizzle melted Milkybar chocolate over the whipped cream topping and scatter Milkybar buttons for decoration.
- Serve: Slice carefully and serve chilled for a rich, creamy dessert experience.
Notes
- This is a no-bake cheesecake, perfect for those who want a creamy dessert without turning on the oven.
- Use full-fat cream cheese and cream for the best texture and flavor.
- Chilling the cheesecake overnight ensures a firm set and easier slicing.
- Decorate with extra Milkybar buttons or white chocolate shavings for an extra special touch.
Nutrition
- Serving Size: 1 slice
- Calories: 502 kcal
- Sugar: 26 g
- Sodium: 249 mg
- Fat: 41 g
- Saturated Fat: 24 g
- Unsaturated Fat: 15 g
- Trans Fat: 0.3 g
- Carbohydrates: 38 g
- Fiber: 2 g
- Protein: 5 g
- Cholesterol: 110 mg


