

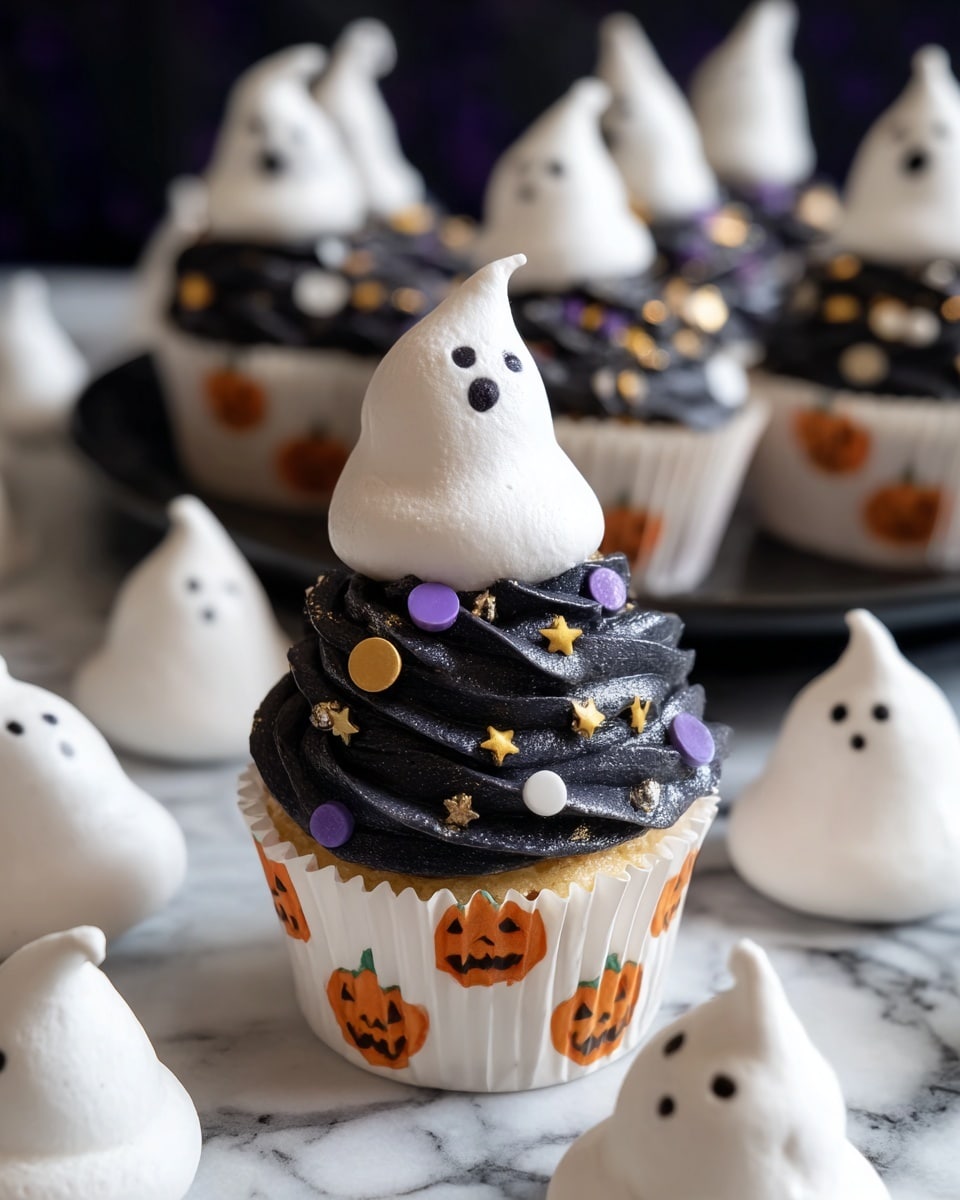
If you’re looking for a fun, spooky treat that’s both light and irresistible, you’ve got to try this Meringue Ghosts Recipe. I absolutely love how these little edible ghosts turn out — crisp on the outside, delicate and airy inside, and just the right amount of sweetness. When I first made them, I was amazed at how simple ingredients like egg whites and sugar could transform into something so delightfully festive. Stick around, and I’ll share tips to help you whip up these charming meringue ghosts that will impress your family and friends with no stress at all!
Why You’ll Love This Recipe
- Super Simple Ingredients: You only need egg whites, sugar, and a bit of black food coloring to make magic happen.
- Perfect Texture: Crisp, airy meringues that practically melt in your mouth every time.
- Halloween Fun: Makes a spooky yet elegant dessert or party snack that kids and adults love.
- Make-Ahead Friendly: You can bake them well in advance and decorate when ready to serve.

Ingredients You’ll Need
The ingredients for this Meringue Ghosts Recipe are straightforward but essential. Using room temperature egg whites really helps you get those fluffy peaks, and superfine sugar dissolves seamlessly for that glossy finish. I always recommend investing in gel or paste black food coloring because it gives you precise control when drawing those little ghostly faces.
- Caster (Super Fine) Sugar: This sugar dissolves quickly into the egg whites, giving your meringue a smooth texture.
- Egg Whites (Medium, Room Temperature): Room temperature whites whip up better and give you more volume.
- Black Food Colouring Gel or Paste: Perfect for drawing eyes and mouths with an icing pen or brush.
Variations
I love that you can get creative with this Meringue Ghosts Recipe—whether it’s changing up the decorations or tweaking flavors, it’s super flexible. For Halloween parties, adding a splash of vanilla or almond extract to the meringue for a subtle twist always goes down great. I encourage you to make it your own and have fun!
- Chocolate-Dipped Ghosts: After baking, dip the ghost bottoms in melted chocolate for an extra indulgent treat—my family goes crazy for this version.
- Colored Ghosts: Add a tiny amount of food color to the meringue before piping for pastel ghost variations.
- Flavored Meringue: Try a drop of peppermint or orange extract to give a festive twist.
- Mini Ghosts: Use a smaller piping tip to create bite-sized ghosts perfect for a party platter.
How to Make Meringue Ghosts Recipe
Step 1: Preheat, Prep, and Whisk Your Egg Whites
Start by preheating your oven to 100°C (212°F). Line a large baking sheet with non-stick baking parchment to ensure the ghosts won’t stick. Here’s a crucial step I learned the hard way: make sure your mixing bowl is absolutely spotless and free from any grease. Even a hint of fat can stop your egg whites from whipping properly. Use a glass or metal bowl for the best results, and avoid plastic.
Step 2: Whip Egg Whites and Slowly Add Sugar
Whisk your room-temperature egg whites on medium speed until they reach soft peaks. You’ll see them start to puff up, hold shape but with a little wobble. Now comes the key: add your caster sugar one spoonful at a time, still whisking. This slow addition helps the sugar dissolve, giving you that glossy, stiff meringue. Don’t rush this part—keep whisking until the meringue is shiny and holds stiff peaks when you pull up the whisk. I usually test by flipping the bowl upside down to make sure nothing falls.
Step 3: Pipe the Ghosts and Bake Low and Slow
Fit a piping bag with a 1cm round nozzle, then spoon in your meringue mixture. Pipe ghost shapes onto the baking sheet—imagine a little rounded ghost with a trailing tail. Don’t worry about perfect shapes; charming little imperfections make them even more fun. Bake at the low temperature for about an hour or until the ghosts are crisp and lift easily. Then, here’s the trick: turn off the oven and leave them in overnight to dry out completely. This is what makes them perfectly crisp without browning.
Step 4: Decorate with Faces
Once your meringue ghosts are completely cooled, it’s time to bring them to life! Use a black food coloring pen or a tiny paintbrush with gel paste to draw spooky little eyes and mouths. I usually let them sit for a bit after decorating to ensure the faces set nicely without smudging. This is the part that kids get super excited about—they love adding their own scary or silly expressions.
Pro Tips for Making Meringue Ghosts Recipe
- Spotless Bowls Only: I can’t stress enough how important this is—washing with hot soapy water and drying with a lint-free cloth works wonders.
- Room Temp Egg Whites: I used to skip this step but now I swear by it because it whips up so much fluffier and faster.
- Low and Slow Baking: Patience is key here—you want to dry the ghosts out, not brown them, so avoid bumping up the heat.
- Leave in Oven to Dry: Leaving meringues in the switched-off oven is a game changer for achieving perfect crispness without cracks.
How to Serve Meringue Ghosts Recipe
Garnishes
I usually keep decorations simple with just the classic black ghostly faces, but sometimes I add edible glitter to give them a magical shimmer. For a fun party, pairing them with colorful sprinkles around the plate adds a festive touch. The contrast really makes the white meringues pop visually.
Side Dishes
These meringue ghosts are perfect on their own but can also be served alongside a rich pumpkin mousse or hot chocolate when you want a cozy fall vibe. I often serve them as a light dessert at Halloween dinners to balance heavier mains.
Creative Ways to Present
For Halloween parties, I’ve placed these ghosts atop cupcakes or mini cakes to instantly transform them into spooky treats. Floating them on a “graveyard” dirt pudding made with crushed cookies is a crowd-pleaser, especially with kids. Setting them on a mirrored tray with low blue lighting creates a ghostly glow that’s perfect for Halloween ambiance.
Make Ahead and Storage
Storing Leftovers
Once completely cool, store your meringue ghosts in an airtight container in a cool, dry place. I’ve found they stay crisp for up to a week this way. Just avoid humid areas because moisture is the enemy of meringue crispness.
Freezing
Yes, you can freeze meringue ghosts! I wrap them well in cling film and place them in an airtight container. When you’re ready, thaw at room temperature—they come back just as crisp as fresh.
Reheating
Reheating isn’t really needed, but if you want to freshen them up, pop them in a very low oven (around 90°C/194°F) for 5-10 minutes to remove minor moisture and revive crispness.
FAQs
-
Can I use regular granulated sugar instead of caster sugar?
Caster sugar is finer and dissolves more easily, which helps create a smooth, shiny meringue. If you only have granulated sugar, you can pulse it a few times in a food processor to make it finer, or use extra time to whisk so it fully dissolves.
-
Why didn’t my egg whites whip up stiff peaks?
Common reasons include grease on your bowl or whisk, egg whites that are too cold, or accidentally getting yolk into your whites. Make sure your tools are clean, use room temperature whites, and separate eggs carefully for best results.
-
Can I make these without piping?
Absolutely! You can spoon the meringue onto the baking sheet and shape them gently with the back of the spoon. The ghosts will be a bit more rustic but still delicious and spooky.
-
How long do meringue ghosts keep?
Stored in an airtight container in a dry place, they stay fresh and crisp for about a week. Avoid humid conditions, which can make them soft.
Final Thoughts
This Meringue Ghosts Recipe has become a Halloween staple in my house because it’s whimsical, easy, and always impresses guests with its delicate crunch and playful appearance. I love how you can personalize each ghost, turning baking into a creative activity as much as a tasty one. If you want a fun baking project that’s bound to bring smiles and a little spooky delight, this recipe is your go-to. Give it a try—you’ll enjoy every step as much as the outcome!
Print
Meringue Ghosts Recipe
- Prep Time: 30 minutes
- Cook Time: 1 hour
- Total Time: 1 hour 30 minutes
- Yield: Makes about 20 ghosts
- Category: Dessert
- Method: Baking
- Cuisine: Western
Description
Delightfully airy and sweet, these Meringue Ghosts are a perfect Halloween treat. Made with simple ingredients like egg whites and caster sugar, they are baked slowly to achieve a crisp, melt-in-your-mouth texture. Finished with cute black eyes and mouths, these whimsical ghosts are both fun to make and delicious to eat.
Ingredients
Ingredients
- 120g Caster (Super Fine) Sugar
- 2 Medium Egg Whites, at room temperature
- Black Food Colouring Gel or Paste for the eyes and mouth
Instructions
- Preheat oven and prepare tray: Preheat your oven to 100°C (212°F) or Gas Mark 1/2. Line a large baking sheet with non-stick baking parchment to prevent the meringues from sticking.
- Whisk the egg whites: In a spotless, grease-free bowl, whisk the egg whites at medium speed until soft peaks form. Gradually whisk in the caster sugar, a spoonful at a time, continuing to whisk until the mixture becomes shiny and stiff.
- Pipe the ghosts: Spoon the stiff meringue into a piping bag fitted with a 1cm round nozzle. Pipe ghost shapes onto the lined baking sheet until all the meringue is used up.
- Bake and dry the meringues: Place the baking sheet in the oven and bake for about 1 hour or until the meringues are crisp and lift easily from the parchment. After baking, turn off the oven and leave the meringues inside for several hours or overnight to dry completely.
- Decorate the ghosts: Once the meringues are completely cool, use black food colouring gel or a black icing pen to add eyes and a mouth to each ghost. Allow the decoration to set before serving.
Notes
- Ensure the bowl and whisk are completely clean and free of grease to help the egg whites whisk properly.
- You can use either a black icing pen or a small paintbrush with black food colour paste to create the ghost faces.
Nutrition
- Serving Size: 1 ghost (approximate)
- Calories: 25
- Sugar: 6 g
- Sodium: 5 mg
- Fat: 0 g
- Saturated Fat: 0 g
- Unsaturated Fat: 0 g
- Trans Fat: 0 g
- Carbohydrates: 6 g
- Fiber: 0 g
- Protein: 1 g
- Cholesterol: 0 mg
