

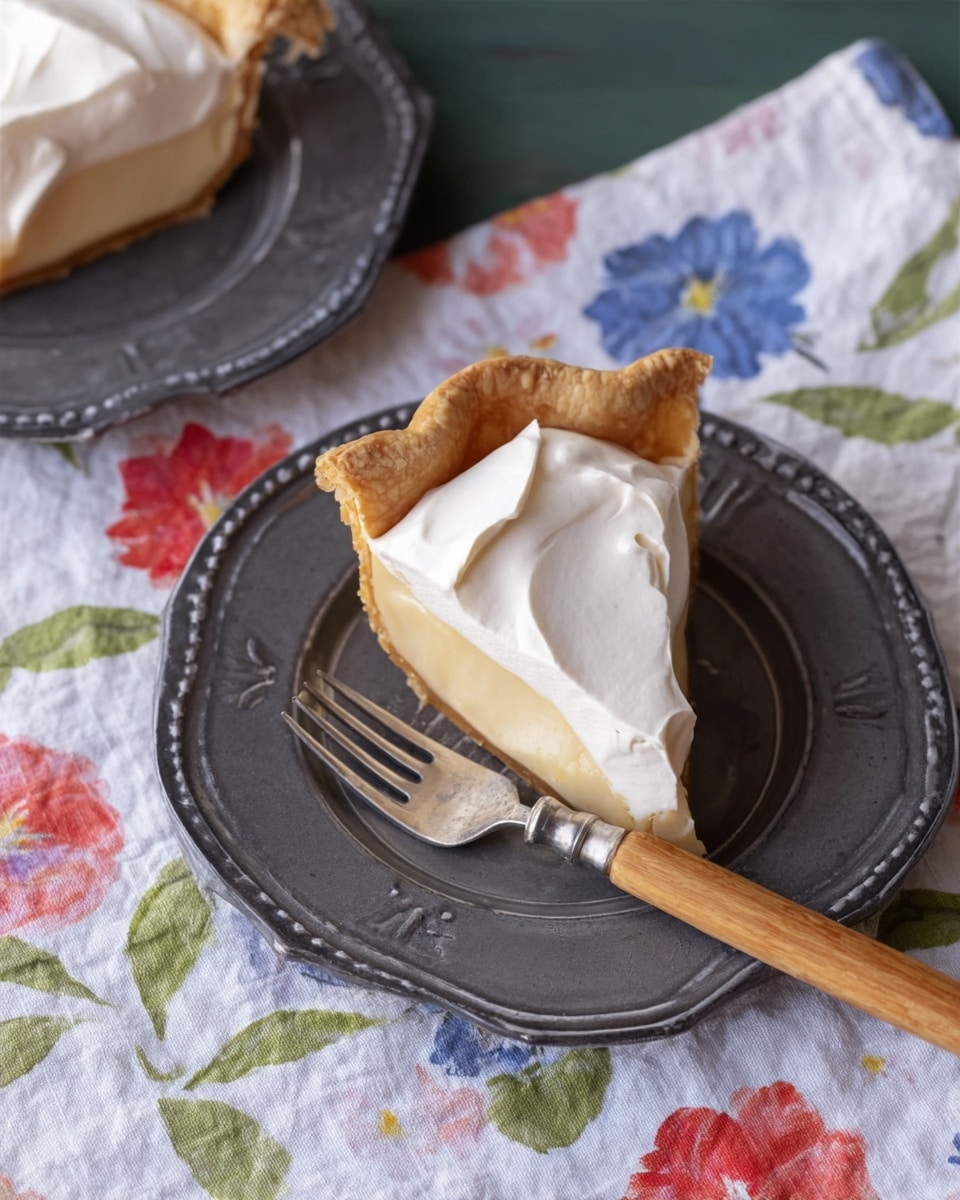
If you’re on the hunt for a dessert that feels both cozy and a little fancy, you absolutely have to try this Maple Cream Pie Recipe. I love this pie because it hits that perfect balance between rich, creamy, and sweet without being overly sugary, and the deep, warm flavor of maple syrup gives it such a comforting vibe. You’re going to find that this pie isn’t just delicious, it’s something special enough to impress your guests or make family gatherings that much sweeter.
Why You’ll Love This Recipe
- Rich Maple Flavor: The maple syrup reduction creates a deep, natural sweetness that elevates the pie.
- Silky Creamy Texture: The custard filling is luxuriously smooth and velvety, thanks to the perfect balance of cream and milk.
- Delightfully Homemade: Making your own crust and custard adds that heartfelt touch that store-bought pies just can’t match.
- Perfect for Any Occasion: Whether it’s a casual night in or a holiday spread, this pie always steals the show.

Ingredients You’ll Need
I like how the ingredients for this Maple Cream Pie Recipe come together – they’re simple but thoughtfully chosen to build layers of flavor and creaminess. Keep an eye out for a good quality dark maple syrup; it really makes all the difference.
- Best Ever Pie Crust: A buttery and flaky crust is essential here—it’s the perfect base to hold that creamy filling.
- Dark Maple Syrup: Go for the darker grade if you can—it brings a richer, more intense maple flavor compared to light syrup.
- Whole Milk: Adds subtle creaminess without weighing down the custard.
- Heavy Whipping Cream: This is used twice—once for the filling for richness, and again for whipping to top the pie.
- Butter: A bit of softened butter enriches the custard and smooths out the flavors.
- Egg Yolks: They’re the ultimate thickening and binding agents that give this pie its luscious texture.
- Cornstarch: A great thickener that keeps the filling silky and stable without any grit.
- Salt: Just a pinch to balance all the sweetness and boost the maple notes.
Variations
While I love the classic version of this Maple Cream Pie Recipe, I’ve found there’s room to play around with flavors and textures to make it your own. Whether you want to keep it traditional or shake things up a bit, here are a few ideas that have worked well for me.
- Nutty Twist: Adding toasted pecans or walnuts into the crust or sprinkled on top gave my pie a lovely crunch my family loved.
- Spiced Maple: A pinch of cinnamon and nutmeg in the custard made it especially warm and comforting during fall months.
- Dairy-Free Option: I swapped coconut cream for the dairy whipping cream once, and though it’s a bit different, it still turned out deliciously creamy.
- Mini Pies: Making individual-sized pies in tart pans was great for a party—everyone got their own, and they looked so cute!
How to Make Maple Cream Pie Recipe
Step 1: Prepare and Bake the Pie Crust
Start by rolling out your pie crust on a lightly floured surface to about a quarter-inch thickness. I like using a 9-inch pie pan for just the right size. After you line the pan, crimp the edges nicely—it not only looks pretty, but helps the crust hold its shape. Don’t forget to line the crust with parchment and fill it with pie weights (or dried beans) before blind baking at 350°F for 20 minutes. Removing the weights and baking for another 15-20 minutes ensures the crust gets golden and crisp without sogginess. Let the crust cool completely before adding your luscious filling.
Step 2: Reduce the Maple Syrup
This next step really brings out that concentrated maple flavor. Pour your dark maple syrup into a saucepan and bring it to a boil over high heat, then let it bubble away until it’s reduced by half—about 10 minutes. You’ll start to notice a thicker consistency and aroma that makes you feel like you’re right in the heart of maple country. Turn off the heat once done.
Step 3: Heat the Dairy Mixture
In a separate saucepan or a microwave-safe jug, combine your whole milk, one cup of heavy cream, and softened butter. Heat this gently until it just starts to simmer—don’t let it boil over! This warm dairy blend will mellow the maple reduction when you stir it in next, setting the stage for a smooth custard.
Step 4: Combine and Simmer the Filling
Slowly stir the warm milk mixture into the reduced maple syrup. Return the pan to medium heat and keep stirring constantly with a wooden spoon until everything melts and combines into a silky mixture. Then, turn the heat down low and let it gently simmer while you prepare the egg yolk mix.
Step 5: Temper the Egg Yolks
Whisk together the egg yolks, cornstarch, and salt in a bowl until smooth. Here’s where a little patience pays off: Slowly ladle the hot milk mixture into your egg yolks while whisking constantly. This tempering step is key to avoid scrambling the eggs—go slow, and keep whisking.
Step 6: Cook the Custard
Pour your tempered filling back into the saucepan and cook over low heat. Whisk continuously for about 5 minutes until it comes to a boil. Once boiling, keep whisking for one more minute to fully set the cornstarch. When the custard is thick and luscious, immediately strain it through a sieve—not skipping this step helps get a perfectly smooth texture by catching any bits that cooked unevenly.
Step 7: Assemble and Chill
Pour the hot custard right into your baked pie crust and smooth the top. You’ll want to let it cool at room temperature for about an hour before transferring it to the fridge to chill for 4 hours or more. This chilling step lets everything set properly and flavors to meld beautifully.
Step 8: Whip and Top
When your pie is ready to serve, whip the remaining cup of heavy cream until soft peaks form—light, airy whipped cream complements the creamy filling perfectly. Dollop it generously on top or pipe decorative swirls for a lovely finish. I always feel like this final touch makes the pie look and taste extra special.
Pro Tips for Making Maple Cream Pie Recipe
- Prevent Soggy Crust: Blind bake the crust thoroughly and let it cool fully before pouring in the filling to keep it crisp.
- Tempering Is Key: Add hot dairy slowly to the egg yolks while whisking to avoid curdling your custard.
- Cooling Patience: Don’t skip the chilling—cold pie slices better and the flavors deepen overnight.
- Strain the Custard: Pouring the cooked custard through a sieve ensures an ultra-smooth texture that feels like heaven.
How to Serve Maple Cream Pie Recipe
Garnishes
I usually keep the garnish simple—a cloud of lightly sweetened whipped cream and a few toasted pecan halves for crunch and color. Sometimes I sprinkle just a touch of cinnamon or a few flakes of sea salt to highlight the maple’s sweetness. A little fresh maple syrup drizzle on top doesn’t hurt either if you want to amp up the maple vibes!
Side Dishes
This pie pairs wonderfully with fresh fruit, like sliced apples or pears, and a cup of strong coffee or a lightly sweetened tea. For festive occasions, I love serving it alongside vanilla ice cream or a simple scoop of bourbon-spiked whipped cream to give it an extra wow factor.
Creative Ways to Present
One fun idea I tried was making mini maple cream tarts in little tartlet pans topped with a swirl of whipped cream and a single pecan half — they looked fabulous on a dessert platter. You can also dust the top lightly with cocoa powder or edible gold dust for a special holiday touch. A rustic, handwritten tag stuck into the whipped cream labeling the pie as “Maple Magic” was a hit with my guests!
Make Ahead and Storage
Storing Leftovers
I cover the pie tightly with plastic wrap or a pie dome and keep it in the fridge. It stays fresh and creamy for up to 2 days, but honestly, I rarely have leftovers that long. If you do, the flavors only deepen and taste even better the next day.
Freezing
Freezing maple cream pie can be a bit tricky because of the dairy custard and whipped cream topping. I’ve had the best luck freezing just the pie crust and custard layer (without whipped cream) tightly wrapped. When you’re ready, thaw it slowly in the fridge and whip fresh cream for topping. This way, the texture stays smooth and fresh.
Reheating
This pie is best enjoyed chilled, so I don’t recommend reheating. If you prefer it a little warmer, let it sit at room temperature for about 15 minutes before serving. That softens the custard without losing that creamy texture.
FAQs
-
Can I use light maple syrup instead of dark maple syrup?
While you can use light maple syrup, dark maple syrup gives the pie a richer, more complex flavor that really shines through. If you only have light syrup, you might want to increase the quantity slightly or add a pinch of brown sugar for depth.
-
How do I prevent the custard from curdling?
The key is tempering the eggs properly by slowly whisking in the hot milk mixture to the egg yolks. Also, keep your heat low when cooking the custard and stir constantly. Don’t rush this step to avoid lumps or curdling.
-
Can I make the pie a day ahead?
Yes! In fact, this pie tastes even better the next day after chilling thoroughly, so making it a day ahead is perfect for meal prep or holiday hosting.
-
What should I do if my crust puffs up during blind baking?
If the crust starts to puff up, gently press it back down with your pie weights or a fork. Using enough pie weights and pie crust docking (pricking with a fork) helps prevent this problem altogether.
Final Thoughts
I honestly can’t say enough about how much I adore this Maple Cream Pie Recipe. Every time I make it, I get compliments on the smooth, rich filling and that signature maple sweetness that feels like an edible hug. It’s one of those recipes I find myself coming back to again and again—whether to cozy up on a chilly night or serve something special at a gathering. Trust me, once you try it, you’ll want to keep this one in your dessert rotation too. So go ahead, roll up your sleeves and enjoy the magic of homemade maple cream pie with people you love!
Print
Maple Cream Pie Recipe
- Prep Time: 30 mins
- Cook Time: 40 mins
- Total Time: 1 hour 10 mins plus 4 hours chilling
- Yield: 8 servings
- Category: Dessert
- Method: Baking
- Cuisine: American
Description
This Maple Cream Pie is a luscious dessert featuring a tender, buttery pie crust filled with a rich, creamy custard infused with dark maple syrup. The filling is silky smooth and topped with freshly whipped cream, making it a perfect treat for any occasion, especially autumn and holiday gatherings.
Ingredients
Pie Crust
- 1 recipe Best Ever Pie Crust
Filling
- 1¼ cups (12½ oz/354 g) dark maple syrup
- 1½ cups (12 fl oz/360 ml) whole milk
- 1 cup (8 fl oz/240 ml) heavy whipping cream
- 2 tablespoons (1 oz/28 g) butter, softened
- 6 large egg yolks, at room temperature
- ¼ cup (1 oz/28 g) cornstarch
- ½ teaspoon salt
- 1 cup (8 fl oz/240 ml) heavy whipping cream (for topping)
Instructions
- Prepare the pie crust: On a floured surface, roll out the pie crust to a ¼-inch (6-mm) thick round. Line a 9-inch pie tin with the dough and crimp the edges. Place a piece of parchment paper over the crust, fill with pie weights, and bake in a preheated oven at 350°F (180°C) for 20 minutes.
- Bake the crust: Remove the parchment and pie weights, then bake the crust for an additional 15-20 minutes until it is dry and golden brown. Let it cool while preparing the filling.
- Reduce the maple syrup: In a medium high-sided saucepan, bring the maple syrup to a boil over high heat. Let it bubble and reduce by half, which should take about 10 minutes. Turn off the heat afterwards.
- Heat milk mixture: In a separate saucepan or microwave-safe jug, combine whole milk, 1 cup (8 fl oz/240 ml) heavy cream, and softened butter. Heat until simmering.
- Combine milk and syrup: Stir the hot milk mixture into the reduced maple syrup saucepan. Return to medium heat and simmer, stirring constantly with a wooden spoon until the mixture is fully combined and smooth. Turn heat to low.
- Whisk egg mixture: In a large bowl, whisk together egg yolks, cornstarch, and salt. Gradually add the hot milk mixture one ladleful at a time to the eggs while whisking constantly to temper the eggs.
- Cook the custard: Return the combined filling to the saucepan over low heat. Cook, whisking constantly, until the mixture boils (about 5 minutes). Continue whisking for another 1 minute to fully cook the cornstarch.
- Strain and fill crust: Immediately pour the custard through a sieve to remove any solids, then spread the hot custard evenly in the baked pie shell.
- Cool and chill: Let the pie cool at room temperature for one hour, then refrigerate for at least 4 hours to set.
- Top with whipped cream: Before serving, whip the remaining 1 cup (8 fl oz/240 ml) heavy cream to soft peaks and spread or pipe it over the chilled pie.
- Store leftovers: Cover the pie well and refrigerate leftovers for up to 2 days.
Notes
- Use dark maple syrup for the richest flavor and deepest color in the custard.
- Ensure egg yolks are at room temperature to prevent curdling when tempered with hot liquid.
- Whisk constantly during cooking to avoid lumps and prevent the custard from burning.
- Chilling the pie thoroughly is essential for the custard to set properly.
- Leftover pie can be refrigerated for up to 2 days; avoid freezing as it may affect texture.
Nutrition
- Serving Size: 1 slice (1/8 of pie)
- Calories: 380
- Sugar: 42g
- Sodium: 150mg
- Fat: 20g
- Saturated Fat: 13g
- Unsaturated Fat: 6g
- Trans Fat: 0.3g
- Carbohydrates: 45g
- Fiber: 0g
- Protein: 5g
- Cholesterol: 155mg

