

If you’re on the hunt for the ultimate Lemon Bars Recipe that’s both tangy and sweet, you’ve just struck gold. I’m talking about a perfect balance of buttery shortbread crust topped with a bright, lemony filling that’s smooth and just the right amount of tart. Seriously, once you try my take on this classic, you’ll find yourself making it over and over again – it’s that fan-freaking-tastic.
Why You’ll Love This Recipe
- Effortless Elegance: This Lemon Bars Recipe comes together with simple ingredients but tastes like a bakery masterpiece.
- Bright and Zesty Flavor: I love how the fresh lemon zest and juice really make these bars pop with citrusy brightness.
- Perfect Texture Balance: The buttery shortbread crust contrasts beautifully with the silky, tangy filling.
- Family Favorite: My family goes crazy for these bars – they’re perfect for gatherings, dessert trays, or just a sunny afternoon treat.

Ingredients You’ll Need
I like to keep this Lemon Bars Recipe true to its roots with fresh lemons and simple pantry staples. Each ingredient plays a specific role in delivering that balance of flavor and texture that you’ll love biting into.

- All-purpose flour: Divided between the crust and filling, this gives structure and a tender crumb to your bars.
- Powdered sugar: It sweetens the crust delicately and is perfect for dusting since it melts into the surface beautifully.
- Salt: Just a touch brings out all the flavors and balances the sweetness.
- Unsalted butter: Melted for ease, this is key for a rich, tender crust that practically melts in your mouth.
- Lemon zest: This is where the fresh citrus aroma starts – zest releases lemon oils that add vibrant, floral notes.
- Sugar (granulated): Makes the filling sweet but also, combined with zest, gives that zingy lemon power.
- Eggs: These provide structure and help set the silky lemon custard filling.
- Fresh lemon juice: The star of the show! Fresh, tart lemon juice is non-negotiable for that sunshiny tang.
Variations
I love how versatile this Lemon Bars Recipe can be — sometimes I add a little twist depending on my mood or what’s in the pantry. Feel free to personalize!
- Gluten-free crust: I’ve swapped in a gluten-free flour blend for the crust and it still turns out tender and buttery, perfect for those with sensitivities.
- Extra zing: When I want an even brighter punch, I add a teaspoon of lemon extract along with the fresh juice to amplify that lemon flavor.
- Berry topping: Adding fresh raspberries or blueberries right on top before baking offers a lovely contrast and a pop of color.
- Less sweet version: I’ve dialed back sugar by a quarter cup to make it a bit more balanced, especially if serving with rich whipped cream.
How to Make Lemon Bars Recipe
Step 1: Prepare the Buttery Shortbread Crust
Start by preheating your oven to 350°F and lining a 9×13 inch pan with parchment paper for easy removal later. Mix 2 1/2 cups of flour with powdered sugar and salt, then slowly pour in melted butter. I like to use a stand mixer with a paddle attachment here, but mixing by hand works just fine too. If you’re a vanilla fan, this is the moment to add a splash – it adds a subtle warmth that’s lovely against the lemon. Press the crumbly dough evenly into the pan and bake for about 20 minutes, until it’s a light golden brown. Keep an eye on it so the edges don’t get too dark!
Step 2: Make the Lemony Filling
While the crust bakes, pulse granulated sugar and lemon zest together in a food processor until the sugar is pale yellow and infused with zest—this little trick literally transforms the flavor and aroma of the filling. Don’t have a processor? No worries! Just finely mince the zest and mix it into the sugar. Then in a large bowl, combine the zesty sugar with the remaining 1/2 cup flour. Next, whisk in fresh lemon juice and eggs until smooth and combined. It helps to use room temperature eggs to avoid curdling and to get that nice custardy filling.
Step 3: Bake and Chill for Perfect Bars
Pour the lemon filling onto the warm crust and return the pan to the oven. Bake for around 25 minutes, rotating halfway so it cooks evenly. The filling should be set but still have a bit of a jiggle in the center – that’s how you know it’ll be perfectly creamy when chilled. Let the bars cool for about an hour, then pop them into the fridge for at least two hours. This chilling step is key—it lets the filling firm up so you can cut clean bars later.
Step 4: Cut and Serve with a Dusting of Sugar
Last but not least, dust the cooled lemon bars with powdered sugar. For clean slices, I always use a clean, sharp knife and keep it slightly damp—wiping off sugar buildup and re-wetting the blade after each cut. This prevents crumbly edges and keeps your bars looking as pretty as they taste.
Pro Tips for Making Lemon Bars Recipe
- Use Fresh Lemons: Nothing beats fresh lemon juice and zest for authentic flavor that store-bought just can’t replicate.
- Don’t Skip Chilling: I used to rush this step and the filling just wouldn’t set – patience is your friend here.
- Pulse Sugar & Zest: Blending them intensifies the lemon flavor and distributes the zest evenly without any bitter peel bits.
- Clean Your Knife Often: Cutting with a clean, damp knife keeps edges neat and prevents crumbling or tearing.
How to Serve Lemon Bars Recipe

Garnishes
I usually keep it simple with a light dusting of powdered sugar because it highlights the vibrant lemon flavor without overpowering it. Sometimes I add a few thin lemon slices or even a sprig of fresh mint when I’m serving guests — it makes them feel extra special and looks gorgeous on the plate.
Side Dishes
These bars shine best on their own, but if I’m pairing them, I love serving with a cup of Earl Grey tea or a scoop of vanilla bean ice cream for a delightful contrast. They also pair nicely with fresh berries or a dollop of lightly sweetened whipped cream for an elegant touch.
Creative Ways to Present
For parties, I like to cut these lemon bars into mini squares and arrange them on a tiered dessert stand. It’s a simple way to impress and makes them super easy for guests to grab. Another fun idea is to drizzle a bit of white chocolate or lemon glaze on top for extra flair during special occasions – it’s always a crowd-pleaser!
Make Ahead and Storage
Storing Leftovers
I store leftover lemon bars covered tightly in the fridge, usually in an airtight container. They stay fresh and delicious for up to 4 days — you’ll actually notice the flavors deepen a bit overnight, if you can wait that long!
Freezing
Freezing lemon bars is totally doable and a lifesaver when you want to prep ahead. I wrap individual bars tightly in plastic wrap, then place them in a freezer bag. They keep well for up to 2 months. When you’re ready to enjoy, just thaw in the fridge overnight.
Reheating
I usually prefer these chilled, but if you want to warm them a bit, a quick 10-15 second zap in the microwave softens the filling nicely without melting the crust. Just be careful not to heat too long or they get too gooey!
FAQs
-
Can I make this Lemon Bars Recipe vegan or dairy-free?
Yes! For a dairy-free crust, substitute vegan butter or coconut oil for the butter, and use a flax or chia egg as an egg substitute in the filling. The texture will be slightly different but still deliciously lemony.
-
How do I prevent the filling from cracking?
To avoid cracks, be sure not to overbake your lemon bars. The filling should still jiggle slightly in the center when you remove them from the oven. Cooling gradually and chilling before slicing also helps maintain a smooth surface.
-
What kind of lemons work best for this recipe?
I highly recommend using fresh, unwaxed lemons for the best zest and juice quality. Meyer lemons offer a sweeter, less acidic flavor if you want a milder lemon bar.
-
Can I use bottled lemon juice?
Fresh lemon juice really makes a difference in flavor and brightness, so I don’t recommend bottled juice. If you must, choose one that’s 100% lemon juice with no additives.
-
How do I get clean slices when cutting lemon bars?
Use a sharp knife and wipe it clean after each cut. Wetting the blade slightly helps reduce sticking and keeps the edges neat — this trick saved me from so many crumbly disasters!
Final Thoughts
This Lemon Bars Recipe is truly close to my heart—it was my go-to dessert for potlucks, eager guests, and lazy weekend baking. I love how adaptable and foolproof it is, yet it yields restaurant-quality flavor every time. If you’re looking for a bright, fresh dessert that never disappoints, I really hope you give this a try. I’m confident you’ll adore every bite just as much as I do!
Print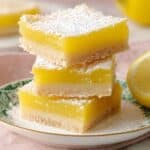
Lemon Bars Recipe
- Prep Time: 20 minutes
- Cook Time: 55 minutes
- Total Time: 4 hours 15 minutes
- Yield: 15 bars
- Category: Dessert
- Method: Baking
- Cuisine: American
Description
These bright and zingy lemon bars feature a buttery, tender shortbread crust topped with a smooth, tart lemon filling. Perfectly balanced between sweet and tangy, these bars are easy to make and ideal for dessert or a refreshing treat.
Ingredients
Crust
- 2 1/2 cups all-purpose flour (300g)
- 2/3 cups powdered sugar (66g)
- 1/2 tsp salt
- 12 tbsp unsalted butter, melted (170g)
Filling
- 1/2 cup all-purpose flour (60g)
- 3 cups sugar (600g)
- 3 tbsp lemon zest (zest of three lemons)
- 8 large eggs, room temperature
- 1 cup fresh lemon juice (240mL)
- Powdered sugar for dusting, as needed
Instructions
- Prepare the Oven and Pan: Preheat your oven to 350°F (175°C) and line a 9×13-inch baking dish with parchment paper, allowing some overhang for easy removal of the bars.
- Make the Crust: In a bowl, whisk together 2 1/2 cups (300g) of flour, powdered sugar, and salt. Pour in the melted butter and mix until thoroughly combined. Alternatively, use a stand mixer with a paddle attachment for convenience. Optionally, add a dash of vanilla with the butter for extra flavor.
- Bake the Crust: Evenly press the dough into the bottom of the prepared pan, creating a flat, compact layer. Bake in the preheated oven for about 20 minutes or until the crust turns a light golden color.
- Prepare Zesty Sugar: While the crust bakes, pulse the sugar and lemon zest in a food processor until the zest is fully incorporated and the sugar lightens in color. If you don’t have a food processor, finely mince the zest and mix it thoroughly into the sugar by hand.
- Mix Filling: In a large bowl, combine the zested sugar mixture with the remaining 1/2 cup (60g) flour. Pour in the fresh lemon juice and add the eggs. Mix very well until the filling is smooth and fully combined.
- Assemble and Bake: Pour the lemon filling over the warm baked crust. Return the pan to the oven and bake for approximately 25 minutes, rotating the pan halfway through baking to ensure even cooking.
- Cool and Chill: Once baked, remove the lemon bars from the oven and allow them to cool at room temperature for about one hour. After cooling, refrigerate the bars for at least two hours to set properly.
- Serve: Dust the top generously with powdered sugar. Using a clean, sharp, damp knife, cut into bars, cleaning and re-wetting the knife between each cut for neat slices.
Notes
- For extra flavor, a dash of vanilla can be added to the crust mixture.
- Using room temperature eggs helps the filling mix uniformly.
- Make sure to allow the bars to cool completely and chill before cutting to prevent cracking.
- Cleaning and wetting the knife between cuts ensures tidy slices.
- Lemon zest can be adjusted based on desired tartness.
Nutrition
- Serving Size: 1 bar
- Calories: 385 kcal
- Sugar: 46 g
- Sodium: 113 mg
- Fat: 12 g
- Saturated Fat: 7 g
- Unsaturated Fat: 5 g
- Trans Fat: 0 g
- Carbohydrates: 66 g
- Fiber: 1 g
- Protein: 6 g
- Cholesterol: 111 mg


