
This irresistible Instant Pot Teriyaki Chicken transforms ordinary chicken breasts into tender, flavor-packed morsels coated in a rich, glossy sauce that rivals your favorite takeout. With just a handful of ingredients and your trusty pressure cooker, you’ll have a restaurant-quality meal on the table in under 30 minutes – perfect for those hectic weeknights when cooking is the last thing you want to think about!
Why You’ll Love This Recipe
- Incredibly Fast: Skip the takeout wait time! Your Instant Pot does all the heavy lifting, delivering tender, flavor-infused chicken in just 12 minutes of pressure cooking.
- Effortlessly Tender: The pressure cooking method transforms even the leanest chicken breasts into succulent, melt-in-your-mouth meat that’s perfectly infused with teriyaki flavor.
- Customizable Heat: Control the sweetness and spice levels by choosing your teriyaki sauce carefully or making your own from scratch.
- Family-Friendly: This crowd-pleaser works for everyone from picky kids to discerning adults, making dinner planning much simpler.
- Versatile Leftovers: The flavors actually deepen overnight, making this perfect for meal prep and next-day lunches that you’ll actually look forward to eating.

Ingredients You’ll Need
- Chicken Breast: The star protein that becomes incredibly tender in the Instant Pot. Boneless, skinless thighs work wonderfully too if you prefer darker meat with more moisture.
- Teriyaki Sauce: The flavor foundation that infuses the chicken with that characteristic sweet-savory profile. Store-bought works perfectly, but homemade allows you to customize the flavor exactly to your taste.
- Water: Creates the steam necessary for pressure cooking while helping to prevent the “burn” notice on your Instant Pot.
- Cornstarch: The magical thickening agent that transforms the thin cooking liquid into that gorgeous, glossy sauce that clings to every piece of chicken.
- Rice: While not part of the cooking process, you’ll want this ready for serving to soak up all that delicious sauce.
- Green Onions/Sesame Seeds: These finishing touches add fresh flavor, texture, and visual appeal to your finished dish.
Note: You’ll find the complete list of ingredients, along with their exact measurements, in the printable recipe card at the bottom of this post.
Variations
Protein Alternatives
Swap chicken breast for chicken thighs for even juicier results. Feeling adventurous? Try this recipe with pork tenderloin (adjust cooking time to 8 minutes) or firm tofu (reduce to 3 minutes) for a vegetarian version.
Sauce Customizations
Enhance your teriyaki experience by adding a tablespoon of minced ginger and garlic to the sauce before cooking. For a spicy kick, mix in a tablespoon of sriracha or a teaspoon of red pepper flakes. Sweet tooth? A tablespoon of honey or brown sugar deepens the caramelization.
Veggie Boosters
For a complete one-pot meal, add chunky vegetables like bell peppers, broccoli, or carrots after pressure cooking during the sauce-thickening phase. They’ll retain their texture while soaking up the delicious sauce.
Pineapple Teriyaki
Add 1 cup of pineapple chunks and 1/4 cup pineapple juice before cooking for a tropical twist that’s especially delicious with rice.
How to Make Instant Pot Teriyaki Chicken
Step 1: Prepare the Instant Pot
Add the chicken breasts to the bottom of your Instant Pot’s inner pot, arranging them in a single layer if possible for even cooking.
Step 2: Add Sauce Ingredients
Pour the teriyaki sauce evenly over the chicken, ensuring each piece gets coated. Add the water around the edges rather than directly on top of the sauce.
Step 3: Pressure Cook
Secure the lid and set the valve to “sealing” position. Select Manual/Pressure Cook and set for 12 minutes on high pressure. Your Instant Pot will take about 10 minutes to come to pressure before the cooking time begins.
Step 4: Natural Release
Once the cooking cycle completes, allow the pressure to naturally release for 10 minutes. This helps keep your chicken tender rather than tough. After 10 minutes, carefully turn the valve to “venting” to release any remaining pressure.
Step 5: Remove and Shred Chicken
Transfer the chicken to a cutting board, leaving the sauce in the pot. Let it rest briefly before chopping into bite-sized pieces or shredding with two forks.
Step 6: Thicken the Sauce
Switch your Instant Pot to Sauté mode. In a small bowl, mix the cornstarch with 2 tablespoons of cold water until smooth, then whisk this slurry into the sauce in the pot. Stir continuously until the sauce thickens to a glossy consistency, about 2-3 minutes.
Step 7: Combine and Serve
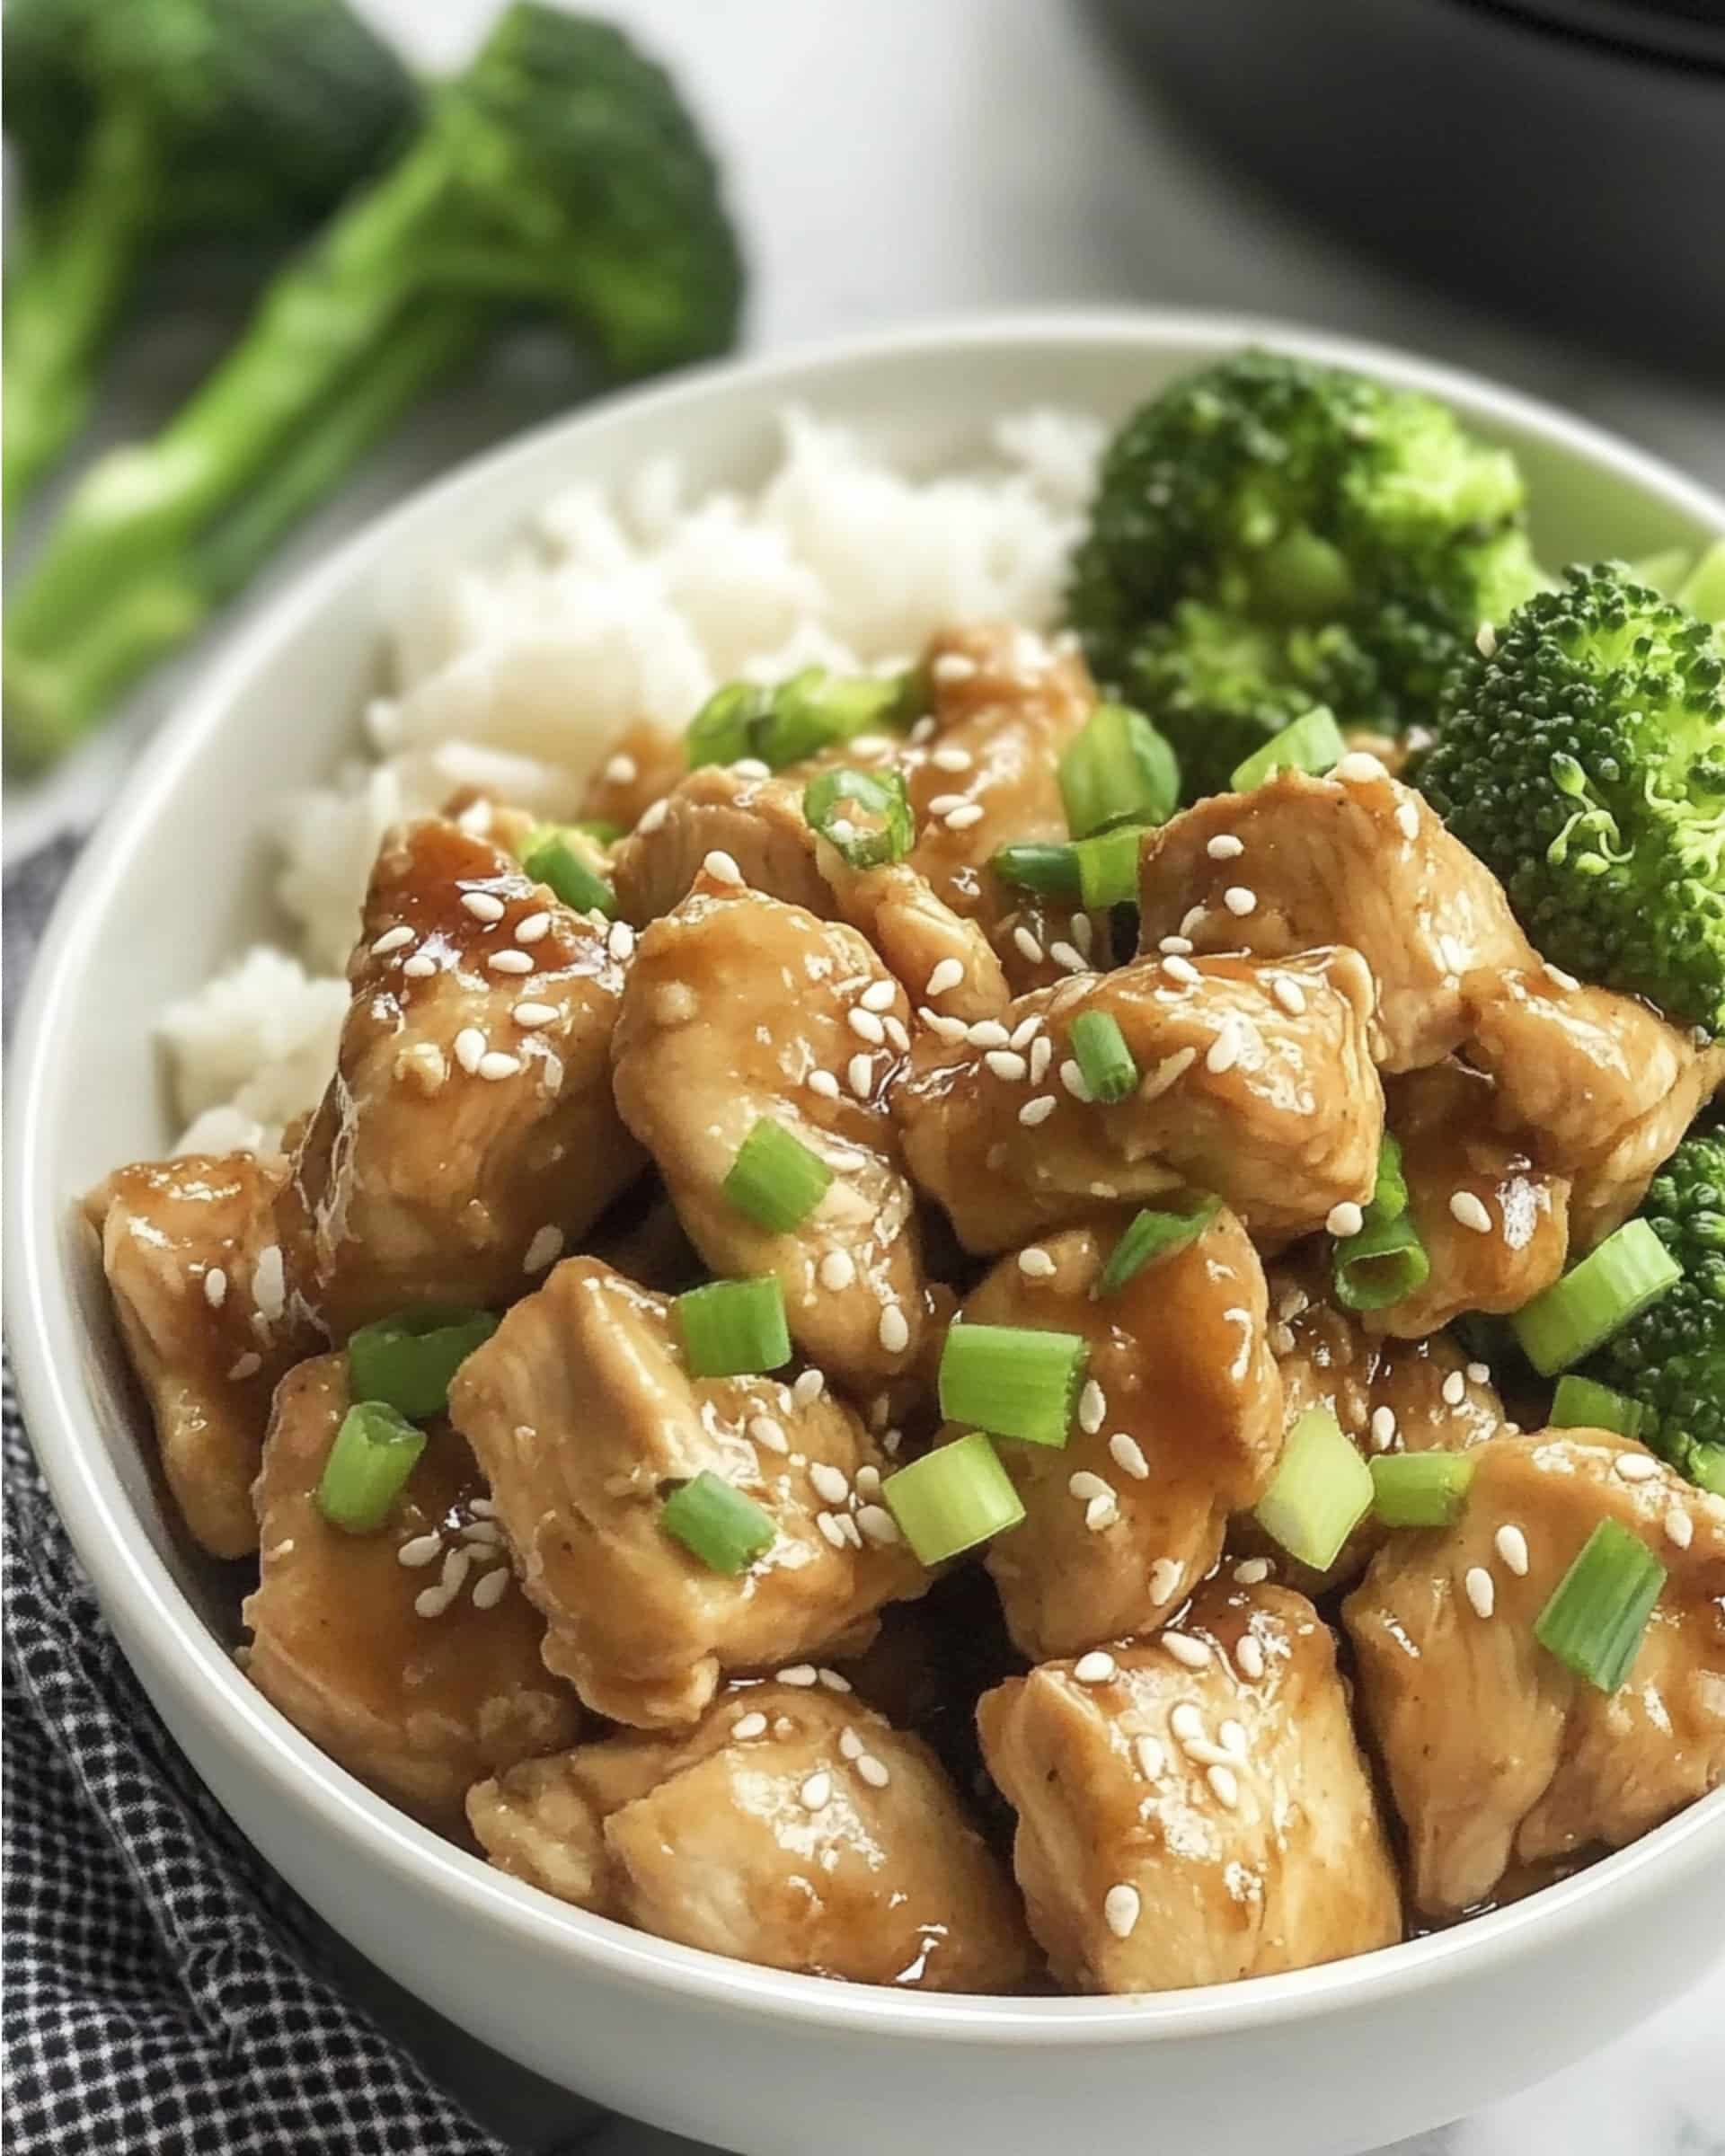
Return the chopped chicken to the pot and stir to coat each piece thoroughly with the thickened sauce. Serve hot over rice with your choice of vegetables and garnish with sliced green onions and sesame seeds.
Pro Tips for Making the Recipe
- Slice Chicken Before Cooking: For even faster cooking and maximum flavor absorption, cut chicken into chunks before pressure cooking.
- Sauce Consistency: If your sauce becomes too thick, add a splash of water or chicken broth. Too thin? Mix a little more cornstarch with cold water and add gradually.
- Homemade Teriyaki Boost: If using store-bought sauce, enhance it with fresh minced garlic and grated ginger for a more authentic flavor profile.
- Natural Release Matters: Don’t skip the natural pressure release step – it’s crucial for keeping your chicken tender rather than tough and chewy.
- Double Batch Wisdom: This recipe doubles beautifully for meal prep, but don’t double the water – keep it at 1/2 cup regardless of how much chicken you’re cooking.
How to Serve

The classic approach is to serve this saucy teriyaki chicken over a bed of fluffy white rice, where every grain catches the delicious sauce. For a healthier twist, try brown rice, quinoa, or cauliflower rice as your base.
For vegetables, steamed broccoli is the traditional pairing, but don’t limit yourself! Snow peas, bell peppers, baby bok choy, or a colorful medley of Asian vegetables all work beautifully. For extra flavor, quickly stir-fry your vegetables with a splash of the teriyaki sauce.
Transform this dish into a complete teriyaki bowl experience by arranging separate sections of rice, chicken, steamed vegetables, sliced avocado, shredded carrots, and edamame in a large bowl. The visual appeal is stunning, and everyone can mix their perfect bite.
For casual entertaining, set up a DIY teriyaki station with chicken, rice, various vegetables, and extra sauce, allowing guests to create their own customized bowls. Add fun toppings like crispy wonton strips, furikake seasoning, or wasabi peas for extra texture and flavor dimension.
Don’t forget the finishing touches! A sprinkle of toasted sesame seeds, thinly sliced green onions, or even a drizzle of sriracha mayo can elevate your presentation from homemade to restaurant-quality in seconds.
Make Ahead and Storage
Storing Leftovers
This teriyaki chicken actually tastes even better the next day after the flavors have had time to meld. Store leftovers in an airtight container in the refrigerator for up to 4 days. Keep the chicken and sauce together to prevent the meat from drying out.
For meal prep, portion the chicken with rice and vegetables in divided containers for grab-and-go lunches throughout the week. The sauce will naturally infuse everything with flavor as it sits.
Freezing
This recipe freezes beautifully! Allow the chicken and sauce to cool completely before transferring to freezer-safe containers or heavy-duty freezer bags. Remove as much air as possible to prevent freezer burn. Label with the date and contents, then freeze for up to 3 months.
For individual portions, freeze the sauced chicken in single-serving containers or even ice cube trays (for smaller portions to add to stir-fries later). Once frozen solid, transfer the cubes to a freezer bag for space-saving storage.
Reheating
From refrigerated: Reheat in the microwave for 2-3 minutes, stirring halfway through. Adding a tablespoon of water helps revive the sauce consistency. Alternatively, reheat in a skillet over medium-low heat, adding a splash of water if needed to loosen the sauce.
From frozen: Thaw overnight in the refrigerator for best results, then reheat as above. For last-minute meals, use the defrost function on your microwave before reheating thoroughly, or reheat directly in a covered saucepan with a tablespoon of water over low heat, stirring occasionally.
FAQs
Can I use frozen chicken breasts in this recipe?
Yes, you can cook directly from frozen! Increase the pressure cooking time to 15 minutes instead of 12, and make sure the chicken pieces aren’t frozen together in a block. The sauce might be slightly thinner when using frozen chicken due to the extra moisture released, so you might need a bit more cornstarch to reach your desired thickness.
My sauce is too thin. How can I fix it?
The beauty of the Instant Pot’s sauté function means you can easily adjust the sauce consistency. If your sauce is too thin after adding the initial cornstarch slurry, mix another tablespoon of cornstarch with a tablespoon of cold water and slowly whisk it into the simmering sauce. Continue cooking for 1-2 minutes until it reaches your desired thickness. Remember that the sauce will thicken slightly more as it cools.
Can I make this recipe ahead for a party?
Absolutely! This teriyaki chicken actually tastes even better after the flavors have had time to meld. Make it up to two days ahead, storing in the refrigerator in an airtight container. When ready to serve, reheat gently on the stovetop or in a slow cooker set to warm. Add a splash of water if needed to loosen the sauce, and garnish with fresh green onions and sesame seeds just before serving for that fresh-made appearance.
How can I make this recipe gluten-free?
The main source of gluten in this recipe is typically the teriyaki sauce. Look for certified gluten-free teriyaki sauce brands, or make your own using tamari instead of regular soy sauce. Also verify that your cornstarch is processed in a gluten-free facility (most are naturally gluten-free, but cross-contamination can occur). With these simple swaps, you’ll have a delicious gluten-free meal everyone can enjoy!
This Instant Pot Teriyaki Chicken brings restaurant-quality flavor to your dinner table with minimal effort and maximum satisfaction. The combination of tender chicken, rich glossy sauce, and endless serving possibilities makes this a recipe you’ll return to again and again. Even on your busiest nights, you’re just minutes away from a home-cooked meal that tastes like you spent hours in the kitchen. Give it a try tonight – your family will be asking for seconds before they’ve finished their firsts!
Print
Instant Pot Teriyaki Chicken Recipe
- Prep Time: 15 minutes
- Cook Time: 12 minutes
- Total Time: 37 minutes (includes pressure build-up and release time)
- Yield: 6 servings
- Category: Main-course
- Method: Instant Pot
- Cuisine: Japanese-American
Description
This Instant Pot Teriyaki Chicken is a deliciously convenient way to enjoy a restaurant-quality meal at home. Tender, juicy chicken breasts are pressure cooked in a rich teriyaki sauce, then chopped and coated with a thickened glaze. Ready in under 30 minutes, this flavor-packed dish is perfect for busy weeknights and meal prep alike.
Ingredients
- 2 lb chicken breast
- 1/2 cup water
- 1 1/2 cup teriyaki sauce
- 2 tbsp cornstarch
Instructions
- Prep the Instant Pot: Place the chicken breasts in the Instant Pot in a single layer, making sure they’re not stacked on top of each other for even cooking.
- Add liquids: Pour the teriyaki sauce over the chicken, ensuring it’s well coated. Add water to the Instant Pot to provide enough liquid for pressure cooking and to prevent the burn notice.
- Set up the Instant Pot: Close and seal the lid securely. Make sure the pressure valve is set to the “sealing” position to allow proper pressure build-up.
- Pressure cook: Set the Instant Pot to high pressure for 12 minutes. The pot will take about 10 minutes to come to pressure before the cooking time begins.
- Natural release: Once the cooking time is complete, allow for a natural pressure release. This typically takes about 10 minutes and helps keep the chicken tender and juicy rather than becoming tough from a quick release.
- Remove chicken: Carefully open the lid away from your face once the pressure is released. Remove the chicken from the liquid and set aside on a cutting board to rest for a few minutes.
- Thicken the sauce: Set the Instant Pot to saute mode. Mix the cornstarch with 2 tablespoons of cold water in a small bowl until smooth, then whisk this slurry into the liquid in the pot. Continue to whisk until the sauce thickens to a glossy consistency, about 2-3 minutes.
- Prepare the chicken: While the sauce thickens, chop the cooked chicken into bite-sized pieces.
- Combine and coat: Return the chopped chicken to the pot with the thickened teriyaki sauce. Stir gently to ensure all pieces are evenly coated with the delicious sauce.
- Serve: Serve the teriyaki chicken over cooked rice with steamed vegetables like broccoli, carrots, or snap peas. Garnish with thinly sliced green onions and/or a sprinkle of sesame seeds for extra flavor and presentation.
Notes
- For best results, use chicken breasts of similar size to ensure even cooking.
- You can use store-bought teriyaki sauce or make your own for a more customized flavor.
- For a lower-carb option, serve over cauliflower rice instead of regular rice.
- The sauce will continue to thicken as it cools, so don’t over-thicken it in the pot.
- Leftover teriyaki chicken can be stored in an airtight container in the refrigerator for up to 4 days.
- This dish freezes well for up to 3 months. Thaw overnight in the refrigerator before reheating.
Nutrition
- Serving Size: 1/6 of recipe
- Calories: 285
- Sugar: 14g
- Sodium: 1580mg
- Fat: 4g
- Saturated Fat: 1g
- Unsaturated Fat: 3g
- Trans Fat: 0g
- Carbohydrates: 20g
- Fiber: 0g
- Protein: 38g
- Cholesterol: 96mg


