

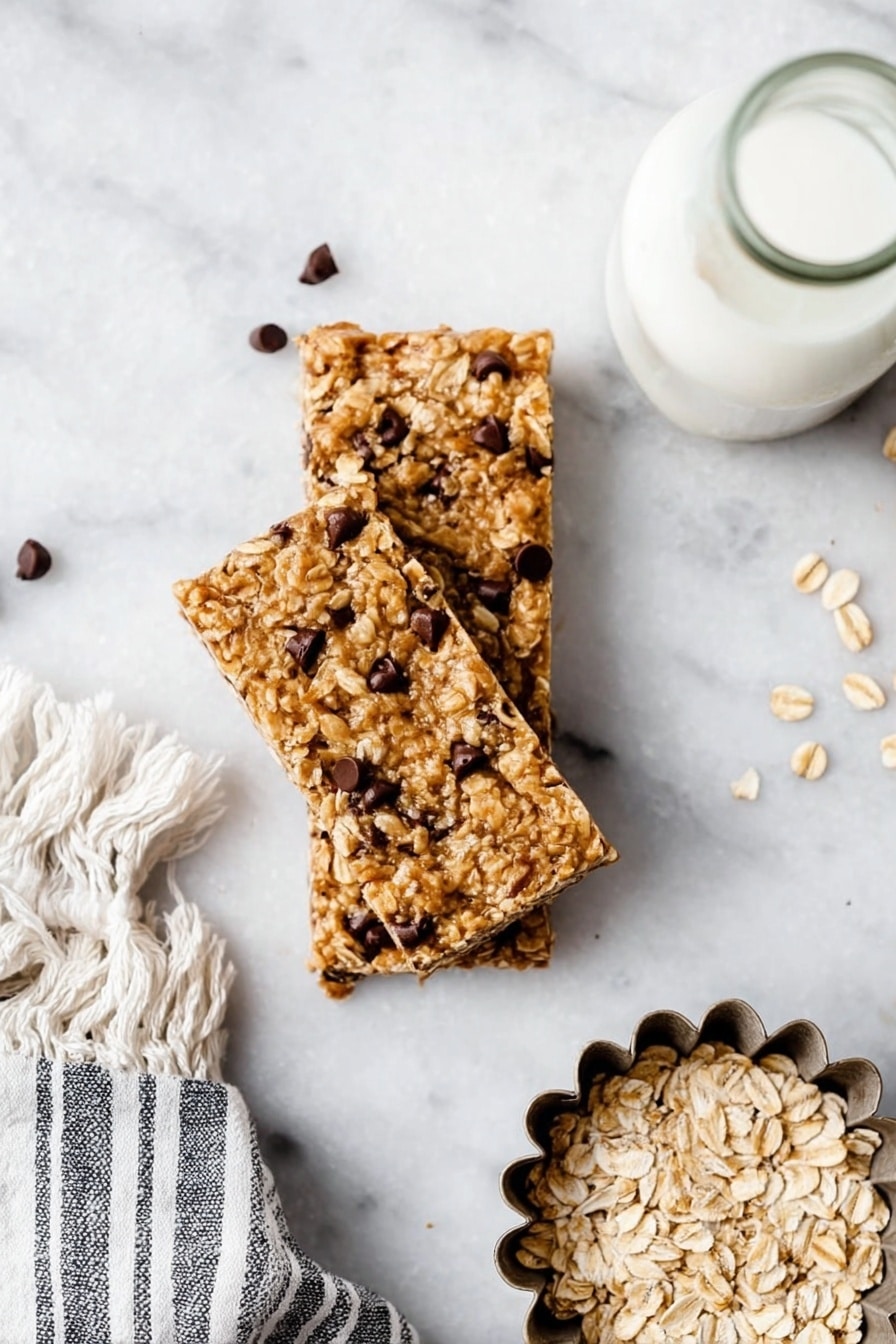
If you’re anything like me, having a wholesome, homemade snack ready to grab is a total game-changer—especially when it’s something as delicious as these Homemade Peanut Butter Granola Bars Recipe. They’re soft-baked, packed with peanut butter flavor, and just the right hint of sweetness that makes them totally irresistible. Whether you need an afternoon pick-me-up or a quick breakfast on the go, this recipe will become your new best friend.
Why You’ll Love This Recipe
- Simple Ingredients: You probably already have these in your pantry, making it easy to whip up anytime.
- Soft-Baked Texture: Unlike many granola bars that are hard and dry, these are chewy and soft—so satisfying!
- Customizable Add-Ins: I love mixing in different nuts or seeds depending on the mood or season.
- Great For All Diets: Gluten-free friendly and vegan options mean everyone can enjoy these bars.

Ingredients You’ll Need
This Homemade Peanut Butter Granola Bars Recipe comes together with a handful of pantry staples that balance flavor and texture perfectly. I always recommend using natural peanut butter—it’s less sweet and more flavorful, which really lets that peanut taste shine.

- Old-fashioned rolled oats: Use verified gluten-free oats if you need to; they give the bars their hearty base and chewy bite.
- Natural peanut butter: If your peanut butter is thick or solid, give it a quick zap in the microwave to soften—it helps everything blend in beautifully.
- Honey or maple syrup: Both are great sweeteners, but honey tends to help the bars stick together better.
- Mini chocolate chips (optional): I love how these melt slightly into the bars, giving little pockets of chocolate goodness.
- Whole eggs (or flax eggs for vegan): Eggs bind the mixture; flax eggs work great for a plant-based version.
- Optional add-ins: Nuts, seeds, or dried fruit to personalize your bars just how you like them.
Variations
One of the best parts about this Homemade Peanut Butter Granola Bars Recipe is how easy it is to tweak depending on what you have or your dietary preferences. I often switch things up to keep it interesting and suit everyone’s tastes.
- Nut-Free Version: Swap peanut butter for sunflower seed butter and omit any nuts or seeds to keep it allergy-friendly. My nephew loves this when he visits.
- Extra Crunch: Adding chopped walnuts or pecans gives these bars a satisfying crunch—I’ve found it adds a lovely contrast to the soft oats.
- Vegan-Friendly: Use a flax egg instead of whole eggs and maple syrup in place of honey to keep everything plant-based.
- Chocolate Lovers: Double up the mini chocolate chips or drizzle melted dark chocolate on top once cooled—I guarantee this will make them disappear fast!
How to Make Homemade Peanut Butter Granola Bars Recipe
Step 1: Preheat and Prepare Your Pan
Start by heating your oven to 350°F. Line a 9×9 inch baking pan with parchment paper. This step is crucial—I learned the hard way that without parchment, these bars can stick and break apart when cutting, so take the extra minute now to save frustration later.
Step 2: Mix the Ingredients
In a large bowl, combine your oats, peanut butter, honey or maple syrup, eggs (or flax eggs), and any add-ins you fancy. If your peanut butter feels thick or firm, heat it gently for 10-15 seconds in the microwave to loosen it up—this trick makes mixing way easier. Stir everything together until evenly combined.
Step 3: Press and Bake
Transfer the mixture into your prepared pan. Press down REALLY firmly—you want to compact it tightly so the bars hold together well after baking. Sprinkle mini chocolate chips on top and gently press them in. Bake for 15-17 minutes. I always start peeking around minute 14 because ovens vary, and you’re looking for the edges just turning golden with the center set but still soft.
Step 4: Cool and Slice
This part is key: let the bars cool completely in the pan on a wire rack. I’ve found cutting too soon leads to crumbly squares that don’t hold their shape. Once cool, slice into 16 bars with a sharp knife, and you’re ready to enjoy.
Pro Tips for Making Homemade Peanut Butter Granola Bars Recipe
- Firm Pressing Matters: Don’t be shy with your hands when pressing the mixture into the pan—it makes all the difference in bar cohesion.
- Monitor Baking Time Closely: Ovens differ, so watch closely after 14 minutes to avoid overbaking and drying out the bars.
- Use a Sharp Knife to Cut: A dull knife can smash your bars—warm it slightly under hot water, wipe dry, and cut smoothly for cleaner edges.
- Cooling is Crucial: Letting the bars cool fully before slicing lets them firm up and keeps them from crumbling.
How to Serve Homemade Peanut Butter Granola Bars Recipe
Garnishes
When I serve these bars, I sometimes sprinkle a pinch of flaky sea salt on top right after they come out of the oven. It adds a lovely balance to the sweet peanut butter flavor. A drizzle of extra peanut butter or some nut butter swirl on top before chilling is another favorite finish.
Side Dishes
These bars are great on their own, but I’ve also loved pairing them with fresh fruit like apple slices or a small yogurt for breakfast. They work well alongside a strong cup of coffee or a comforting glass of cold milk too.
Creative Ways to Present
For parties or lunchboxes, I like wrapping each bar individually in parchment paper tied with a pretty string or placing them neatly in a decorative tin. They also make thoughtful homemade gifts—perfect for neighbors or colleagues.
Make Ahead and Storage
Storing Leftovers
I keep these bars in an airtight container at room temperature for up to 4 days. Making sure they’re fully cooled before storing prevents sogginess. Personally, I store them stacked with parchment paper between layers to keep them from sticking together.
Freezing
They freeze beautifully! I wrap individual bars in plastic wrap and place them in a freezer-safe bag. When I want a quick snack, I thaw them at room temp or warm gently in the microwave for just 10-15 seconds to bring back that fresh-baked softness.
Reheating
If your bars have hardened in the fridge or freezer, a quick zap in the microwave on a low setting or warming in a toaster oven brings back their chewy texture without drying them out—just be careful not to overheat.
FAQs
-
Can I use crunchy peanut butter instead of smooth?
Absolutely! Crunchy peanut butter adds an extra layer of texture inside the bars, which I actually enjoy a lot. Just make sure to soften it slightly if it’s too stiff to blend well with the other ingredients.
-
How do I make these bars vegan?
To make this a vegan-friendly Homemade Peanut Butter Granola Bars Recipe, replace the eggs with flax eggs (1 tablespoon ground flaxseed meal mixed with 3 tablespoons water per egg), and use maple syrup instead of honey. This swap maintains the bars’ texture and flavor beautifully.
-
Can I skip the chocolate chips?
Yes! The chocolate chips are optional and can be swapped out for dried fruit or extra nuts if you prefer. The bars still hold together and taste great without them, especially with honey helping the binding.
-
Why are my granola bars crumbly?
This usually happens when the mixture isn’t pressed down firmly enough before baking or the bars are cut before fully cooling. Make sure you compact the mixture tightly in the pan and allow the bars to cool completely for the best texture.
Final Thoughts
I absolutely love how this Homemade Peanut Butter Granola Bars Recipe turns out every single time. It’s quick, satisfying, and hits that sweet spot between healthy and indulgent. When I first tried making granola bars at home, I struggled with bars crumbling or drying out, but this recipe nailed it perfectly—and my family goes crazy for them. Give it a try and I promise you’ll want to stash a batch in your fridge or freezer for whenever hunger strikes. Trust me, once you make these, store-bought bars will be a thing of the past!
Print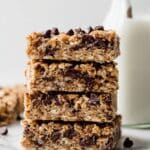
Homemade Peanut Butter Granola Bars Recipe
- Prep Time: 5 min
- Cook Time: 15 min
- Total Time: 20 min
- Yield: 16 squares
- Category: Snack
- Method: Baking
- Cuisine: American
- Diet: Gluten Free
Description
These Peanut Butter Granola Bars are a soft-baked, gluten-free snack packed with wholesome rolled oats, natural peanut butter, and a touch of honey or maple syrup. Enhanced with optional mini chocolate chips and nuts or seeds, these bars offer a deliciously chewy texture and a perfect balance of sweetness and nutty flavor. Ideal for a healthy on-the-go treat or lunchbox addition, they are easy to prepare and bake in under 20 minutes.
Ingredients
Main Ingredients
- 3 cups old-fashioned rolled oats (use verified gluten-free if needed)
- 3/4 cup natural peanut butter
- 1/3 cup honey or maple syrup
- 1/2 cup mini chocolate chips (optional)
- 2 whole eggs (use flax egg for vegan-friendly)
Optional Add-ins
- Pinch of salt (omit if peanut butter is salted)
- Walnuts
- Pecans
- Almonds
- Chia seeds
- Sunflower seeds
- Pumpkin seeds
- Dried fruit
Instructions
- Preheat the oven: Set your oven to 350℉ (177℃) to prepare it for baking the granola bars.
- Mix ingredients: In a large bowl, combine the rolled oats, peanut butter, honey or maple syrup, eggs, and any optional add-ins you choose. If your peanut butter is solid, warm it briefly for 10-15 seconds to make it more fluid before mixing.
- Prepare the baking dish: Line a 9×9 inch baking pan with parchment paper to prevent sticking and make removing the bars easier after baking.
- Press mixture in pan: Transfer the mixture into the lined baking dish and press firmly and evenly. For chocolate chips, sprinkle them on top and gently press them into the mixture for even distribution.
- Bake the bars: Bake in the preheated oven for 15-17 minutes or until the centers are set and edges start to brown. Begin checking at 14 minutes for your preferred doneness.
- Cool and slice: Remove the pan from the oven and let the bars cool completely on a wire rack before slicing into 16 squares with a sharp knife. Cooling ensures the bars hold together when cut.
Notes
- Pressing the mixture firmly into the pan is crucial to help the bars stick together after baking.
- Cooling completely before cutting prevents the bars from crumbling.
- You can customize the bars by adding your favorite nuts, seeds, or dried fruits.
- Honey helps the bars bind better than maple syrup but both taste great.
- For vegan versions, replace eggs with flax eggs to maintain binding.
- Use gluten-free oats if you require a gluten-free snack.
- These bars make a healthy and convenient snack that can be stored in an airtight container for up to a week.
Nutrition
- Serving Size: 1 square
- Calories: 200
- Sugar: 9 g
- Sodium: 64 mg
- Fat: 9 g
- Saturated Fat: 2 g
- Unsaturated Fat: 7 g
- Trans Fat: 0 g
- Carbohydrates: 25 g
- Fiber: 3 g
- Protein: 6 g
- Cholesterol: 17 mg

