
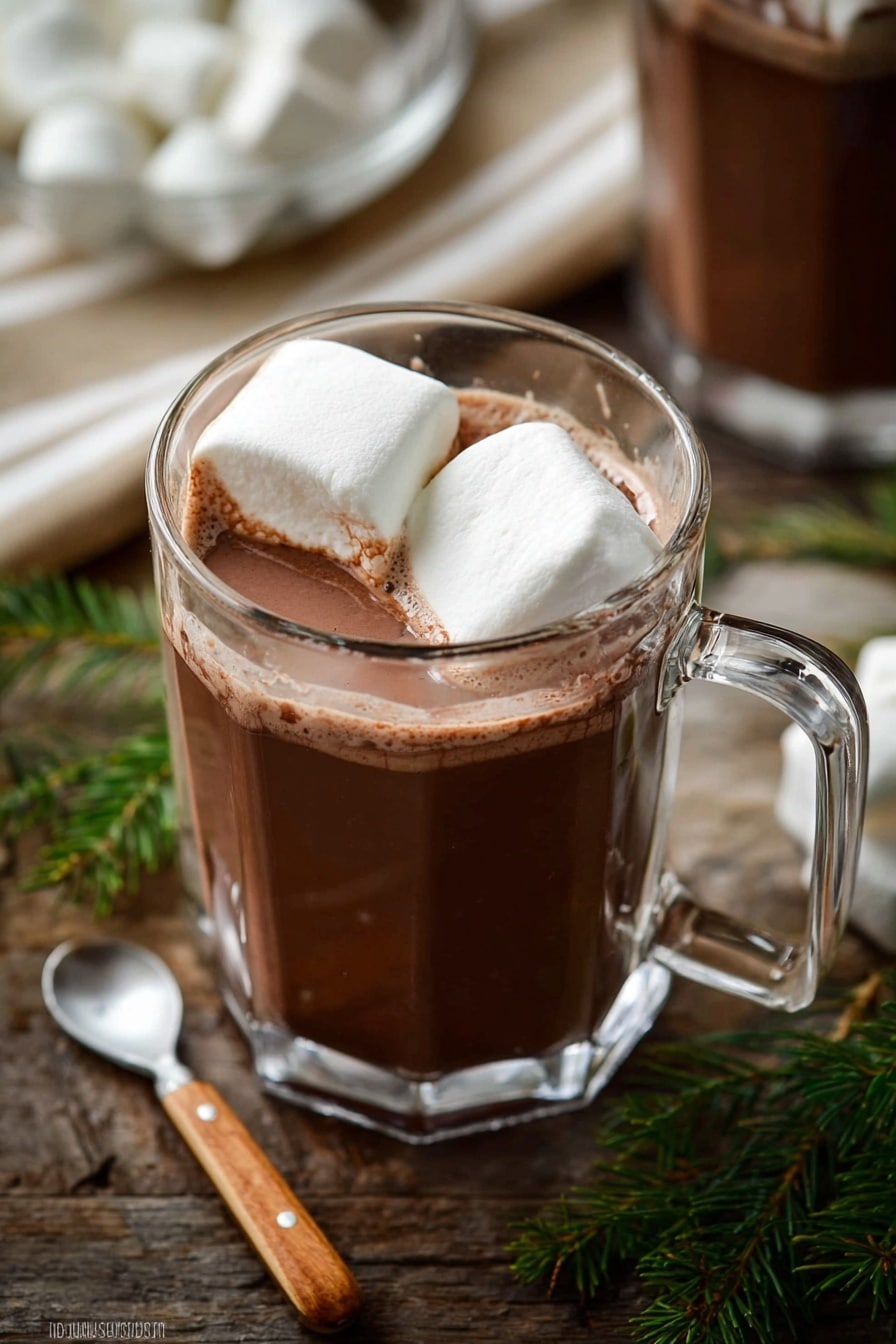
If you’ve ever wondered how to get those fluffy, melt-in-your-mouth treats that make hot chocolate extra special, you’ve got to try my Homemade Marshmallows Recipe. I absolutely love how these turn out—soft, pillow-y, and with just a hint of vanilla that pulls you in every time. Plus, they’re surprisingly easy to make yourself at home. Stick with me here, and I’ll walk you through every step so you get perfect marshmallows, whether it’s your first time or your fiftieth!
Why You’ll Love This Recipe
- Pillowy Soft Texture: This Homemade Marshmallows Recipe yields marshmallows with an irresistible, fluffy consistency you can’t find in stores.
- Perfect Balance of Sweetness: I’ve dialed in the sweetness so they’re just right—not too sugary, with a subtle vanilla kiss.
- Fun and Impressive to Make: Whipping up your own batch is honestly an enjoyable process, and a great way to impress friends or family.
- Make-Ahead Friendly: These marshmallows last for up to two weeks at room temp, making prep for parties or cozy nights ahead a breeze.

Ingredients You’ll Need
The magic of this Homemade Marshmallows Recipe truly lies in using simple, high-quality ingredients that transform into clouds of sweetness. No weird additives, just straightforward pantry staples that come together beautifully.

- Confectioners’ sugar: A combination of powdered sugar and cornstarch helps dust your pan and keep the marshmallows from sticking.
- Cornstarch: Works with confectioners’ sugar to give that non-sticky finish and clean cuts.
- Unflavored gelatin: This is what gives marshmallows their bouncy, soft structure—make sure you use genuine gelatin for the best texture.
- Cold water: Divided for blooming the gelatin and dissolving the sugar; using cold water keeps everything in control during cooking.
- Light corn syrup: Adds a smooth sweetness and helps prevent crystallization, so your marshmallows stay silky.
- Granulated sugar: Provides the bulk of the sweetness and texture; be careful to cook it properly for the perfect soft-ball stage.
- Salt: Just a pinch to balance the sweetness and boost flavor.
- Pure vanilla extract: The finishing touch giving that comforting warm flavor I fall in love with every time.
Variations
I love experimenting with this Homemade Marshmallows Recipe—whether adding a splash of different flavors or tweaking textures for special occasions. You should definitely make it your own and see what fun combos you can dream up.
- Flavor twists: I once added a bit of peppermint extract during the last whip, and my family went crazy for those festive mint marshmallows.
- Chocolate-dipped marshmallows: After cutting them, dip in melted chocolate and sprinkle crushed nuts or sprinkles for a show-stopping treat.
- Vegan Adaptation: While gelatin is essential here, you can experiment with agar-agar, but expect a slightly different texture—it’s fun to try, but keep expectations in check.
- Fruit-flavored: Swap vanilla for a natural fruit extract like raspberry or lemon for a bright twist that’s perfect for summer gatherings.
How to Make Homemade Marshmallows Recipe
Step 1: Prep Your Pan and Gelatin
Start by generously spraying a 9×13-inch glass or ceramic baking pan with nonstick spray—I don’t recommend metal pans because they can mess with the flavor. Next, sift together the confectioners’ sugar and cornstarch, then lightly dust the pan with some of this mixture. This prevents your marshmallows from sticking and makes cleanup a breeze. Now, sprinkle the gelatin over half a cup of cold water in your mixer bowl. Whisk it on low for a minute, then just let it sit while you cook the sugar syrup—that’s called blooming the gelatin and sets you up for that perfect texture.
Step 2: Cook the Sugar Syrup to Soft-Ball Stage
In a heavy-duty saucepan, combine the remaining cold water, corn syrup, granulated sugar, and salt. Stir gently over medium heat until the sugar dissolves. Here’s where I discovered an important trick: keep a water-moistened pastry brush handy to brush down any sugar crystals that cling to the pan’s sides—this stops unwanted crystallization and keeps your final marshmallows silky smooth. Attach a candy thermometer, without it touching the pan’s bottom, and cook without stirring until it reaches 235–240°F (soft-ball stage). This usually takes 10–15 minutes, so be patient and watch closely. Once out of the heat, let it rest for 5 minutes before moving on.
Step 3: Whip it Up—The Fun Part!
Turn your mixer to low and slowly pour the hot syrup into the gelatin mixture—careful, it’s really hot! Then gradually raise the speed to high and whip for 10 to 15 minutes. You’ll notice the mixture turning white, thick, and glossy—that’s your marshmallow magic happening. Near the last minute, drizzle in your vanilla for that warm, comforting scent. If you’re using a handheld mixer, this may take a bit longer, so don’t worry if your arm gets a workout!
Step 4: Pour, Set, and Cut
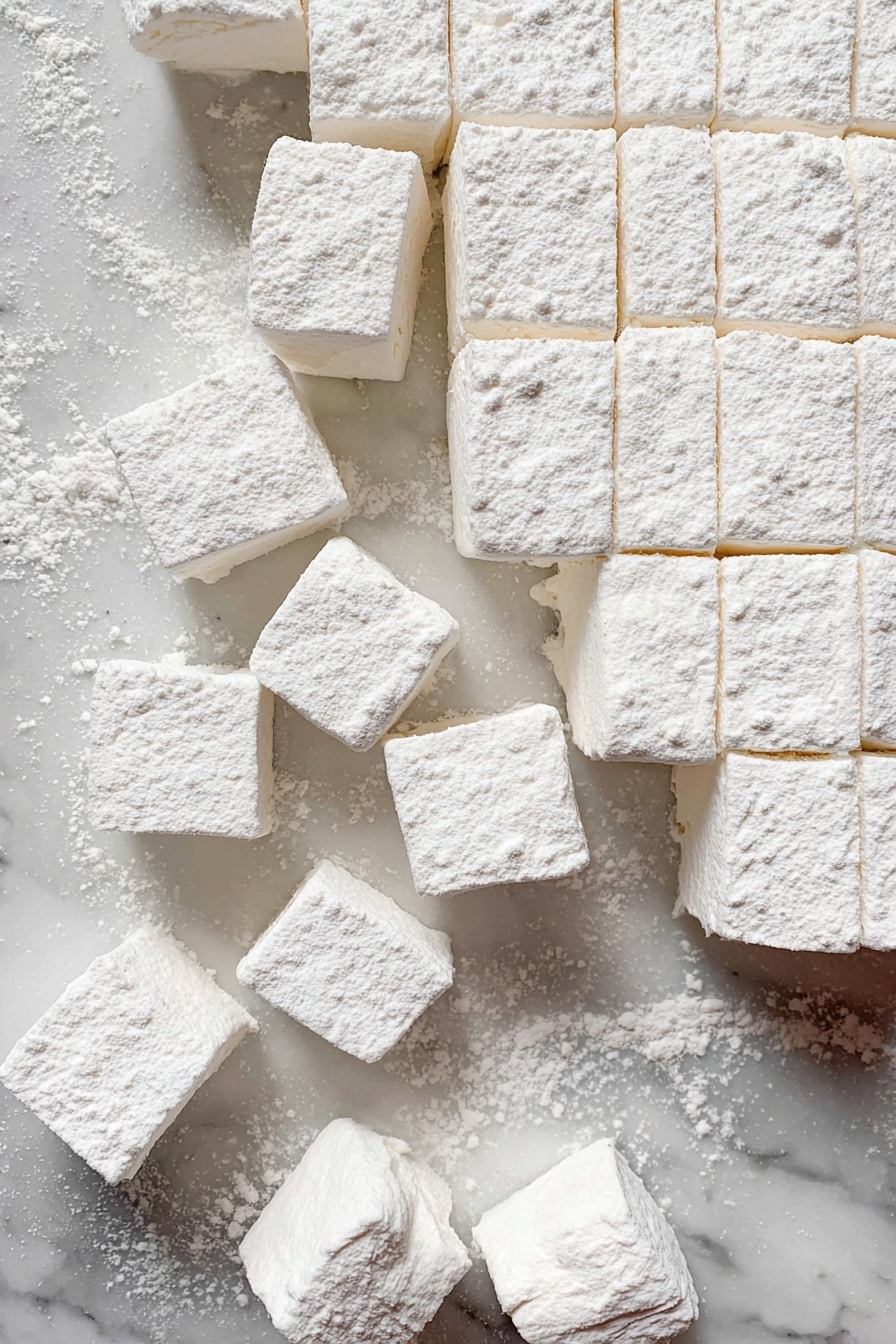
Spoon the cloud-like marshmallow fluff into your prepared pan and smooth it out with a spatula. Now comes the hardest part—waiting! Let it set uncovered at room temperature for at least 6 hours, or even better, up to 48 hours if you’re super patient (trust me, it’s worth it). Once firm, dust your cutting board with the leftover sugar-cornstarch mixture and invert the marshmallows onto it. Use a sharp knife (tip: keep it warm by running under hot water and drying) to cut into generous 1.5-inch squares. Roll each piece in the sugar mixture to keep things from sticking and to finish them off beautifully.
Pro Tips for Making Homemade Marshmallows Recipe
- Perfect Pan Choice: Glass or ceramic pans prevent metallic aftertaste, making your marshmallows taste pure and clean.
- Brushing the Pan Sides: Use a damp pastry brush to avoid crystallized sugar ruining your syrup—it’s a game-changer.
- Warm Your Knife: Running your knife under hot water before cutting helps you slice clean edges without sticking.
- Avoid Humidity: Marshmallows don’t set well in humid conditions, so pick a dry day or use an air conditioner for best results.
How to Serve Homemade Marshmallows Recipe
Garnishes
I usually keep it simple with a light dusting of extra powdered sugar and cornstarch, but for a little extra flair, I love rolling them in crushed toasted coconut or dipping one end in melted chocolate. Sprinkles on chocolate-dipped marshmallows add fun, and a pinch of edible glitter can turn these into party-ready treats, especially around the holidays.
Side Dishes
These homemade marshmallows are fantastic on their own, but I’m obsessed with slipping them into a warm mug of hot cocoa or layering them atop brownies or sweet potato casseroles for an extra gooey touch. For something savory-sweet, I like serving them alongside toasted nuts or fruit compotes to balance their sweetness.
Creative Ways to Present
For special occasions, I’ve made marshmallow kabobs alternating colorful marshmallow cubes with berries and chocolate chunks on skewers. Another great trick is pressing crushed peppermint or chopped nuts onto the marshmallow surface before it sets, giving a festive look and texture that steals the show at parties.
Make Ahead and Storage
Storing Leftovers
I store leftover marshmallows in an airtight container at room temperature, layering parchment paper between them so they don’t stick together. This method keeps them fresh and pillowy soft for up to two weeks—long enough to savor one (or two) whenever that craving hits.
Freezing
Freezing homemade marshmallows works surprisingly well. I wrap individual marshmallows or small batches tightly in plastic wrap, then pop them in a sealable freezer bag. When you’re ready for a treat, just thaw them at room temperature for a couple of hours before enjoying. They hold up well without losing their softness.
Reheating
If your marshmallows get a little stiff or dusty over time, a few seconds in the microwave (about 5-10 seconds) can revive that fresh, soft texture. Just be careful not to overheat—they can melt fast, so watch closely and test after a quick burst.
FAQs
-
Can I make homemade marshmallows without a stand mixer?
Absolutely! You can use a handheld electric mixer with a strong bowl, but it might take a bit longer to whip the mixture to the desired fluffy, stiff peaks. Just be prepared for some arm workout and keep the mixer speed as high as possible once you start whipping.
-
Why are my marshmallows sticky after cutting?
Sticky marshmallows usually mean the pan and cutting surface weren’t dusted enough with the sugar-cornstarch mixture. Also, cutting with a cold or dry knife can cause more sticking—warm and wipe the blade between cuts to keep it smooth as silk.
-
Can I use flavored gelatin instead of unflavored?
It’s best to stick with unflavored gelatin and add your own flavorings like vanilla extract. Flavored gelatin often contains extra sugar and colors that can affect the texture and appearance of your marshmallows.
-
How long do homemade marshmallows last?
If stored properly in an airtight container with layers separated by parchment paper, homemade marshmallows will stay fresh and delicious for up to two weeks at room temperature.
Final Thoughts
I remember the first time I made this Homemade Marshmallows Recipe—I couldn’t believe how much better they were than the store-bought versions! The soft texture, the subtle vanilla aroma, and knowing I made them from scratch gave me such a warm, joyful feeling. If you’re craving a cozy, sweet treat that’s fun to make and even better to eat, give this recipe a try. Once you nail it, you’ll find it hard to ever buy marshmallows again.
Print
Homemade Marshmallows Recipe
- Prep Time: 35 minutes
- Cook Time: 15 minutes
- Total Time: 6 hours 50 minutes
- Yield: About 54-60 marshmallows, approximately 54 pieces
- Category: Dessert
- Method: Stovetop
- Cuisine: American
Description
Learn how to make soft, pillowy homemade marshmallows with just a few simple ingredients. This recipe yields marshmallows with a delicate vanilla flavor and a fluffy texture unlike any store-bought version. Perfect for snacking, hot cocoa, or dessert toppings, these marshmallows are easy to prepare ahead and store for up to two weeks.
Ingredients
For Dusting
- 1/3 cup (40g) confectioners’ sugar
- 3 Tablespoons (24g) cornstarch
For Marshmallows
- 3/4 ounce (21g) unflavored gelatin (3 standard 1/4-ounce packets)
- 1 cup (240ml) cold water, divided
- 1 cup (325g) light corn syrup
- 1 and 1/2 cups (300g) granulated sugar
- 1/4 teaspoon salt
- 1 Tablespoon pure vanilla extract
Instructions
- Prepare the Pan: Generously spray the bottom and sides of a 9×13-inch glass or ceramic baking pan with nonstick cooking spray. Sift together the confectioners’ sugar and cornstarch into a bowl, then sprinkle some of it lightly all around the pan to dust it evenly. Set aside the remaining sugar/cornstarch mixture for coating later.
- Bloom the Gelatin: Place the gelatin and 1/2 cup of cold water in the bowl of a stand mixer fitted with a whisk attachment (or a large mixing bowl if using a handheld mixer). Whisk on low speed for 1 minute to combine, then let it sit while you make the sugar syrup. No need to cover.
- Cook the Sugar Syrup: In a heavy-duty 3-quart saucepan, combine the remaining 1/2 cup water, light corn syrup, granulated sugar, and salt. Stir gently over medium heat until the sugar dissolves. Attach a candy thermometer to the pan’s side, ensuring it does not touch the bottom. Brush down the sides with a water-moistened pastry brush to prevent crystallization as it cooks.
- Bring to Soft Ball Stage: Without stirring, cook the syrup until it reaches 235–240°F (113–116°C) — the soft ball stage. Remove the pan from heat and let it rest for 5 minutes.
- Combine Syrup with Gelatin: Turn the mixer to low speed and slowly pour the hot syrup into the gelatin mixture while mixing. Be careful as the syrup is very hot. Gradually increase speed to high and whip for 10–15 minutes until the mixture becomes white, thick, and glossy. During the final minute, add the vanilla extract and mix to incorporate.
- Set the Marshmallows: Pour or spoon the marshmallow mixture into the prepared pan. Smooth the top with a silicone or offset spatula. Leave uncovered at room temperature for at least 6 hours, up to 48 hours, until firm.
- Cut and Coat: Once set, cover a large surface or cutting board with parchment paper and sprinkle it liberally with the remaining cornstarch/sugar mixture. Loosen the edges of the marshmallow from the pan, then invert the pan onto the prepared surface. Peel it away carefully. Using a sharp knife coated with the dusting mixture (and optionally run under hot water and dried for smooth cuts), slice into 1.5-inch squares. Roll edges in the cornstarch/sugar mix to prevent stickiness.
- Store Properly: Store marshmallows in an airtight container at room temperature, layering with parchment paper to prevent sticking. They keep well for up to 2 weeks in a cool, dry place.
Notes
- Homemade marshmallows have a superior texture and vanilla flavor compared to store-bought versions.
- This is a great make-ahead recipe since marshmallows need at least 6 hours to set and can be stored for up to 2 weeks.
- Avoid making marshmallows on humid days as excess moisture can prevent them from setting properly.
- Use a glass or ceramic pan rather than metal to avoid affecting the flavor.
- Coating the knife blade with cornstarch/sugar mixture and rinsing under hot water helps make cleaner cuts.
Nutrition
- Serving Size: 1 marshmallow (approx. 10g)
- Calories: 45
- Sugar: 10g
- Sodium: 30mg
- Fat: 0g
- Saturated Fat: 0g
- Unsaturated Fat: 0g
- Trans Fat: 0g
- Carbohydrates: 11g
- Fiber: 0g
- Protein: 0.3g
- Cholesterol: 0mg
