

If you’ve ever found yourself craving something uniquely decadent that marries crunch with creaminess, you’re going to fall head over heels for this Homemade Dubai Chocolate Bar with Pistachio Recipe. I absolutely love how this treat captures the essence of Middle Eastern flavors wrapped up in silky, rich chocolate — and the best part? It’s surprisingly doable in your own kitchen. Stick with me, and I’ll walk you through every step so you get that perfect balance of crisp kataifi, luscious pistachio paste, and dreamy chocolate layers.
Why You’ll Love This Recipe
- Crunchy and Creamy Texture: The crispy kataifi paired with smooth pistachio paste and silky chocolate creates an irresistible bite.
- Authentic Middle Eastern Twist: The tahini and pistachio bring authentic flavors that make this bar truly stand out.
- Impress Without Stress: You’ll be amazed how straightforward this recipe is, even though it looks fancy!
- Perfect Gift or Treat: It’s a beautiful homemade gift or a delicious way to treat yourself after a long day.

Ingredients You’ll Need
Each ingredient in this Homemade Dubai Chocolate Bar with Pistachio Recipe plays a key role, giving that signature flavor and texture combo. When shopping, look for fresh kataifi dough in the frozen section and high-quality pistachio paste for the best taste.

- Kataifi dough: This shredded pastry is the secret to that delightful crunch — fresh is best, so grab it from your local Middle Eastern or specialty store’s freezer section.
- Butter: Use unsalted butter so you can control the saltiness in the recipe and get a pure, rich flavor.
- Pistachio paste: Look for a natural pistachio paste with no added sugar for authentic flavor and creaminess.
- Tahini: Adds a subtle nuttiness and depth — don’t skip it even if you’re not super familiar with tahini yet!
- Milk chocolate: Choose a good quality one so your chocolate layers melt smoothly and taste indulgent.
- White chocolate: This melts quickly and takes on color beautifully — perfect for that pop of green with your food coloring.
- Food coloring (green): Just a drop or two to give your white chocolate that vibrant pistachio-inspired hue.
Variations
I love mixing things up with this Homemade Dubai Chocolate Bar with Pistachio Recipe, so feel free to customize it based on what you’ve got in your pantry or what suits your taste buds.
- Nut Swaps: If pistachios aren’t your jam, I’ve tried almond paste instead and it worked beautifully—still creamy but with a different nutty vibe.
- Chocolate Choices: Dark chocolate lovers, swapping the milk chocolate for a 70% cocoa bar gives a richer bite without losing the silky texture.
- Seed Alternatives: For a twist, add a teaspoon of toasted sesame seeds instead of tahini for a slightly crunchier texture and different nuttiness.
- Vegan Version: Use coconut oil in place of butter and dairy-free chocolates—I’ve done this and my vegan friends were totally impressed!
How to Make Homemade Dubai Chocolate Bar with Pistachio Recipe
Step 1: Toast the Kataifi to Golden Perfection
Start by roughly chopping your kataifi dough—it helps it toast evenly. I learned this trick the hard way when some parts burned while others were still soft. Melt the butter in a nonstick skillet over medium-low heat, then add your kataifi. Keep it moving gently with a spatula for about 5-10 minutes until you see a beautiful golden color and smell that nutty aroma. Remove promptly to avoid any bitterness. This step is crucial because it turns that delicate dough into a crispy base that contrasts so well with the creamy fillings.
Step 2: Mix Kataifi with Pistachio and Tahini
Once your crispy kataifi has cooled slightly, toss it into a large bowl with your pistachio paste and tahini. You’ll want to gently fold the ingredients together until everything is evenly combined. This mixture is the heart of your bar — creamy, nutty, and rich with a hint of that sesame undertone from the tahini. Set this aside while you get the chocolates ready.
Step 3: Melt and Color the Chocolates
I prefer melting the milk and white chocolate separately using a double boiler because it prevents burning and keeps the chocolate silky. Once the white chocolate is melted, add just three drops of green food coloring and stir gently until the color looks vibrant and smooth—think of that beautiful pistachio green you see in stores. This little pop of color makes your bar look super professional and festive.
Step 4: Layer Your Chocolate Bar
Here’s where the magic happens. Drizzle the colored white chocolate inside your chocolate bar mold first, letting it coat the mold’s edges. Follow that with just enough melted milk chocolate to cover the bottom comfortably. Pop it into the freezer for 10 minutes—this step ensures your layers won’t mix and will hold their shape beautifully.
Step 5: Fill and Seal the Bar
Spoon the pistachio and kataifi mixture into the mold on top of your hardened chocolate base. Use a palette knife to press it evenly and spread it up the sides so you don’t get gaps. Finally, gently pour a final layer of milk chocolate over the top. Freeze for another 10 minutes or until completely set. Carefully pop it out of the mold, and voilà — you just made a stunning homemade Dubai chocolate bar!
Pro Tips for Making Homemade Dubai Chocolate Bar with Pistachio Recipe
- Use a Nonstick Skillet: It makes toasting the kataifi much easier and helps you avoid sticking or burning those delicate strands.
- Control Your Heat: Keep the temperature medium-low when melting chocolate to maintain smooth texture and prevent ruining your chocolate with water or overheating.
- Chill Layers Separately: Pop the mold in the freezer between each chocolate layer so you get clean, defined layers instead of a muddy mix.
- Press the Filling Firmly: Use a palette knife to spread and press your pistachio-kataifi mix evenly—this avoids air pockets and keeps the bar stable.
How to Serve Homemade Dubai Chocolate Bar with Pistachio Recipe

Garnishes
I love garnishing these bars with a light dusting of crushed pistachios or a few whole roasted ones on top just before the chocolate sets—makes for that extra wow factor and reinforces the nutty flavor. Sometimes I drizzle a touch of honey on the side when serving for a subtle floral sweetness that pairs beautifully with the tahini’s earthiness.
Side Dishes
This bar goes perfectly with a cup of strong Arabic coffee or mint tea. When I’m feeling fancy, I serve it alongside fresh dates or dried figs; they complement the rich chocolate and pistachio flavors so well.
Creative Ways to Present
For parties or gifting, I like to cut the bar into smaller bite-sized pieces and arrange them on a platter with edible gold leaf flakes sprinkled on top — it looks stunning and instantly makes this feel like a luxury dessert. Wrapping small portions in wax paper tied with a ribbon turns this into an elegant homemade gift that everyone asks for again.
Make Ahead and Storage
Storing Leftovers
I store leftover bars in an airtight container in the fridge, which keeps them fresh for up to a week. Just be sure to bring them to room temperature before enjoying so the chocolate softens slightly for that melt-in-your-mouth experience.
Freezing
Freezing works great for longer storage! I wrap individual pieces tightly in plastic wrap, then place them in a freezer-safe bag. When you want a treat, thaw in the fridge overnight — the texture holds up really well, and the flavor is just as vibrant.
Reheating
Avoid reheating in the microwave, which can make the chocolate seize or turn grainy. Instead, let your piece sit at room temperature, or if you’re impatient like me, warm it gently over a double boiler for just a few seconds to bring back that luscious smoothness without melting completely.
FAQs
-
Can I use regular shredded phyllo instead of kataifi dough?
You can try, but kataifi dough has a unique thread-like texture that crisps differently than standard shredded phyllo. If you use regular shredded phyllo, toast it carefully and expect a slightly different crunch and look. Fresh kataifi really makes the authentic difference.
-
Is there a substitute for pistachio paste?
Yes! Almond or cashew paste can work as a substitute, though pistachio offers a distinct flavor that’s central to this recipe. If you use another nut paste, you might want to adjust sweetness or add a touch of vanilla to keep your filling balanced.
-
Why do I need to freeze between chocolate layers?
Freezing solidifies each layer quickly, preventing them from mixing or bleeding into one another. This results in beautifully defined layers and a neater bar overall. Take it from me—skipping this step usually means the layers run together and lose that professional look.
-
How long will the homemade Dubai chocolate bar last?
When properly stored in the fridge in an airtight container, your bar will stay fresh for up to a week. For longer storage, freezing is your best friend. Just be sure to thaw properly before serving.
Final Thoughts
This Homemade Dubai Chocolate Bar with Pistachio Recipe holds a special place in my heart because it combines some of my favorite flavors and textures into one show-stopping treat. I remember the first time I made it — my family went crazy for it, and I loved how it felt so fancy yet was surprisingly simple to pull together. Give this recipe a try in your kitchen, and I’m sure you’ll find yourself making it again and again for celebrations, gifts, or just because you deserve a sweet escape.
Print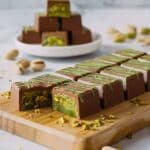
Homemade Dubai Chocolate Bar with Pistachio Recipe
- Prep Time: 25 minutes
- Cook Time: 5 minutes
- Total Time: 30 minutes
- Yield: 1 large Dubai Chocolate Bar
- Category: Dessert
- Method: Freezing, Stovetop (for toasting kataifi), Melting (double boiler method for chocolates)
- Cuisine: Middle Eastern
Description
Experience the luxurious fusion of crispy kataifi, rich pistachio cream, and smooth chocolates with this homemade Dubai Chocolate Bar. This indulgent treat, inspired by the popular dessert sensation, combines the crunchy texture of golden-browned kataifi dough with creamy pistachio paste and luscious layers of milk and white chocolate, elevated by a subtle hint of tahini. Perfect for impressing guests or satisfying your chocolate cravings, this dessert is easier to prepare than you think!
Ingredients
Kataifi Mixture
- 2 cups kataifi
- 1 tablespoon butter
- 1 cup pistachio paste
- 2 tablespoons tahini
Chocolate Layers
- 2 cups milk chocolate
- ⅓ cup white chocolate
- 3 drops green food coloring
Instructions
- Prepare the kataifi dough: Roughly chop the kataifi dough into shorter threads for easier handling and even toasting.
- Toast the kataifi: Melt butter in a nonstick skillet over medium-low heat, ensuring it coats the pan. Add the kataifi threads and stir occasionally for 5-10 minutes until they turn golden brown and crispy. Remove from heat and transfer to a bowl.
- Mix kataifi with pistachio and tahini: In a large bowl, combine the toasted kataifi with pistachio paste and tahini until thoroughly mixed. Set aside while preparing the chocolate layers.
- Melt the chocolates: Using a double boiler or gentle microwave bursts, melt the milk chocolate in one bowl and the white chocolate in another until smooth and glossy.
- Add color to the white chocolate: Stir three drops of green food coloring into the melted white chocolate until evenly blended, giving it a vibrant hue.
- Form the chocolate base: Drizzle the colored white chocolate along the inside of a chocolate bar mold to create decorative edges. Then pour enough melted milk chocolate to cover the bottom of the mold comfortably. Freeze for 10 minutes to set.
- Add the filling: Spoon the pistachio and kataifi mixture into the mold on top of the set chocolate base. Use a palette knife to spread and flatten the filling evenly, pressing it gently so it touches the sides of the mold for structure.
- Top with chocolate: Carefully pour a final layer of milk chocolate over the filling, smoothing the surface to seal the dessert.
- Set the bar: Freeze the entire mold for an additional 10 minutes or until the chocolate is completely firm.
- Unmold and serve: Gently remove the chocolate bar from the mold and enjoy your decadent Dubai Chocolate Bar!
Notes
- Learn how to make the viral Dubai Chocolate Bar at home with this straightforward recipe.
- The kataifi provides a uniquely crispy texture that contrasts beautifully with the creamy pistachio filling.
- Using a double boiler ensures your chocolates melt smoothly without burning.
- If you don’t have a chocolate bar mold, a loaf pan lined with parchment paper can work as an alternative.
- For a more intense pistachio flavor, consider using freshly ground pistachios to make your own paste.
- Store the finished chocolate bar in the refrigerator or freezer to maintain its texture and freshness.
Nutrition
- Serving Size: 1/4 of a large bar
- Calories: 812
- Sugar: 54.2 g
- Sodium: 152.3 mg
- Fat: 51.1 g
- Saturated Fat: 22.7 g
- Unsaturated Fat: 28.4 g
- Trans Fat: 0 g
- Carbohydrates: 76.2 g
- Fiber: 6.9 g
- Protein: 15.8 g
- Cholesterol: 29.9 mg


