
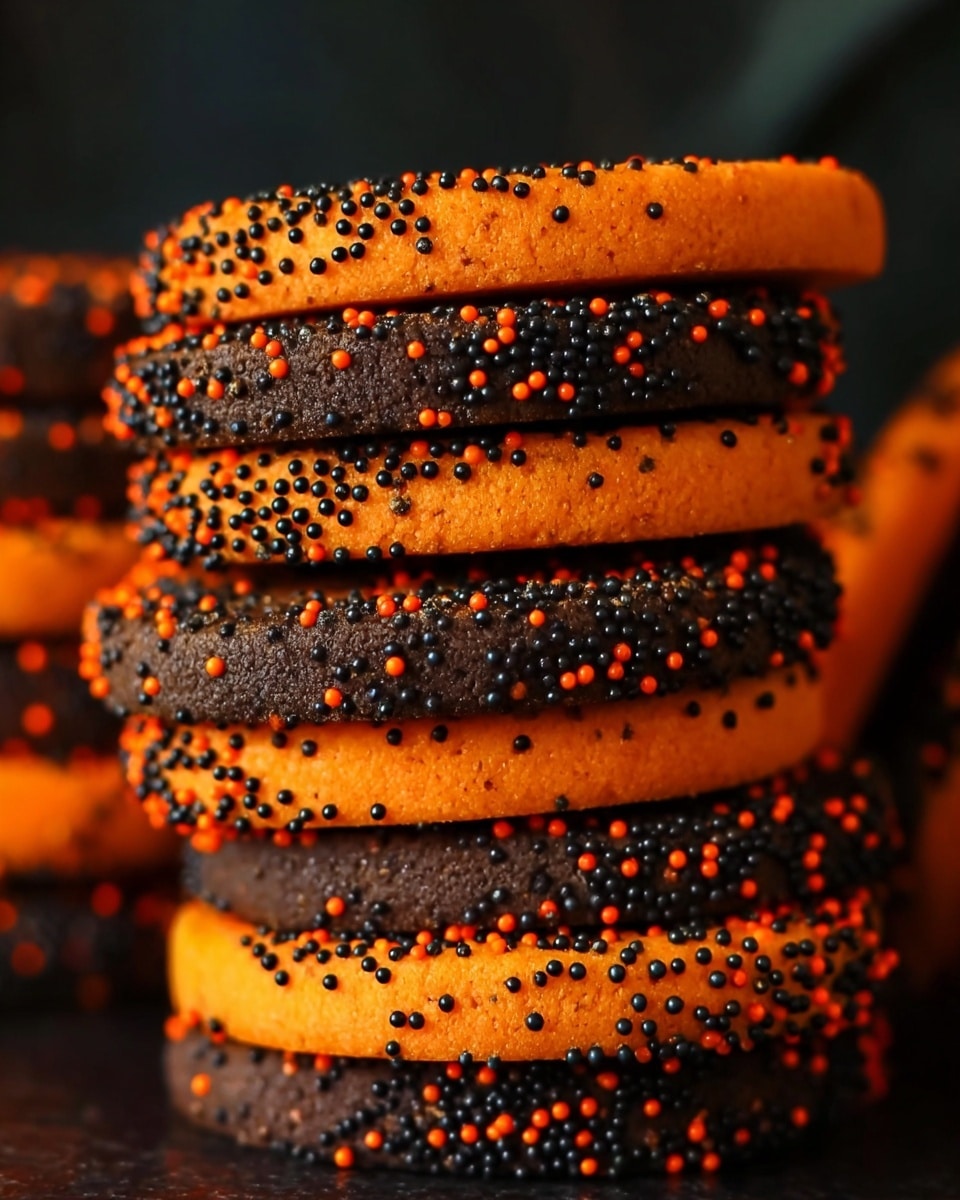
If you’re on the hunt for a fun and festive treat that totally nails the spooky season, you’ve got to try this Halloween Sugar Cookies Recipe. I absolutely love how these cookies bring together vibrant colors and classic sweetness, perfect for sharing at parties or just enjoying with a cup of tea on a chilly fall afternoon. Stick with me, and I promise you’ll be slicing beautiful, colorful cookies that taste as good as they look!
Why You’ll Love This Recipe
- Vibrant Halloween Colors: The gel food coloring gives these cookies that bold orange and black perfect for spooky vibes.
- Simple Yet Impressive: With straightforward ingredients and steps, they look like you put in way more effort than you actually did.
- Perfect Texture: Crispy edges and tender centers every single time — my family can’t stop munching on them.
- Fun to Personalize: You can easily switch up colors or add sprinkles to make each batch unique and festive.

Ingredients You’ll Need
These ingredients come together in harmony to create a classic sugar cookie dough that’s perfectly sturdy for rolling and cutting. A few tips—using gel food coloring avoids softening your dough like liquid colorings might, and room-temperature butter is key for smooth mixing.
- All-purpose flour: The base of your cookie—adds structure and chew.
- Baking powder: Gives a gentle lift without making cookies cakey.
- Salt: Enhances all the flavors in the dough.
- Butter: Use softened, not melted, for the right texture and flavor.
- Granulated sugar: Sweetness that also helps cookies spread and crisp.
- Eggs: Bind everything together while keeping cookies tender.
- Vanilla extract: Adds warmth and depth to the flavor profile.
- Gel food coloring (orange and black): For those classic Halloween hues without messing with dough consistency.
- Halloween sprinkles (optional): For extra fun and festive crunch on the edges.
Variations
I love that this Halloween Sugar Cookies Recipe is so easy to customize, whether you want to swap colors or add fun mix-ins. Let your creativity run wild—it’s half the joy of baking these cookies!
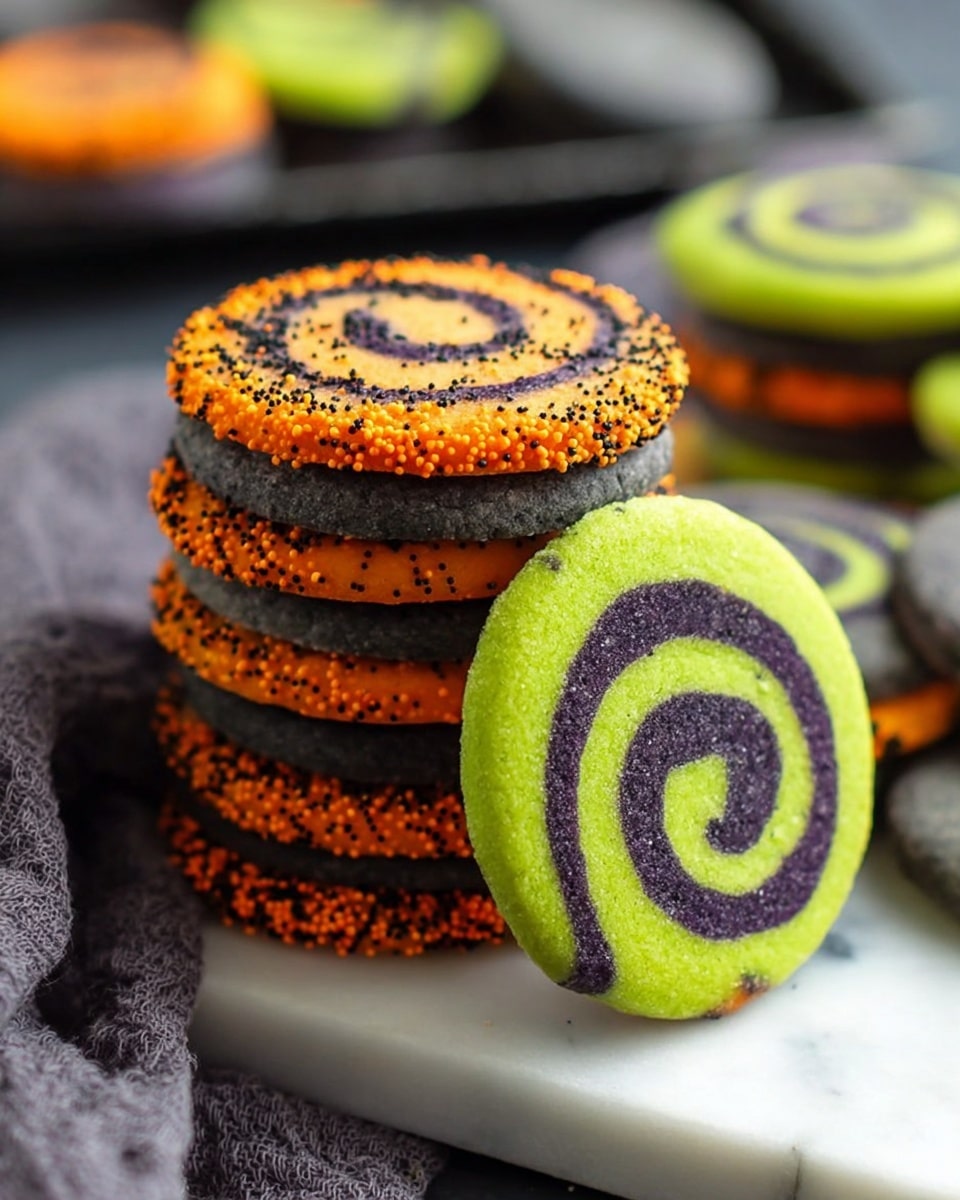
- Color swaps: I’ve played around with purple and green combinations that look amazing; try electric purple and green gel colors for something unique.
- Sprinkles or no sprinkles: Sometimes I skip sprinkles for a smooth look, but adding festive Halloween sprinkles takes these cookies to a whole new level of fun.
- Gluten-free alternative: I haven’t tried this myself, but substituting with a 1-to-1 gluten-free flour blend could work—just watch the dough texture.
- Flavor twists: Add a touch of almond extract or swap vanilla for maple to surprise your guests.
How to Make Halloween Sugar Cookies Recipe
Step 1: Mix the Dry Ingredients
Start by combining your all-purpose flour, baking powder, and salt in a bowl. Give it a good whisk to make sure everything is evenly distributed—this helps avoid those little salt pockets ruining your cookie’s sweetness later on.
Step 2: Cream Butter and Sugar
In a separate large bowl, cream the softened butter and granulated sugar until your mixture is light and fluffy. This step is where the cookies get their tender crumb, so don’t rush it—about 3-5 minutes with a mixer works perfectly.
Step 3: Add Eggs and Vanilla
Next, beat in the eggs one at a time followed by the vanilla extract. You’ll notice the mixture becomes silkier and creamier—this is exactly what you want before you bring in the dry ingredients.
Step 4: Combine Wet and Dry Ingredients
Gradually add your flour mixture into the butter mixture, mixing until a smooth dough forms. Be patient here—overmixing can make cookies tough, so stop as soon as everything is combined.
Step 5: Divide and Color the Dough
Separate your dough into two equal portions. Here’s where the fun begins: add orange gel food coloring to one half and black gel food coloring to the other. Use your mixer to knead the colors in evenly. Pro tip: rinse your bowl and beaters between colors to keep them vibrant and pure.
Step 6: Chill the Dough Patty
Shape each colored dough ball into a flattened rectangle. Wrap each in plastic and let them chill in the fridge for 1 to 2 hours. This firms up the dough, making it much easier to roll and slice later.
Step 7: Roll and Stack
Roll each chilled dough rectangle out to about ⅛ to ¼ inch thick—thin enough to see your color magic but thick enough to hold together well. I usually place the orange layer on the bottom and black on top for a fun stacked effect.
Step 8: Trim and Add Sprinkles (If Using)
Trim the edges with a pizza cutter to create straight, clean lines. If you want to jazz them up, lightly brush water on the outside edges of the dough and press Halloween sprinkles in. This gives a playful, festive crunch that’ll wow your guests.
Step 9: Form the Dough Log and Chill Again
Gently roll the stacked dough into a log shape, wrap it tightly in plastic, and chill for at least another hour. This resting step helps the dough hold its shape during baking and makes slicing into neat rounds so much easier.
Step 10: Slice and Bake
Preheat your oven to 350°F. Using a sharp, thin knife or blade, slice the log into ¼ to ½ inch thick rounds. I learned the hard way that a dull or thick blade squishes the dough, so take your time here! Place the rounds on a parchment-lined baking sheet with about 2 inches between each.
Bake for 10-12 minutes, or until the tops lose their shiny appearance. You want them lightly golden on the edges but still tender inside. Let cool on the baking sheet for a few minutes before transferring to a wire rack.
Pro Tips for Making Halloween Sugar Cookies Recipe
- Use Gel Food Coloring: This keeps your dough from getting too soft or sticky, unlike liquid colors.
- Chill Thoroughly: Don’t skip the chilling steps—this is the secret to clean cookie edges and easier slicing.
- Sharp Blade for Slicing: Invest in a thin, sharp knife or even dental floss to slice the dough log cleanly.
- Avoid Overmixing: Mix the flour in just until combined to keep your cookies tender, not tough.
How to Serve Halloween Sugar Cookies Recipe
Garnishes
I’m a fan of keeping garnishes simple but festive—think classic Halloween sprinkles pressed around the edges or a light dusting of powdered sugar for a “haunted forest” effect. When I host parties, those little touches spark a lot of joy and compliments.
Side Dishes
Serve these cookies alongside a warm pumpkin spice latte, hot apple cider, or even a vibrant orange sherbet to keep everything in the spirit of fall. My family loves pairing them with a bowl of chili or a hearty soup for a cozy gathering.
Creative Ways to Present
I’ve tried arranging these cut-out cookies in a checkerboard pattern on a platter, alternating the orange and black slices for a fun visual. Another favorite is stacking them in bundles tied with black and orange ribbon—super cute and perfect for gift-giving during Halloween season.
Make Ahead and Storage
Storing Leftovers
Store leftover cookies in an airtight container at room temperature. I usually layer them with parchment paper to prevent sticking. They stay fresh and buttery for up to 5 days, which is great because my family can’t handle the temptation for long!
Freezing
I’ve frozen both the dough log and baked cookies with great success. Wrap the dough tightly in plastic wrap and foil before freezing, then thaw overnight in the fridge before slicing and baking. Baked cookies freeze well, too—just thaw at room temp before serving.
Reheating
If you want to freshen up the cookies after storage, pop them in a 300°F oven for 3-5 minutes. This revives their crispness without drying them out, making them taste freshly baked all over again.
FAQs
-
Can I make this Halloween Sugar Cookies Recipe without food coloring?
Absolutely! The food coloring is what makes these cookies eye-catching for Halloween, but if you prefer natural cookies, you can skip the coloring and still enjoy a delicious sugar cookie. You might want to add a bit more vanilla or a touch of almond extract to keep the flavor exciting.
-
How do I prevent my sugar cookies from spreading too much?
The key is to chill your dough well before baking. This recipe calls for chill times that help keep the cookies firm, preventing them from spreading too thin in the oven. Also, make sure your baking powder is fresh to give a gentle lift without too much spread.
-
Can I use this Halloween Sugar Cookies Recipe for cut-out shapes?
Yes! After chilling the dough, you can roll it out and use cookie cutters for classic Halloween shapes like pumpkins, ghosts, or bats. Just keep the dough chilled and handle it gently to maintain clean edges and prevent cracking.
-
What’s the best way to slice the dough log?
Using a very sharp, thin knife or a clean piece of kitchen floss works best. Thick or dull blades tend to squash the dough and ruin the edges. Chilling the dough again before slicing also helps maintain firm, clean slices.
-
Can I make this recipe vegan or dairy-free?
While I haven’t tried this variation myself, swapping butter for vegan margarine and using a plant-based egg replacer could work. Keep in mind that texture and flavor might differ slightly, so a small test batch is a great way to experiment.
Final Thoughts
This Halloween Sugar Cookies Recipe is one of those go-to treats that never fails to impress and delight. I remember the first time I made these for a fall gathering—the surprise on everyone’s faces when I sliced into those marbled orange and black rounds was priceless. I truly recommend giving this recipe a whirl; it’s not only fun to make but creates the perfect festive vibe for any Halloween celebration. Trust me, once you try these cookies, they’ll become a seasonal favorite in your kitchen, too!
Print
Halloween Sugar Cookies Recipe
- Prep Time: 15 minutes
- Cook Time: 10 minutes
- Total Time: 2 hours 25 minutes
- Yield: 20 cookies
- Category: Dessert
- Method: Baking
- Cuisine: American
Description
These festive Halloween Sugar Cookies are vibrant, colorful, and perfect for spooky celebrations. The recipe features two-tone dough tinted with bright gel food colorings, rolled together into a log and sliced into delicious, soft sugar cookies with fun sprinkles on the edges. Easy to prepare and bake, these cookies are ideal for parties or holiday treats that delight kids and adults alike.
Ingredients
Dry Ingredients
- 3 cups all-purpose flour
- 1 tsp baking powder
- ½ tsp salt
Wet Ingredients
- 1 cup butter at room temperature
- 1½ cups granulated sugar
- 2 large eggs
- 2 tsp vanilla extract
Coloring and Decoration
- 1 tsp orange gel food coloring (electric orange)
- 1 tsp black gel food coloring (super black)
- Halloween sprinkles (optional)
Instructions
- Mix Dry Ingredients: In a bowl, combine the all-purpose flour, baking powder, and salt thoroughly. Set this mixture aside for later incorporation.
- Cream Butter and Sugar: In a separate large mixing bowl, cream together the softened butter and granulated sugar using an electric mixer until the mixture is smooth and fluffy.
- Add Eggs and Vanilla: Add eggs one at a time and pour in the vanilla extract, then beat the mixture well to combine all wet ingredients evenly.
- Combine Dry and Wet Mixes: Gradually add the flour mixture to the wet ingredients in batches while mixing continuously until a smooth dough forms and no dry flour remains visible.
- Divide Dough: Split the dough into two equal portions for coloring purposes.
- Color the Dough: Add orange gel food coloring to one half and black gel food coloring to the other. Beat each colored dough separately with the mixer until the color is fully incorporated and vibrant. Rinse the mixing bowl and beaters in between colors to avoid mixing.
- Shape and Chill Dough Patties: Shape each colored dough into a ball, flatten them into patties, then reshape edges into neat rectangles. Wrap each rectangle tightly in plastic wrap and chill in the refrigerator for 1 to 2 hours to firm up.
- Roll and Stack Dough: On a clean surface, roll each dough patty to about ⅛ to ¼ inch thickness. Stack one colored dough on top of the other (orange typically on bottom, black on top).
- Trim Edges and Add Sprinkles: Use a pizza cutter to trim straight edges from the stacked dough layers. Optionally, brush water on the dough edges and press Halloween sprinkles to decorate the outside of the dough log.
- Roll Dough Log and Chill Again: Carefully roll the stacked dough layers into a tight log shape. Wrap the log in plastic wrap and refrigerate for at least 1 hour to set the shape before slicing.
- Preheat Oven: Preheat your oven to 350°F (175°C) to prepare for baking.
- Slice and Bake Cookies: Using a thin, sharp blade, slice the chilled dough log into ¼ to ½ inch thick rounds. Place the cookies approximately 2 inches apart on a parchment paper-lined baking sheet. Bake for 10-12 minutes or until the tops are no longer shiny and edges are set.
- Cool and Serve: Remove cookies from the oven and allow them to cool on the baking sheet for a few minutes, then transfer to a wire rack to cool completely before serving.
Notes
- To create different color combinations, prepare additional batches of dough with alternate gel food colorings such as green (1 tsp), purple (3 tsp), or combinations like Black/Green and Purple/Green as desired.
- This recipe yields enough dough for one color combo; to make multiple combos, prepare separate batches accordingly.
- Using a thin, sharp blade when slicing the dough log helps prevent squished cookies and maintains clean edges.
- Chilling the dough multiple times is important for easier handling and maintaining shape during baking.
Nutrition
- Serving Size: 1 cookie
- Calories: 140
- Sugar: 9g
- Sodium: 85mg
- Fat: 7g
- Saturated Fat: 4g
- Unsaturated Fat: 2g
- Trans Fat: 0g
- Carbohydrates: 18g
- Fiber: 0.5g
- Protein: 2g
- Cholesterol: 35mg

