
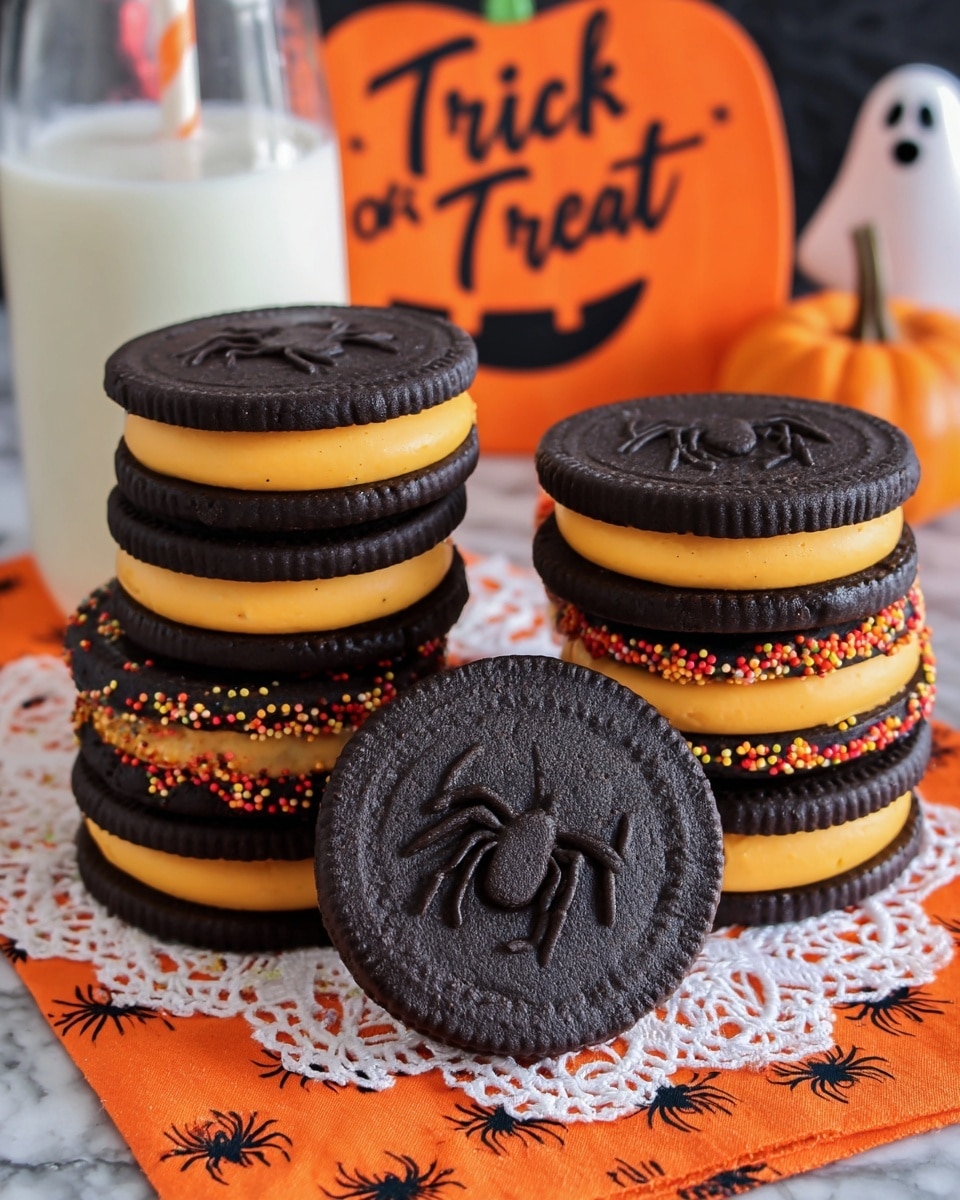
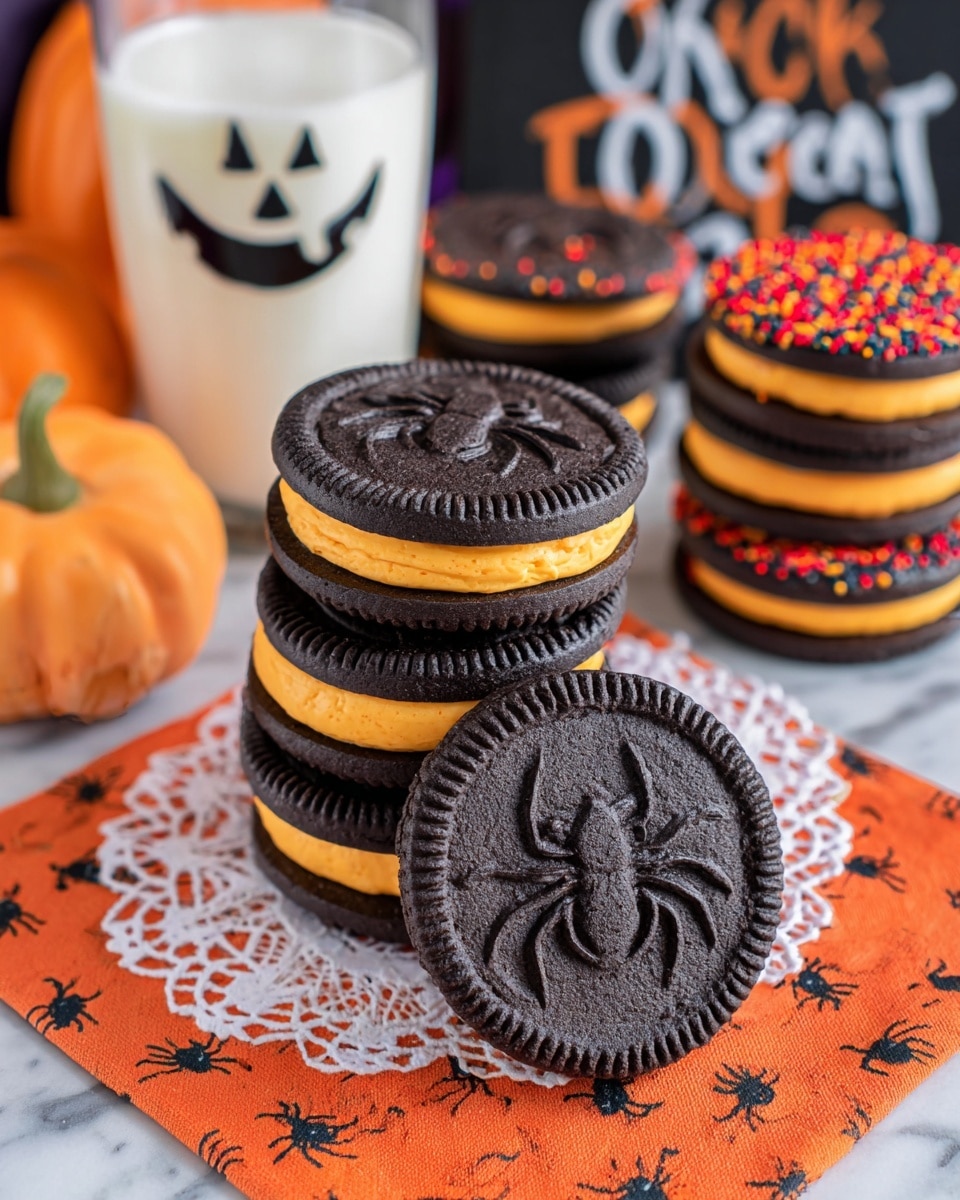
If you’re looking to impress your friends and family with a spooky treat that’s both delicious and fun to make, you’re in the right place. I absolutely love this Halloween Oreo Cookies Recipe because it combines that classic Oreo charm with a festive twist that’s perfect for the season. These cookies are not only adorable but also melt-in-your-mouth good, making them a total crowd-pleaser.
Why You’ll Love This Recipe
- Classic Oreo Taste with a Halloween Twist: The black cocoa powder gives these cookies their signature dark color, making them spooky yet delicious.
- Easy to Customize: From orange swirl frosting to fun sprinkles, you can make these as simple or elaborate as you like.
- Perfect Texture: Soft but sturdy cookies sandwiching creamy frosting — just how an Oreo should be.
- Great for All Skill Levels: Whether you’re a beginner or a pro, the step-by-step instructions will set you up for success.

Ingredients You’ll Need
These ingredients work beautifully together to create those rich, chocolatey cookies and the luscious frosting that makes this Halloween Oreo Cookies Recipe shine. I always recommend using fresh spices and good quality butter for the best flavor.
- Unsalted butter: Softened butter helps the dough come together smoothly and adds richness.
- Powdered sugar: Key for both the sweetness in the cookies and the smoothness of the frosting.
- Vanilla extract: Just a splash to bring out flavor in both dough and frosting.
- Table salt: Balances sweetness and enhances depth of flavor.
- All-purpose flour: The foundation of our cookies; make sure to measure carefully for perfect texture.
- Black cocoa powder: This is the magic ingredient that gives the cookies their signature dark color.
- Vegetable shortening: Adds stability and creaminess to the frosting without overpowering flavor.
- Orange gel coloring: For that vibrant Halloween frosting color without changing the frosting texture.
Variations
This Halloween Oreo Cookies Recipe is like a blank canvas, and I love making it my own. If you want a slightly different vibe or dietary tweaks, there are plenty of creative ways to play around.
- Frosting Flavors: I sometimes add a hint of almond extract for a nutty twist; it’s surprising how that small change adds depth.
- Vegan Version: You can swap butter for vegan butter and use a plant-based shortening to make these dairy-free.
- Spooky Decorations: Try adding edible eyes or little chocolate spiders on top of the frosting for an extra Halloween punch.
- Different Colors: Instead of orange, try a vibrant purple or green frosting for a ghostly gore effect — your call!
How to Make Halloween Oreo Cookies Recipe
Step 1: Cream the Butter and Sugar
Start by beating the softened unsalted butter with powdered sugar until the mixture turns creamy and pale. This step creates the perfect base for the cookies, so take your time—it usually takes about 2-3 minutes with a hand mixer. Add in vanilla extract and salt, then mix again until combined evenly. If your butter is too hard, your dough could get lumpy, so bringing it to room temp is key here.
Step 2: Combine Flour and Cocoa
Next, whisk together the all-purpose flour and black cocoa powder to make sure everything is evenly distributed. Slowly add this dry mix into the creamy butter mixture. I like to do this in two or three batches — makes it easier to blend smoothly without a floury cloud in the kitchen! Eventually, you’ll get a rich black dough that’s slightly crumbly but holds together when squeezed.
Step 3: Chill and Roll Out the Dough
Divide the dough in half, wrap each in plastic wrap, and refrigerate for 30 minutes. This chilling step is what keeps the cookies from spreading too much when baking, preserving that crisp, clean shape. When chilled, place one dough ball between two sheets of wax paper and roll it out to about ¼ inch thick. Use a 2-inch round cookie cutter for neat, uniform cookies. If there’s leftover dough, gather it up, reroll, and cut more circles until you have about 12 cookies total.
Step 4: Add Fun Details (Optional) and Bake
If you want to get creative, gently press Halloween-themed cookie stamps onto each cookie before baking. It adds a subtle, cool texture that’s perfect for festive vibes. Pop the cookie sheet into the fridge while you prep the second batch for extra chilling. Then bake your cookies in a preheated 350°F oven for 11-12 minutes. Once done, cool the cookies on the baking sheet for 5 minutes to set before transferring to a wire rack — don’t skip this small wait or the cookies might break.
Step 5: Whip Up the Orange Frosting
While the cookies are cooling, beat together butter, vegetable shortening, vanilla extract, and powdered sugar until perfectly smooth and creamy. The shortening helps maintain frosting shape at room temperature, which is great for sandwich cookies. Add orange gel coloring a tiny bit at a time with a toothpick until you reach that bright, festive shade you want.
Step 6: Assemble Your Halloween Oreo Cookies
Fill a piping bag fitted with tip #10 with frosting and pipe a generous swirl onto half the cookies. Press the remaining cookies on top to make sandwiches, applying gentle pressure so the frosting spreads evenly. If you want, roll the edges in colorful sprinkles for a fun finishing touch. And that’s it — your homemade Halloween Oreos are ready to wow!
Pro Tips for Making Halloween Oreo Cookies Recipe
- Keep Dough Cool: I discovered chilling the dough and even the cookie sheets helps keep those clean edges sharp and prevents spreading.
- Use Black Cocoa Powder: Regular cocoa just won’t give the same intense dark color; trust me, it’s worth hunting down.
- Frost Just Before Serving: I found that assembling the sandwiches too far in advance can cause the cookies to soften — piping and stacking fresh is best.
- Avoid Overbaking: The cookies might seem soft when out of the oven but they firm up nicely while cooling, so don’t bake past 12 minutes.
How to Serve Halloween Oreo Cookies Recipe
Garnishes
I love adding a sprinkle of edible glitter or festive nonpareils around the edges of the frosting to catch the light and add a little extra magic. Sometimes I also pipe little ghost eyes with black gel icing — it’s a fun little detail that always gets compliments.
Side Dishes
These cookies pair amazingly with a cold glass of milk, or for the adults, a rich hot chocolate with a hint of cinnamon. I’ve also served them alongside pumpkin spice cupcakes at parties, and they’re an instant hit every time.
Creative Ways to Present
Last Halloween, I arranged the cookies on a rustic, wooden tray surrounded by dried autumn leaves and tiny fake pumpkins — it made the perfect centerpiece for my dessert table. You can also stack them in cute treat bags tied with orange ribbon for easy take-home favors.
Make Ahead and Storage
Storing Leftovers
Store your Halloween Oreo Cookies in an airtight container at room temperature for up to 3 days. I learned the hard way that refrigeration can dry them out unless the container is very well sealed.
Freezing
If you want to save some for later, you can freeze the cookies (both assembled or just baked cookies) in a single layer using parchment paper between layers in a sealed freezer bag. They keep well for up to 2 months. Thaw overnight in the fridge before frosting or serving for the best texture.
Reheating
Since these are cookies, reheating usually isn’t necessary, but if you want to warm them up slightly, I gently microwave them for 10 seconds. This softens the frosting just a bit without melting it entirely, making for a fresh-baked feel.
FAQs
-
Can I use regular cocoa powder instead of black cocoa powder?
You can substitute regular cocoa powder, but the cookies won’t turn out as dark or have quite the same intense chocolate flavor. Black cocoa is key for achieving that authentic “Oreo” look and feel.
-
How do I prevent my cookies from spreading too much while baking?
Chilling the dough thoroughly before baking and keeping your baking sheets cool helps maintain the shape. Also, avoid over-creaming the butter and sugar, which can cause excess air and spreading.
-
Can I make the frosting ahead of time?
Yes! You can prepare the frosting a day ahead and keep it refrigerated in an airtight container. Let it come to room temperature and re-whip before piping for the best consistency.
-
What if I don’t have a piping bag or tip #10?
No worries! You can spread the frosting with a small butter knife or the back of a spoon for a more rustic look. Or make a DIY piping bag using a zip-top bag with a tiny corner snipped off.
-
Can I add sprinkles to these cookies?
Definitely! Rolling the cookie edges in festive Halloween sprinkles right after assembling adds color, texture, and fun to the presentation. Just make sure to do this while the frosting is still soft.
Final Thoughts
This Halloween Oreo Cookies Recipe has become a seasonal favorite in my household because it’s fun to make and irresistibly tasty. I used to struggle finding Halloween treats that weren’t overly complicated or just store-bought sweets, but this homemade version hits all the right notes: spooky, sweet, and utterly satisfying. I hope you enjoy making these as much as we do — trust me, once you whip them up, they’ll be a Halloween tradition in your kitchen too!
Print
Halloween Oreo Cookies Recipe
- Prep Time: 15 minutes
- Cook Time: 11 minutes
- Total Time: 56 minutes
- Yield: 10 sandwich cookies
- Category: Dessert
- Method: Baking
- Cuisine: American
Description
These Halloween Oreo Cookies are a festive and delicious treat perfect for the spooky season. With a rich black cocoa cookie base and creamy orange-tinted frosting sandwiched between, they mimic classic Oreos with a seasonal twist. The cookies are soft, chocolaty, and beautifully decorated, making them ideal for Halloween parties or gifting.
Ingredients
For the Cookies
- ½ cup unsalted butter, softened
- ½ cup powdered sugar
- 1 teaspoon vanilla extract
- ¼ teaspoon table salt
- 1 cup all purpose flour (120g)
- 2 tablespoons black cocoa powder
For the Frosting
- ¼ cup unsalted butter, softened
- ¼ cup vegetable shortening
- ½ teaspoon vanilla extract
- 1 ¾ cup powdered sugar
- orange gel coloring
Instructions
- Make the cookie dough: Beat the unsalted butter and powdered sugar together until creamy. Add the vanilla extract and salt, then mix again to combine evenly.
- Add dry ingredients: Whisk together the all-purpose flour and black cocoa powder in a separate bowl. Slowly add these dry ingredients to the butter mixture, folding gently to form a cookie dough.
- Chill the dough: Gather the dough into a ball and cut it in half. Wrap each half in plastic wrap and refrigerate for 30 minutes to firm up.
- Preheat oven: Preheat your oven to 350°F (175°C) to ensure it’s ready for baking once the dough is rolled out.
- Roll and cut cookies: Place one dough ball between two sheets of wax paper and roll out to ¼ inch thickness. Use a 2-inch round cookie cutter to cut out circles. Reroll the scraps to cut out a total of 12 circles per batch.
- Chill before baking: Place the cookie circles on a nonstick baking sheet. Optionally, gently press cookie stamps onto the tops for design. Refrigerate the tray while you repeat the rolling and cutting with the second dough ball.
- Bake the cookies: Bake cookies in the preheated oven for 11-12 minutes. After removing them, let the cookies cool on the hot baking pan for 5 minutes before transferring them to a wire rack to cool completely.
- Prepare the frosting: Beat unsalted butter, vegetable shortening, and vanilla extract together until smooth and creamy. Gradually add powdered sugar, beating until fluffy. Mix in orange gel coloring a little at a time to reach your desired color.
- Assemble the cookies: Spoon the frosting into a piping bag fitted with icing tip #10. Pipe swirls of frosting onto half of the cookies. Top each with a remaining cookie and gently press to spread frosting evenly between the layers.
- Optional decoration and storage: Roll the edges of the sandwich cookies in sprinkles if desired. Store the finished cookies in a loosely sealed container to keep them fresh.
Notes
- Refrigerating the dough and cookie sheet before baking helps cookies maintain their shape and prevents spreading.
- Black cocoa powder gives these cookies their distinctive dark color — do not substitute with regular cocoa powder unless you want a lighter color.
- If you don’t have cookie stamps, you can decorate the cookies with a fork or leave them plain before baking.
- Use gel food coloring to avoid thinning the frosting; a little goes a long way.
- Store cookies at room temperature in an airtight container for up to 3 days or freeze for longer storage.
Nutrition
- Serving Size: 1 sandwich cookie
- Calories: 180
- Sugar: 15g
- Sodium: 75mg
- Fat: 10g
- Saturated Fat: 4g
- Unsaturated Fat: 5g
- Trans Fat: 0g
- Carbohydrates: 22g
- Fiber: 1g
- Protein: 1g
- Cholesterol: 15mg


