
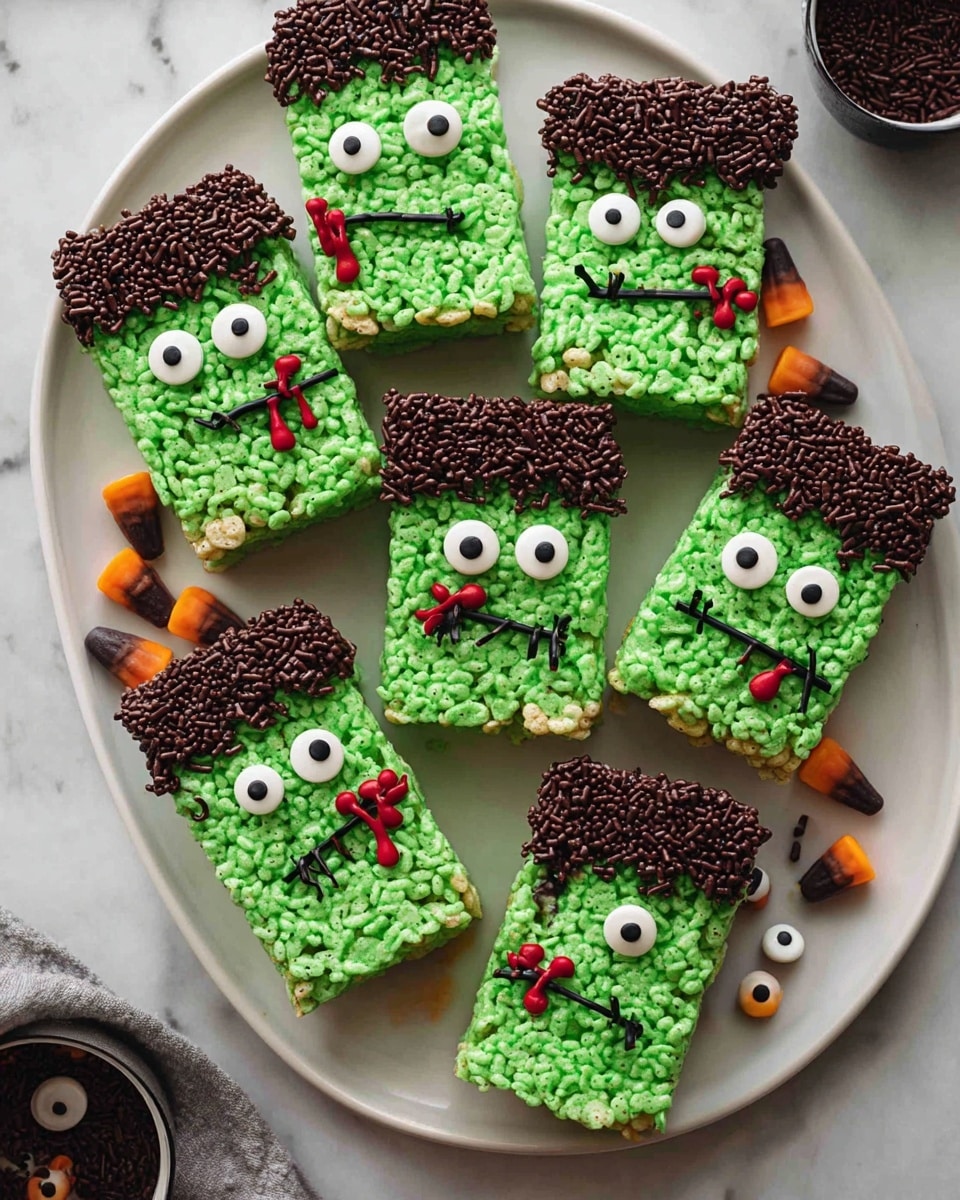
If you’re looking to wow the neighborhood or just want a super fun treat for your Halloween party, I absolutely have to share this Halloween Frankenstein Rice Krispies Treats Recipe with you. It’s playful, delicious, and surprisingly easy to pull off—trust me, these little green monsters are a fan-freaking-tastic way to celebrate spooky season! I first made them for a school bake sale, and my family went crazy for how cute and tasty they turned out. Keep reading, because you’ll find all my best tips to get these perfect on your very first try.
Why You’ll Love This Recipe
- Super Easy and Fun: You don’t need fancy tools or baking skills to make these guys come to life.
- Perfect for Beginners: If you’re new to themed treats, this Halloween Frankenstein Rice Krispies Treats Recipe is a great way to start.
- Crowd-Pleaser: Kids and adults alike love the marshmallowy crunch with that spooky green twist.
- Creative and Customizable: You can easily swap candy or adjust decorations to make it your own unique monster.

Ingredients You’ll Need
The magic of these Frankenstein Rice Krispies treats starts with just a handful of ingredients that you probably already love or can find easily. The green marshmallow mixture is what gives the monster its signature look, and I’ll share a little secret about how to get that color just right without going overboard.
- Nonstick baking spray: Makes it a breeze to release the treats from the pan without sticking.
- Unsalted butter: Melts smoothly and lets you control the salt level so your treats aren’t too salty.
- Mini marshmallows: The glue that holds everything together—fresh marshmallows work best for gooey goodness.
- Kosher salt: Just a pinch balances the sweetness perfectly.
- Green food coloring: The star of the show for that Frankenstein complexion —start with a few drops, and add until you get a bright, fun green.
- Rice Krispies cereal: The crispy base that keeps each bite light and crunchy.
- Semisweet chocolate chips: For dunking the “monster’s neck” and making those signature chocolate stitches and details.
- Chocolate sprinkles: Adds texture and a little extra chocolate flair over the dipped ends.
- Candy eyeballs: You’ll want these googly eyes to bring your Frankenstein monsters to life!
- Reese’s Minis Unwrapped: Classic choice for the “neck bolts” – peanut butter cups add both flavor and a fun shape.
- Black writing gel: Perfect for drawing stitches and spooky smiles.
- Red writing gel (optional): Adds a little “bloody” detail if you want to get extra creepy.
Variations
I love how versatile this Halloween Frankenstein Rice Krispies Treats Recipe is — you can easily tweak it to suit your taste or dietary needs, or just to make it extra fun. Here are a few of my favorite ways to mix it up:
- Nut-Free Version: Instead of Reese’s Minis, try mini marshmallows or small gummy candies as “neck bolts” for a kid-friendly option.
- Vegan Adaptation: Use vegan butter, vegan marshmallows, and dark chocolate that’s dairy-free for a plant-based Frankenstein.
- Extra Gooey Treats: Increase marshmallows slightly for a softer, chewier texture—my family swears by it!
- Spooky Color Swap: Change up the green and try neon orange or purple food coloring for different Halloween monsters.
How to Make Halloween Frankenstein Rice Krispies Treats Recipe
Step 1: Prep your pan and melt the butter
Start by spraying the bottom and sides of a 13 x 9-inch pan generously with nonstick spray. This step might sound small, but it saves you a lot of luck and drama when it’s time to pull the treats out. Then, melt 4 tablespoons of unsalted butter in a large pot over medium-low heat until it’s bubbly but not browned—this ensures your marshmallow mixture is nice and smooth.
Step 2: Add marshmallows, salt, and green food coloring
Once the butter is melted, toss in your mini marshmallows and a pinch of kosher salt. Stir gently until the marshmallows melt down into a glossy mixture. Now for the fun part: add green food coloring — I usually start with about 8 to 10 drops and stir. If the color isn’t as bright as I want, I add more, a few drops at a time. You want that glow-in-the-dark green look, not something dull or pastel. Keep stirring until it’s smooth and totally combined.
Step 3: Fold in the Rice Krispies cereal
Remove the pot from heat and pour in the Rice Krispies cereal. Grab a big spoon or spatula and fold the cereal in gently but thoroughly, making sure every kernel is coated in that gooey green mixture. This part is key—if you don’t coat evenly, the treats won’t hold together well. It’s okay if it feels sticky; that’s how it’s supposed to be!
Step 4: Press into the pan and cool
Transfer the sticky mixture immediately into your sprayed pan. I like to use a piece of parchment paper or lightly greased hands to press it down evenly—you want a firm but not squashed layer. Let the treats stand at room temperature for about 15 minutes to set up and cool enough to cut easily.
Step 5: Cut and prepare your Frankenstein shapes
Turn the set Rice Krispies treats onto a cutting board. Cut the rectangle in half lengthwise, then cut each half into 5 pieces crosswise—you’ll end up with 10 Frankenstein bodies ready to decorate. At this stage, be gentle to keep those edges clean.
Step 6: Melt chocolate and decorate your monsters
Place the chocolate chips in a microwave-safe cup or bowl. Microwave on 30-second intervals, stirring well between each, until the chocolate is melted and silky smooth. Dip one end of each treat into the melted chocolate, then immediately sprinkle with chocolate sprinkles to add fun texture. Use some of the remaining melted chocolate as “glue” to attach candy eyeballs and mini peanut butter cups for the classic Frankenstein neck bolts.
Step 7: Add finishing touches with writing gel
Finally, bring out your black writing gel and draw on spooky mouths and signature Frankenstein stitches. If you want to get really creative, add tiny touches of red writing gel to imitate a bit of “blood”—it’s optional but so fun for a little extra creep factor. Let your monsters dry for about 15 minutes before serving.
Pro Tips for Making Halloween Frankenstein Rice Krispies Treats Recipe
- Don’t Rush the Cooling: Letting your treats set before cutting helps avoid crumbly edges and keeps them looking sharp.
- Use Parchment Paper for Easy Pressing: I use a flattened piece of parchment to press the mixture down to avoid sticky hands and keep an even layer.
- Build Your Decorations in Layers: Attach eyes and neck bolts with melted chocolate, then add your final details with writing gel once everything’s semi-set.
- Be Careful with Food Coloring: Add color slowly—too much can affect taste and texture, so start small and adjust.
How to Serve Halloween Frankenstein Rice Krispies Treats Recipe

Garnishes
I like to add some festive garnishes—not just for looks but because they make the treats feel extra special. Aside from the candy eyeballs and chocolate sprinkles, adding little edible confetti or Halloween-themed sugar decorations around the tray can really set the mood. Sometimes I toss some green-tinted coconut flakes around for a “franken-moss” effect on the platter.
Side Dishes
These treats are sweet and substantial on their own, so I keep sides simple. I love pairing them with a cold glass of milk or a warm cup of spiced apple cider for the adults. If it’s a kids-only party, a punch bowl of orange sherbet punch complements the festive vibe perfectly.
Creative Ways to Present
One of my favorite ways to present these Frankenstein treats is by placing each in a little black cupcake liner—this adds a nice contrast to the bright green and keeps fingers cleaner. For parties, I like to arrange them on a platter with some dry ice underneath for an eerie fog effect that really delights the kids. You can also tie a narrow black ribbon around each piece to make them look like tiny spooky gifts!
Make Ahead and Storage
Storing Leftovers
I usually keep leftover treats in an airtight container at room temperature. They’ll stay fresh and chewy for up to 3 days. When I’ve had leftovers, I noticed they soften slightly but still maintain that classic Rice Krispies crunch.
Freezing
Freezing works well if you want to make these monsters ahead of time. Wrap individual treats in plastic wrap, then place them in an airtight freezer bag or container. They can last for up to a month in the freezer. When you’re ready to serve, thaw them at room temperature for about an hour.
Reheating
I don’t recommend microwaving these treats since it can make them overly sticky or mushy, but if you want them softer, let them sit at room temp or briefly warm in a shaded spot for 30 minutes. That’s usually enough to bring back some softness without ruining texture.
FAQs
-
Can I use regular-sized marshmallows instead of mini for this Halloween Frankenstein Rice Krispies Treats Recipe?
Yes, you can! Just keep in mind that regular marshmallows take a little longer to melt and might require a bit more stirring. Mini marshmallows melt faster and create a smoother mixture, which is why I prefer them for this recipe.
-
How do I make sure the green color doesn’t look dull or washed out?
Start with a few drops of food coloring and add more gradually until you get a vibrant green. Remember, the marshmallow mixture will lighten as it cools, so aim for a slightly brighter green while mixing. Using gel food coloring instead of liquid helps give a richer shade without thinning the marshmallow mixture.
-
Can I make these without chocolate or candy decorations?
Absolutely! The Frankenstein look comes mostly from the green color and shape — if you want a simpler version, you can skip chocolate and candies. Use icing or edible markers to draw faces instead, or incorporate other fun Halloween decor like edible eyes for a no-chocolate version.
-
What is the best way to cut these treats neatly?
Wait until the treats have cooled completely but are still slightly soft. Use a sharp kitchen knife that you sometimes warm under hot water and dried before cutting. This helps to get tidy, clean edges without crumbly bits.
-
Do these Halloween Frankenstein Rice Krispies Treats keep well overnight?
Yes, store them in an airtight container at room temperature, and they’ll stay fresh and delicious for up to 3 days. Avoid fridge storage to keep them from drying out.
Final Thoughts
Honestly, this Halloween Frankenstein Rice Krispies Treats Recipe is one of my all-time favorite festive desserts because it combines childhood nostalgia with a lovable spooky twist. They’re simple to make, endlessly customizable, and guaranteed to bring smiles wherever you share them. Whenever I make them, I’m reminded of the joy of creating something fun with my kids—and I hope you’ll enjoy that same experience. So go ahead, gather your ingredients, and get ready to bring your own batch of cute, creepy Frankenstein monsters to life this Halloween!
Print
Halloween Frankenstein Rice Krispies Treats Recipe
- Prep Time: 30 minutes
- Cook Time: 5 minutes
- Total Time: 50 minutes
- Yield: 10 servings
- Category: Dessert
- Method: Stovetop
- Cuisine: American
Description
These Halloween Rice Krispies Treats are a fun and festive twist on the classic snack, designed to look like Frankenstein’s Monster. With bright green marshmallow coating, chocolate-dipped ends, candy eyeballs, and Reese’s Minis as neck bolts, these treats are perfect for a spooky celebration. Easy to make and delicious to eat, they combine crunchy Rice Krispies cereal with gooey marshmallow and festive decorations to delight kids and adults alike.
Ingredients
Base Ingredients
- Nonstick baking spray
- 4 tablespoons unsalted butter
- 10 ounces mini marshmallows (about 5-1/2 cups)
- Pinch kosher salt
- Green food coloring (enough to make marshmallow mixture bright green)
- 5 cups Rice Krispies cereal
Decorations
- 8 ounces semisweet chocolate chips
- ¼ cup chocolate sprinkles
- 20 candy eyeballs
- 20 Reese’s Minis Unwrapped (mini peanut butter cups)
- Black writing gel
- Red writing gel (optional)
Instructions
- Prepare Pan: Spray the bottom and sides of a 13 x 9-inch pan with nonstick baking spray to prevent sticking.
- Melt Butter: In a large pot, melt 4 tablespoons of unsalted butter over medium-low heat until fully melted.
- Add Marshmallows and Color: Add 10 ounces of mini marshmallows, a pinch of kosher salt, and green food coloring to the melted butter. Stir continuously until the mixture is fully combined, smooth, and a bright green color. Add more food coloring if necessary to achieve the desired vivid green.
- Mix in Cereal: Remove the pot from heat and add 5 cups of Rice Krispies cereal. Stir thoroughly until each piece of cereal is completely coated with the green marshmallow mixture.
- Press in Pan: Transfer the marshmallow-coated cereal mixture to the prepared pan. Use a piece of parchment paper or greased hands to gently but firmly press the mixture evenly against the bottom of the pan. Let it stand at room temperature for 15 minutes to set.
- Cut Treats: Turn the set mixture onto a cutting board. Cut the rectangle in half lengthwise, then cut each half crosswise into 5 equal pieces, making a total of 10 rectangular treats.
- Melt Chocolate: Place 8 ounces of semisweet chocolate chips in a microwave-safe glass measuring cup or bowl. Microwave in 30-second intervals, stirring between each, until the chocolate is fully melted and smooth.
- Dip and Decorate: Dip one end of each Rice Krispies treat into the melted chocolate and place them on parchment paper. Immediately sprinkle the chocolate ends with chocolate sprinkles before the chocolate hardens.
- Add Features: Use some of the melted chocolate as edible glue to attach 20 candy eyeballs and 20 unwrapped Reese’s Minis as Frankenstein’s neck bolts.
- Draw Details: Use black writing gel to add mouths and stitches to the treats. Optionally, use red writing gel to add a bit of “blood” for a spookier effect.
Notes
- Use parchment paper or grease your hands to prevent sticking when pressing the mixture into the pan.
- Adjust the amount of green food coloring based on how vibrant you want the treats.
- If you don’t have candy eyeballs, you can substitute with white and black icing dots.
- Allow the treats to cool and set completely before dipping in chocolate to avoid melting.
- Store treats in an airtight container at room temperature to keep them fresh.
Nutrition
- Serving Size: 1 treat
- Calories: 210
- Sugar: 18g
- Sodium: 70mg
- Fat: 10g
- Saturated Fat: 6g
- Unsaturated Fat: 3g
- Trans Fat: 0g
- Carbohydrates: 28g
- Fiber: 1g
- Protein: 2g
- Cholesterol: 20mg

