
If you’re looking to wow your friends and family this spooky season, I’ve got just the thing for you: my all-time favorite Halloween Dirt Cups Recipe. These creepy-cute, creamy delights not only taste incredible but are also super fun to make — the perfect combo for a Halloween party or just a cozy evening with the kids. When I first tried this recipe, I was blown away by how easy it was to put together and how everyone went crazy for the delicious “dirt” texture. Trust me, you’re going to want to keep this recipe handy all fall long!
Why You’ll Love This Recipe
- Quick and Easy: You can whip this up in about 30 minutes, which means more time to enjoy the fun part—decorating and eating!
- Kid-Friendly Fun: Getting creative with Halloween sprinkles and candy decorations makes it a hit with the little ones.
- Delicious Texture: The crushed Oreos create that perfect “dirt” look and add a satisfyingly crunchy contrast to the smooth pudding.
- Make-Ahead Friendly: You can prepare these a day in advance, making party planning way less stressful.

Ingredients You’ll Need
These ingredients come together in such a simple way, yet they create the ultimate Halloween treat. The Oreos give that perfect crumbly dirt effect while the pudding and whipped topping make it creamy and dreamy. Here are a few tips on picking the best stuff to make your cups rock.
- Oreos: For that authentic dirt look, you want classic Oreos—no filling needed—because it blends perfectly into crumbly “soil.”
- Milk: Whole milk works best for the pudding to get that rich, velvety texture.
- Instant chocolate pudding mix: Using instant saves time but still gives you a smooth, chocolatey base.
- Frozen whipped topping: Thaw it completely for easy folding without lumps.
- Chocolate syrup: Divided into two parts, it adds subtle sweetness and helps make that clumpy dirt for decorating.
- Milano cookies: Perfect for making tiny “RIP” tombstones with black decorator icing.
- Black decorator icing: For spooky writing on your cookie tombstones.
- Ghost Peeps: Adds a fun, festive ghostly friend on top.
- Pumpkin candies and Halloween sprinkles: These festive touches bring the cups to life with bursts of color and Halloween spirit.
Variations
I love how versatile this Halloween Dirt Cups Recipe is—you can easily customize it to fit your family’s preferences or dietary needs. Don’t be afraid to get creative!
- Use gluten-free Oreos: I switched these out one year for my gluten-sensitive niece and she couldn’t believe they tasted just as good!
- Swap chocolate pudding for vanilla: For a lighter flavor, switching to vanilla pudding creates a new twist that’s just as delicious.
- Add peanut butter layers: If you’re a peanut butter fan like me, stirring some creamy peanut butter into the pudding adds rich depth.
- Decorate with edible eyes or gummy worms: Perfect for extra creepy fun that kids adore — just make sure you add them right before serving so they don’t get soggy!
How to Make Halloween Dirt Cups Recipe
Step 1: Whip Up the Pudding Base
Start by pouring your instant chocolate pudding mix into a large bowl, then slowly whisk in the cold milk for 2-3 minutes until it thickens. Let it rest for about 5 minutes—this resting step is key because the pudding sets up just right for folding in that fluffy whipped topping. When you mix in the thawed topping, use gentle folding motions so you keep it light and airy.
Step 2: Add Chocolate Syrup for That Perfect Swirl
Once your pudding mixture is ready, stir in half of the chocolate syrup, but don’t overmix—it should look a little streaky for an awesome marbled effect. Then cover and pop it in the fridge until you’re ready to build your cups.
Step 3: Crush Those Oreos into Dirt
This is my favorite part! Toss your Oreos (cream and all) into a food processor or blender and pulse until they resemble dirt—think fine crumbs, not powder. You might need to do this in batches so you don’t overfill your processor. I learned that crushing the Oreos in smaller batches helps keep the texture consistent and avoids a muddy mess.
Step 4: Layer Your Dirt Cups
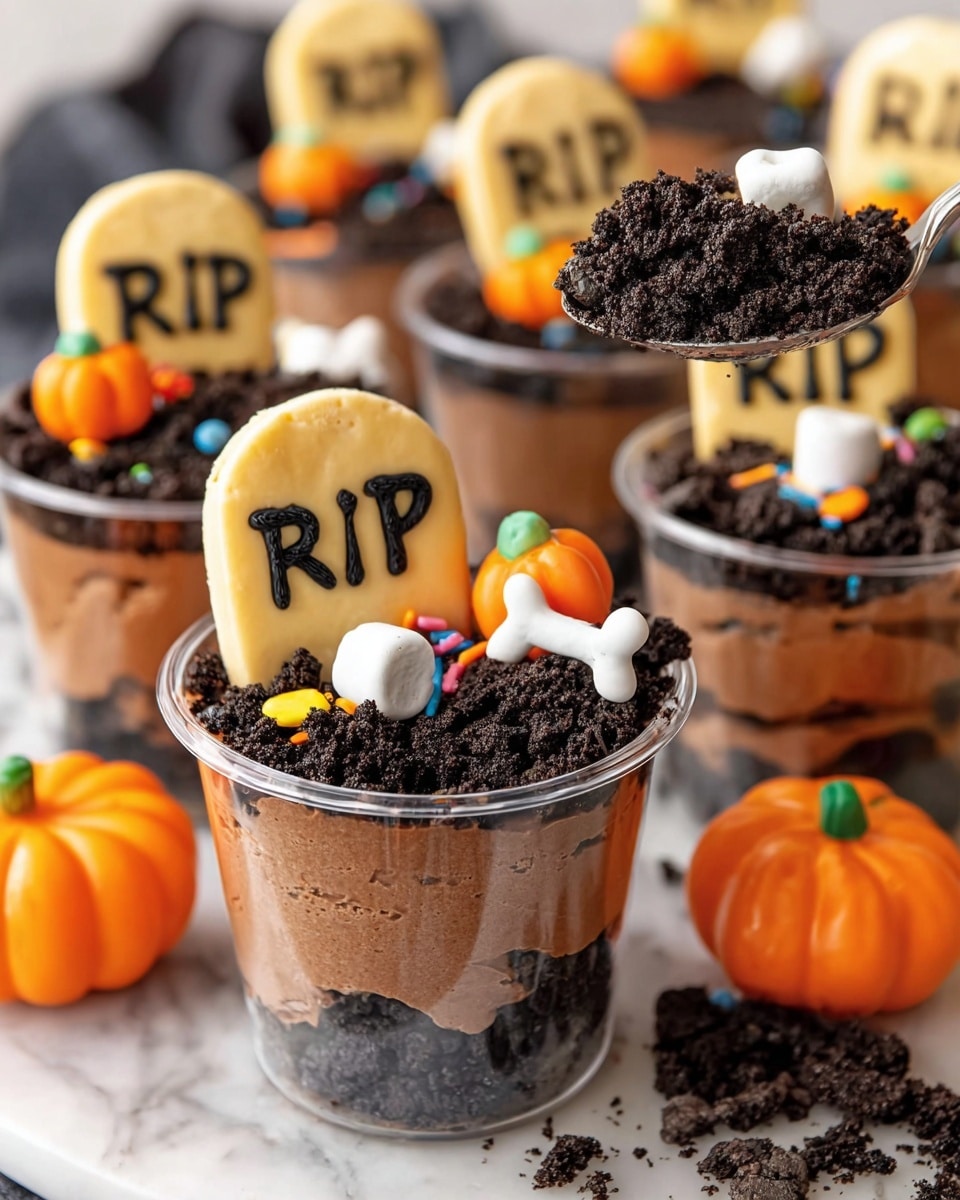
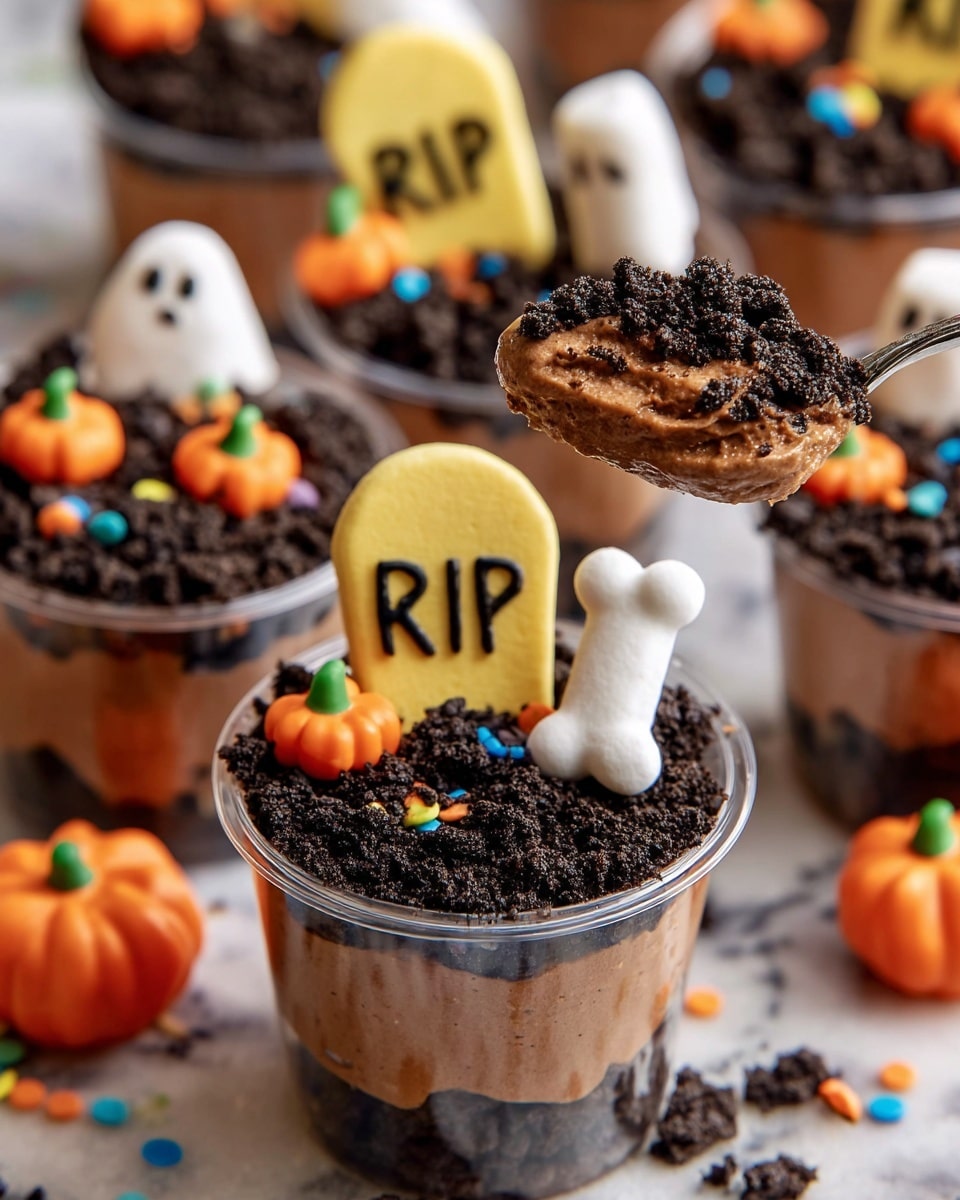
Grab your dessert cups (I use 9-ounce disposable cups which are perfect size for sharing). Start with about 2 tablespoons of Oreo crumbs at the bottom, then add roughly 1/4 cup of the pudding mixture. Repeat with another Oreo layer and pudding layer, finishing off with a final tablespoon of Oreo “dirt” on top. Layering is what makes these cups so visually fun and tasty—don’t skip it!
Step 5: Make the Clumpy Dirt for Decorating and Have Fun!
Mix the remaining Oreo crumbs with the rest of the chocolate syrup. Here’s where the magic happens—the mixture turns clumpy and moist, perfect for resembling freshly dug dirt. Top your cups with this clumpy dirt, then get creative: add Milano cookie tombstones decorated with “RIP,” ghost Peeps, pumpkin candies, and Halloween sprinkles for the ultimate spooky effect. You can make these right away or refrigerate until party time.
Pro Tips for Making Halloween Dirt Cups Recipe
- Crush Oreos in Small Batches: I discovered this trick prevents your crumbs from clumping too much and keeps the dirt texture just right.
- Don’t Overmix the Pudding and Syrup: Keeping the streaky look adds visual interest and keeps the flavor balanced.
- Add Toppings Last Minute: I learned the hard way that adding candy and cookies too early makes them soggy, so save decorations until serving time.
- Use the Right Cups: I usually go for 9-ounce plastic cups—they’re just the right size for portion control and cute presentation.
How to Serve Halloween Dirt Cups Recipe
Garnishes
My go-to garnishes are the Milano cookies with “RIP” written in black icing, ghost-shaped Peeps for hiccup-inducing adorableness, and a sprinkle of mini pumpkin candies with colorful Halloween-themed sprinkles. These little touches take the presentation from fun to fang-tastic—and kids especially love digging their spoons in to find these surprises!
Side Dishes
This dessert is rich enough to stand on its own, but if I’m planning a Halloween spread, I like to pair these cups with light savory bites like deviled eggs shaped like eyeballs or mini pumpkin-shaped cheese balls. The contrast between sweet and savory is always a crowd-pleaser, plus it keeps things balanced.
Creative Ways to Present
For a party, I love using small mason jars or even tiny flower pots lined with plastic wrap to serve these dirt cups. One Halloween, I even added edible worms made from fruit leather tucked inside the dirt—everyone got a kick out of it! You can also arrange cups on a tray dusted with cocoa powder for a foggy graveyard effect.
Make Ahead and Storage
Storing Leftovers
If you happen to have leftovers—and you might considering how popular these are!—keep them covered with plastic wrap in the fridge. I’ve noticed the Oreo layers soften after a day, so I usually sprinkle fresh crushed Oreos on top before serving again to bring back that crisp texture.
Freezing
Freezing isn’t my favorite method for this recipe because the texture of the pudding changes once thawed. That said, if you freeze them, plan to enjoy the cups within a month, and thaw overnight in the fridge. Just be ready for a slightly softer “dirt” texture.
Reheating
This dessert is best enjoyed cold, so reheating isn’t really necessary or recommended. If you want to bring it to room temperature, take the cups out of the fridge about 15 minutes before serving to let flavors open up without melting the whipped topping.
FAQs
-
Can I make Halloween Dirt Cups Recipe dairy-free?
Absolutely! You can substitute dairy-free milk and whipped topping alternatives, and choose a dairy-free chocolate pudding mix or make your own by using cornstarch and cocoa powder. Just make sure your Oreos and candies are also dairy-free, as some brands vary.
-
What size cups are best for Halloween Dirt Cups Recipe?
I typically use 9-ounce plastic disposable cups because they hold the right amount for a single serving, but small mason jars or clear glass dessert dishes also work well if you want a fancier presentation.
-
How far in advance can I prepare these dirt cups?
You can prepare the pudding and Oreo crumbs up to a day ahead, but I recommend assembling and decorating the cups the same day or right before serving. This helps prevent soggy crumbs and keeps your decorations fresh and vibrant.
-
Can I use homemade chocolate pudding instead of instant?
Yes! Homemade chocolate pudding works wonderfully and often tastes even richer. Just be sure it’s fully chilled and thick before folding in the whipped topping so your layers hold properly.
-
What are some creative decorations for Halloween Dirt Cups Recipe?
Besides Milano cookie tombstones, you can use gummy worms, candy eyeballs, mini candy pumpkins, edible glitter, or even spooky plastic picks. The key is to add decorations just before serving to keep everything looking fresh and fun.
Final Thoughts
This Halloween Dirt Cups Recipe has become a staple for me every spooky season because it’s as fun to make as it is to eat. I love that it brings a little whimsy and indulgence to dessert time, and it’s always a hit no matter the crowd. You’ll enjoy that perfect combo of creamy, crunchy, and festive flavors, especially when you get to customize and decorate alongside your favorite people. Give it a try—I promise it’ll become one of your go-to Halloween treats too!
Print
Halloween Dirt Cups Recipe
- Prep Time: 30 minutes
- Cook Time: 0 minutes
- Total Time: 30 minutes
- Yield: 18 servings
- Category: Dessert
- Method: No-Cook
- Cuisine: American
Description
Halloween Dirt Cups are a fun and festive dessert perfect for Halloween parties. This layered treat combines crushed Oreo cookies, rich chocolate pudding, and fluffy whipped topping to create a dirt-like appearance, topped with spooky decorations like Milano cookies with ‘RIP’ icing, ghost Peeps, pumpkin candies, and colorful Halloween sprinkles. Easy to prepare and delightfully creepy, this dessert is sure to impress kids and adults alike.
Ingredients
Dessert Base
- 2 (19 ounce) family size packages of Oreos
- 4 cups milk
- 2 (3 ounce) packages instant chocolate pudding mix
- 16 ounces frozen whipped topping, thawed
- 1 cup chocolate syrup, divided
Decorations
- Milano cookies
- Black decorator icing
- Ghost Peeps
- Pumpkin candies
- Halloween sprinkles
Instructions
- Make the Pudding Mixture: In a large bowl, combine the instant chocolate pudding mix with 4 cups of milk. Whisk vigorously for 2-3 minutes until the mixture starts to thicken, then let it stand for 5 minutes to fully set. Once set, gently fold in the thawed whipped topping until incorporated.
- Add Chocolate Syrup to Pudding: Stir in half a cup (½ cup) of chocolate syrup into the pudding mixture just a few times to create a marbled or streaky effect. Cover this bowl and refrigerate until you are ready to assemble the cups.
- Prepare Oreo Crumbs: Place the Oreo cookies in a food processor or blender and pulse until they are reduced to fine crumbs resembling dirt. You may need to do this in batches depending on your appliance size. Transfer the crumbs into a large mixing bowl.
- Assemble the Dirt Cups: Using about 9-ounce dessert cups, layer the dessert starting with approximately 2 tablespoons of Oreo cookie crumbs as the base. Top with about ¼ cup of the pudding mixture. Repeat the layering once more with Oreo crumbs and pudding, then finish with 1 tablespoon of Oreo crumbs on top.
- Prepare Clumpy Cookie Topping: To the remaining Oreo crumbs, add the remaining ½ cup of chocolate syrup and stir until the crumbs become clumpy and moist. Set this mixture aside.
- Decorate the Cups: Use black decorator icing to write “RIP” on Milano cookies and place them into some of the cups. Add ghost-shaped Peeps to others for variety. Then, top each cup with the clumpy cookie crumb mixture to resemble freshly dug soil, and finish with mini pumpkin candies and Halloween-themed sprinkles for a festive touch.
- Serve or Store: Serve the dirt cups immediately for best texture, or refrigerate until serving time. For best results, add cookie and candy toppings just before serving to prevent sogginess.
Notes
- Use disposable plastic cups of about 9 ounces, small mason jars, or similar-sized containers for best portioning.
- Prepare the dessert up to one day in advance and store in the refrigerator. Avoid making it earlier to prevent the Oreo layers from becoming soggy.
- Do not add cookie or candy toppings until right before serving to maintain their texture and appearance.
- Leftover dirt cups can be refrigerated covered with plastic wrap. Oreo crumbs may soften over time but can be refreshed with a fresh sprinkle of crushed Oreos before serving again.
Nutrition
- Serving Size: 1 cup (approximate)
- Calories: 320
- Sugar: 30g
- Sodium: 180mg
- Fat: 15g
- Saturated Fat: 9g
- Unsaturated Fat: 5g
- Trans Fat: 0g
- Carbohydrates: 44g
- Fiber: 2g
- Protein: 3g
- Cholesterol: 15mg


