
If you’re looking for a sweet treat that’s as fun to make as it is to eat, you’re going to flip for my Halloween Cake Pops Recipe. These spooky little bites pack all the rich chocolatey goodness of a classic cake, perfectly combined with creamy frosting and decorated with festive flair. Whether you’re hosting a haunted house party or just craving a bite-sized indulgence, this recipe is your ticket to Halloween magic on a stick!
Why You’ll Love This Recipe
- Perfect Bite-Sized Fun: These cake pops are ideal for parties or handing out to trick-or-treaters without any mess.
- Rich Homemade Chocolate Cake: The moist chocolate cake base beats store-bought mixes any day for flavor and texture.
- Easy Decorating Tricks: You don’t need fancy skills to make these spooky pops look amazing, I’ll show you the simple steps!
- Make-Ahead Friendly: You can prep these days in advance—perfect for getting ahead during busy Halloween week.

Ingredients You’ll Need
All the ingredients come together beautifully to create a deep chocolate flavor with the perfect crumb and a frosting that’s smooth and just firm enough to hold without slipping. I always recommend using fresh cocoa powder and real butter for that intense homemade vibe.
- Cocoa powder: Use unsweetened cocoa for the richest chocolate flavor—it really makes a difference.
- Boiling water: This helps bloom the cocoa powder, boosting the chocolate taste and giving the cake a tender crumb.
- Butter: Room temperature butter whips best for a fluffy cake batter and buttercream frosting.
- Sugar: Regular granulated sugar sweetens the cake just right without overpowering the chocolate.
- Eggs: They add structure and moisture—be sure they’re fresh!
- Vanilla extract: Adds warmth and rounds out the chocolate flavor wonderfully.
- All-purpose flour: The foundation of the cake; aim for fresh for best results.
- Baking soda: Gives the cake a nice lift and tender crumb.
- Salt: Just a pinch to balance the sweetness and emphasize flavor.
- Milk: Provides moisture; whole milk is best for a richer cake.
- Sour cream: This ingredient adds tang and extra moistness that keeps the cake tender.
- Salted butter (for frosting): Adds creaminess and helps the frosting set nicely on your pops.
- Icing sugar: For smooth, sweet frosting that holds up well when piped or spread.
- Heavy cream: Adjusts frosting consistency—important for cake pop assembly.
- Orange candy melts: Perfect for that festive Halloween color without fuss.
- Confectioners sugar: Great for dusting or mixing with colors for decorating details.
- Green and black food coloring gels or edible pens: For fun spooky accents like eyes, spiders, or creepy faces.
Variations
I love how versatile this Halloween Cake Pops Recipe is. You can tweak the decorations and flavors to fit whatever spooky style you’re going for. Honestly, every time I make them, I find myself trying a new twist based on who I’m sharing them with!
- Flavor Swap: For a different vibe, try adding pumpkin spice to the cake or swapping the chocolate for red velvet—my family totally loves the seasonally festive pumpkin twist!
- Diet-Friendly: I once made a gluten-free batch using almond flour and it worked surprisingly well—just dial down the moisture a bit.
- Theme Variation: Instead of ghosts and pumpkins, try making cute mummies or black cats with different colored candy melts and simple piped eyes.
How to Make Halloween Cake Pops Recipe
Step 1: Bake Your Chocolate Cake Base
This recipe calls for a deeply chocolatey, moist cake that’s the perfect base for cake pops. Start by combining your cocoa powder with boiling water—that blooming step is key to unlocking intense chocolate flavor. Then, cream the butter and sugar together until fluffy; this makes your cake wonderfully tender. Add eggs one at a time so the batter stays smooth, then mix in your dry ingredients alternately with milk and sour cream. The sour cream adds such a lovely moisture that keeps these cake pops tender but sturdy. I always line my 9×13 pan well and bake at 350ºF until a toothpick comes out clean. The cooling step is important because warm cake crumbles won’t hold well!
Step 2: Whip Up That Buttercream Frosting
While your cake cools, make the creamy buttercream that ties everything together. I use salted butter whipped until fluffy, then slowly add powdered sugar and vanilla. The texture here is everything—you want it firm enough to shape but light enough not to overpower the cake. The heavy cream helps adjust consistency perfectly. I keep this frosting a bit on the thicker side since it’s going to hold the cake crumbs nicely when you shape the pops.
Step 3: Crumble, Mix, and Shape Your Pops
Once your cake is completely cooled, crumble it into fine crumbs in a large bowl—no big chunks here, because smooth texture means prettier pops! Add just enough buttercream to bind the crumbs without getting too sticky. This part takes a little trial to get the right balance, but you’ll get a feel as you go. Roll the mixture into bite-sized balls, about the size of a ping pong ball or smaller, and place them on parchment-lined trays. Pop those into the fridge or freezer for a bit; cooling them makes dipping way easier.
Step 4: Dip and Decorate Your Spooky Cake Pops
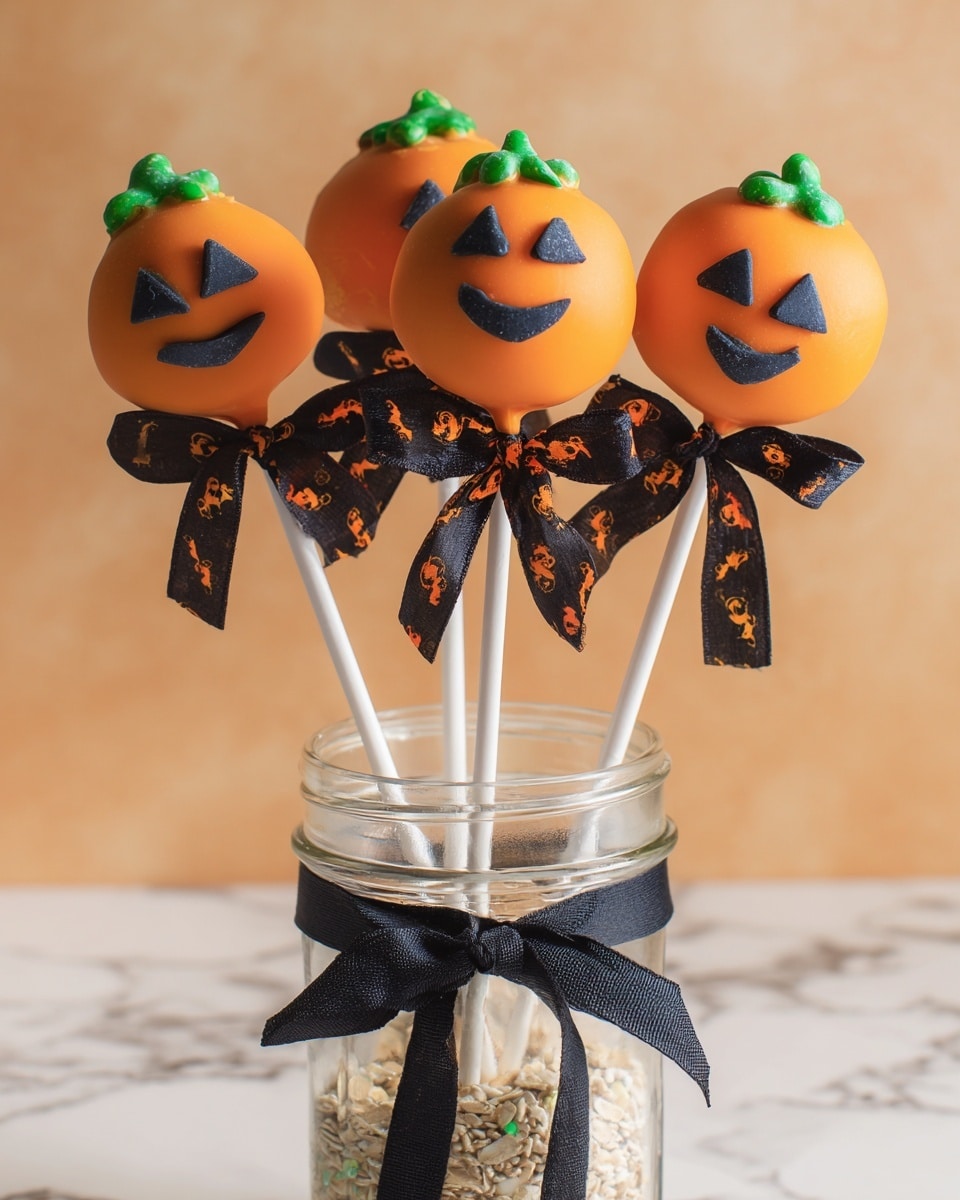
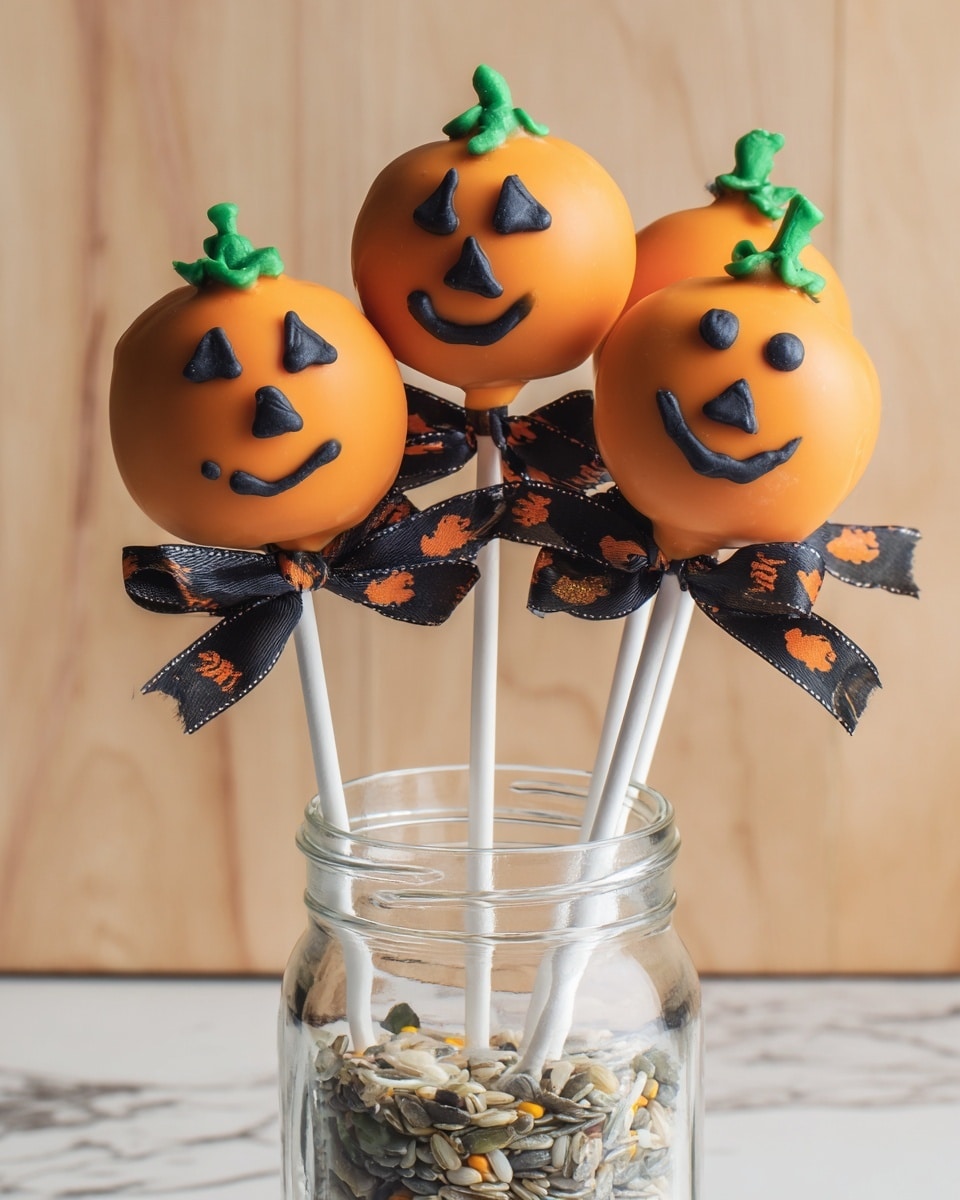
Here’s where the fun really starts! Melt your orange candy melts gently—remember, low and slow is best to avoid clumps. Dip the chilled cake balls on sticks into the candy coating and let the excess drip off. I like to hold them upright in a styrofoam block or a box lid filled with rice to dry. Once set, use confectioners sugar mixed with food coloring to dust or pipe details. Black and green food coloring gels or edible pens help you add eyes, spider webs, or wicked smiles. Don’t sweat perfection—quirky decorations give them personality and that homemade charm everyone loves at Halloween!
Pro Tips for Making Halloween Cake Pops Recipe
- Chill for Success: Always chill the cake balls before dipping—it prevents them from falling apart in the chocolate.
- Use Candy Melts Wisely: If your candy melts get too thick, add a tiny bit of vegetable oil for a smoother dip.
- Keep Decorations Simple: Sometimes just two dots for eyes make the spookiest expressions—don’t overthink it!
- Avoid Overmixing: When combining crumbs and frosting, mix just until combined so pops stay tender, not dense.
How to Serve Halloween Cake Pops Recipe
Garnishes
I love finishing these cake pops with a light dusting of confectioners sugar or edible glitter for a bit of magic. Sometimes, I’ll add tiny candy eyes or sprinkles that look like spider webs—those little details get such a great reaction from kids and adults alike!
Side Dishes
Serve cake pops alongside simple finger foods like popcorn spiked with Halloween candy, or pair with a cold glass of milk (or spiced cider for grown-ups). These mini treats are also great with a warm batch of homemade hot chocolate when you’re gearing up for chilly October evenings.
Creative Ways to Present
Presentation is half the fun! I like to arrange the cake pops standing tall in a pumpkin-shaped container filled with candy corn or crinkled tissue paper. For parties, build a “cake pop bouquet” by wrapping the sticks with curling ribbon and placing them in mason jars decorated with Halloween stickers. Trust me, these little touches make your spread unforgettable.
Make Ahead and Storage
Storing Leftovers
After you’ve wowed everyone, just store any leftover cake pops in an airtight container in the fridge. They’ll keep well for up to five days without losing moisture or flavor. Just make sure they’re separated so the candy coating doesn’t stick together.
Freezing
If you want to prep even earlier, these pops freeze beautifully. I wrap each cake pop individually in plastic wrap and place them in a freezer-safe container. When I’m ready to serve, I thaw them in the fridge overnight—still just as moist and delicious!
Reheating
Reheating cake pops isn’t usually necessary, but if you want the frosting a bit softer, let them sit at room temperature for 15-20 minutes. Avoid microwaving as this can melt the candy coating or dry out the cake inside.
FAQs
-
Can I use store-bought cake instead of baking from scratch?
Absolutely! While I love how homemade cake gives extra flavor, you can crumble a good-quality store-bought chocolate cake and mix it with buttercream for quick cake pops. Just make sure the cake isn’t too dry.
-
What if my cake pops are falling off the sticks?
This usually happens if cake balls are too warm when dipped. Chill them until firm before dipping, and dip the stick in melted candy before poking into the ball for a better hold.
-
Can I use white chocolate instead of candy melts?
You can, but be cautious—white chocolate is more sensitive to temperature and can seize. Candy melts are formulated for dipping, so they typically give you a smoother coating and easier handling.
-
How do I keep cake pops from cracking?
Make sure your cake balls are chilled well and that your candy coating is at the right temperature—not too hot to melt the cake, but warm enough to dip smoothly. Also, avoid overmixing the cake and frosting.
Final Thoughts
I absolutely love how this Halloween Cake Pops Recipe brings the whole family into the kitchen—not just for baking but for decorating too—and the smiles that follow are priceless. When I first tried making cake pops, I was a little intimidated, but with this recipe and tips, you’ll feel like a pro in no time. If you want to impress your friends or just enjoy a festive, indulgent treat, these cake pops are your go-to. So, grab your ingredients, put on your favorite spooky playlist, and have a blast creating these delicious little monsters!
Print
Halloween Cake Pops Recipe
- Prep Time: 1 hour
- Cook Time: 30 minutes
- Total Time: 1 hour 30 minutes
- Yield: 50 cake pops
- Category: Dessert
- Method: Baking
- Cuisine: American
Description
Delightfully festive Halloween Cake Pops made from rich homemade chocolate cake and creamy buttercream frosting, beautifully decorated with vibrant candy melts and food coloring to capture the spooky spirit. Perfect for parties and trick-or-treat treats!
Ingredients
Chocolate Cake Ingredients
- 3/4 cup cocoa powder
- 1 cup boiling water
- 1/2 cup plus 2 tablespoons butter, softened
- 2 cups sugar
- 3 large eggs
- 1 teaspoon vanilla extract
- 1 3/4 cups all-purpose flour
- 1 1/2 teaspoons baking soda
- 1/4 teaspoon salt
- 3/4 cup milk
- 1/4 cup sour cream
Buttercream Frosting Ingredients
- 1 cup salted butter
- 3 teaspoons vanilla extract
- 4 cups icing sugar (powdered sugar)
- 5-6 tablespoons heavy cream
Decorating Ingredients
- 2 cups orange candy melts
- 1/4 cup confectioners’ sugar
- Green food coloring gel
- Black food coloring gel or black food writer
Instructions
- Prepare the Chocolate Cake Batter: Preheat your oven to 350ºF (175ºC). Grease and flour a 9 x 13 inch cake pan thoroughly. In a small bowl, mix the cocoa powder with boiling water until smooth and let it cool to room temperature.
- Cream Butter and Sugar: In a large mixing bowl, beat the softened butter and sugar together using a mixer until the mixture becomes light and fluffy, about 3-4 minutes on medium speed.
- Add Eggs and Vanilla: Add the eggs one at a time into the butter and sugar mixture, beating well after each addition. Stir in the vanilla extract to combine.
- Combine Wet and Dry Ingredients: Gradually add the cooled cocoa mixture into the batter, mixing well. In a separate bowl, whisk together the flour, baking soda, and salt. Alternately add this dry mixture and the milk with sour cream into the butter mixture, beginning and ending with the dry ingredients, mixing until fully incorporated but not overmixed.
- Bake the Cake: Pour the batter into the prepared cake pan, smoothing the top evenly. Bake in the preheated oven for 30-40 minutes, or until a wooden pick inserted into the center comes out clean. Remove from the oven and allow the cake to cool completely.
- Make the Buttercream Frosting: Using a paddle attachment, whip the salted butter in a bowl with an electric mixer until fluffy. Gradually add the icing sugar, mixing on low speed at first to avoid a sugar cloud, then increase speed to combine thoroughly.
- Add Cream and Vanilla: Add the vanilla extract and heavy cream one tablespoon at a time, mixing continuously, until the frosting reaches a firm but spreadable consistency suitable for coating cake pops. Continue whipping until light and smooth.
- Decorating Preparation: Melt the orange candy melts according to package instructions. Prepare green and black food coloring gels or food writer for decorating details on the cake pops.
- Assemble and Decorate Cake Pops: Crumble the cooled cake and mix thoroughly with buttercream frosting to form a dough-like mixture. Shape into small balls, insert sticks, chill to firm up, then dip into melted orange candy melts. Use colored gels and confectioners’ sugar to add festive Halloween designs as desired. (Exact decorating steps are detailed in the original post.)
Notes
- For best results, chill the cake crumb mixture before shaping to make handling easier.
- Use a refrigerated stage to help candy melts adhere smoothly on the cake pops.
- Ensure cake is completely cooled before crumbling to avoid a messy mixture.
- Decorating designs can be customized with different colors or details depending on the Halloween theme preferred.
Nutrition
- Serving Size: 1 cake pop
- Calories: 150
- Sugar: 18g
- Sodium: 65mg
- Fat: 7g
- Saturated Fat: 4g
- Unsaturated Fat: 2.5g
- Trans Fat: 0g
- Carbohydrates: 22g
- Fiber: 1g
- Protein: 2g
- Cholesterol: 30mg

