
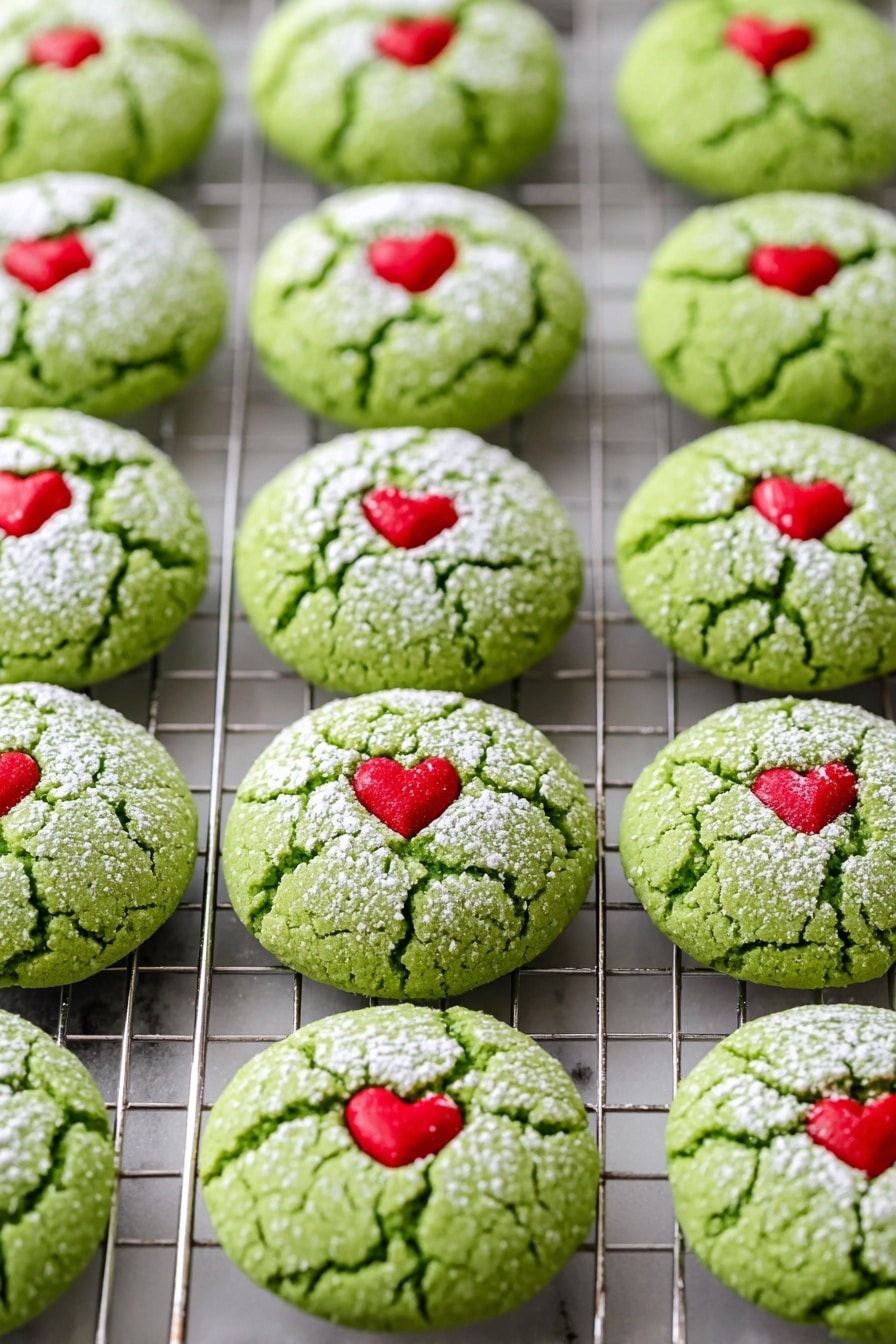
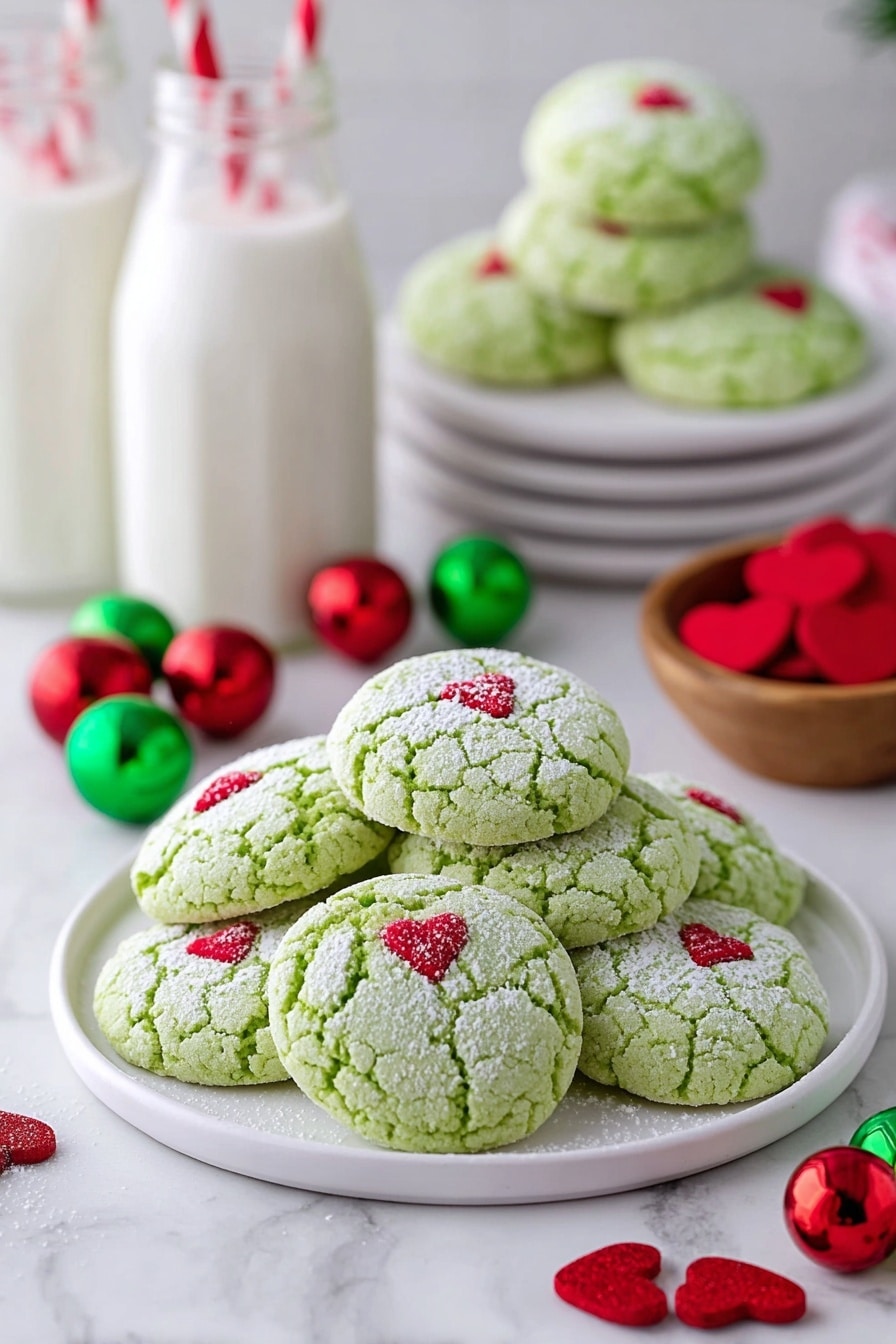
If you’re on the hunt for a holiday cookie that’s as fun to make as it is to eat, you’re going to love this Grinch Cookies with Peppermint and Green Food Coloring Recipe. These cookies come out soft, chewy, bursting with peppermint flavor, and dressed up in that iconic Grinch green — perfect for Christmas cookie swaps or festive dessert tables. Trust me, once you try this recipe, it’ll become a holiday must-bake for your family, just like it did for mine!
Why You’ll Love This Recipe
- Quick and Easy: I was amazed how fast the dough comes together using cake mix as the base — no fuss, just fun.
- Bright Peppermint Flavor: The peppermint extract really makes these cookies sing with a refreshing holiday twist you’ll adore.
- Festive Look: The green food coloring and the red heart sprinkles make these cookies irresistible on any dessert tray.
- Soft and Chewy Texture: They come out with just the right chewy bite, never dry, which my whole family can’t get enough of.

Ingredients You’ll Need
Each ingredient in this Grinch Cookies with Peppermint and Green Food Coloring Recipe was thoughtfully chosen to create a soft, flavorful, and colorful treat. Plus, using cake mix simplifies the process without sacrificing taste — making it a perfect shortcut I genuinely appreciate during busy holiday baking.
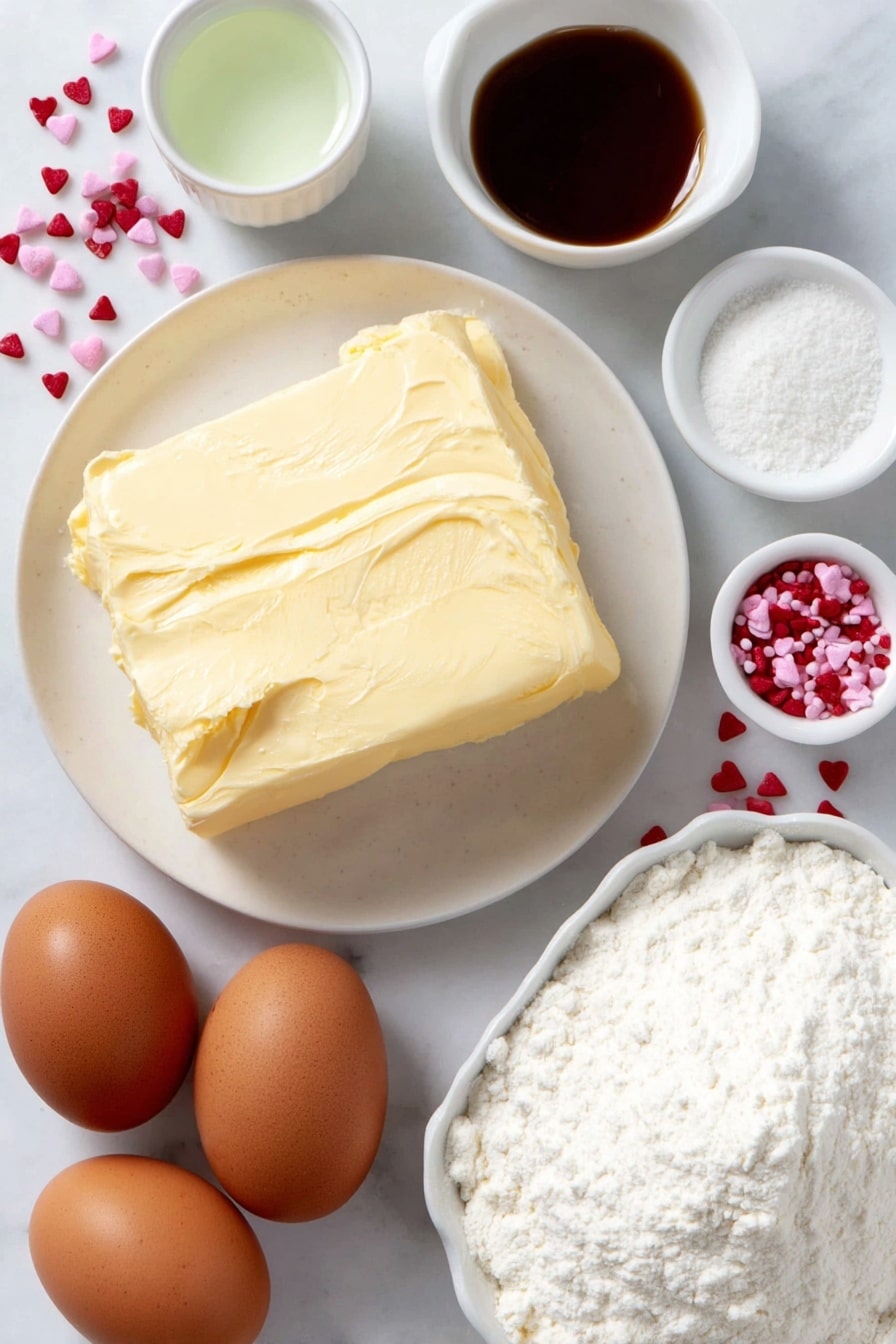
- White Cake Mix: Gives a tender crumb and sweetness—grab a good-quality boxed mix for best texture.
- Unsalted Butter: Softened to room temperature for easy mixing and creamy flavor.
- Eggs: Room temperature eggs blend better and help the cookies bind perfectly.
- Peppermint Extract: This is your secret weapon for that minty holiday zing—pure peppermint extract packs the best flavor.
- Vanilla Extract: Adds warmth and rounds out the peppermint to avoid an overpowering bite.
- Green Gel Food Coloring: I recommend gel over liquid since it delivers vibrant color without thinning the batter.
- Powdered Sugar: To coat the outside so the sticky dough is easier to handle and you get that lovely cracked look.
- Cornstarch: Mixed with powdered sugar to prevent clumping and help the coating stick perfectly.
- Red Heart-Shaped Sprinkle or Cinnamon Hearts: The adorable finishing touch that turns these cookies into little Grinch hearts ready to steal!
Variations
One of the best things about this Grinch Cookies with Peppermint and Green Food Coloring Recipe is how easy it is to tweak it to suit your taste or dietary needs — I’ve had fun trying a few twists depending on the mood and occasion!
- Chocolate Peppermint: I sometimes swap half the cake mix with chocolate cake mix, and it’s a chocolate lover’s dream with a hint of mint.
- Vegan Option: Using a dairy-free butter and egg replacer works pretty well here, though I suggest chilling the dough a bit longer before baking to help with texture.
- Extra Festive: White chocolate chips or crushed candy canes folded into the dough add texture and extra sweetness — my family goes crazy for these.
- Less Intense Mint: If peppermint’s too strong for you, try half peppermint and half vanilla extract for a mellow but still festive flavor.
How to Make Grinch Cookies with Peppermint and Green Food Coloring Recipe
Step 1: Prep Your Oven and Baking Sheet
First things first, preheat your oven to 375°F (190°C). Then line a large baking sheet with parchment paper — trust me, this makes cleanup a breeze and keeps your cookies from sticking or browning too much on the bottoms. Having this ready before mixing saves you time when the batter’s done.
Step 2: Mix the Base Dough
Using a hand mixer or stand mixer, combine the white cake mix, softened butter, and eggs. You’ll find that the batter will be thick and sticky—that’s good! Mix until everything is fully incorporated but don’t overmix. At this point, add both the peppermint extract and vanilla extract, followed by enough green gel food coloring to get that vibrant Grinch green. I usually start with a teaspoon and add more until I’m happy with the shade. Mix on low speed just to combine the color — you want it even but don’t want to overwork the dough.
Step 3: Prepare the Sugar-Coating Mixture
In a small bowl, whisk together the powdered sugar and cornstarch. This mix not only helps the sticky dough be easier to handle but also gives the cookies that classic cracked look once baked. Don’t skip the cornstarch — it prevents the sugar from clumping and makes rolling smoother.
Step 4: Shape and Coat Your Cookies
Using a 1½ tablespoon cookie scoop (or just a spoon), scoop out your dough balls one at a time. Roll each ball gently in the powdered sugar and cornstarch mixture, coating it completely. This part can get a bit sticky, so I like dusting my hands with a little extra powdered sugar if needed to keep the dough from sticking to me. Place the coated dough balls about one inch apart on your prepared baking sheet so they don’t spread into each other.
Step 5: Bake and Adorn
Bake in the preheated oven for 10 to 12 minutes. You’ll want to watch closely after 10 because the best indicator is when the edges are set and the tops look dry but still soft. The cookies will look slightly puffed but not browned. This step is where knowing your oven makes a difference — if they cook too long, they lose that soft center I love.
As soon as you pull the tray out, gently press a red heart-shaped sprinkle into the center of each cookie while it’s still warm — this little heart is what truly seals the deal on the Grinch vibe!
Step 6: Cool and Enjoy
Let the cookies cool on the baking sheet for about 5 minutes so they firm up just enough to move without breaking. Then transfer them to a wire rack to cool completely. This cooling step helps maintain that chewy texture you’re aiming for.
Pro Tips for Making Grinch Cookies with Peppermint and Green Food Coloring Recipe
- Use Gel Food Coloring: I learned that gel coloring gives you that perfect vivid green without altering the dough’s consistency.
- Don’t Skip Cornstarch in the Coating: At first, I forgot cornstarch, and the sugar clumped — cornstarch is the small miracle that keeps it smooth and easy to roll.
- Work Quickly When Pressing Sprinkles: The cookies cool fast, so place the heart sprinkle right after baking when the dough is still warm but not too hot to avoid it sliding off.
- Avoid Overbaking: I find checking them at the 10-minute mark really helps keep the centers soft and chewy, exactly how Grinch cookies should be.
How to Serve Grinch Cookies with Peppermint and Green Food Coloring Recipe
Garnishes
I usually keep it simple with extra red heart-shaped sprinkles on some cookies for added color. For parties, dusting a little powdered sugar over the tray for a snowy effect adds charm without overpowering the peppermint flavor. Sometimes I even drizzle a bit of white chocolate for an extra festive, creamy touch that everyone goes nuts for.
Side Dishes
These cookies pair wonderfully with a cup of hot cocoa, peppermint tea, or even a creamy eggnog during the holidays. I love setting up a cookie-and-cocoa bar with marshmallows, candy canes, and whipped cream for guests to customize their drinks alongside these festive bites.
Creative Ways to Present
For holiday gatherings, I like arranging the cookies in the shape of a Christmas tree on a serving platter, adding green pine sprigs and red cranberries around for color contrast. Wrapping stacks of three or four tied with festive ribbon also makes for an easy and adorable gift idea. Kids especially love helping decorate a Grinch-themed cookie platter with extra sprinkles and edible glitter for that extra “wow” factor.
Make Ahead and Storage
Storing Leftovers
I store leftovers in an airtight container at room temperature and they stay soft for several days — honestly, they rarely last that long at my place! If you want to keep them fresh longer, placing a slice of bread inside the container can help maintain moisture.
Freezing
If you want to freeze these Grinch Cookies, I recommend freezing the dough balls before baking. Simply scoop and coat as usual, lay them on a baking sheet to freeze solid, then transfer to a freezer-safe container for up to 3 months. When ready, bake straight from frozen, adding a couple extra minutes to the baking time. This trick saved me loads of time during the busy holiday season.
Reheating
To warm up leftover cookies, I pop them in the microwave for about 10 seconds or in a preheated oven at 300°F for 5 minutes. This brings back their fresh-baked softness and melts the center just a bit again — just what you want when you’re craving that perfect chewy texture.
FAQs
-
Can I use regular liquid food coloring instead of gel in this Grinch Cookies with Peppermint and Green Food Coloring Recipe?
You can, but gel food coloring is better because it provides more vibrant color without thinning the dough. Liquid coloring might make the dough a bit runnier, affecting texture and spreading during baking.
-
How do I prevent my Grinch cookies from spreading too much?
Make sure your butter is softened but not melted and avoid overmixing the dough. Also, chilling the dough for 20-30 minutes before scooping can help them hold their shape better if your kitchen is warm.
-
Can I substitute peppermint extract with another flavor?
Absolutely! While peppermint gives that classic holiday feel, you can use mint extract, almond, or even vanilla extract if you prefer a milder or different flavor profile. Just adjust the quantity to taste.
-
Will these cookies be gluten-free?
This recipe uses boxed white cake mix, which usually contains gluten. To make it gluten-free, look for a gluten-free white cake mix brand and ensure all other ingredients are gluten-free certified.
-
How long do Grinch Cookies with Peppermint and Green Food Coloring stay fresh?
Stored properly in an airtight container at room temperature, these cookies stay fresh and soft for up to 5 days. For longer storage, freezing dough or baked cookies works well.
Final Thoughts
I absolutely love how this Grinch Cookies with Peppermint and Green Food Coloring Recipe brings a touch of whimsy and magic to my holiday baking. It’s not just a cookie — it’s a festive tradition that fills the kitchen with peppermint aromas and lots of smiles. Whether you’re baking solo or with little helpers, you’ll find these cookies bring a little extra joy to the season. So grab your mixer, whip up a batch, and get ready for some Grinchy cheer that’s destined to steal hearts (and possibly the cookie jar) this Christmas!
Print
Grinch Cookies with Peppermint and Green Food Coloring Recipe
- Prep Time: 15 minutes
- Cook Time: 10 minutes
- Total Time: 25 minutes
- Yield: 30 cookies
- Category: Dessert
- Method: Baking
- Cuisine: American
Description
Delightfully festive and easy to make, these Grinch Cookies are soft, minty, and beautifully green, perfect for holiday celebrations and cookie exchanges. Made with a white cake mix base, peppermint extract, and charming heart-shaped sprinkles, these cookies combine a fun, seasonal look with a delicious, light texture.
Ingredients
Cookie Dough
- 15.25 ounces white cake mix (432 g box)
- 8 tablespoons unsalted butter (softened)
- 2 large eggs (room temperature)
- 2 teaspoons peppermint extract (or mint extract)
- ½ teaspoon vanilla extract
- Green gel food coloring (amount as needed for desired color)
Coating and Decoration
- ¼ cup powdered sugar (32 g)
- 3 tablespoons cornstarch
- Red heart-shaped sprinkles or cinnamon hearts
Instructions
- Preheat Oven: Preheat your oven to 375°F (190°C) and line a large baking sheet with parchment paper. This prepares your baking surface to ensure even cooking and easy cookie removal.
- Mix Wet Ingredients: Using a hand-held or stand mixer, combine the white cake mix, softened butter, and eggs until the mixture is well blended and smooth, forming a thick dough.
- Add Flavor and Color: Stir in the peppermint (or mint) extract and vanilla extract. Then gradually add green gel food coloring until you achieve your desired shade of green. Mix on low speed just until the color and extracts are evenly combined; the dough will remain thick and sticky.
- Prepare Coating: In a small bowl, whisk together the powdered sugar and cornstarch. This mixture will help prevent the sticky dough from adhering to your hands and rolling surface.
- Shape and Coat Cookies: Using a 1 ½ tablespoon cookie scoop, portion out dough balls. Roll each ball in the powdered sugar and cornstarch mixture to coat thoroughly. Place the coated balls about 1 inch apart on the prepared baking sheet to allow room for spreading.
- Bake Cookies: Bake the cookies for 10 to 12 minutes, or until the edges are set and the tops appear dry. Baking times may vary slightly depending on your oven.
- Add Decoration: Immediately upon removing the cookies from the oven, press one red heart-shaped sprinkle onto the top of each cookie to attach it before the cookie hardens.
- Cool: Let the cookies cool on the baking sheet for 5 minutes to firm up, then transfer them to a wire rack to cool completely. This will help them set perfectly for serving or storing.
Notes
- These easy Grinch Cookies are perfect for holiday gatherings, guaranteed to charm both kids and adults with their festive look and minty flavor.
- For a stronger mint flavor, you can increase the peppermint extract slightly, but be careful not to overpower the sweetness.
- Ensure the butter is softened but not melted to achieve the best dough consistency.
- If you don’t have green gel food coloring, you can use liquid food coloring, but a little goes a long way to avoid a watery dough.
- Store the cookies in an airtight container at room temperature for up to 5 days, or freeze for longer storage.
Nutrition
- Serving Size: 1 cookie
- Calories: 93 kcal
- Sugar: 7 g
- Sodium: 105 mg
- Fat: 4 g
- Saturated Fat: 2 g
- Unsaturated Fat: 2 g
- Trans Fat: 1 g
- Carbohydrates: 14 g
- Fiber: 1 g
- Protein: 1 g
- Cholesterol: 20 mg


