
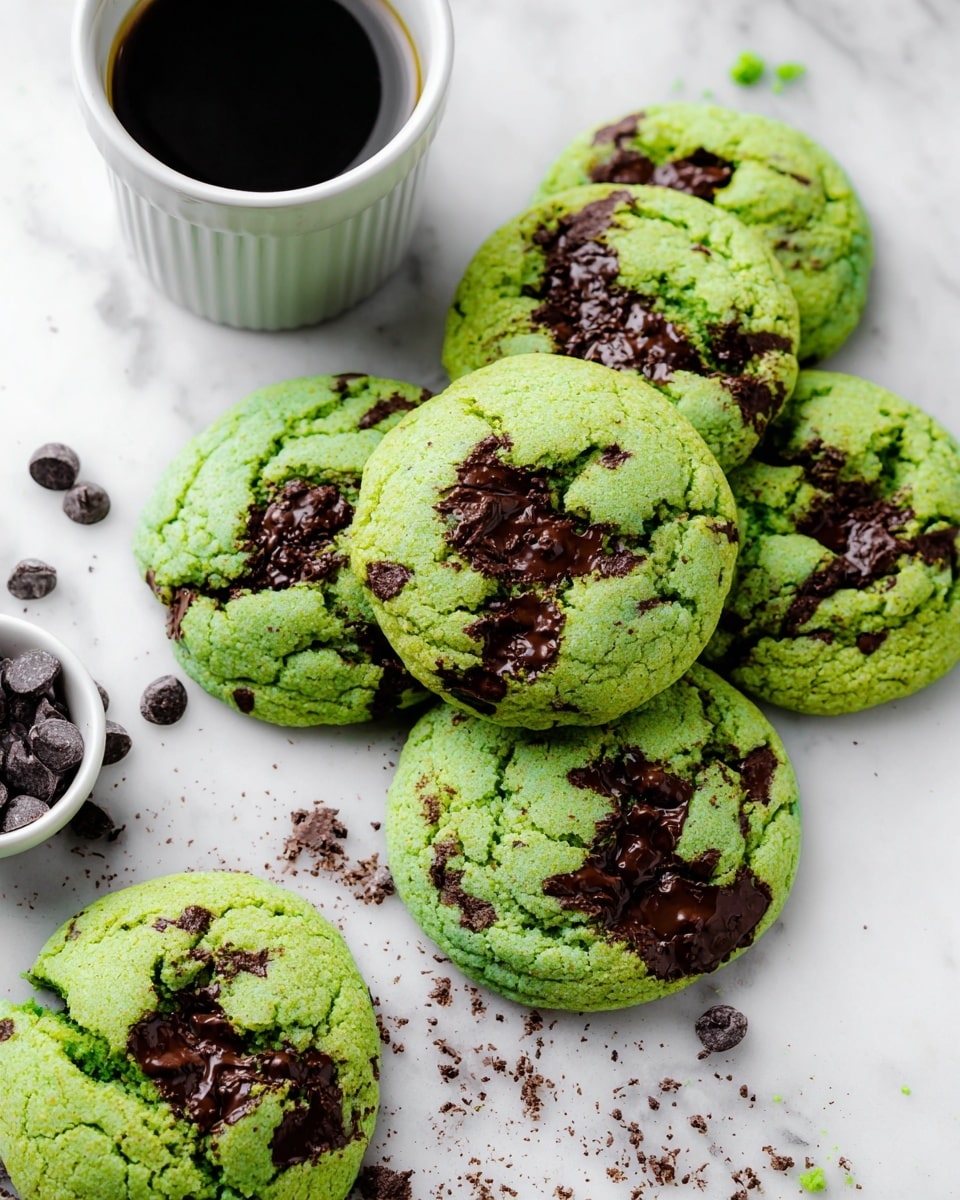
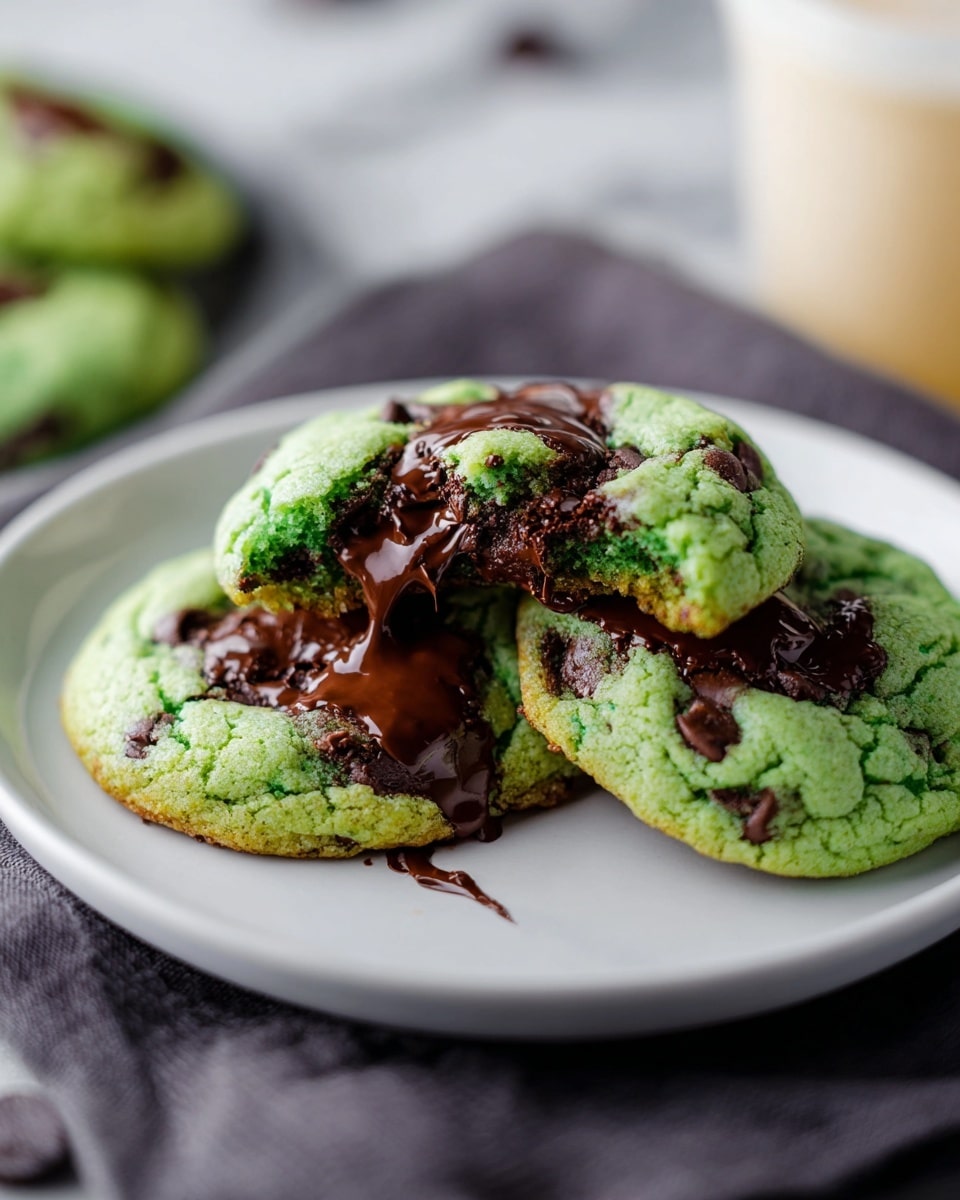
If you’re anything like me and love the refreshing burst of mint combined with the comforting richness of chocolate, then this Green Mint Chocolate Chip Cookies Recipe is going to become your new favorite treat. I absolutely love how these cookies have the perfect balance—bright minty flavor with melty dark chocolate chunks that remind me of my favorite ice cream. What makes them so special? The dough itself has a lovely pale green tint thanks to a few drops of food coloring, which makes them fun to look at and perfect for festive occasions or anytime you want to impress your friends.
One of the best things about this Green Mint Chocolate Chip Cookies Recipe is how it’s so easy to make but yields bakery-quality cookies that everyone goes crazy for. I discovered this recipe on a chilly afternoon when I wanted something cozy but fresh, and it quickly became a staple in my cookie lineup. These cookies are great whenever you want a sweet with a twist that’s not the usual chocolate chip—plus, the peppermint extract is just enough to brighten every bite without overpowering. Trust me, once you try these, you’ll want to make them again and again!
Why You’ll Love This Recipe
- Refreshing Mint Flavor: The peppermint extract gives just the right pop of coolness without overwhelming the cookie.
- Chunky Dark Chocolate: Using chopped dark chocolate bars creates gooey pockets of deliciousness that chocolate chips simply can’t match.
- Soft Yet Slightly Chewy Texture: The combination of cream of tartar and cornstarch ensures these cookies hold the perfect chewiness and don’t get too crisp.
- Beautiful Green Appearance: The green tint from food coloring makes them festive and fun, perfect for holidays or themed parties.

Ingredients You’ll Need
Before you dive in, let’s talk about the ingredients that make these Green Mint Chocolate Chip Cookies Recipe so delicious. Most of them are pantry staples, but the dark chocolate bars and peppermint extract are key to achieving that authentic mint chocolate chip vibe.
- Butter: Make sure it’s softened to room temperature for easy creaming with the sugar.
- Sugar: Regular granulated sugar keeps the cookies sweet and helps with texture.
- Eggs & Egg Yolk: These add richness and structure to your dough.
- Peppermint Extract: This is your mint magic—don’t substitute with mint extract unless it’s pure, or the taste might get a little too intense.
- Green Food Coloring: Just a few drops create the classic mint cookie look, but feel free to adjust based on your preference.
- Flour: All-purpose flour is perfect here for structure.
- Baking Powder & Baking Soda: These leavening agents help the cookie rise slightly and get that soft texture.
- Cream of Tartar: Adds tenderness and helps maintain the cookie’s shape.
- Cornstarch: This is a secret ingredient in many soft cookies for a tender crumb.
- Salt: Balances the sweetness and enhances flavors.
- Dark Chocolate Bars: I recommend chopping these yourself—the chunks melt better and give you those melty chocolate flecks reminiscent of homemade ice cream.
Variations
I love customizing this Green Mint Chocolate Chip Cookies Recipe depending on the occasion or my mood. Sometimes I like to switch up the chocolate or add a little texture for extra fun—don’t be afraid to play around and make this recipe your own!
- White Chocolate Twist: I’ve swapped out the dark chocolate for white chocolate chips before, which makes the mint really pop and adds a creamy sweetness that’s dreamy.
- Vegan Adaptation: Try replacing butter with vegan margarine and use flax eggs—while I haven’t tested it fully yet, I hear it works well with these flavors!
- Double Mint Kick: Add a teaspoon of finely chopped fresh mint leaves to the dough if you want an extra burst of natural mint flavor, but keep the extract light so it’s not overpowering.
- Festive Touch: Swap green food coloring for blue or add some sprinkles on top before baking for a holiday-themed batch that’s both tasty and looks fantastic.
How to Make Green Mint Chocolate Chip Cookies Recipe
Step 1: Cream the Butter and Sugar Until Fluffy
This is where your cookie’s texture journey begins. Using a stand mixer or hand mixer, beat the softened butter and sugar together for about a minute, then scrape down the sides of the bowl to make sure everything gets evenly mixed. Beat again on medium speed for another 1 to 2 minutes until you see the mixture lighten and fluff up—that light, airy texture is a good sign that your cookies will be tender and buttery.
Step 2: Add Eggs, Peppermint Extract, and Green Food Coloring
Next, add the eggs and extra yolk along with the peppermint extract and food coloring. Beat everything together just until smooth—overmixing here can make the dough too dense, so stop as soon as it comes together. I usually start with 8-10 drops of green food coloring, but depending on your brand, you might want to add a bit more or less to match your desired color.
Step 3: Combine Dry Ingredients Separately
In a separate bowl, whisk together the flour, baking powder, baking soda, cream of tartar, cornstarch, and salt. This step ensures that your leavening and texture agents are evenly distributed so your cookies bake perfectly.
Step 4: Mix Dry Ingredients into Wet Until Almost Combined
Slowly add the dry ingredients to the wet mixture, combining gently until the flour is just about mixed in. I like to stop here before it’s fully incorporated because we still need to add the chocolate. This approach prevents overworking the dough, which can make cookies tough.
Step 5: Stir in Half Chopped Chocolate and Half Coarsely Chopped Chocolate
Here’s my favorite little trick: chop half your chocolate bars into small bits so they melt into little pockets of chocolate, then coarsely chop the other half to leave visible flecks—just like the ones in mint chocolate chip ice cream. Mix these chunks into the dough carefully so they’re well distributed but still chunky enough to get those lovely melty bites.
Step 6: Chill the Dough for 1-2 Hours
This is important! Cover your dough and refrigerate it because chilled dough controls spreading and intensifies the flavors. I’ve learned that without chilling, the cookies can spread too thin and lose that chewy interior I love so much. Plus, chilling makes the dough easier to handle when scooping.
Step 7: Preheat Oven and Prepare Baking Sheets
Preheat your oven to 350°F (175°C). Line baking sheets with parchment paper or a silicone baking mat to prevent sticking and help with even baking. I usually bake one sheet at a time to keep things consistent.
Step 8: Shape and Bake the Cookies
Using a 1/4 cup measuring cup (yes, it’s a bit hefty), scoop balls of the dough and place them spaced apart on your baking sheets. Don’t flatten them; the cookies will spread a bit on their own. Bake for about 8-10 minutes until the edges just start to turn golden but the tops look underbaked—this is key for that soft center.
Step 9: Cool and Enjoy
Let the cookies rest on the baking sheet for about 5 minutes to firm up before transferring them to a wire rack to cool completely. This little pause makes sure they hold together and don’t break apart when you pick them up. Then, get ready for cookie bliss!
Pro Tips for Making Green Mint Chocolate Chip Cookies Recipe
- Chill for Better Texture: Chilling the dough for at least an hour keeps cookies from spreading too much and deepens the mint flavor.
- Chocolate Chopping Trick: I learned that chopping half the chocolate finely and half coarsely gives the best texture and visual appeal.
- Watch the Bake Time Closely: Take the cookies out when edges just start to brown—overbaking makes them dry.
- Use a Large Scoop: Using a 1/4 cup scoop may seem big, but the dough balls bake into thick, chewy cookies that everyone loves.
How to Serve Green Mint Chocolate Chip Cookies Recipe
Garnishes
I often garnish these cookies with a light dusting of powdered sugar for a snowy look or add a few small mint leaves on top when serving for a fresh touch. Sometimes I dip half the cooled cookie in melted dark chocolate and sprinkle crushed candy canes for a festive pop—my family goes crazy for that! It’s these little presentation touches that make serving the cookies feel extra special.
Side Dishes
These cookies pair perfectly with a cold glass of milk (classic for a reason) or a warm cup of coffee or hot chocolate. I like to serve them alongside peppermint bark or mint-flavored ice cream for a delightful dessert platter. The flavors complement each other beautifully and make a memorable treat for guests.
Creative Ways to Present
For parties, I’ve arranged these cookies on a platter lined with fresh mint sprigs and little bowls of whipped cream or chocolate sauce for dipping. For a holiday twist, try stacking them into a “cookie tree” or wrapping them in clear bags tied with green ribbon as thoughtful gifts. These creative ideas always get compliments and add a festive feel.
Make Ahead and Storage
Storing Leftovers
I store leftover cookies in an airtight container at room temperature, layering them with parchment paper to prevent sticking. They stay fresh for about 4-5 days, which usually means I get tempted to eat them all quickly! Keeping them sealed well preserves their chewy texture.
Freezing
If you want to save cookies for a longer time, freeze the baked cookies in a single layer on a baking sheet, then transfer them to a freezer-safe bag or container. They keep perfectly for up to 3 months, and I love having a stash for spontaneous sweet cravings. You can also freeze the dough balls themselves—just thaw before baking.
Reheating
To reheat, I pop cookies into a warm oven (about 300°F) for 3-5 minutes or microwave them for 10-15 seconds to bring back that fresh-baked softness and melty chocolate texture. Be careful not to overheat or they’ll dry out quickly. A quick warm-up restores that “just baked” magic wonderfully.
FAQs
-
Can I use peppermint extract instead of mint extract?
Yes, peppermint extract is preferred in this recipe because it has a strong, bright minty flavor that works well with chocolate. Mint extract is milder and can taste more herbal, so if using mint extract, reduce the amount to avoid overpowering the cookie.
-
What’s the benefit of using chopped chocolate bars instead of chips?
Chopped dark chocolate bars melt more evenly and create pockets of gooey, melty chocolate, which adds a rich texture and flavor. Chocolate chips are often designed to hold their shape when baked, so they don’t melt as fully, making bars a better choice for this recipe.
-
Can I make these cookies gluten-free?
Absolutely! Substitute the all-purpose flour with a gluten-free baking blend that includes xanthan gum for best results. Just be sure to test the dough consistency and adjust moisture if needed, as gluten-free dough can behave differently.
-
How long do these cookies stay fresh?
Stored in an airtight container at room temperature, these cookies stay fresh and soft for about 4-5 days. For longer storage, freezing is your best bet.
Final Thoughts
This Green Mint Chocolate Chip Cookies Recipe is one of those happy discoveries that’s easy enough for a weekday treat but special enough to share at parties or holidays. I love how the mint and dark chocolate flavors meld together with a texture that’s chewy and tender. You’ll enjoy how little effort it takes to wow everyone around you with these beauties. So next time you want to bake something both classic and a little unexpected, give this recipe a try—I promise it’ll become a family favorite in no time.
Print
Green Mint Chocolate Chip Cookies Recipe
- Prep Time: 10 minutes
- Cook Time: 10 minutes
- Total Time: 2 hours 20 minutes
- Yield: 24 cookies
- Category: Dessert
- Method: Baking
- Cuisine: American
Description
These Green Mint Chocolate Chip Cookies feature a delightful blend of peppermint flavor and rich dark chocolate chunks, offering a refreshing twist on a classic favorite. Soft on the inside with just-starting-to-brown edges, these cookies are perfect for mint chocolate lovers seeking a homemade treat with vibrant green color and melty chocolate flecks throughout.
Ingredients
Wet Ingredients
- 1 cup Butter, softened
- 1 1/2 cups Sugar
- 2 Large Eggs
- 1 Egg yolk
- 1 teaspoon Peppermint Extract
- 10 Drops Green Food Coloring
Dry Ingredients
- 3 1/4 cups Flour
- 2 teaspoons Baking Powder
- 1 teaspoon Baking Soda
- 1 1/2 teaspoons Cream of Tartar
- 1 teaspoon Cornstarch
- 1/2 teaspoon Salt
Chocolate
- 12 ounces Dark Chocolate Bars, chopped (divided)
Instructions
- Cream Butter and Sugar: In a large bowl or stand mixer, beat the softened butter and sugar together for 1 minute. Scrape the sides and bottom of the bowl, then continue beating on medium speed for 1-2 minutes until the mixture is light and fluffy.
- Add Eggs and Flavor: Add the 2 large eggs, 1 egg yolk, peppermint extract, and green food coloring to the butter and sugar mixture. Beat together just until smooth and well combined.
- Combine Dry Ingredients: In a separate bowl, mix together the flour, baking powder, baking soda, cream of tartar, cornstarch, and salt. Gradually add this mixture to the wet ingredients and stir until the flour is almost fully incorporated.
- Add Chocolate Chunks and Chips: Fold half of the chopped dark chocolate into the dough. Chop the remaining half coarsely and add it to the dough to create small flecks similar to traditional mint chocolate chip ice cream. Mix just until combined.
- Chill Dough: Cover the cookie dough and refrigerate it for 1 to 2 hours to firm up, which helps achieve the perfect texture when baking.
- Preheat Oven and Prepare Baking Sheet: Preheat the oven to 350°F (175°C). Line one or more baking sheets with parchment paper or a silicone baking mat (silpat) to prevent sticking.
- Shape Cookies: Using a ¼ cup measuring cup, scoop and form balls of dough. Place them spaced apart on the prepared baking sheet.
- Bake Cookies: Bake the cookies in the preheated oven for 8 to 10 minutes, until the edges are just beginning to brown but the tops remain pale. Avoid browning the tops to keep the soft texture.
- Cool: Let the cookies cool on the baking sheet for 5 minutes before transferring them to a wire rack to cool completely.
Notes
- * Recipe adapted from Little Dairy on the Prairie.
- Cookies can be frozen for up to 3 months, stored in an airtight container or freezer bag.
- Using all chopped dark chocolate bars instead of chips provides more melty chocolate throughout the cookie.
Nutrition
- Serving Size: 1 cookie
- Calories: 220
- Sugar: 15g
- Sodium: 120mg
- Fat: 12g
- Saturated Fat: 7g
- Unsaturated Fat: 4g
- Trans Fat: 0g
- Carbohydrates: 25g
- Fiber: 2g
- Protein: 3g
- Cholesterol: 45mg


