

If you’re on the hunt for a spooky dessert that’s as impressive as it is delicious, you’re going to want to stick around for this one. I’m absolutely thrilled to share my Graveyard Halloween Cake Recipe with you—it’s a fan-freaking-tastic creation that blends rich chocolate cake with vibrant orange, black, and green buttercreams to bring a little Halloween magic to your kitchen. Trust me when I say this cake not only tastes dreamy but also looks totally haunting, making it a guaranteed showstopper at any Halloween bash or family gathering. Ready to dig into the dirt and ghosts? Let’s get started!
Why You’ll Love This Recipe
- Show-Stopping Visuals: The striking black, orange, and green buttercream layers create a spooky graveyard with edible ghosts and pumpkins that wow every time.
- Rich, Moist Chocolate Cake: Infused with espresso and buttermilk to deepen the flavor and keep it melt-in-your-mouth tender.
- Customizable Decorating Fun: You can get creative with your sprinkles, Halloween décor, and piping techniques to make it uniquely yours.
- Perfect for a Crowd: This recipe yields 15 generous slices, making it ideal for parties or family gatherings.

Ingredients You’ll Need
I love how the ingredients in this Graveyard Halloween Cake Recipe come together to build layers of flavor and texture. From the moisture-packed chocolate cake to the creamy colored buttercreams, each element plays a key role. When you shop, take note of the quality butter and pure vanilla—it makes a huge difference!
- Sugar: You’ll need granulated sugar for the cake and powdered sugar for the buttercreams—stay stocked up.
- Butter: Make sure it’s softened to room temp to whip up those smooth frostings.
- Espresso powder: Enhances the chocolate flavor in both the cake and black buttercream.
- Dark cocoa powder: The secret to that rich color and deep chocolate taste.
- Heavy cream: Adds luscious creaminess to the buttercream frostings.
- Vanilla extract: A little vanilla goes a long way in bringing flavors to life.
- Buttermilk: Keeps the cake tender and tangy, balancing the cocoa’s bitterness.
- Cake flour: For a delicate crumb and soft texture in your cake layers.
- Baking soda and salt: Your leavening and seasoning essentials to make the cake rise and taste just right.
- Eggs and vegetable oil: Adds structure and moisture.
- Food gel coloring: Orange, black, and green to get those perfect Halloween hues.
- Decorating items: Crushed Oreos, Halloween candy ghosts and pumpkins, KitKats, and sprinkles to add spooky details and texture.
Variations
One of the things I adore about the Graveyard Halloween Cake Recipe is how flexible it is for personalization. Whether you want to swap out the chocolate for a pumpkin spice cake or try different colors and decorations, there’s a way to make it your own. Here’s a few tweaks I’ve experimented with that you might enjoy!
- Flavor Swap: I once swapped the chocolate cake base for a rich pumpkin spice cake, which added a comforting autumn vibe—perfect for chilly Halloween nights.
- Dairy-Free Option: Using vegan butter and coconut cream in the frostings works beautifully if you’re catering to dairy sensitivities.
- Decor Twist: Instead of Oreos, crushed graham crackers can give the “graveyard dirt” a slightly sweeter, crunchier texture.
- Mini Cakes: For smaller gatherings, I’ve made this in mini pans – they’re adorable and still pack the flavor punch.
How to Make Graveyard Halloween Cake Recipe
Step 1: Bake Your Moist Chocolate Cake Layers
Start by preheating your oven to 350°F and prepping three 6-inch round cake pans with butter and flour—or a floured baking spray if you want to keep it super easy. I like to whisk the espresso into boiling water early, which makes sure the espresso flavor dissolves completely—that little touch deepens the chocolate beautifully. Using a stand mixer, cream together the butter and sugar until fluffy, about five minutes, which really aerates the mix and leads to a lighter crumb.
Next, add eggs one at a time, making sure each is fully incorporated before the next goes in. I always beat the batter on medium-high speed a bit after adding the oil for some extra fluffiness. Alternate folding in the dry flour mixture and the buttermilk-espresso mix gently—you want to keep as much air as possible!
Then into the oven for 20-25 minutes. A toothpick should come out clean when done. Pro tip: I bake all three pans together on the middle rack to keep the baking even. Once cool, level your cakes so they stack nice and flat, wrap them tightly, and freeze them overnight or at least an hour—that freeze makes frosting so much easier to manage.
Step 2: Whip Up Your Vibrant Buttercreams
Each buttercream has its own magic. For the orange, start by whipping softened butter until super fluffy, then alternate adding powdered sugar and heavy cream in small batches—this method prevents lumps and gives you smooth, spreadable frosting. A quick burst of high-speed mixing after all the ingredients are combined helps maximize fluffiness. Adding orange gel coloring last means you control the shade perfectly—go as bright or muted as you like.
The black buttercream folds in espresso powder and dark cocoa for a deep, rich chocolate taste that pairs so well with the black gel coloring. It can look grey at first but darkens with a little time, so don’t stress! And the green buttercream is half-batch, whipped up with the same technique—perfect for piping grass and eerie vines around your graveyard scene.
Step 3: Assemble and Decorate Your Scary Graveyard
This part I love the most! Start by taping your cake boards and stacking the three layers with generous orange buttercream between each one. Don’t worry about perfection here because the crumb coat you put on next will trap any crumbs and make for a smooth final finish. I refrigerate for about 10-15 minutes after the crumb coat to firm it up—this really helps with clean decorating.
While chilling, you can detail your little decorations — I use a writing tip to add faces on my Halloween ghosts and pumpkins, which always delights the kids. For the spooky graveyard fault line, add a thick band of black buttercream around the center, then press in Halloween sprinkles, ghosts, and pumpkins. I discovered that slicing the backs off the ghosts and pumpkins to make them thinner helps them nestle nicely without sticking out too far.
Finish with the final orange frosting coat, smoothing carefully to keep a sharp contrast between the colors. Then add crushed Oreos mounds for “dirt” and stick KitKats all around the base, piping bright green grass making the graveyard scene really come alive. It’s a process, but so worth it when you see those wide-eyed reactions!
Pro Tips for Making Graveyard Halloween Cake Recipe
- Freeze Before Frosting: Freezing the cake layers overnight seals in moisture and makes clean frosting a breeze—I learned this the hard way by trying it fresh!
- Patience with Coloring: Add gel colors gradually and mix gently to avoid over-whipping the buttercream, which can affect texture.
- Slice Decor Pieces Thin: Cutting the backs off your candy ghosts and pumpkins lets them sit nicely in the fault line without bulking out.
- Crumb Coat Cool Down: Don’t skip chilling the crumb coat—it saved me from a crumb-ridden mess more than once.
How to Serve Graveyard Halloween Cake Recipe
Garnishes
I love topping this cake with little details—crumbled Oreos for “graveyard dirt” add great texture and visual appeal, plus all your Halloween candy ghosts and pumpkins for that extra spooky touch. For a final fun pop, sprinkling a few festive Halloween sprinkles really makes the decoration sing and adds a playful crunch every slice.
Side Dishes
Because the Graveyard Halloween Cake Recipe is super rich, I like pairing it with light sides—think fresh fruit platters, a tangy citrus salad, or even a scoop of vanilla bean ice cream. For parties, a warm cup of spiced apple cider or a simple black coffee makes a perfect companion.
Creative Ways to Present
Want to take presentation up a notch? Try serving this cake on a rustic wooden board with dry ice in the background for spooky fog effect—my guests went wild when I did that last year! You can also pipe little green grass borders or add edible tombstones made from cookies to really set the scene. For a kid-friendly option, turn the leftovers into mini graveyard cupcakes decorated with the same colorful buttercream and candy accents.
Make Ahead and Storage
Storing Leftovers
I always keep any leftover Graveyard Halloween Cake in an airtight container in the fridge. Wrapped tightly, it stays fresh for up to 4 days. I’ve found that chilling also helps the frosting set more firmly, making slices cleaner when you serve again.
Freezing
Since I freeze the cake layers before assembly, I’ve also had excellent results freezing the fully decorated cake for up to a month. Just wrap it well in plastic and place it in a cake box. When ready, thaw the cake overnight in the fridge to preserve texture and flavor.
Reheating
To bring leftover slices back to life, I like to let them sit at room temperature for about 30 minutes. This softens the buttercream and revives that fresh-baked feel. If you prefer warm cake, a gentle zap in the microwave for 10 seconds does the trick—just don’t overdo it or you’ll melt the decorations!
FAQs
-
Can I make this Graveyard Halloween Cake Recipe dairy-free?
Absolutely! Swap out regular butter for a plant-based alternative and use coconut or almond cream in place of heavy cream for the buttercreams. Use a dairy-free milk substitute in the cake as well, and be sure to double-check your chocolate and decorations to keep things fully dairy-free.
-
How far in advance can I assemble the cake?
You can bake and freeze the cake layers up to a week ahead. Once assembled and decorated, it’s best enjoyed within 2-3 days if kept refrigerated. If you plan to freeze the decorated cake, stick to under a month for best quality.
-
What if I don’t have all the food colors?
No worries! You can experiment by mixing basic food colors to achieve close shades. For example, blending a bit of red and yellow can create orange, and adding blue to yellow can give you green. Just start with a little and build up gradually.
-
Can I make this cake in one large pan instead of three 6-inch pans?
Yes, but you’ll want to adjust baking times accordingly—usually longer for larger pans. Also, slicing the large cake evenly can be trickier, so using multiple smaller pans as the recipe suggests helps keep layers uniform and the decorating process smoother.
Final Thoughts
This Graveyard Halloween Cake Recipe is truly one of my favorite festive treats to make each fall. It combines rich, moist cake, vibrant buttercream colors, and playful spooky details into a dessert that not only tastes fantastic but also captures the Halloween spirit perfectly. I hope you’ll have as much fun baking and decorating this as I do—plus, the joy it brings to your family and friends is just priceless. So grab your spatula and let’s make some magic happen in the kitchen!
Print
Graveyard Halloween Cake Recipe
- Prep Time: 3 hours
- Cook Time: 25 minutes
- Total Time: 4 hours 25 minutes
- Yield: 15 slices
- Category: Dessert / Cake
- Method: Baking
- Cuisine: American
Description
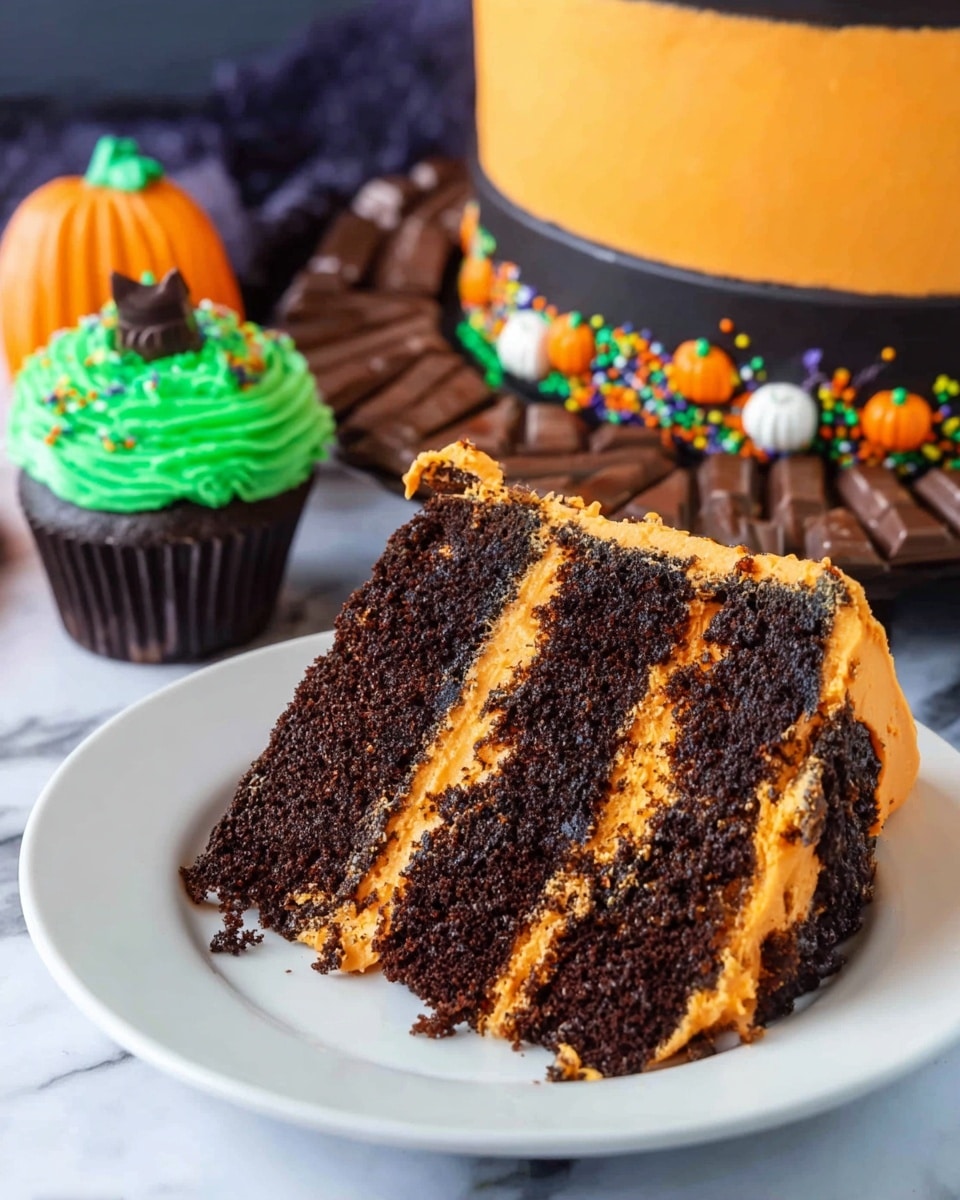
This Graveyard Halloween Cake is a festive and spooky dessert perfect for Halloween celebrations. Featuring a moist and rich chocolate cake layered with vibrant orange, black, and green buttercream frostings, it’s decorated with crushed Oreos to mimic dirt, along with Halloween-themed ghosts, pumpkins, tombstones, KitKats, and sprinkles for an eerie graveyard effect. The cake uses classic baking techniques combined with detailed frosting work to create a visually stunning and delicious treat.
Ingredients
Orange Buttercream Frosting
- 1 cup butter, softened to room temperature
- 5-7 cups powdered sugar
- 1 tbsp vanilla extract
- ¾ cup heavy cream
- Pinch of salt
- Orange food gel coloring
Black Buttercream Frosting
- 1 cup butter, softened to room temperature
- ½ teaspoon espresso powder
- ½ cup dark cocoa powder (Hershey’s Special Dark recommended)
- 1 teaspoon vanilla extract
- 5-7 cups powdered sugar
- ¾ cup heavy cream
- Pinch of salt
- Black food gel coloring
Green Buttercream Frosting (Half Batch)
- ½ cup butter, softened to room temperature
- 3-5 cups powdered sugar
- ½ tbsp vanilla extract
- 6 tbsp heavy cream
- Pinch of salt
- Green food gel coloring
Chocolate Cake
- 1 ¼ cup sugar
- ½ cup unsalted butter
- ½ teaspoon instant espresso powder
- ⅓ cup boiling water
- ⅓ cup dark cocoa powder
- ½ cup buttermilk
- 1 teaspoon vanilla extract
- 1 ⅓ cup cake flour
- ¾ teaspoon baking soda
- ½ teaspoon salt
- 2 extra-large eggs
- 1 extra-large egg yolk
- ¼ cup vegetable oil
Additional Decorating Items
- Crushed Oreos
- Halloween Ghosts, Pumpkins, Tombstones decorations
- KitKats, halved
- Halloween Sprinkles
Instructions
- Prepare the Chocolate Cake Batter: Preheat the oven to 350°F. Grease three 6-inch round cake pans with butter and flour or use a floured baking spray. Using a stand mixer, cream together the sugar and butter until fluffy, about 5 minutes. Meanwhile, microwave the water for 30 seconds, then dissolve the instant espresso powder into it. Whisk the dark cocoa powder, buttermilk, and vanilla extract into the espresso water mixture. In a separate bowl, sift together cake flour, baking soda, and salt. To the creamed butter-sugar mixture, add eggs and the extra yolk one at a time, mixing fully after each addition. Add the vegetable oil and mix until combined. Beat on medium high for about 1 minute until the batter is light and fluffy. Fold in half of the flour mixture, then half of the buttermilk mixture. Repeat with the remaining flour and buttermilk mixtures until fully incorporated.
- Bake the Cake: Pour batter evenly into the prepared pans. Bake for 20-25 minutes or until a toothpick inserted in the center comes out clean. For even baking, place all pans on the same rack or bake one at a time. Allow cakes to cool completely, then level the tops if necessary by trimming domes off. Wrap each cake layer in plastic wrap and freeze overnight or for at least one hour to make frosting easier.
- Make Orange Buttercream Frosting: In a mixer, whip the butter until fluffy. Add vanilla extract and salt, mixing until combined. Alternately add powdered sugar (about 1 cup at a time) and heavy cream (2 tablespoons at a time), mixing briefly after each addition. Once all are added, whip on high for 20-30 seconds. Add orange gel food coloring and mix on medium-low until fully incorporated and vibrant.
- Make Black Buttercream Frosting: Whip butter in a mixer until fluffy. Mix in espresso powder, dark cocoa powder, vanilla, and salt until combined. Alternately add powdered sugar and heavy cream as with the orange buttercream, mixing after each addition. Whip on high for 20-30 seconds once all added. Add black gel food coloring and mix on medium-low until the frosting turns a deep black (initially gray, darkens over time).
- Make Green Buttercream Frosting (Half Batch): Whip softened butter until fluffy. Mix in vanilla extract and salt. Alternately add powdered sugar and heavy cream, mixing thoroughly after each addition. Whip on high for 20-30 seconds once fully combined. Add green gel food coloring and mix on medium-low until fully incorporated.
- Prepare Cake for Decorating: Crush Oreos finely using a food processor or a ziplock bag and rolling pin. Prepare cake boards by taping the bottom of an 8-inch board to a cake turntable for stability, then tape a 6-inch board onto the center of the larger board. Place a small dollop of frosting onto the smaller board and place the first cake layer on top to adhere it. Repeat layering with orange buttercream between cake layers.
- Apply Crumb Coat: Spread a thin, even layer of orange buttercream frosting all over the assembled cake to trap crumbs. Refrigerate the crumb-coated cake for 10-15 minutes to firm up the frosting.
- Decorate Halloween Figures: While the cake chills, decorate Halloween ghosts and pumpkins using the black buttercream with a writing tip to add details such as eyes, mouths, and pumpkin lines. Halve these figures to make them thinner and easier to place on the cake.
- Add Black Buttercream and Decorations: Apply a thick layer of black buttercream around the center section of the cake. Press Halloween sprinkles gently into this black band. Attach halved ghosts and pumpkins on top of the black frosting. Chill the cake again for 10 minutes.
- Apply Final Orange Frosting: Frost large areas above and below the black frosting band with orange buttercream using a piping bag with a large round cut tip to achieve even coverage. Frost the top of the cake as well. Use a bench scraper to smooth the sides carefully to keep a clean line between the orange and black layers, and an offset spatula to tidy the top edges.
- Final Decorations: Make small mounds of crushed Oreos on top of the cake and place halved KitKats around the cake’s base. Refrigerate the cake for 10 minutes. Insert toothpicks into the bottom of the ghosts and pumpkins then position them on top of the cake. Press in chocolate headstones gently. Using the green buttercream and a grass piping tip, pipe grass around headstones and KitKats to finish the graveyard effect.
Notes
- Make the cake at least a day before and freeze it; this greatly helps with smoother frosting application. If not possible, freeze for at least one to two hours.
- Add sprinkles to the black buttercream fault line before placing the ghosts and pumpkins for better adhesion.
- Slice the backs of the ghosts and pumpkins to make them thinner for better placement and less protrusion.
- Trim the bottoms of ghosts placed on the fault line to shorten them and fit the decoration perfectly; unnecessary if making a larger cake.
- Leftover buttercream frostings can be used for Halloween-themed cupcakes or cookies to avoid waste.
- Nutrition estimates do not include additional candy decorations or Oreos used for garnishing.
Nutrition
- Serving Size: 1 slice (approx. 1/15th of the cake)
- Calories: 450
- Sugar: 35g
- Sodium: 210mg
- Fat: 28g
- Saturated Fat: 16g
- Unsaturated Fat: 10g
- Trans Fat: 0.5g
- Carbohydrates: 50g
- Fiber: 3g
- Protein: 5g
- Cholesterol: 85mg


