

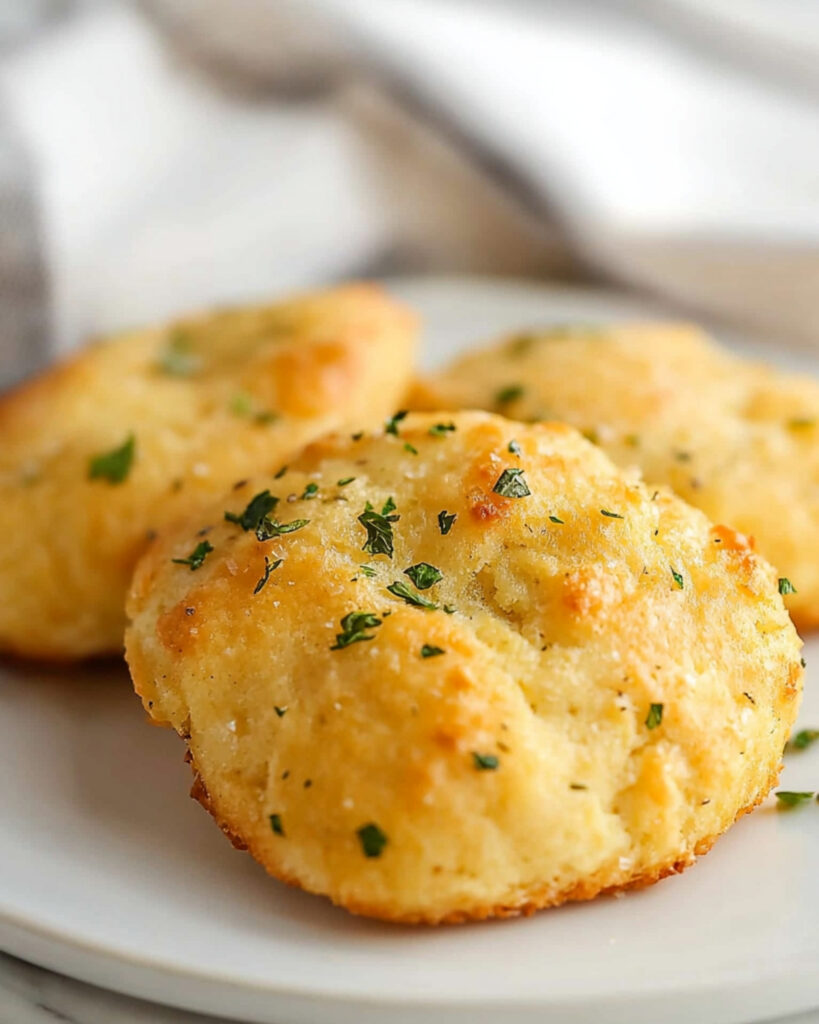
These Garlic Cheddar Biscuits are a game-changer for your dinner table! Imagine pulling apart a warm, buttery biscuit with melted cheddar and aromatic garlic in every bite – and it only takes 22 minutes from start to finish. These homemade biscuits blow away any restaurant version with their fluffy texture, sharp cheddar flavor, and that irresistible garlic butter topping that makes your fingers deliciously messy. Perfect alongside soups, salads, or as a quick snack when hunger strikes!
Why You’ll Love This Recipe
- Lightning Fast: From bowl to table in just 22 minutes! These biscuits are the definition of quick comfort food when you need something delicious without waiting around.
- Simple Ingredients: Nothing fancy required – just pantry staples you likely already have on hand. No need for specialty flours or hard-to-find ingredients.
- Foolproof: Even if you’ve never baked before, you can nail these biscuits. The drop biscuit method means no rolling, cutting, or fancy techniques required.
- Customizable: The basic recipe is fantastic as is, but you can easily adjust the cheese type, add herbs, or tweak the seasonings to make them your own.

Ingredients You’ll Need
- All-purpose flour: The backbone of our biscuits, providing structure while keeping things tender.
- Baking powder and baking soda: The dynamic duo that gives these biscuits their perfect rise and fluffy texture.
- Garlic powder: Infuses the dough with savory flavor throughout. Don’t skip this – it’s what makes these biscuits special!
- Sugar: Just a touch balances the savory flavors and helps with browning.
- Salt: Enhances all the flavors and keeps these biscuits from tasting flat.
- Whole milk: The fat content in whole milk creates tender, rich biscuits. It’s worth using the real deal here.
- Butter: Creates those beautiful flaky layers and adds incomparable richness.
- Cheddar cheese: Sharp cheddar works best for maximum flavor impact, but any good melting cheese will work.
- Topping ingredients: The magic finishing touch! Melted butter, garlic, onion powder, parsley, and a hint of sweetness create that unforgettable flavor that keeps everyone reaching for seconds.
Note: You’ll find the complete list of ingredients, along with their exact measurements, in the printable recipe card at the bottom of this post.
Variations
Want to put your own spin on these biscuits? Try these tasty twists:
- Herb Garden: Add 1-2 tablespoons of fresh chopped herbs like rosemary, thyme, or chives to the dough.
- Spicy Kick: Mix in 1/4 teaspoon of cayenne pepper or a handful of diced jalapeños for heat lovers.
- Cheese Swap: Replace cheddar with pepper jack, smoked gouda, or a mix of your favorite cheeses.
- Bacon Lover’s: Fold in 1/4 cup of crispy bacon bits to the dough before baking.
- Italian Style: Add 1 teaspoon of Italian seasoning to the dough and use mozzarella cheese instead of cheddar.
How to Make Garlic Cheddar Biscuits
Step 1: Prep Your Space
Preheat your oven to 425°F and line your baking sheet with parchment paper. Having everything ready makes the process smooth and stress-free.
Step 2: Mix Dry Ingredients
In a large bowl, whisk together all the dry ingredients—flour, baking powder, baking soda, garlic powder, sugar, and salt. This ensures even distribution of leavening agents and seasonings.
Step 3: Add Wet Ingredients
Using a wooden spoon, gently stir in the milk and melted butter until just combined. The mixture will look a bit shaggy, and that’s perfect! Then fold in the shredded cheddar cheese with just a few strokes.
Remember not to overmix the dough, or your biscuits will turn out dense rather than fluffy!
Step 4: Portion and Bake
Using a 1/4 cup measuring cup, scoop out 8 portions of dough and drop them onto your prepared baking sheet. Leave at least 2 inches between each biscuit to allow for spreading. Bake for 12-14 minutes until they’re slightly golden on top.
Step 5: Prepare the Topping
While the biscuits are baking, stir together all the topping ingredients—melted butter, garlic powder, onion powder, salt, dried parsley, and sugar—until well combined.
Step 6: Apply the Magic Topping
As soon as the biscuits come out of the oven, generously brush the garlic butter topping over each one, making sure to use all that flavorful goodness. Let them cool just enough so you don’t burn your mouth before digging in!
Pro Tips for Making the Recipe
- Cold ingredients work best: For extra fluffiness, try using cold milk and chilled butter cut into small pieces rather than melted.
- Don’t skimp on the cheese: Freshly grated cheese melts much better than the pre-shredded bagged variety, which contains anti-caking agents.
- Make them uniform: Using a cookie scoop or measuring cup ensures all biscuits are the same size and will bake evenly.
- Watch the clock: These biscuits go from perfectly golden to overdone quickly, so keep an eye on them after the 10-minute mark.
- Double batch it: These disappear fast! Consider making a double batch and freezing half for next time.
How to Serve
These biscuits are versatile enough to complement almost any meal:
Perfect Pairings:
- Serve alongside hearty soups like tomato, potato, or chicken noodle
- Add to a breakfast plate with scrambled eggs and bacon
- Offer as the bread component with pasta dishes or stews
- Make mini chicken sandwiches using split biscuits
For Extra Flair:
- Drizzle with honey for a sweet-savory contrast
- Split and toast them the next day for breakfast
- Use as the base for strawberry shortcake for a unique dessert twist
Make Ahead and Storage
Storing Leftovers
Store completely cooled biscuits in an airtight container at room temperature for up to 24 hours. For longer freshness, refrigerate them for up to 3 days. The flavor actually improves slightly after the first day as the garlic infuses throughout!
Freezing
These biscuits freeze beautifully! Place cooled biscuits on a baking sheet in a single layer and freeze for one hour. Then transfer them to a freezer-safe bag where they’ll keep for up to 3 months. Label them with the date so you know when you made them.
Reheating
For that fresh-baked experience, warm refrigerated biscuits in the microwave for 10-15 seconds or until just heated through. For frozen biscuits, wrap them in foil and heat in a 350°F oven for about 10 minutes. For extra luxury, brush with a fresh batch of garlic butter topping before serving reheated biscuits.
FAQs
-
Why did my biscuits turn out dense instead of fluffy?
Dense biscuits usually result from overmixing the dough, which develops too much gluten. Mix just until the ingredients are combined a few lumps are perfectly fine! Also, check that your baking powder and baking soda are fresh, as expired leavening agents won’t give you that perfect rise.
-
Can I use buttermilk instead of regular milk?
Absolutely! Buttermilk makes wonderfully tangy biscuits. If using buttermilk, reduce the baking powder to 3/4 teaspoon but keep the baking soda the same, as buttermilk’s acidity will react with the baking soda for lift.
-
My cheese didn’t melt properly. What went wrong?
Pre-shredded cheeses often contain anti-caking agents that can prevent proper melting. For best results, buy a block of cheddar and grate it yourself right before adding to the dough. Also, make sure your cheese is at room temperature before mixing it in.
-
Can I make the dough ahead of time?
While these biscuits are best made fresh, you can mix the dry ingredients ahead of time and store them in an airtight container. When ready to bake, just add the wet ingredients and cheese. For the best rise and texture, it’s not recommended to store mixed biscuit dough for long periods.
Final Thoughts
These Garlic Cheddar Biscuits bring a touch of homemade comfort to any meal in just minutes. They’re so simple yet incredibly satisfying—exactly the kind of recipe that becomes a treasured family favorite. The next time you need something quick to round out a meal or just want to treat yourself to something delicious, give these biscuits a try. I guarantee the aroma alone will win you over before you even take that first warm, cheesy bite!
Print
Garlic Cheddar Biscuits Recipe
- Prep Time: 10 minutes
- Cook Time: 12 minutes
- Total Time: 22 minutes
- Yield: 8 biscuits
- Category: Snacks
- Method: Baking
- Cuisine: American
- Diet: Vegetarian
Description
Delicious and fluffy garlic cheddar biscuits that are perfect for any occasion. They are easy to make, packed with cheesy and garlicky flavors, and can be customized to your taste with simple ingredients.
Ingredients
Dry Ingredients
-
- 1 1/2 cups all-purpose flour
- 1 teaspoon baking powder
- 1/2 teaspoon baking soda
- 1 teaspoon garlic powder
- 1 teaspoon granulated sugar
- 1 teaspoon salt
Wet Ingredients
-
- 2/3 cup whole milk
- 1/4 cup unsalted butter, melted
- 1/2 cup shredded cheddar cheese
Topping
- 1/4 cup unsalted butter, melted
- 1/2 teaspoon garlic powder, or fresh finely minced garlic for a more potent flavor!
- 1/2 teaspoon onion powder
- 1/4 teaspoon salt
- 1 teaspoon dried parsley
- 1/2 teaspoon sugar
Instructions
- Preheat the oven: Preheat your oven to 425℉ and line your baking sheet with parchment paper.
- Prepare the dry ingredients: In a large bowl, whisk to combine all of the dry ingredients (flour, baking powder, baking soda, garlic powder, sugar, and salt).
- Mix the wet ingredients: Using a wooden spoon, stir in the wet ingredients until just combined. Fold in the shredded cheese. Be careful not to over-mix the dough to prevent dense biscuits.
- Portion the dough: Use a 1/4 cup measuring cup to measure out 8 balls of batter. Drop them, rounded, onto your prepared baking sheet, leaving at least 2 inches of space between them for spreading.
- Bake the biscuits: Bake for about 12 to 14 minutes, or until they are slightly golden.
- Prepare the topping: While the biscuits are baking, stir together all of the topping ingredients (melted butter, garlic powder, onion powder, salt, parsley, and sugar).
- Add the topping: Once the biscuits are finished baking, generously spread the topping over all of them. Let them cool slightly to avoid burning your mouth, then enjoy!
Notes
- Store: Place cooled leftover biscuits in an airtight container and store at room temperature for up to 24 hours, or in the fridge for up to 3 days.
- Freeze: These baked biscuits freeze beautifully. Place them in a single layer on a baking sheet, freeze for an hour, then transfer to a freezer-safe bag for up to 3 months. Reheat them from frozen (adding a few extra minutes to the oven reheat time) or thaw overnight in the fridge. Brush them with freshly made butter topping before serving for added flavor.
- Reheat: For a fresh-baked feel and taste, warm the biscuits in the microwave for 10-second intervals until heated through. Alternatively, wrap them in foil and bake at 350°F for about 7 minutes.
Nutrition
- Serving Size: 1 biscuit
- Calories: 200
- Sugar: 1g
- Sodium: 300mg
- Fat: 12g
- Saturated Fat: 7g
- Unsaturated Fat: 4g
- Trans Fat: 0g
- Carbohydrates: 17g
- Fiber: 1g
- Protein: 4g
- Cholesterol: 35mg


