
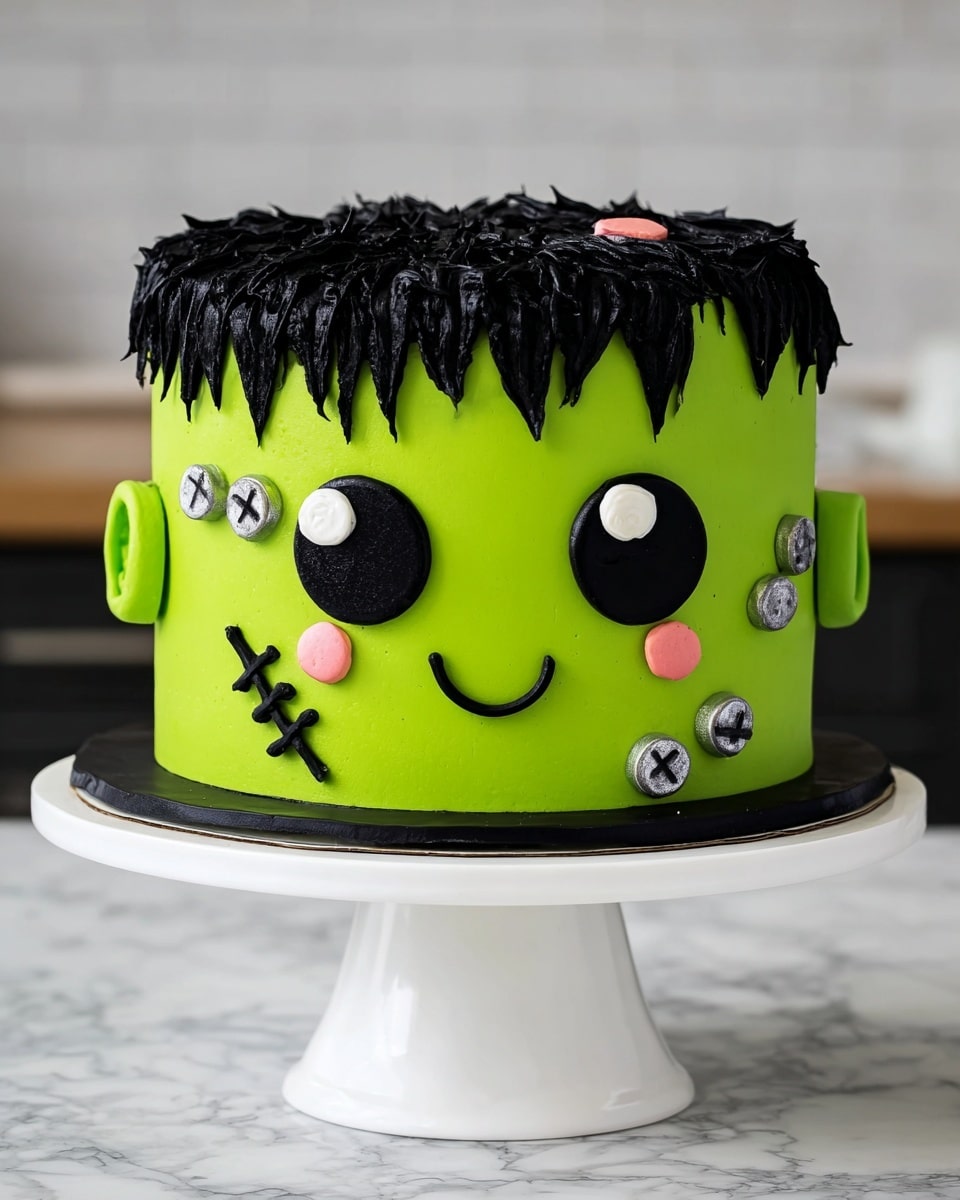
If you’re looking for a spooky, fun, and downright delicious dessert to wow your friends and family, you absolutely have to try this Frankenstein Cake Recipe. I promise, this is not your average Halloween cake — it’s a beautifully vibrant green velvet cake layered with rich cream cheese buttercream, decorated to look like the iconic Frankenstein, and it tastes as incredible as it looks. When I first baked this, my family went crazy for it, and I bet you’ll love it too. Let’s dive in so you can bring this monster masterpiece to your kitchen!
Why You’ll Love This Recipe
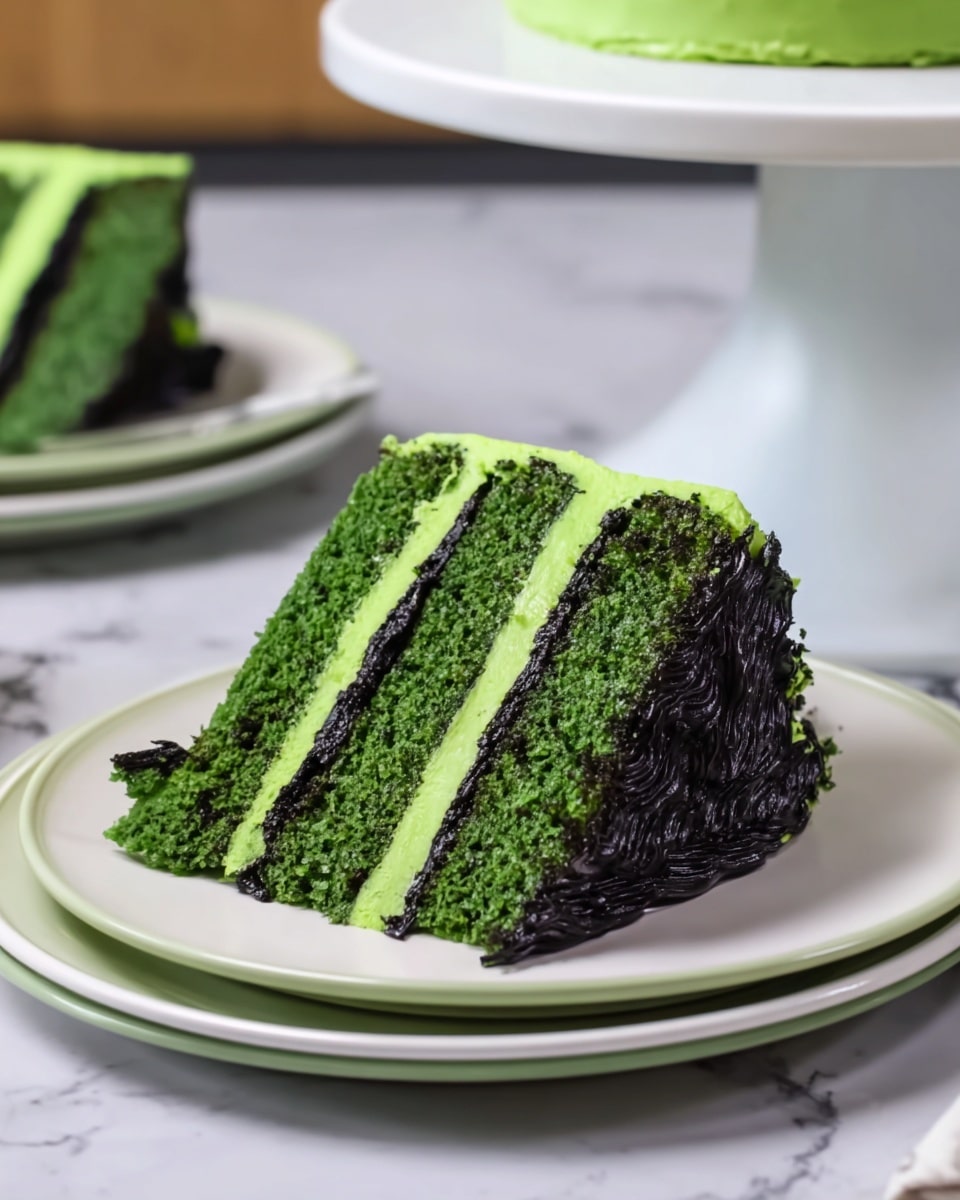
- Vibrant & Unique: The vivid green velvet cake is a fun twist on the classic red velvet, perfect for Halloween or any fun event.
- Creamy & Rich Frosting: The cream cheese buttercream is luscious and smooth, complementing the cake beautifully without overpowering it.
- Step-by-Step Friendly: I walk you through each step with tips that will set you up for decorating success, even if you’re new to cake decorating.
- Make-Ahead Friendly: You can prep the cake layers and frosting in advance, making your baking experience stress-free and enjoyable.

Ingredients You’ll Need
The ingredients here are pretty straightforward, and I love how they work together to keep the cake moist with just the right crumb. Make sure your ingredients are at room temperature — it really makes a difference when mixing!
- Cake Flour: Using cake flour gives this velvet cake a tender, soft texture you’ll really appreciate.
- Unsweetened Cocoa Powder: Just a little bit adds that subtle chocolate note without darkening the green color.
- Baking Soda & Salt: They balance the flavors and help the cake rise perfectly.
- Unsalted Butter: Room temperature butter creams up with the sugar to give your cake the right structure.
- Granulated Sugar: Sweetness that plays well with the cream cheese frosting.
- Large Eggs: Eggs add richness and help bind everything together.
- Buttermilk: This is the secret to that moist, melt-in-your-mouth crumb.
- Vegetable or Canola Oil: A little extra fat for moistness and softness.
- Green Gel Food Coloring: Use gel for a bright and consistent green without messing with the batter’s texture.
- Vanilla Extract or Bean Paste: Adds depth of flavor.
- White Vinegar: Helps with the velvet texture and intensifies the green color.
- Unsalted Butter (for frosting): Creamy base for the buttercream.
- Full-Fat Cream Cheese: Gives the frosting a tangy creaminess.
- Powdered Sugar: Essential for that smooth, spreadable frosting.
- Heavy Whipping Cream: Lightens up the frosting to just the right consistency.
- Electric Green & Black Gel Food Coloring: For that spooky, eye-catching design detail.
- Optional Cake Decorating Tools: Offset spatula, piping bags, and tips will help you get those fine details just right.
Variations
One of my favorite parts about this Frankenstein Cake Recipe is that you can easily tweak it to make it your own. Whether you want a dairy-free twist or want to play with different colors, there’s room for creativity here.
- Dairy-Free Version: I’ve swapped the butter and cream cheese for dairy-free alternatives like vegan butter and cream cheese, and the cake still comes out moist and delicious.
- Different Colors: For a fun twist, try purple or blue velvet instead of green — it’s super easy to sub out gel colors.
- Spiced-Up Cake: Add a pinch of cinnamon or nutmeg to the batter for a subtle autumnal flavor that pairs perfectly with cream cheese frosting.
- Mini Cakes: I’ve made mini Frankenstein cakes before — just adjust baking time and they become adorable, personalized treats for parties.
How to Make Frankenstein Cake Recipe
Step 1: Prepare Your Cake Pans and Oven
Start by preheating your oven to 350°F (175°C). Grease your cake pans well — I’ve found that using homemade cake release or a non-stick baking spray paired with parchment paper on the bottoms helps cakes slip out like magic. For this recipe, you’ll need four 6-inch or three 7-inch cake pans.
Step 2: Make the Green Velvet Cake Batter
This is where the real magic begins. In a medium bowl, sift the cake flour, cocoa powder, baking soda, and salt together — this helps keep your cake fluffy and even. Then, in a large bowl or mixer, cream the room temperature butter and granulated sugar until it’s lighter in color and fluffy, which usually takes about 1-2 minutes. Add your eggs one at a time on medium speed to fully incorporate them.
Next, pour in the buttermilk, oil, green gel food coloring, vanilla, and white vinegar. Mix gently on low — the batter might look a little curdled at this point, but trust me, it comes together when you add in the dry ingredients. Slowly fold in the dry mix in two parts on low speed until just combined and no flour streaks remain. Don’t overmix, or you’ll end up with a dense cake.
Step 3: Bake and Cool Your Cake Layers
Divide the batter evenly between your prepared pans. I like to weigh my pans with batter to make sure they hold the exact same amount — it really pays off with even layers. Give your pans a few firm taps on the counter to pop any air bubbles, then bake for 28-32 minutes. You’ll know they’re done when a toothpick inserted into the center comes out clean or with just a few tender crumbs.
Let the cakes cool in the pans for 10 minutes before running a small offset spatula around the edges. Flip your cakes onto wire racks to cool completely. Once cooled, level the tops with a serrated knife. If you’re making this ahead, wrap the layers tightly and freeze — they thaw beautifully without losing moisture.
Step 4: Whip Up Cream Cheese Buttercream
Beat your butter and cream cheese together on medium speed until smooth and creamy, about 30 seconds. Add vanilla and salt, then slowly add powdered sugar and heavy cream on low to prevent a sugar cloud in your kitchen — trust me, I learned that the hard way! Adjust thickness by adding a bit more cream or powdered sugar as needed. Set aside small portions of white and grey frosting for decorating (use just a tiny drop of black gel for grey), and mix the rest with green food coloring until you get a bright, even color. Cover with plastic wrap to keep frosting from crusting.
Step 5: Assemble and Decorate Your Frankenstein Cake
Start stacking! Place your first cake layer on a greaseproof cake board and secure it with a dab of frosting. Spread an even layer of green buttercream between each layer for that picture-perfect height. Then, apply a thin crumb coat around the outside and chill your cake in the fridge for about 20 minutes (or pop it in the freezer for 5 to speed things up) until the frosting is firm to the touch.
Next, frost your cake with a thicker second coat of green frosting and smooth everything out with an offset spatula and bench scraper for those clean edges. Chill again until firm.
While chilling, create black buttercream by adding black gel and black cocoa powder to some frosting. Using your piping bags and different-sized round tips, start bringing Frankenstein to life — pipe on his eyes, smile, hair, and neck bolts with the black and white frosting. Use your grey for shading and detail. I like to use a circle cutter or a small glass to keep the eyes symmetrical and perfectly spaced — it’s a neat trick I discovered that makes such a difference!
Pro Tips for Making Frankenstein Cake Recipe
- Room Temp Ingredients: I always set out eggs, butter, and buttermilk at least 30 minutes before baking to help everything blend smoothly for a tender crumb.
- Measure Flour Correctly: Spoon your cake flour into the cup measure and level it off or even better, use a kitchen scale for precise measuring.
- Use Gel Food Coloring: It keeps your frosting bright and avoids any bitter taste or runny texture that liquid colorings can cause.
- Avoid Overmixing: Overworking the batter can result in a tough cake — mix just until combined, especially after adding flour.
How to Serve Frankenstein Cake Recipe
Garnishes
I personally keep the garnishes simple to let the frosting artwork shine, but you can sprinkle edible glitter or attach candy bolts alongside to amp up the Halloween spirit. A few candy eyeballs or even a drizzle of dark chocolate can give it an extra eerie touch that the kids adore.
Side Dishes
Serve this cake alongside a scoop of vanilla bean ice cream or a dollop of whipped cream. A hot cup of spiced apple cider or black coffee balances the sweetness perfectly. If you’re hosting a spooky party, some fruity punch pairs beautifully too!
Creative Ways to Present
One fun idea I’ve tried is placing the cake on a spinning cake stand and dimming the lights, so the glowing green cake looks extra dramatic. You could also set it on a vintage platter and scatter Halloween-themed decorations like fake cobwebs and mini pumpkins around. For kids’ parties, I’ve carved fondant “scars” to add dimension and it was a total hit!
Make Ahead and Storage
Storing Leftovers
Once decorated, I keep leftover Frankenstein Cake wrapped well in the fridge for up to a week — the buttercream keeps it moist and fresh. Just make sure it’s covered tightly to prevent absorbing fridge odors.
Freezing
I actually make the layers in advance and freeze them wrapped tightly in plastic and foil. You can freeze a fully frosted cake too — just flash freeze it until the frosting is firm, then wrap in plastic wrap and freeze. It stays delicious for about a month. Thaw overnight in the fridge and decorate fresh when ready!
Reheating
Cake is best enjoyed at room temperature, so I take leftovers out of the fridge about 30 minutes before serving. If it’s a bit chilled, the frosting will soften up nicely without getting melty. I don’t recommend microwaving since it can make the frosting separate.
FAQs
-
Can I use regular food coloring instead of gel for the Frankenstein Cake Recipe?
You can, but gel food coloring is definitely my recommendation. Gel colors are more concentrated, so you get that bright, vivid green without adding extra liquid that can alter the cake batter or frosting texture. Regular liquid coloring can make the batter too wet or the frosting too runny, affecting the final look and texture.
-
How far in advance can I make the Frankenstein Cake Recipe?
You can bake and freeze your cake layers up to a month ahead, and the frosting can be made ahead and stored in the fridge or freezer. I like to assemble and decorate the cake the day before serving to keep it fresh but prepare in parts ahead to reduce day-of stress.
-
What if I don’t have buttermilk for the cake?
No worries! You can make a quick buttermilk substitute by adding 1 tablespoon of white vinegar or lemon juice into a cup of milk, letting it sit for 5 minutes until it curdles slightly. This works perfectly in this Frankenstein Cake Recipe.
-
Can I use a different frosting instead of cream cheese buttercream?
Absolutely! If cream cheese isn’t your favorite, you can use a classic buttercream by replacing the cream cheese with extra butter. Just keep in mind the flavor will be different, and cream cheese adds that lovely tang that pairs beautifully with velvet cake.
Final Thoughts
I absolutely love how this Frankenstein Cake Recipe turns out every single time — it’s a crowd-pleaser that’s as fun to make as it is to eat. The best part? It’s approachable for home bakers, with my tips helping you every step of the way so you don’t feel overwhelmed. Whether you’re baking for Halloween, a themed birthday, or just because you’re craving something unique, this cake will steal hearts. Give it a try, and I guarantee you’ll smile every time you slice into that vibrant green, creamy, spooky masterpiece!
Print
Frankenstein Cake Recipe
- Prep Time: 20 minutes
- Cook Time: 28 minutes
- Total Time: 1 hour 48 minutes
- Yield: 20 servings
- Category: Dessert
- Method: Baking
- Cuisine: American
Description
This vibrant and fun Frankenstein Cake is a festive green velvet cake layered with a rich, creamy cream cheese buttercream frosting. Perfect for Halloween or any spooky-themed party, the cake features moist, tender layers dyed a bright green with gel food coloring and decorated with playful piping that brings Frankenstein’s monster to life. The recipe guides you through baking from scratch, preparing a smooth and flavorful cream cheese buttercream, and decorating tips to create an impressive, eye-catching dessert.
Ingredients
Green Velvet Cake
- 2 1/2 cups cake flour (300g)
- 2 Tbsp unsweetened cocoa powder, sifted (10g)
- 1 tsp baking soda (6g)
- 1/2 tsp fine salt (3g)
- 1/2 cup unsalted butter, room temperature (113g)
- 1 3/4 cups granulated sugar (350g)
- 2 large eggs, room temperature (112g)
- 1 1/4 cups buttermilk, room temperature (300g)
- 2/3 cup vegetable or canola oil (145g)
- Green gel food coloring, 2 squirts or 1 Tbsp liquid food coloring
- 2 tsp vanilla extract or vanilla bean paste (8g)
- 1 tsp white vinegar (4g)
Cream Cheese Buttercream Frosting
- 1 1/2 cups unsalted butter, room temperature (339g – 3 sticks)
- 1/2 cup full-fat cream cheese, room temperature (113g or 4 oz.)
- 1 Tbsp vanilla extract or vanilla bean paste (12g)
- 1 tsp fine salt (6g)
- 8 cups powdered sugar (1000g)
- 2 Tbsp heavy whipping cream, room temperature (30g)
- Electric Green Gel Food Coloring (quantity as needed)
- Black Gel Food Coloring (quantity as needed)
Additional Tools / Decorations
- 10-inch greaseproof cake board
- Spinning cake stand
- Small offset spatula
- 1 large piping bag
- 3 small piping bags
- 2 large round piping tips (e.g., Wilton 2A)
- 1 small round piping tip (e.g., Wilton 12)
- 1 tiny piping tip (e.g., Wilton 3)
Instructions
- Preheat and Prepare Pans: Preheat your oven to 350°F (175°C). Grease four 6-inch or three 7-inch cake pans using homemade cake release or non-stick baking spray and line them with parchment paper. Set aside.
- Mix Dry Ingredients: In a medium bowl, sift together the cake flour, cocoa powder, baking soda, and salt until fully combined and aerated.
- Cream Butter and Sugar: In a large bowl or stand mixer bowl, cream the unsalted butter and granulated sugar on medium-high speed for 1-2 minutes until the mixture lightens in color and becomes fluffy. Scrape down the bowl sides as needed.
- Add Eggs: Mix in the eggs one at a time on medium speed until fully incorporated.
- Add Wet Ingredients: Combine buttermilk, vegetable oil, green gel food coloring, vanilla extract, and white vinegar in the bowl. Mix on low until just combined; the batter might look curdled but will smooth out after adding dry ingredients.
- Incorporate Dry Ingredients: Slowly add the sifted dry ingredients into the wet mixture in two portions on low speed. Mix gently until no visible streaks of flour remain; avoid overmixing.
- Divide and Bake: Evenly divide the batter into the prepared pans. Tap each pan firmly on the counter several times to release air bubbles. Bake for 28-32 minutes or until a toothpick inserted in center comes out with a few moist crumbs.
- Cool Cake Layers: Remove pans from oven and cool for 10 minutes. Run a small offset spatula around the pan edges to loosen, then invert layers onto a wire rack to cool completely. Once cool, level each cake layer with a serrated knife for even stacking.
- Prepare Cream Cheese Buttercream: Beat butter and cream cheese on medium speed with paddle attachment for 30 seconds until smooth. Add vanilla extract and salt, mix on low until combined.
- Add Sugar and Cream: Gradually mix in powdered sugar and heavy cream on low speed. Cover mixer with a kitchen towel to avoid powdered sugar mess. Scrape bowl sides as needed. Adjust consistency with additional cream or powdered sugar until smooth and pipeable.
- Divide Frosting for Colors: Set aside 1/4 cup of white frosting in a small piping bag fitted with a large round tip. Place another 1/4 cup in a bowl, add a tiny amount of black gel food coloring to create light grey, then put into a small piping bag with large round tip. Add green gel food coloring to the remaining frosting until bright and evenly colored. Cover to prevent crusting.
- Stack and Crumb Coat: Place one cake layer on a greaseproof cake board using a small dab of frosting to secure it. Spread an even layer of green frosting between each layer. Apply a thin crumb coat all around the cake to seal in crumbs. Smooth with an offset spatula or bench scraper. Chill in fridge for 20 minutes or freezer for 5 minutes until firm.
- Final Frosting Layer: Remove cake from chilling and apply a thick second layer of green frosting evenly around the cake. Smooth well. Chill again in fridge for 30 minutes or freezer for 10 minutes until completely firm.
- Prepare Black Frosting for Decoration: Color remaining buttercream black by adding gel food coloring and 3 Tbsp dark or black cocoa powder. Transfer to a piping bag fitted with a coupler and small round piping tip (Wilton 12).
- Decorate Cake: Using black and white buttercream, pipe Frankenstein’s eyes, smile, and hair details. Use the grey frosting to add bolts on the neck. Allow frosting to set before serving.
- Serve and Enjoy: Serve the cake chilled or at room temperature, and enjoy a festive and fun treat perfect for Halloween.
Notes
- Use room temperature ingredients to ensure smooth mixing and even texture.
- Measure cake flour accurately by spooning into the cup or weighing with a scale for best results.
- Gel food coloring is preferred to maintain frosting consistency without bitterness.
- Mix cake batter only until ingredients are incorporated to avoid dense cake layers.
- Weigh cake pans to evenly distribute batter for uniform layers.
- Banging pans on counter eliminates air bubbles for better crumb texture.
- Level cooled or thawed cake layers for even stacking and presentation.
- Freeze cake layers before assembling to simplify trimming and frosting.
- Use a circle cutter or glass to space out and center Frankenstein’s eyes perfectly.
- Make cake layers and frosting ahead of time; cake layers freeze well and frosting stores up to a month refrigerated or 3 months frozen.
- Frosted cake can be refrigerated for up to a week or frozen up to a month with buttercream sealing moisture.
Nutrition
- Serving Size: 1 slice (1/20th of cake)
- Calories: 420
- Sugar: 38g
- Sodium: 180mg
- Fat: 22g
- Saturated Fat: 11g
- Unsaturated Fat: 8g
- Trans Fat: 0g
- Carbohydrates: 52g
- Fiber: 1g
- Protein: 4g
- Cholesterol: 65mg
