
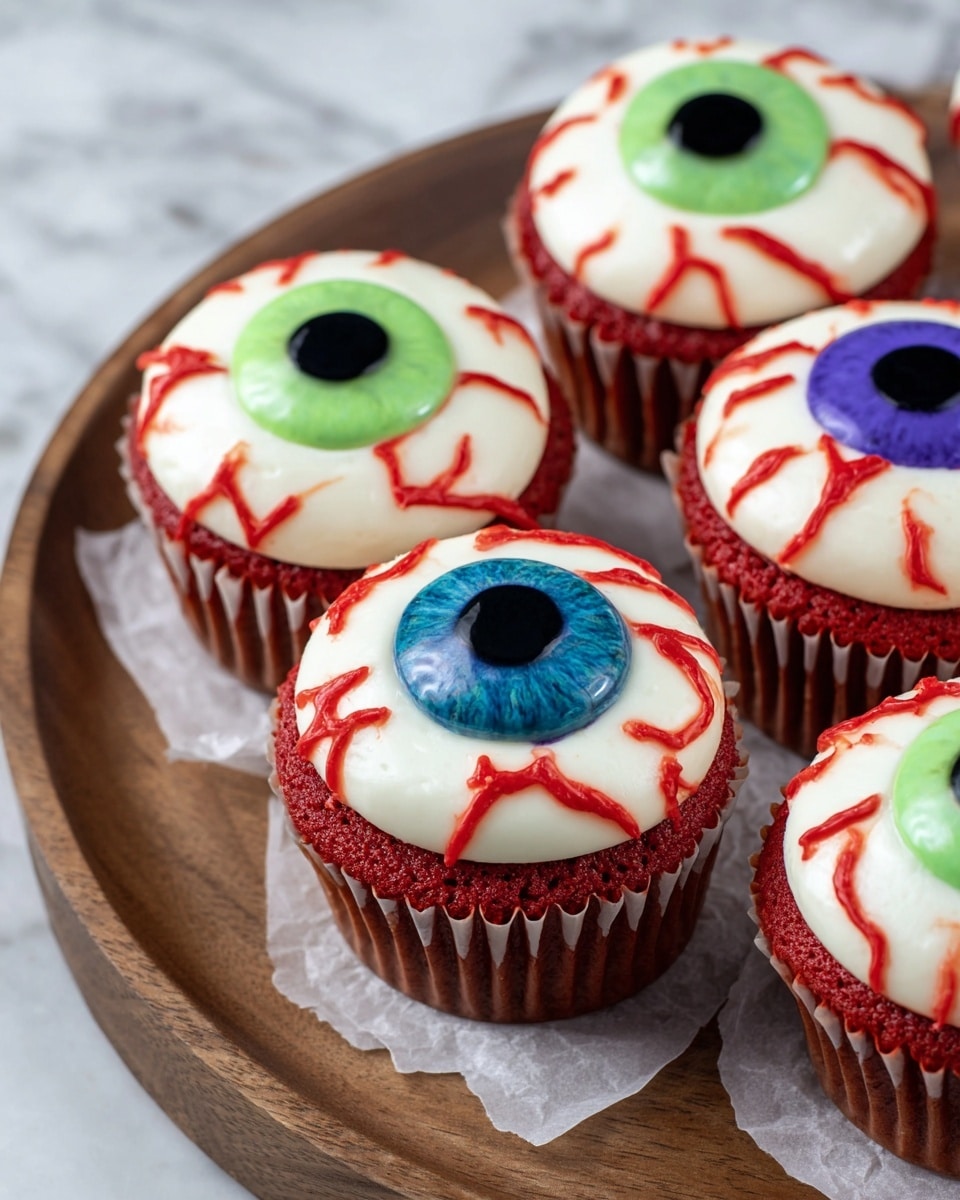
If you’re looking for a show-stopping treat that will make your guests do a double take, you’ve got to try this Eyeball Cupcakes Recipe. It’s seriously one of my favorite Halloween desserts that’s as fun to make as it is to eat. I love how these creepy-but-cute cupcakes bring out the kid in everyone, and once you try this recipe, you’ll find that decorating these spooky little eyeballs isn’t nearly as tricky as it looks. Stick with me—I’ll walk you through every step to help you nail this deliciously eerie treat with confidence!
Why You’ll Love This Recipe
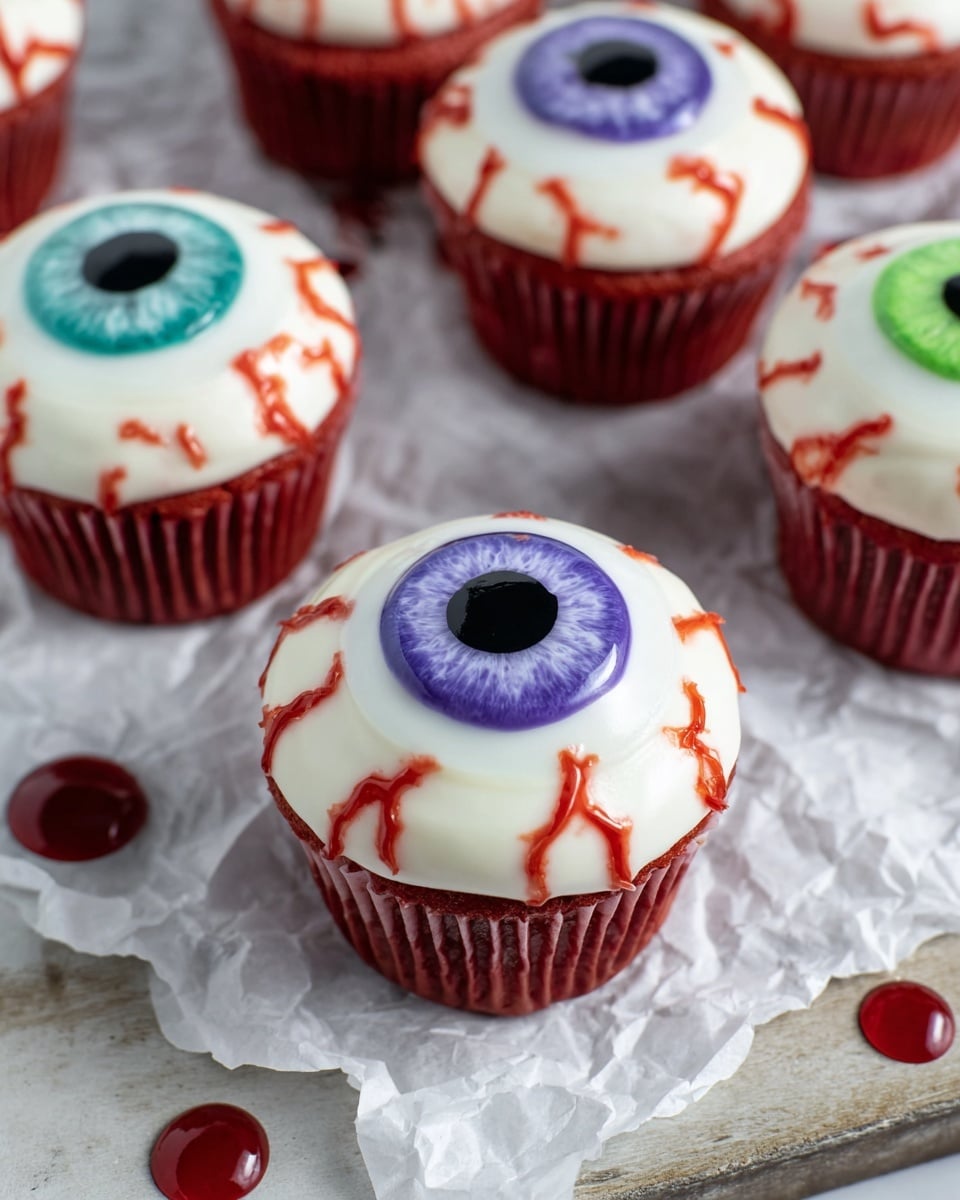
- Visually Stunning and Playful: These cupcakes really steal the spotlight with their eye-catching fondant irises and realistic edible blood veins.
- Perfect Balance of Flavor and Texture: The moist red velvet base paired with creamy vanilla buttercream is such a winning combo every time.
- Approachable Decoration Technique: Even if you aren’t a pro baker, my tips make the fondant painting and blood veins doable and fun to create.
- Great for Parties and Holidays: These cupcakes are a blast for Halloween but honestly, I find they work any time you want to surprise and delight your crowd.

Ingredients You’ll Need
For eyeball cupcakes that taste as amazing as they look, the ingredients list strikes the perfect balance between classic cupcake staples and fun decorating essentials. Each part—from the rich red velvet cupcakes to the creamy buttercream and the clever fondant irises—plays a vital role. When you shop, look for high-quality butter and fresh eggs, and if possible, get gel food coloring—it gives vivid color without thinning your batter or frosting.
- Cake flour: It’s lighter than all-purpose and helps your cupcakes stay soft and fluffy.
- Unsweetened cocoa powder: Just a tablespoon here—don’t skip it, it amps up that classic red velvet flavor.
- Baking powder: This gives the cupcakes their lift.
- Fine salt: Balances all the sweetness perfectly.
- Unsalted butter: Room temperature butter is key for velvety batter and frosting texture.
- Granulated sugar: For sweetness and to help create a nice crumb.
- Eggs: Bring richness and structure to your cupcakes.
- Buttermilk: Adds tang and moisture—don’t substitute if you can avoid it!
- Vegetable or canola oil: Works with butter to keep things tender.
- Vanilla extract or vanilla bean paste: I love the depth vanilla bean paste adds, but either works beautifully.
- Red gel or liquid food coloring: The secret to that vibrant red hue we all crave in red velvet.
- Powdered sugar: For silky smooth buttercream.
- Heavy whipping cream: Makes the frosting light and fluffy.
- Seedless raspberry or strawberry jam: Turns into your edible “blood” veins—super easy and tasty!
- White and black fondant: For crafting those spooky, yet adorable eyeball irises and pupils.
- Gel food coloring in blue, purple, and green: To paint your irises spooky and realistic.
Variations
I love customizing my eyeball cupcakes depending on the occasion or my pantry stash. You can totally make this recipe your own, whether you need gluten-free options, want to try different frosting flavors, or tweak the “blood” for a less sweet twist. Feel free to get creative here—I promise it’s more forgiving than you think!
- Gluten-Free Version: I’ve made these with a gluten-free flour blend, and by letting the batter rest for half an hour, I got a nice texture that’s just as tender as the original.
- Mini Eyeball Cupcakes: You can bake them in mini muffin tins for tiny spooky bites—perfect for parties with lots of guests.
- Frosting Flavors: Try swapping vanilla buttercream for cream cheese frosting if you want that classic tangy red velvet pairing.
- Jam Alternatives: If you want a less fruity “blood,” you can mix corn syrup with red food coloring to keep it glossy and more wafer-thin.
How to Make Eyeball Cupcakes Recipe
Step 1: Create Your Fondant Irises
Start early with the fondant irises because they need time to dry for the best effect. I like kneading the white fondant until it’s pliable—trust me, it’s easier to work with when warm. Rolling it out evenly and cutting perfect 1-inch circles is key, so a small cutter or bottle cap are your best friends here. Then comes the fun part: painting! Mixing gel food coloring with a little vodka (or clear extract) lets you paint on the super vibrant iris colors, which dry with a cool streaky effect. Add the black little pupils in the center and then pull the paint streaks towards the edge for that creepy spooky depth. If your paint feels too wet to streak, giving it a few extra minutes to dry really helps.
Step 2: Bake Moist Red Velvet Cupcakes
Preheat to 350°F (175°C) and line your muffin tin. I always sift my dry ingredients together to avoid lumps and get a smoother batter. Creaming the butter and sugar until fluffy is a game changer—you’ll notice the difference in your cupcake’s texture right away. Adding eggs, then buttermilk, oil, vanilla, and food coloring on low speed keeps everything from curdling. When you fold in the dry ingredients, don’t overmix; as soon as you don’t see flour streaks, stop. Use a cookie scoop to fill cupcake liners evenly—plus, it keeps your cupcakes all the same size. Baking takes about 17-20 minutes; I always test with a toothpick to make sure it comes out clean but moist. Letting them rest in the pan for 10 minutes before transferring to a rack makes them easier to handle, so don’t skip that!
Step 3: Whip Up Silky Vanilla Buttercream
Softened butter, vanilla, and salt whipped first sets the stage for the smoothest frosting. Don’t rush the powdered sugar—add it gradually on low speed to prevent a powder cloud in your kitchen! Midway through I mix in heavy cream, which lightens the frosting so it pipes beautifully. If you need your frosting thinner or thicker, add cream or powdered sugar a little at a time until you have the perfect consistency. Loading it into a piping bag with a large round tip preps you for that clean, bold dome of luscious frosting on each cupcake.
Step 4: Make Your Edible “Blood” Veins
This is where your cupcakes get that creepy realistic vibe. Mix seedless raspberry or strawberry jam with water and a touch of red gel color until smooth and dripping—almost paint-like. This jam “blood” pipes easily through a small round tip or just a tiny snip at the bag’s end if you’re improvising. Keep the bag’s tip propped up to avoid messy spills before you’re ready to decorate.
Step 5: Assemble Your Eyeball Cupcakes
Once your cupcakes are completely cooled, pipe a generous dome of buttercream on each. I lightly tap the cupcake on the counter to smooth the frosting gently—this makes placing your irises so much easier. Use a small spatula to nestle each fondant iris right in the center, then pop them in the fridge for about 15 minutes; this firms up the frosting so it won’t smudge when you pipe on the blood veins. Carefully pipe thin, random veins of edible blood around the eyeball, and just like that—you’ve got the ultimate eyeball cupcakes!
Pro Tips for Making Eyeball Cupcakes Recipe
- Room Temperature Ingredients: I’ve learned that letting eggs, butter, and buttermilk sit out beforehand makes your batter blend beautifully and your cupcakes super tender.
- Don’t Overmix the Batter: Mixing just until combined saved me from dense cupcakes every time. It’s tempting to stir more, but trust me, less is more here.
- Fondant Painting Technique: If your gel paint feels too wet to pull those eerie streaks, giving it 10 minutes to dry makes all the difference in that haunting iris effect.
- Avoid Smudging Frosting: Chilling the cupcakes after you place your fondant irises helps the buttercream firm up so your blood veins pipe neatly without ruining your masterpiece.
How to Serve Eyeball Cupcakes Recipe
Garnishes
I keep it simple by focusing on the eyeball decorations themselves—they’re showstoppers on their own! But if you want to jazz them up a bit, try adding tiny edible gold or silver sprinkles around the base for a bit of shimmer. Or, scatter a few edible glitter flakes lightly over the frosting to mimic spooky reflections. I love to keep the iris colors vibrant and varied for extra visual interest—it always gets compliments!
Side Dishes
When I serve these, I like pairing them with a simple hot chocolate or a rich, spiced apple cider. The warmth of drinks contrasts perfectly with the cool, creamy cupcakes. For a party, some salty snacks like popcorn or spiced nuts balance out the sweetness wonderfully.
Creative Ways to Present
For Halloween bash vibes, I arrange the cupcakes on a cake stand lined with fake spiderwebs and scatter plastic eyeballs around as props. Another fun idea is placing them on black or red plates with “blood splatter” drizzled in raspberry coulis on the side. I even set up a “build your eyeball cupcake” station for kids, where they can pipe their own blood veins—pure party magic and such a fun interactive twist!
Make Ahead and Storage
Storing Leftovers
If you do have any cupcakes left over (which sometimes seems impossible in my house), store unfrosted cupcakes in an airtight container at room temp for up to two days. They last even longer in the fridge—up to a week—but I always bring them to room temperature before frosting for the best texture.
Freezing
I’ve frozen unfrosted cupcakes successfully by wrapping each one tightly in plastic wrap, then placing them in freezer bags for up to three months. The key is to thaw them completely before frosting to preserve that tender crumb. Buttercream freezes well too, so you can prepare frosting ahead and thaw gradually as needed.
Reheating
To bring frozen or refrigerated cupcakes back to life, I let them sit at room temperature for about an hour. If you want to warm them up quickly, a few seconds in the microwave (10-15 seconds) works—but watch carefully so you don’t dry them out. Once warmed, frost immediately for that fresh-out-of-the-oven feel.
FAQs
-
Can I use regular food coloring instead of gel for this Eyeball Cupcakes Recipe?
You can use liquid food coloring, but I recommend gel food coloring whenever possible because it provides brighter, more intense color without affecting your batter’s consistency. Plus, it works better for painting the fondant irises since it’s less watery and streaks beautifully.
-
How do I keep the fondant from sticking when rolling and cutting the irises?
Sprinkle a little cornstarch or powdered sugar on your work surface and rolling pin to prevent sticking. Kneading the fondant first until pliable also helps. Just be careful not to overdo the dusting—you want it to roll smoothly without cracking.
- What if I don’t have a piping bag or tips for the frosting and blood veins?
No worries! You can use a sturdy zip-top plastic bag, fill it with frosting or jam, and snip a small corner off for piping. It’s a simple hack that works great when you’re in a pinch.
-
Can I make the cupcakes a day ahead?
Absolutely! You can bake the cupcakes a day before and keep them unfrosted at room temperature in an airtight container. Just wait to frost them until the day of your event for the freshest taste and texture.
-
Is there an easier way to make the edible blood veins?
If you want a super simple option, raspberry or strawberry jam mixed with a bit of water and red food coloring is the easiest—and it tastes way better than store-bought candy syrups.
Final Thoughts
Honestly, I absolutely love how this Eyeball Cupcakes Recipe turns out every time, and it’s quickly become a favorite in my household—not just for Halloween, but whenever we want a playful treat that’s part dessert, part art project. When I first tried making the fondant irises, I worried it would be fiddly, but little tricks like letting the paint dry just right really take the stress out of it. If you’re on the fence, just dive in! These cupcakes are a perfect mix of fun, flavor, and wow-factor that you and your friends will remember. Happy baking, and may your cupcakes be delightfully spooky!
Print
Eyeball Cupcakes Recipe
- Prep Time: 10 minutes
- Cook Time: 18 minutes
- Total Time: 58 minutes
- Yield: 12 cupcakes
- Category: Dessert
- Method: Baking
- Cuisine: American
Description
These spooky Eyeball Cupcakes are a fun and festive Halloween treat featuring classic red velvet cupcakes topped with creamy vanilla buttercream and decorated with colorful fondant irises and edible fake blood for a realistic eyeball effect. Perfect for parties, they combine moist, fluffy cupcakes with creative, edible decorations that are both playful and delicious.
Ingredients
Red Velvet Cupcakes
- 1 1/3 cups cake flour (160g)
- 1 Tbsp unsweetened cocoa powder, sifted (5g)
- 1 1/2 tsp baking powder (6g)
- 1/4 tsp fine salt (2g)
- 4 Tbsp (1/2 stick) unsalted butter, room temperature (56g)
- 2/3 cup granulated sugar (133g)
- 2 large eggs, room temperature (112g)
- 1/2 cup buttermilk, room temperature (120g)
- 1/3 cup vegetable or canola oil (73g)
- 1 tsp vanilla extract or vanilla bean paste (4g)
- 1/2 tsp red gel food coloring or 1 Tbsp liquid food coloring
Vanilla Buttercream Frosting
- 1/2 cup (1 stick) unsalted butter, room temperature (113g)
- 1 tsp vanilla extract or vanilla bean paste (4g)
- 1/4 tsp fine salt (2g)
- 2 cups powdered sugar (250g)
- 2 Tbsp heavy whipping cream, room temperature (30g)
Edible Fake Blood
- 1/3 cup seedless raspberry or strawberry jam (95g)
- 2 Tbsp water (30g)
- 1/4 tsp red gel food coloring or 1 tsp liquid food coloring – optional
Suggested Tools / Decoration
- 1/3 cup White Fondant
- 2 Tbsp Black Fondant
- Small Paint Brush
- Gel Food Coloring (blue, purple, and/or green)
- Electric hand mixer or stand mixer
- Muffin tin
- Cupcake liners
- Small Whisk
- Large Piping Bag
- Large Round Piping Tip like a Wilton 2A
- Small Piping Bag
- Small Round Piping Tip like a Wilton 3
Instructions
- Fondant Iris: Knead the white fondant until warm, then roll out and cut 12 circles about 1 inch in diameter. Dust your surface with cornstarch if the fondant sticks. Mix gel food coloring with clear alcohol or extract to paint the white circles. Roll out black fondant and cut 12 small circles (about 1/3 inch) for pupils and place them in the center of each iris. Use a paintbrush to streak the paint from the pupil to the edge of the iris for a spooky effect. Let dry.
- Prepare Cupcake Batter: Preheat oven to 350°F (175°C) and line a muffin tin with 12 liners. Sift together cake flour, cocoa powder, baking powder, and salt in a medium bowl. In a large bowl, cream butter and sugar with a mixer until light and fluffy. Add eggs one at a time, then mix in buttermilk, oil, vanilla, and food coloring until combined. Add dry ingredients in two parts, mixing until no flour streaks remain. Scrape bowl as needed.
- Bake Cupcakes: Divide batter evenly among cupcake liners and bake for 17-20 minutes or until a toothpick inserted comes out with moist crumbs. Cool in the pan for 10 minutes then transfer to a wire rack to cool completely.
- Make Vanilla Buttercream Frosting: Beat butter on medium speed until smooth. Add vanilla and salt, then gradually beat in powdered sugar and heavy cream on low speed until smooth and creamy. Adjust consistency with more cream or powdered sugar as needed. Transfer frosting to a piping bag fitted with a large round tip and set aside.
- Prepare Edible Fake Blood: In a small bowl, whisk seedless raspberry or strawberry jam, water, and optional red food coloring until smooth and thin. Transfer to a small piping bag with a small round tip; seal and set aside.
- Decorate Eyeball Cupcakes: Pipe a large mound of buttercream onto each cooled cupcake, gently tapping to smooth. Place a fondant iris in the center and chill cupcakes for 15 minutes to firm frosting. Carefully pipe veins around the sides of each cupcake using the edible fake blood to complete the eyeball effect. Serve and enjoy!
Notes
- To make mini eyeball cupcakes, bake this recipe in mini muffin tins for about 40 cupcakes, baking for 9-10 minutes at 350°F (175°C).
- Use room temperature ingredients to ensure smooth mixing.
- Measure flour properly by spooning and leveling or use a kitchen scale.
- Mix batter just until combined to keep cupcakes tender and fluffy.
- Use a large cookie scoop for even cupcake portions.
- Banging the cupcake pan on the counter before baking removes air bubbles.
- Seal piping bags with rubber bands to prevent frosting leakage.
- For gluten-free cupcakes, substitute your favorite gluten-free flour blend and let batter rest 30 minutes before baking.
- Unfrosted cupcakes keep for 2 days at room temp, up to 1 week refrigerated, or 3 months frozen.
- Frosting keeps up to 1 month refrigerated or 3 months frozen; stir well after thawing.
- Frosted cupcakes can be stored at room temperature for up to 3 hours or refrigerated up to 3 days.
- Frost cupcakes just before serving for best texture and appearance.
Nutrition
- Serving Size: 1 cupcake
- Calories: 320
- Sugar: 28g
- Sodium: 170mg
- Fat: 18g
- Saturated Fat: 9g
- Unsaturated Fat: 7g
- Trans Fat: 0g
- Carbohydrates: 35g
- Fiber: 1g
- Protein: 3g
- Cholesterol: 50mg

