
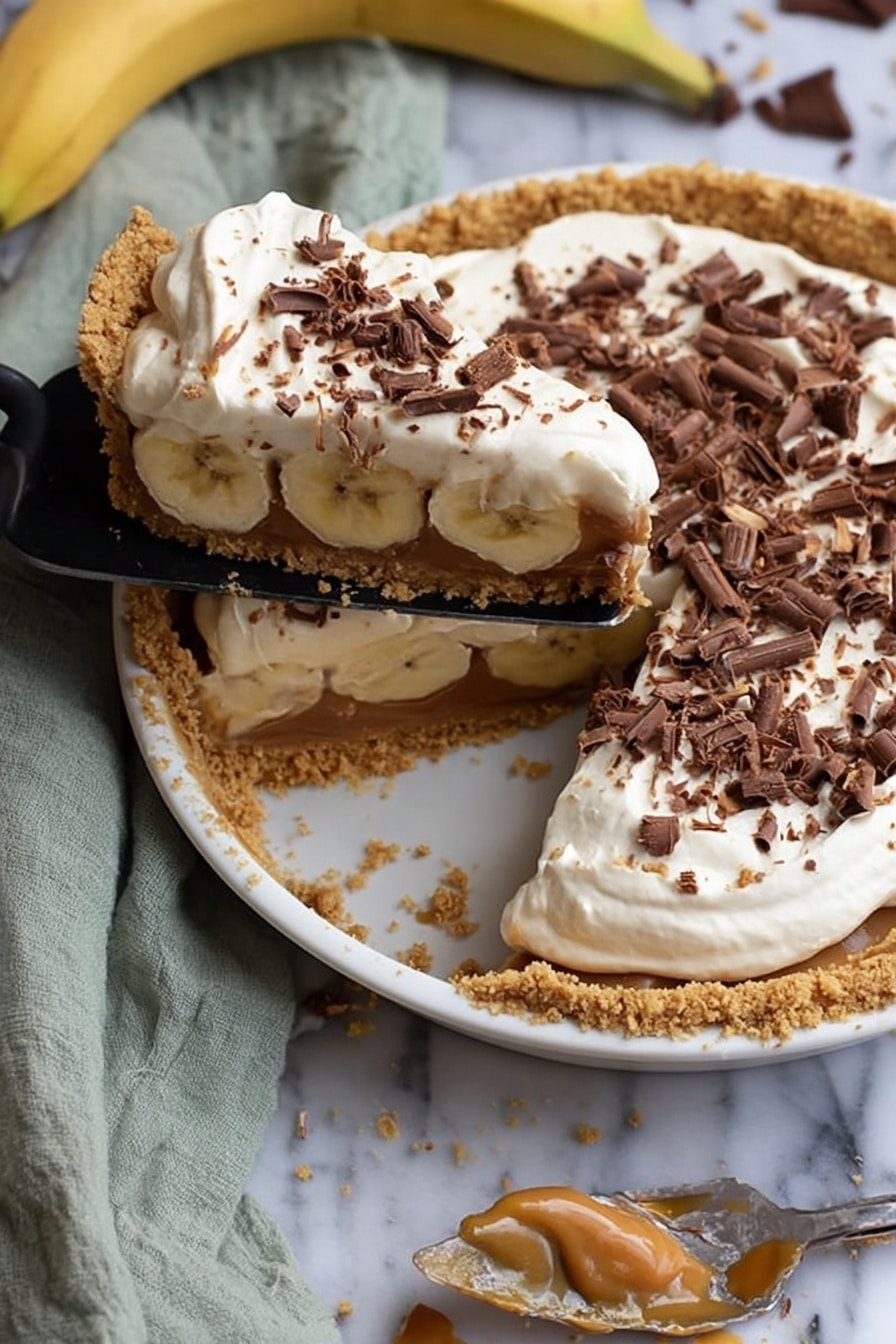
If you’ve been drooling over the idea of an indulgent dessert but don’t want to turn on your oven, you’re going to adore this Easy No-Bake Banoffee Pie Recipe. It’s one of those desserts that feels fancy enough for guests yet easy enough for a spontaneous craving—and trust me, I’ve made it both ways. With layers of buttery biscuit, silky caramel, fresh bananas, and fluffy cream, you’re in for something truly special without any fuss.
Why You’ll Love This Recipe
- No Oven Needed: Perfect for those hot days or when you want dessert quickly without heating up your kitchen.
- Simple Ingredients: Easy to find staples create this classic dessert that everyone will rave about.
- Impress Without Stress: Looks and tastes like a showstopper, but you can whip it up with little effort.
- Family Favorite: My loved ones always ask for seconds, and I bet yours will too!

Ingredients You’ll Need
Each ingredient plays a vital role in bringing this Easy No-Bake Banoffee Pie Recipe to life. When combined, they create that perfect balance of buttery crispness, creamy sweetness, and fresh fruity flavor. Let me share a few tips so you can shop smart and get the best results.
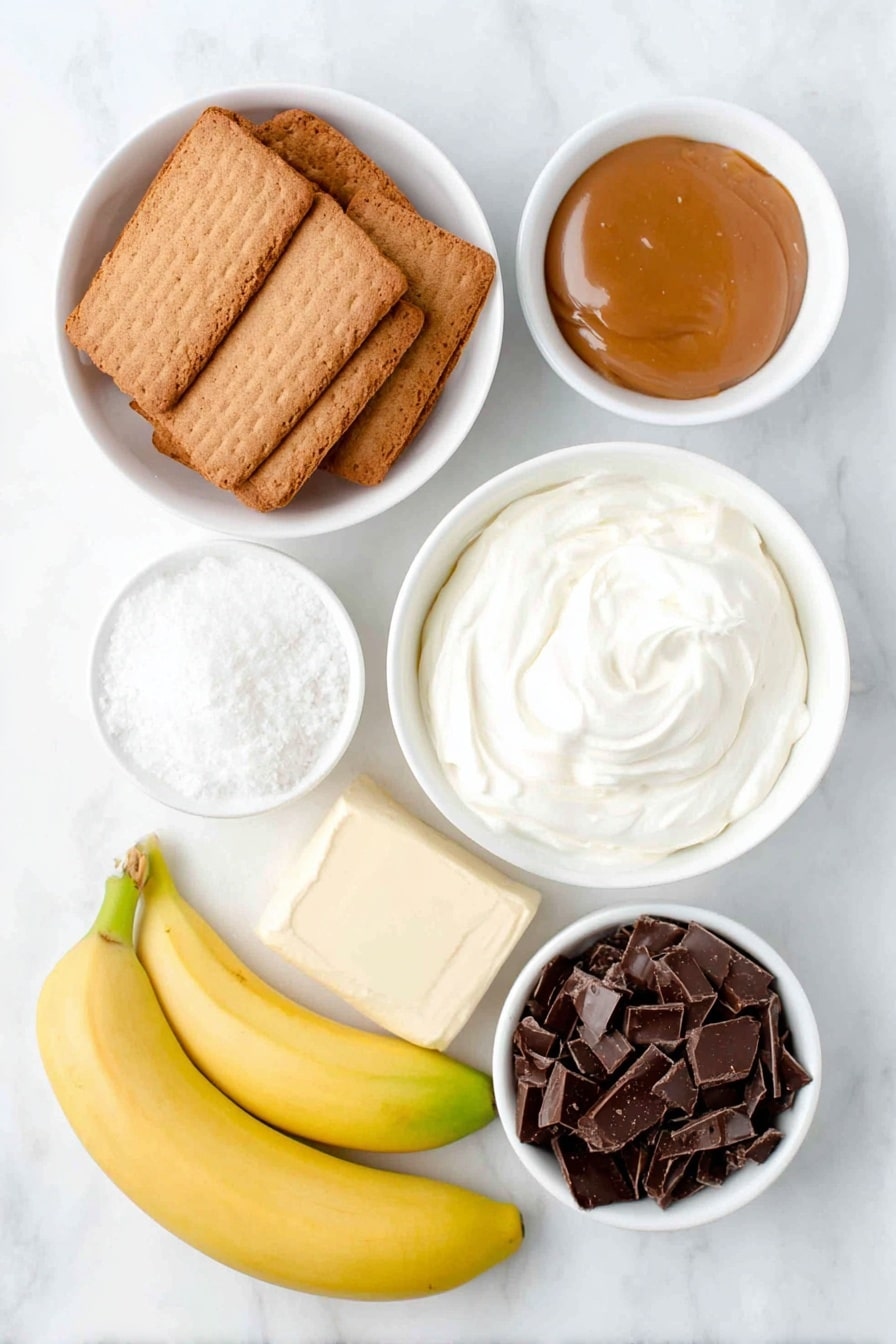
- Digestives: These biscuits form the crunchy base; you can swap for graham crackers if you prefer a slightly different flavor.
- Unsalted butter/baking spread: Use unsalted to control saltiness and ensure a rich, smooth biscuit crust.
- Caramel sauce: Choose a good-quality caramel or make your own for that decadent sweetness—see my notes for a quick tip.
- Bananas: Go for large, ripe but firm bananas so they slice nicely without turning mushy.
- Double cream: This makes your topping luxuriously fluffy and stable enough to hold shape.
- Icing sugar: Sweetens the cream just enough without overpowering the other flavors.
- Chocolate curls: Adds a little crunch and decoration, but feel free to sprinkle cocoa powder or chopped nuts instead.
Variations
I love how versatile the Easy No-Bake Banoffee Pie Recipe can be, and I’m always tweaking it to suit the occasion or mood. Don’t hesitate to make it your own. Here are a few of my favorite ways to switch things up:
- Chocolate Banoffee Pie: I once added a layer of melted dark chocolate between the caramel and bananas—my family went crazy for the extra richness.
- Vegan Version: Swapping the butter for coconut oil and the double cream for coconut cream works surprisingly well, plus using dairy-free caramel glaze.
- Crunchy Nuts: Tossing some toasted pecans or hazelnuts on top gives a lovely contrast in texture and is something I recommend if you love that crunch.
- Salted Caramel Twist: Adding a pinch of sea salt to store-bought caramel will highlight the flavor and make it taste even more gourmet.
How to Make Easy No-Bake Banoffee Pie Recipe
Step 1: Create Your Crunchy Biscuit Base
Start by finely crushing the digestives—either pop them in a bag and roll with a rolling pin or pulse briefly in a food processor. Then, pour in your melted unsalted butter and stir well until the crumbs feel like wet sand. Press this mixture firmly into a 9-inch springform or pie dish, going up the sides slightly if you like. I find using the back of a spoon or a flat-bottomed glass helps get it really compact so the base holds together nicely. Pop the base into the fridge to chill and firm up while you prepare the rest.
Step 2: Spread the Silky Caramel Layer
Once your base is chilled and firm, spoon over the caramel sauce in an even layer. Don’t rush this part—take your time to spread the caramel gently so you don’t break the crumb crust underneath. If your caramel is thick, warming it briefly helps it spread smoothly. This layer is what gives banoffee pie its signature gooey sweetness, so savor this step. Then, chill again for about 30 minutes to let it set.
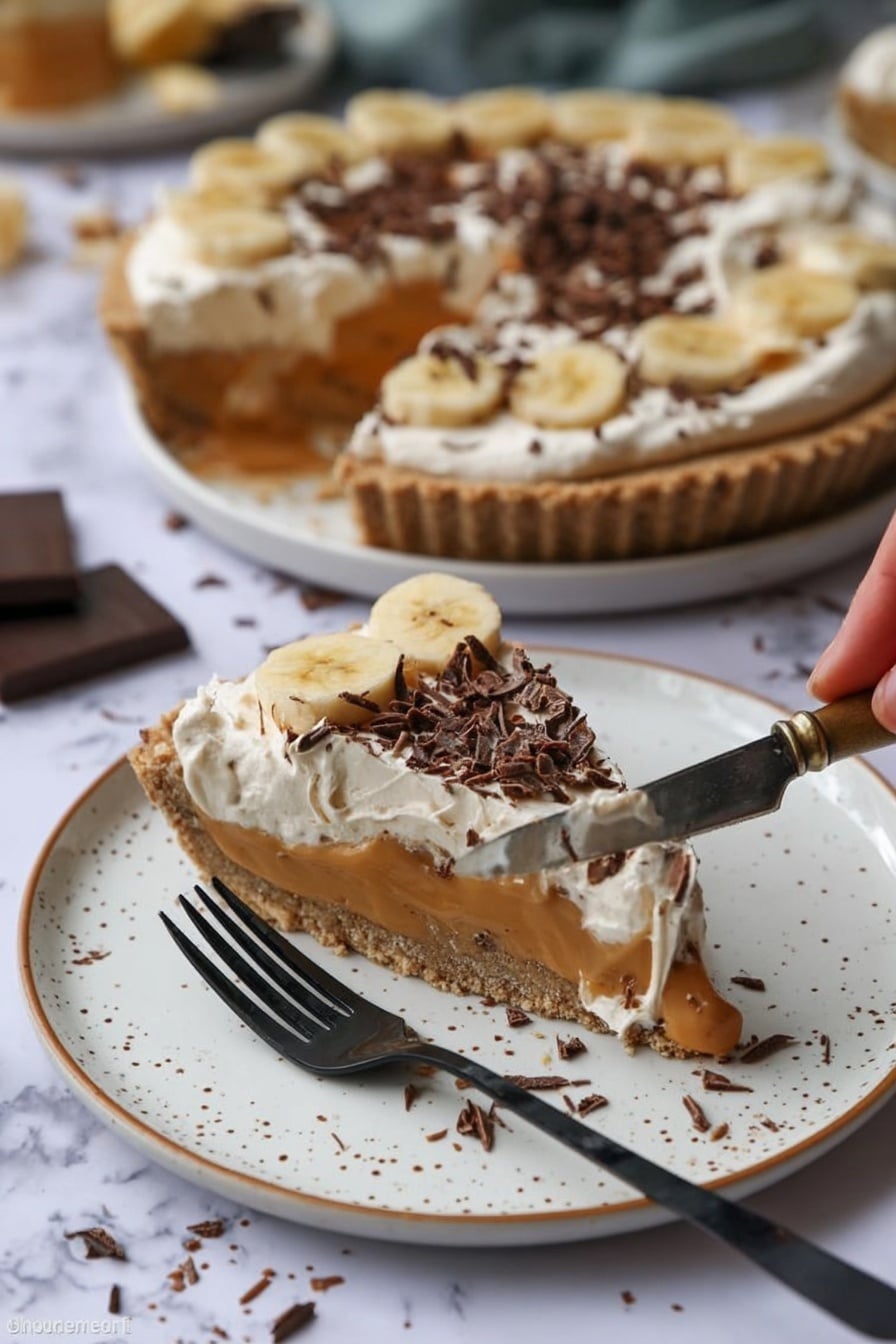
Step 3: Add the Fresh Banana Slices
Slice your ripe bananas about 1cm thick for the best bite. I like to arrange them overlapping just so on top of the caramel—this not only looks beautiful but ensures you get banana in every forkful. If you’re making the pie a bit ahead, brush the banana slices lightly with lemon juice to keep them from browning—it’s a little trick I learned that works wonders.
Step 4: Whip the Cream to Perfection
Now for the cloud-like topping. Beat the double cream with icing sugar until soft peaks form—don’t overwhip or you’ll end up with butter instead of cream! When I make this, I like to use chilled bowls and beaters; it helps the cream whip faster and hold better, which is key because this dessert sits chilled before serving. Spread the whipped cream gently over the bananas, covering them completely.
Step 5: Garnish and Chill Before Serving
Finish with a generous sprinkle of chocolate curls on top. If you don’t have curls, just grate some chocolate or dust cocoa powder for decoration. Pop the pie back into the fridge for at least 3 hours, ideally overnight—this waiting game is tough, but it lets all the flavors meld together beautifully. Before serving, run a knife around the edge to loosen the pie from the dish.
Pro Tips for Making Easy No-Bake Banoffee Pie Recipe
- Use Chill Time Wisely: Giving each layer time to set in the fridge really helps the pie hold its shape when sliced.
- Make Your Own Caramel: I sometimes warm condensed milk on low heat for a homemade caramel that tastes richer and fresher.
- Keep Bananas Fresh: A light brush of lemon juice on bananas prevents browning and keeps your pie looking sharp.
- Don’t Overmix the Crust: Pressing too hard can make the base rock solid; aim for firm but crumbly so it melts just right in your mouth.
How to Serve Easy No-Bake Banoffee Pie Recipe
Garnishes
I’m a sucker for a little extra on top, so aside from chocolate curls, I often add a sprinkle of toasted coconut flakes or a gentle dusting of cinnamon—it adds warmth and a subtle twist that my guests love. Fresh mint leaves also make a lovely visual pop and freshen up each bite.
Side Dishes
This pie is rich, so I like pairing it with simple sides like fresh berries or a tangy fruit salad to cut through the sweetness. Sometimes, I serve it alongside a cup of strong coffee or black tea to balance things out—a classic combo that never disappoints.
Creative Ways to Present
For birthdays or special occasions, I’ve layered banoffee pie into individual glasses as mini parfaits—perfect for portion control and personalizing toppings. Another time, I made it into tartlets using a muffin tin lined with digestive crumbs. Both presentation tweaks got rave reviews and made the dessert feel extra special.
Make Ahead and Storage
Storing Leftovers
I store leftover pie in the fridge covered tightly with plastic wrap or foil. It keeps perfectly for up to 2 days, though honestly, it rarely lasts that long in my house! To prevent the bananas from browning, I sometimes press a piece of baking parchment lightly over the cream before wrapping.
Freezing
Freezing banoffee pie is tricky because the fresh bananas don’t hold up well after thawing—they get mushy and watery. I’ve tried freezing the crust separately to save time, but I recommend enjoying this pie fresh for the best texture and flavor.
Reheating
No reheating needed here! This dessert is meant to be served chilled, so just let it sit out for 10 minutes before serving if it’s been in the fridge a while—this softens the textures beautifully without melting the cream.
FAQs
-
Can I use a different biscuit for the base?
Absolutely! Digestives work great for that classic banoffee flavor, but graham crackers, shortbread, or even vanilla wafers can work well depending on your taste and what you have on hand.
-
Is it possible to make this pie vegan?
Yes! Substitute the butter with coconut oil or a vegan spread, use coconut cream instead of double cream, and look for vegan caramel or make your own with coconut milk and sugar.
-
How long should I let the pie chill before serving?
Chilling for at least 3 hours is ideal to let the layers firm up and meld flavors, but overnight chilling works best if you can plan ahead.
-
Can I prepare the pie in advance for a party?
Yes! This pie actually tastes better after a few hours or overnight in the fridge. Just add any garnish like chocolate curls or nuts right before serving to keep them fresh.
-
What’s the best way to prevent bananas from browning?
Brush banana slices lightly with lemon juice as soon as you slice them. The acidity slows down browning and keeps your pie looking fresh.
Final Thoughts
I absolutely love how this Easy No-Bake Banoffee Pie Recipe comes together with so little effort but delivers maximum smiles around the table. When I first tried making banoffee pie, I was intimidated by all the layers—now it feels like second nature, and I’m always impressed by how elegant it looks. If you’re craving a dessert that can wow your guests or a special treat to make your day sweeter, this recipe is your new best friend. Grab those ingredients, and let’s get to whipping up something delicious today!
Print
Easy No-Bake Banoffee Pie Recipe
- Prep Time: 45 min
- Cook Time: 0 min
- Total Time: 285 min
- Yield: 12 slices
- Category: Dessert
- Method: No-Cook
- Cuisine: British
Description
This classic Banoffee Pie is an indulgent and easy no-bake dessert featuring a crunchy digestive biscuit base, rich caramel sauce, fresh sliced bananas, and a luscious whipped cream topping finished with chocolate curls. Perfect for any occasion, it combines creamy, fruity, and sweet flavors in a simple yet elegant presentation.
Ingredients
Biscuit Base
- 300 g digestives
- 150 g unsalted butter or baking spread (melted)
Filling
- 375 g caramel sauce
- 2-3 large bananas (sliced about 1cm thick)
Topping
- 450 ml double cream
- 50 g icing sugar
- 25 g chocolate curls
Instructions
- Prepare the base. Crush the digestives into fine crumbs using a food processor or by placing them in a sealed bag and crushing with a rolling pin. Mix the crumbs thoroughly with the melted unsalted butter until well combined.
- Form the biscuit base. Press the buttery biscuit mixture evenly into the base and slightly up the sides of a 23cm pie dish or loose-bottomed tin. Use the back of a spoon to compact and smooth it out evenly. Refrigerate for about 30 minutes or until firm to set the base.
- Add the caramel layer. Spread the caramel sauce evenly over the chilled biscuit base with the back of a spoon, ensuring a smooth, uniform layer.
- Layer the bananas. Arrange the banana slices evenly on top of the caramel layer, covering it completely. Make sure the slices are about 1cm thick for the best texture balance.
- Whip the cream. In a chilled bowl, whisk the double cream with icing sugar until soft peaks form. This creates a light yet stable whipped cream topping.
- Top the pie. Spoon or pipe the whipped cream over the banana layer, spreading it evenly and creating a smooth and fluffy surface.
- Garnish and chill. Sprinkle the chocolate curls over the cream topping for a decorative finish. Chill the pie in the refrigerator for at least 4 hours or overnight to allow all layers to set and flavors to meld perfectly before serving.
Notes
- A delicious and easy no-bake banoffee pie! Perfect as a classic dessert with layers of biscuit base, caramel, banana, and cream.
- You can use store-bought caramel sauce or make your own for a richer flavor.
- For best results, chill the pie for several hours to allow it to set completely.
- Chocolate curls can be substituted with grated chocolate or cocoa powder for garnish.
Nutrition
- Serving Size: 1 slice
- Calories: 493
- Sugar: 35 g
- Sodium: 218 mg
- Fat: 30 g
- Saturated Fat: 17 g
- Unsaturated Fat: 10 g
- Trans Fat: 0.4 g
- Carbohydrates: 55 g
- Fiber: 2 g
- Protein: 5 g
- Cholesterol: 72 mg


