

If you’re on the hunt for a fun, festive treat that’s both simple and seriously delicious, you’ve come to the right place. This Easy Halloween Cupcakes Recipe is one of my absolute favorites to whip up every spooky season. From the rich, chocolatey cupcakes to the creamy vanilla buttercream and cute Halloween-themed decorations, these cupcakes always steal the show. Trust me, whether you’re baking with kids or just craving a festive treat, you’ll find making these cupcakes as delightful as eating them!
Why You’ll Love This Recipe
- Super Easy to Follow: The step-by-step instructions make baking a breeze, even if you’re new to baking cupcakes.
- Moist, Rich Chocolate Flavor: Thanks to the cocoa and espresso powder, these cupcakes have a deep chocolate taste that’s irresistible.
- Customizable Halloween Decorations: You get to have fun with spooky frosting designs that wow your guests.
- Great for Parties and Gifting: These cupcakes hold up well and look adorable, making them perfect for sharing or giveaways.

Ingredients You’ll Need
The magic of this Easy Halloween Cupcakes Recipe starts with simple pantry staples and a few special ingredients that bring out the best flavors. I recommend using room temperature items wherever possible to help your batter come together smoothly and bake evenly.
- All purpose flour: The foundation for your cupcakes; measure carefully to avoid dry or dense results.
- Baking soda: Helps your cupcakes rise perfectly light and fluffy.
- Salt: Just a pinch to balance sweetness and enhance flavor.
- Unsweetened cocoa powder (nonalkalized): Gives the cupcakes their rich chocolate core; nonalkalized yields a deeper chocolate punch.
- Espresso powder: This little secret amps up the chocolate flavor—trust me, it’s worth it!
- Boiling water: It helps bloom the cocoa and espresso powders, unlocking that decadent taste.
- Sour cream or plain Greek yogurt: Adds moisture and a slight tang that keeps the cupcakes tender.
- Pure vanilla extract: Brings warmth and rounds out the flavors beautifully.
- Unsalted butter: Softened to room temperature for smooth mixing and creaminess.
- Granulated sugar: Sweetens while contributing to the cupcake’s structure.
- Large eggs: Room temperature eggs help with binding and moisture.
- Confectioners’ sugar: For that silky, sweet buttercream frosting.
- Pinch of salt (for frosting): Balances the sweetness for a perfect buttercream.
- Milk: Used to adjust the frosting consistency—start with less and add more as needed.
- Mini chocolate chips and bittersweet chocolate: For the festive decorations that turn cupcakes into Halloween stars.
Variations
One of the things I love about this Easy Halloween Cupcakes Recipe is how flexible it is. You can easily put your own spin on it depending on your taste or what you have on hand. Don’t hesitate to experiment!
- Use pumpkin puree: I once swapped half the sour cream for pumpkin puree and added a bit of pumpkin pie spice. It turned out moist with a festive twist—perfect for fall!
- Dairy-free option: Try coconut yogurt instead of sour cream and use a vegan butter substitute for the frosting. Just make sure to check your chocolate chips are dairy-free too.
- Fun frosting colors: Add orange or green food coloring to the vanilla buttercream to amp up the Halloween vibes—kids love this!
- Spice it up: A pinch of cinnamon or chili powder in the batter adds a surprising warm kick that pairs beautifully with the dark chocolate.
How to Make Easy Halloween Cupcakes Recipe
Step 1: Prep and mix your dry ingredients
Start by preheating your oven to 350°F and lining your muffin tins with cute paper liners. In a medium bowl, whisk together the flour, baking soda, and salt. This step is key to getting even cupcakes with no surprises in texture, so make sure everything is well combined and lump-free.
Step 2: Bloom the cocoa and espresso powders
In another bowl, whisk the cocoa powder and espresso powder together. Then, pour in the boiling water and whisk until super smooth. This secret technique really brings out that deep chocolate taste and gives your cupcakes that rich, luxurious flavor. Let this mixture come to room temperature, then stir in the sour cream and vanilla extract.
Step 3: Cream butter and sugar, then add eggs
Using your stand or hand mixer, beat the softened butter with sugar until light and fluffy—this usually takes about 3 minutes. This step is where your cupcakes get their tender crumb, so don’t rush it! Next, add eggs one at a time, making sure each egg is fully incorporated before adding the next. Scrape down the sides of the bowl so everything mixes evenly.
Step 4: Combine dry and wet mixes gently
Add one-third of the dry flour mixture to the batter and mix on low speed just until combined. Next, add half of the chocolate mixture and combine again. Repeat this with remaining flour and chocolate mixtures, ending with flour. Use a silicone spatula to scrape the bowl’s sides and bottom to make sure everything is well blended, then give it one last quick mix for 10 seconds.
Step 5: Bake your cupcakes
Scoop the batter into the lined muffin cups about two-thirds full—I love using a small ice cream scoop for even portions. Bake for 18–22 minutes or until a toothpick poked in the center comes out mostly clean with a few moist crumbs. Let cupcakes cool 5 minutes in the pan, then transfer them to a wire rack to cool completely.
Step 6: Make the vanilla buttercream frosting
While the cupcakes are cooling, whip up the frosting. Beat butter on medium-high speed until fluffy (about 5 minutes), then slowly mix in sifted confectioners’ sugar on low speed. Add vanilla and a pinch of salt, and beat until you get a light, airy texture. Add milk a tablespoon at a time until you reach the perfect spreadable consistency.
Step 7: Decorate for Halloween fun
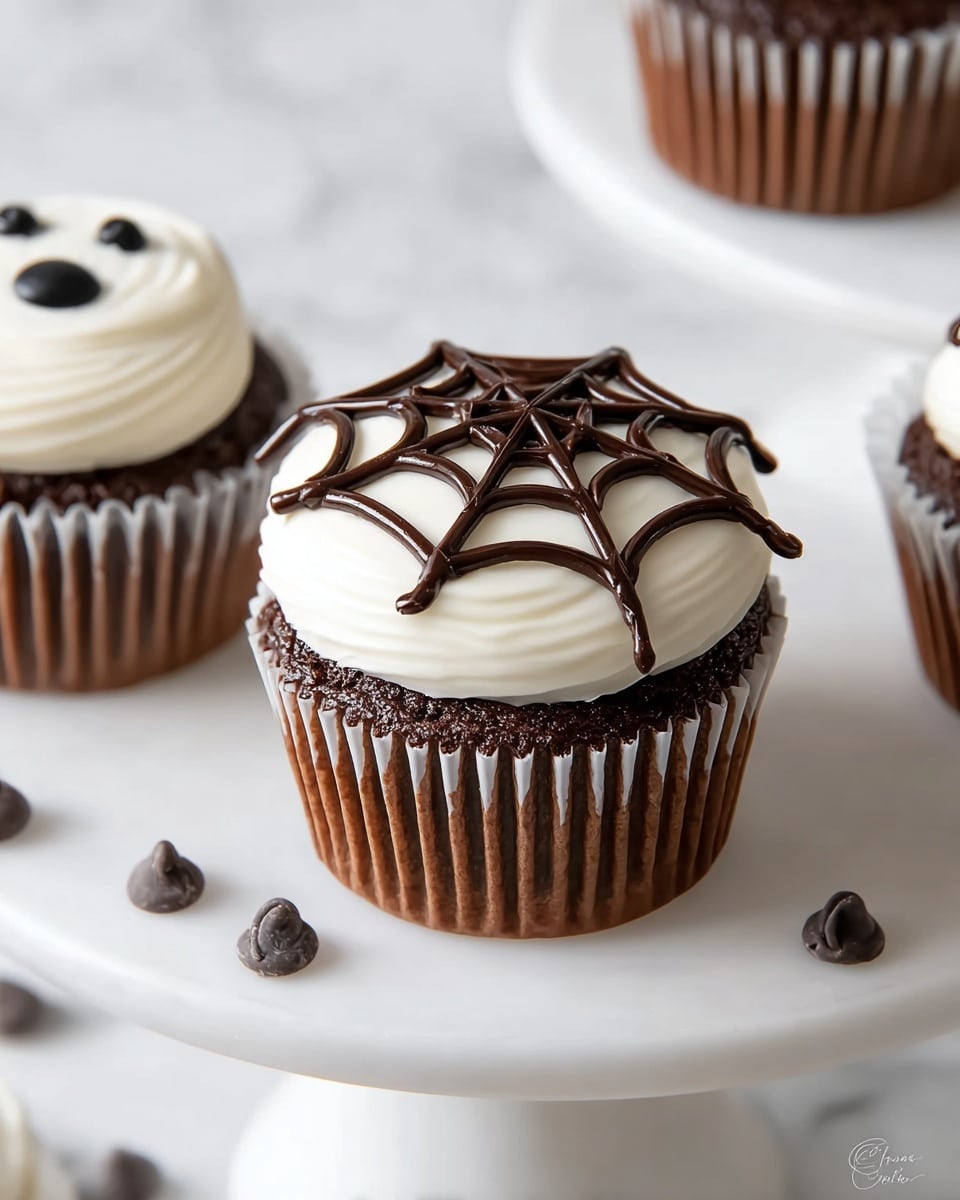
Whip out your piping bag or a simple offset spatula! For ghost cupcakes, I use a large round frosting tip to pipe a ghostly cone shape and pop mini chocolate chips on for eyes—so cute and spooky. For spider web designs, spread frosting evenly, then melt bittersweet chocolate and create circles of chocolate on top, dragging a toothpick from center outwards to form a web. If you’re feeling fancy, try skull faces with big eyes and stitched smiles—it’s easier than it looks and always impresses.
Pro Tips for Making Easy Halloween Cupcakes Recipe
- Room Temperature Ingredients: Always bring eggs, butter, and sour cream to room temp—it makes mixing smoother and gives fluffier cupcakes.
- Don’t Overmix Batter: Mix just until combined after adding flour to avoid dense, tough cupcakes.
- Test Baking Time Early: Start checking cupcakes at 18 minutes; ovens vary, and you want moist cupcakes, not dry.
- Melting Chocolate Safely: Heat chocolate gently at 50% power, stirring frequently to avoid burning or seizing.
How to Serve Easy Halloween Cupcakes Recipe
Garnishes
I love topping my cupcakes with mini chocolate chips for eyes on the ghosts, and the melted chocolate details really elevate the spooky vibe. Sometimes I’ll sprinkle edible glitter or use candy eyeballs for extra playfulness. It makes serving these cupcakes extra fun for kids—and adults too!
Side Dishes
These cupcakes pair wonderfully with a big scoop of vanilla ice cream or a glass of cold milk to balance the rich chocolate. For a Halloween party, I like to add some crunchy caramel popcorn or candied nuts on the side for textural contrast.
Creative Ways to Present
For Halloween parties, I’ve arranged these cupcakes on a tiered stand with little plastic spiders and fake cobwebs draped around. Another time, I put them individually in clear treat bags tied with orange and black ribbons—they make perfect little gifts for trick-or-treaters or coworkers!
Make Ahead and Storage
Storing Leftovers
I store leftover cupcakes in an airtight container at room temperature if I plan to eat them within 2-3 days. If it’s a warm day, I pop them in the fridge to keep the frosting fresh. Just let refrigerated cupcakes come to room temperature before serving for the best flavor.
Freezing
These cupcakes freeze beautifully—in fact, I’ve prepped batches ahead of Halloween and stored them for up to a month. Freeze the cooled cupcakes un-frosted, wrapped in plastic wrap and in a freezer bag. Once thawed overnight in the fridge, frost as usual for that fresh-picked taste.
Reheating
Since cupcakes are best enjoyed fresh, I usually skip reheating. But if you want warmed cupcakes, remove the frosting, microwave the cupcake itself for 10–15 seconds, then add frosting back on for that cozy, just-baked treat feel.
FAQs
-
Can I use a store-bought cupcake mix instead of making from scratch?
Absolutely! If you’re short on time, you can use a chocolate cupcake box mix and then focus on making the delicious vanilla buttercream and decorations yourself. It’s a great shortcut that still yields tasty results.
-
How do I prevent cupcakes from drying out?
Don’t overbake! Start checking your cupcakes a few minutes before the suggested baking time. Also, storing them properly in an airtight container helps keep them moist. The sour cream in the batter is another secret that keeps them wonderfully tender.
-
What if I don’t have espresso powder?
No worries! You can substitute it with an equal amount of instant coffee powder or omit it altogether. The espresso just enhances the chocolate flavor, so the cupcakes will still be delicious.
-
How do I make smooth chocolate designs on the cupcakes?
Melting the chocolate slowly at low power and stirring often is key. Use a small bag to pipe designs and a toothpick to drag the chocolate gently for patterns like spider webs. A steady hand helps, but practicing once or twice makes it easier.
-
Can these cupcakes be made dairy-free?
Yes! Substitute dairy butter with plant-based butter and sour cream with coconut yogurt. Make sure to choose dairy-free chocolate and confectioners’ sugar options if needed. The texture might be slightly different but still tasty.
Final Thoughts
I absolutely love how this Easy Halloween Cupcakes Recipe turns out every single time—moist, flavorful, and super fun to decorate. When I first made these cupcakes, I was amazed at how simple it was to create something festive and scrumptious right at home. Whether you’re baking with family or just treating yourself, I promise these cupcakes will bring smiles all around. So go ahead, grab your mixing bowl, and get ready to be your own Halloween baking hero!
Print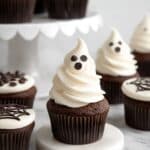
Easy Halloween Cupcakes Recipe
- Prep Time: 15 minutes
- Cook Time: 20 minutes
- Total Time: 1 hour 35 minutes
- Yield: 18 cupcakes
- Category: Dessert
- Method: Baking
- Cuisine: American
Description
Delightfully spooky and delicious, these Easy Halloween Cupcakes feature rich chocolate cupcakes topped with creamy vanilla buttercream frosting. Perfectly decorated with mini chocolate chip ghosts, spider webs, and skull designs, these cupcakes make a festive treat for any Halloween celebration. Moist, chocolatey, and beautifully adorned, they’re sure to impress guests and satisfy sweet cravings.
Ingredients
Chocolate Cupcakes
- 1 ¼ cup (156 g) all purpose flour
- ¾ teaspoon baking soda
- ½ teaspoon salt
- 1 cup (96 g) unsweetened cocoa powder (nonalkalized)
- 1 teaspoon espresso powder (or coffee powder)
- 1 cup (240 mL) boiling water
- ½ cup (120 g) sour cream or plain Greek yogurt, room temperature
- 2 teaspoons pure vanilla extract
- 1 cup (226 g or 2 sticks) unsalted butter, room temperature
- 1 ½ cups (300 g) granulated sugar
- 2 large eggs, room temperature
Vanilla Buttercream Frosting
- 1 cup (226 g or 2 sticks) unsalted butter, room temperature
- 2 ½ cups (300 g) confectioners’ sugar, sifted
- 2 teaspoons pure vanilla extract
- Pinch salt
- 1-2 tablespoons milk, room temperature
Decorations
- 2 Tablespoons mini chocolate chips
- ½ cup bittersweet chocolate, chopped
Instructions
- Preheat and Prepare: Preheat your oven to 350°F (175°C). Line two standard muffin tins with paper liners and set aside to ensure cupcakes bake evenly and don’t stick.
- Combine Dry Ingredients: In a medium bowl, whisk together the all-purpose flour, baking soda, and salt. Set aside this mixture to incorporate later.
- Mix Cocoa and Espresso: In another medium bowl, whisk the unsweetened cocoa powder and espresso powder. Add the boiling water and whisk until smooth. Let this mixture cool to room temperature before stirring in the sour cream and vanilla extract. Set aside.
- Cream Butter and Sugar: Using a stand mixer or hand mixer, beat the room temperature butter and granulated sugar on medium-high speed until the mixture is light and fluffy, approximately 3 minutes. This step is crucial for a light cupcake texture.
- Add Eggs: Add the eggs one at a time, beating well after each addition. Make sure to scrape down the sides of the mixing bowl as needed to fully incorporate all ingredients.
- Combine Ingredients: Add one-third of the flour mixture to the batter on low speed until just combined. Then add half of the chocolate mixture and mix until combined. Repeat the process, finishing with the remaining flour mixture. Use a silicone spatula to scrape the bowl sides and mix for an additional 10 seconds to ensure everything is thoroughly blended.
- Fill Muffin Tins and Bake: Transfer the batter into the prepared muffin tins, filling each cup about two-thirds full. Using an ice cream scoop can help portion uniformly. Bake for 18 to 22 minutes or until a toothpick inserted into the center comes out with little to no crumbs.
- Cool Cupcakes: Allow cupcakes to cool in the pan for 5 minutes before transferring them to a wire rack to cool completely, ensuring the cupcakes maintain moisture and texture.
- Prepare Buttercream Frosting: In a clean mixing bowl, whip room temperature butter on medium-high speed for about 5 minutes until fluffy. Gradually add the sifted confectioners’ sugar on low speed until fully incorporated. Increase speed to medium, add vanilla extract and salt, and beat until light and fluffy. Add milk as needed to reach the desired consistency.
- Melt Chocolate for Decoration: Melt the chopped bittersweet chocolate in the microwave at 50% power, stirring every 20 seconds until smooth. Transfer to a zip-top bag and allow it to cool slightly for decorating.
- Decorate Ghost Cupcakes: Using a large round frosting tip, pipe a cone-shaped ghost on each cupcake. Place mini chocolate chips as eyes for a spooky effect.
- Decorate Spider Web Cupcakes: Spread an even layer of frosting over each cupcake with an offset spatula. Snip a small hole in the corner of the chocolate-filled bag and pipe a dot in the center, then three concentric circles around it. Drag a toothpick from the center outward multiple times to create a spider web pattern.
- Decorate Skull Cupcakes: Spread frosting evenly on cupcakes. Using the melted chocolate in the bag, pipe two large eyes, two small dots for the nose, and a stitched smile resembling Jack Skellington for a festive skull look.
Notes
- You can substitute the homemade cupcake batter with a store-bought mix and follow its instructions for a quicker preparation.
- If the buttercream frosting is too soft, chill it in the refrigerator for 15 to 20 minutes, then briefly re-whip for a better piping consistency.
- For best results with chocolate melting and decoration, consider reviewing basic chocolate melting tips to prevent seizing.
- Store finished cupcakes in an airtight container at room temperature or refrigerate for up to 3 days to keep them fresh.
- For longer storage, freeze cupcakes for up to 1 month and thaw overnight in the refrigerator before serving.
Nutrition
- Serving Size: 1 cupcake
- Calories: 411 kcal
- Sugar: 36 g
- Sodium: 131 mg
- Fat: 25 g
- Saturated Fat: 16 g
- Unsaturated Fat: 7 g
- Trans Fat: 1 g
- Carbohydrates: 47 g
- Fiber: 2 g
- Protein: 3 g
- Cholesterol: 77 mg

