

If you’re anything like me and love easy, melt-in-your-mouth treats, you’re going to be obsessed with this Easter Egg Peanut Butter Candies Recipe. It’s a fan-freaking-tastic way to enjoy that classic peanut butter and chocolate combo but in adorable bite-sized eggs perfect for spring or any time you want a sweet pick-me-up. Trust me, once you try making these, they’ll quickly become a staple for holiday gifting and cozy kitchen moments.
Why You’ll Love This Recipe
- Simple Ingredients: You probably have everything on hand, making this super convenient to whip up whenever the craving strikes.
- Perfect Texture: The peanut butter filling is creamy yet firm, coated in smooth chocolate for that perfect bite.
- Customizable: You can swap the chocolate or sprinkle on toppings effortlessly to suit your taste or occasion.
- Great for Gifting: These candies look so pretty and taste so good, your friends and family will think you bought them from a fancy chocolatier!

Ingredients You’ll Need
What I love about this Easter Egg Peanut Butter Candies Recipe is how straightforward the ingredient list is, yet how these simple pantry staples come together in such a magical way. The key is picking the right kind of peanut butter and chocolate to get that smooth texture and rich flavor.
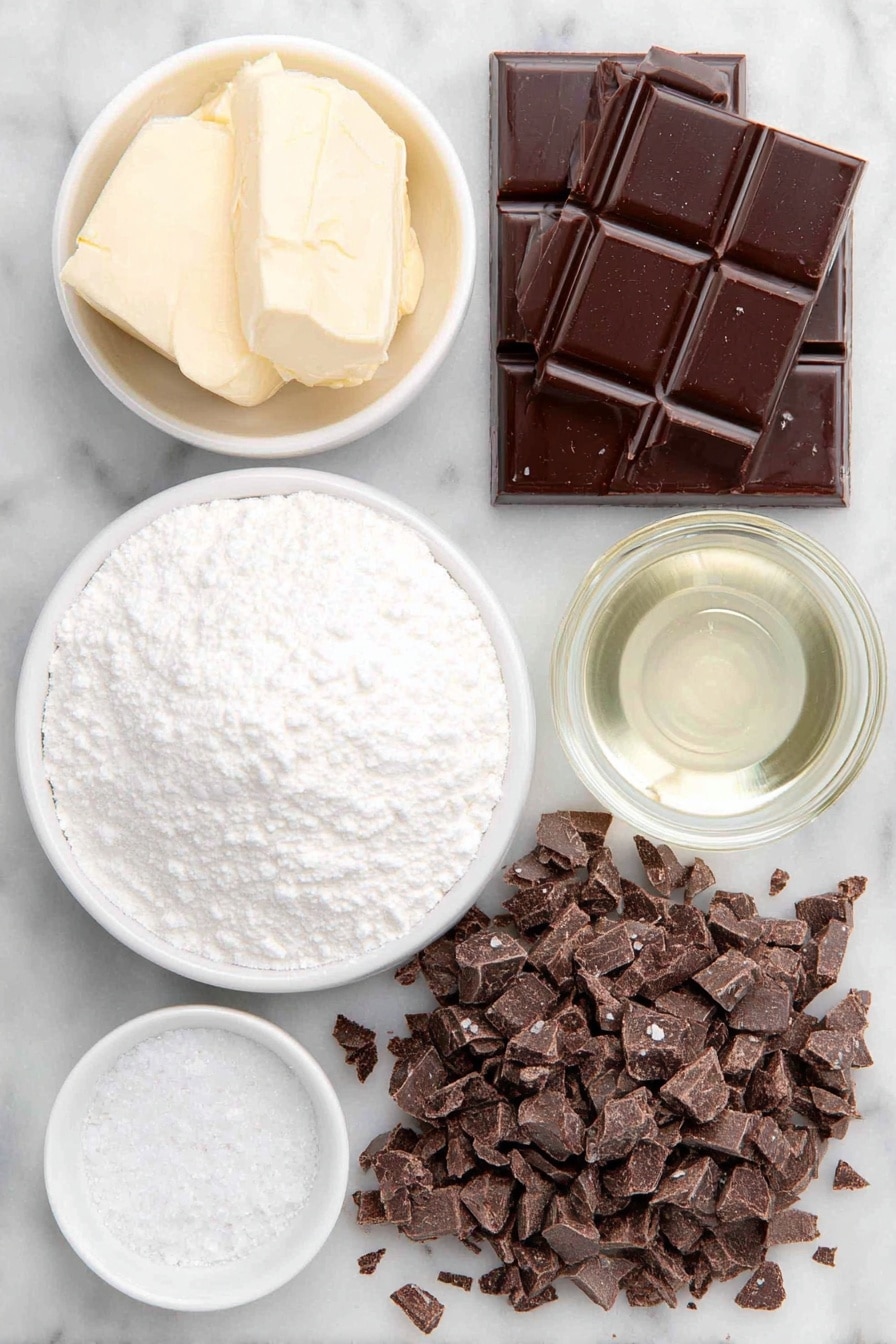
- Unsalted butter: Softened to room temperature to blend easily without lumps.
- Creamy peanut butter: Make sure it’s not the natural kind; creamy and smooth peanut butter helps the mixture stick and taste perfect.
- Confectioners’ sugar: Adds just the right sweetness and helps the candy hold its shape.
- Pure vanilla extract: Enhances the flavors—don’t skip it!
- Salt: Just a pinch to balance the sweetness and amplify the peanut butter flavor.
- Semi-sweet chocolate bars: Coarsely chopped for melting — I find bars melt more evenly than chips.
- Vegetable oil: Helps create a silky smooth chocolate coating, making dipping easier.
- Optional: Coarse sea salt or sprinkles: For a beautiful finishing touch that adds just a hint of contrast.
Variations
I love mixing things up depending on who I’m making these Easter Egg Peanut Butter Candies for. Feel free to customize—you’re going to find that small tweaks make a big impact and keep the recipe fun and fresh.
- Nut Butter Swap: I once tried almond butter instead of peanut butter for a milder yet rich flavor, and the family adored it! Just pick a creamy type to ensure the candies hold together well.
- Chocolate Choices: Using dark chocolate gives a more intense bite, while milk chocolate yields a sweeter, smoother coating. I switch it up based on my mood or the season.
- Diet-Friendly: For a dairy-free version, use vegan butter and dairy-free chocolate. The texture changes slightly, but it’s still a huge crowd-pleaser.
- Toppings: Try crushed nuts, mini sprinkles, or even a dusting of cocoa powder instead of salt for a unique flavor twist.
How to Make Easter Egg Peanut Butter Candies Recipe
Step 1: Cream the Butter and Peanut Butter
Start by beating the softened butter on medium-high speed until it’s smooth and creamy – about two minutes if you use a stand mixer, or a little longer by hand. Add the peanut butter and keep mixing until everything is well combined. Don’t stress if you see a few lumps at this point; they usually melt away as you keep blending.
Step 2: Add Sugar, Vanilla, and Salt
Turn the mixer down to low and gradually add the confectioners’ sugar, vanilla extract, and a pinch of salt. Mix for a couple of minutes until everything comes together in a soft, slightly crumbly mixture. This is the peanut butter filling that makes these candies so dreamy.
Step 3: Shape Your Peanut Butter Eggs
Now comes the fun part—rolling the filling into those cute little Easter egg shapes! Scoop about 1.5 tablespoons of the mixture, roll it into a ball, then gently flatten and pinch one end to form an egg-like oval around ¾ inch thick. I often find that if the mixture sticks too much or feels too soft, giving your hands a light dusting of confectioners’ sugar helps immensely. If the filling gets too warm, pop it in the fridge for 15 minutes to firm up before proceeding.
Step 4: Chill Before Coating
Arrange your formed peanut butter eggs on a parchment-lined baking sheet and chill them for at least one hour, or up to a day if you want to prep ahead. This step is crucial—it firms up the filling so when you dip them in chocolate, they keep their shape beautifully.
Step 5: Melt Chocolate and Dip
Melt your semi-sweet chocolate bars with the vegetable oil either over a double boiler or in the microwave in short bursts (20 seconds at a time), stirring often. Let the melted chocolate cool for a few minutes so it’s warm but won’t soften your peanut butter eggs when dipping. Working with one egg at a time, submerge it fully in chocolate, then lift it out with a fork, tapping gently to remove excess chocolate. Use a toothpick or another fork to carefully slide the coated candy back onto the parchment-lined baking sheet.
Step 6: Add Your Finishing Touches
If you have leftover chocolate, drizzle it artistically over the eggs, or sprinkle coarse sea salt or festive sprinkles while the chocolate is still wet to add that professional touch. Finally, chill the candies for about 30 minutes, or until the chocolate hardens completely, and boom—you’re ready to enjoy.
Pro Tips for Making Easter Egg Peanut Butter Candies Recipe
- Use Creamy (Not Natural) Peanut Butter: I learned the hard way that natural peanut butter doesn’t set well; creamy gives you the perfect consistency for shaping.
- Chill Between Steps: Keeping the peanut butter eggs chilled before and during dipping helps them keep their shape and prevents melting.
- Be Patient With Chocolate: Let melted chocolate cool slightly before dipping to avoid losing the egg shapes.
- Don’t Overwork the Filling: The mixture might feel crumbly at first—that’s normal! The warmth of your hands will smooth it out without overmixing.
How to Serve Easter Egg Peanut Butter Candies Recipe
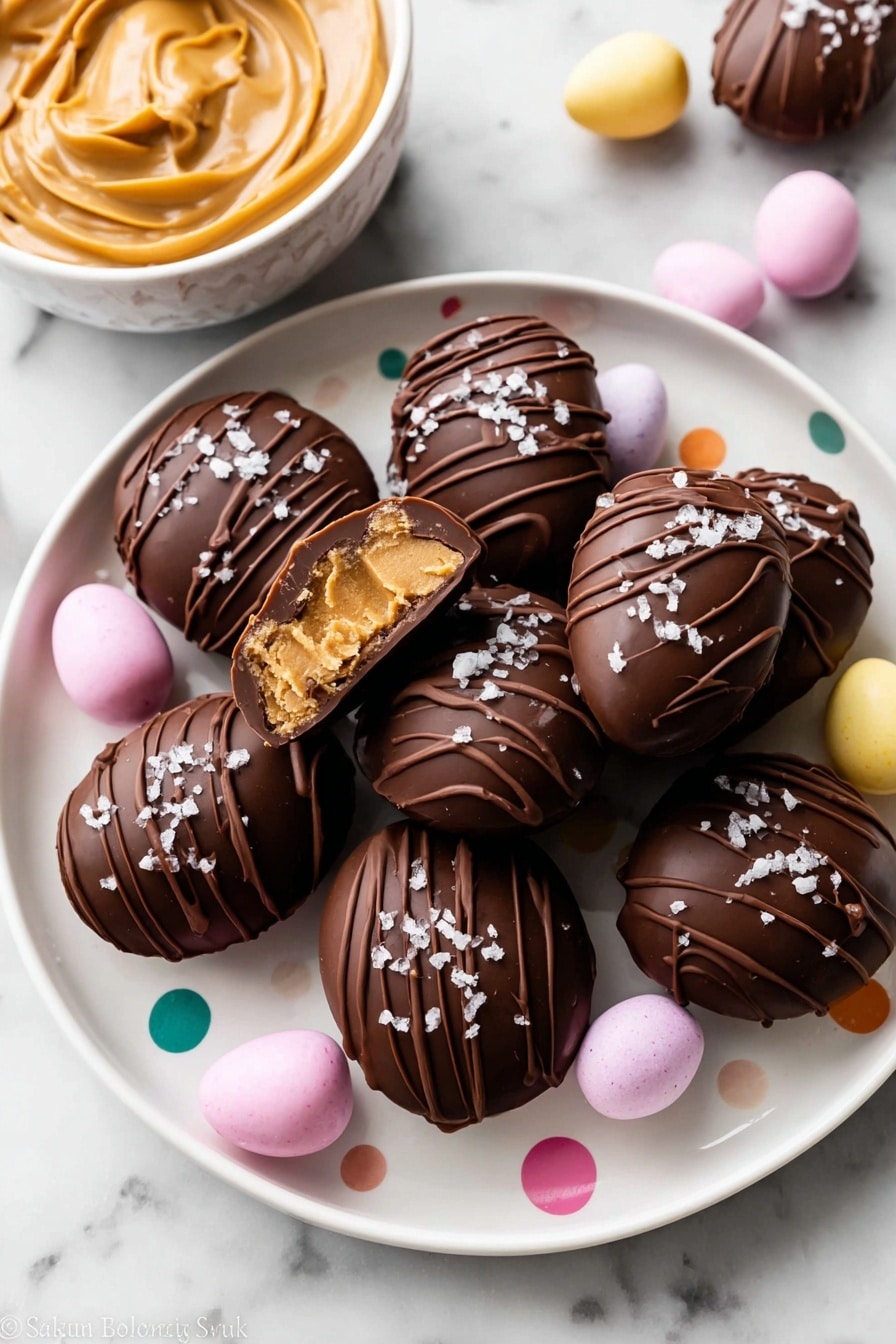
Garnishes
I’m a big fan of sprinkling just a tiny pinch of flaky sea salt atop each candy right after dipping. It adds a pop of flavor and looks great too. When I’m in a festive mood, I use colorful mini sprinkles for a cheerful Easter vibe that kids especially love.
Side Dishes
While these candies stand perfectly on their own, I often pair them with a light spring fruit salad or a simple cup of coffee or tea to balance that rich peanut butter and chocolate flavor. They’re also a hit alongside vanilla ice cream for an indulgent dessert.
Creative Ways to Present
For Easter or gift-giving, I love wrapping these candies in colorful cellophane bags tied with pastel ribbons. Another fun idea is placing them in decorative treat boxes with shredded paper or crinkle-cut paper grass for that “Easter basket” feel. If you’re hosting a party, arrange them on tiered dessert stands to make the display extra special.
Make Ahead and Storage
Storing Leftovers
My go-to way is to layer these candies between sheets of parchment paper in an airtight container kept in the refrigerator. They stay fresh and firm for up to two weeks. I usually remind myself not to leave them out too long or they can get a bit soft — I personally think they taste best when chilled or even slightly frozen.
Freezing
Yep, these freeze beautifully! I freeze mine in a single layer on a baking sheet first, then transfer them to a freezer-safe container. When I want a quick treat, I just grab a couple from the freezer—they have a lovely firm texture that’s almost like peanut butter fudge straight from the chilly depths.
Reheating
No need to “reheat” really—just let frozen candies sit at room temperature for 5-10 minutes before eating to soften slightly, or enjoy them cold for that satisfying snap! If the chocolate gets a bit dull or whitish, just let them warm gently in your hands or fridge to revive that glossy finish.
FAQs
-
Can I use natural peanut butter for the Easter Egg Peanut Butter Candies Recipe?
Natural peanut butter generally contains more oil and less stabilizers, so the candies won’t hold their shape well. I recommend using creamy, processed peanut butter for the best texture and stability.
-
Why does the peanut butter candy mixture sometimes feel crumbly?
The mixture may feel crumbly because confectioners’ sugar can dry it out slightly. Don’t worry, the warmth of your hands when shaping the eggs, or chilling the mixture, helps it come together nicely.
-
How do I prevent the chocolate coating from melting the peanut butter filling?
Make sure to let the melted chocolate cool for several minutes before dipping. Also, keep the peanut butter eggs well chilled just before dipping so they don’t soften or lose shape when they meet the warm chocolate.
-
Can I make these candies ahead of time?
Absolutely! You can make the filling and shape the eggs a day in advance, then dip in chocolate right before serving or gifting. They store well refrigerated for up to two weeks.
Final Thoughts
I absolutely love how this Easter Egg Peanut Butter Candies Recipe brings together simple pantry ingredients into something truly special—and I bet you will too. It’s perfect for making with kids, gifting to loved ones, or just keeping on hand for whenever you need a little chocolate-peanut butter fix. Give it a try; I promise you’ll be hooked from the very first bite!
Print
Easter Egg Peanut Butter Candies Recipe
- Prep Time: 1 hr 30 min
- Cook Time: 30 min
- Total Time: 2 hr
- Yield: 18 candies
- Category: Dessert
- Method: No-Cook
- Cuisine: American
Description
Delightfully rich and creamy Easter Egg Peanut Butter Candies featuring a smooth peanut butter filling coated in decadent semi-sweet chocolate, perfect for festive celebrations or anytime sweet cravings strike.
Ingredients
Peanut Butter Filling
- 6 Tablespoons (85g) unsalted butter, softened to room temperature
- 1 cup (250g) creamy peanut butter (not natural style)
- 2 and 1/2 cups (300g) confectioners’ sugar
- 1/2 teaspoon pure vanilla extract
- 1/8 teaspoon salt
Chocolate Coating
- 12 ounces (3 4-ounce bars) semi-sweet chocolate bars (339g), coarsely chopped
- 1 teaspoon vegetable oil
- Optional: coarse sea salt or flaky sea salt, for topping
Instructions
- Prepare baking sheet: Line a large baking sheet with parchment paper or a silicone baking mat. Set aside to make candy assembly easier and prevent sticking.
- Make peanut butter filling: Using a handheld or stand mixer with a paddle attachment, beat the softened butter on medium-high speed until creamy and smooth, about 2 minutes. Add the creamy peanut butter and beat until combined, about 1 minute. Then add confectioners’ sugar, vanilla extract, and salt, and beat on low speed for 2 minutes until fully combined, resulting in a slightly soft and crumbly mixture.
- Shape peanut butter eggs: Measure about 1.5 tablespoons (29 grams) of the peanut butter mixture, roll it into a ball, then flatten and shape into an egg about 3/4 inch thick by narrowing one end with fingers. Place on the prepared baking sheet. Repeat with the remaining mixture. If the mixture is too soft to handle, chill for 15 minutes or powder hands with confectioners’ sugar to reduce stickiness.
- Chill shaped eggs: Refrigerate the shaped peanut butter eggs for at least 1 hour, up to 1 day, to firm them before coating.
- Melt chocolate coating: Near the end of chilling, melt the semi-sweet chocolate and vegetable oil together using a double boiler or microwave in 20-second increments, stirring well each time until smooth. Let the melted chocolate cool for 6–8 minutes before use.
- Dip eggs in chocolate: Remove the chilled peanut butter eggs and, one at a time, submerge them fully into the melted chocolate. Lift gently with a fork, tap off excess chocolate, and transfer to the lined baking sheet. If eggs soften during dipping, refrigerate for 5–10 minutes before continuing.
- Add optional toppings and drizzle: If desired, sprinkle coarse or flaky sea salt or festive sprinkles over the wet chocolate. Use leftover melted chocolate to drizzle decoratively over the candies.
- Set the coating: Refrigerate coated candies for 30 minutes or until chocolate has completely set before serving.
- Store candies: Layer the finished candies between sheets of parchment or wax paper in an airtight container. Store in the refrigerator for up to 2 weeks. Candies taste best chilled or even slightly frozen.
Notes
- Use creamy peanut butter (not natural style) for smooth texture and flavor in the filling.
- Chilling the peanut butter shapes is essential to maintain their form while dipping in chocolate.
- Melting the chocolate gently in short bursts prevents burning and keeps it smooth for dipping.
- Optional coarse sea salt adds a pleasant contrast to the sweetness.
- Store candies in the refrigerator to maintain firmness and freshness.
Nutrition
- Serving Size: 1 candy (approx. 28g)
- Calories: 150
- Sugar: 16g
- Sodium: 55mg
- Fat: 9g
- Saturated Fat: 3g
- Unsaturated Fat: 6g
- Trans Fat: 0g
- Carbohydrates: 15g
- Fiber: 1g
- Protein: 4g
- Cholesterol: 10mg


