
If you’re looking for the perfect little treat that feels indulgent but won’t leave you with a giant cake to finish, I’ve got just the thing for you: my Cream Cheese Mini Cheesecakes Recipe. These bite-sized delights are creamy, tangy, and just the right amount of sweet — all wrapped up in a buttery graham cracker crust. Whether you’re serving them at a party or satisfying a sweet craving, they’re super easy to make and impossible to resist. Keep reading and I’ll share all my best tips so your mini cheesecakes turn out perfectly every time!
Why You’ll Love This Recipe
- Perfect Portion Size: You get a dozen bite-sized cheesecakes, so no guilt or waste—and everyone can grab their favorite topping.
- Creamy & Tangy Filling: The combination of cream cheese, sour cream, and lemon juice creates that classic cheesecake tang you’ll crave.
- Simple Ingredients: Pantry staples you probably already have, making it a quick and fuss-free dessert.
- Water Bath Trick: My personal twist to keep these minis super smooth and crack-free every time.

Ingredients You’ll Need
The ingredients here come together beautifully to create that classic cheesecake flavor and texture — creamy filling on a buttery, crumbly crust. When shopping, choose a good quality cream cheese and fresh eggs at room temperature for the best results.
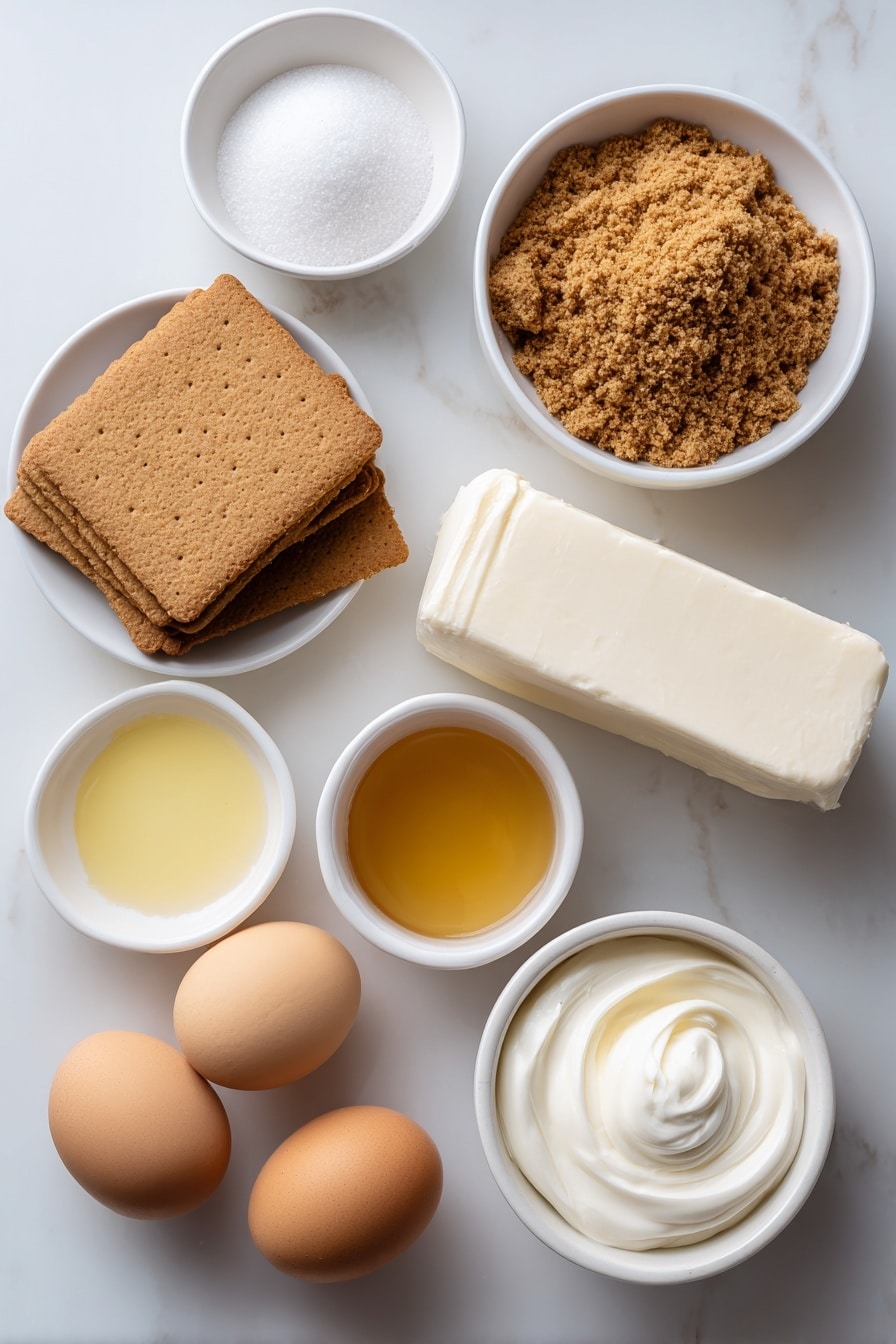
- Graham Cracker Crumbs: Use fresh crumbs for a crunchy, buttery crust; you can crush your own from full sheets for maximum flavor.
- Granulated Sugar: Split between crust and filling for just the right balance of sweetness without overpowering the tang.
- Unsalted Butter: Melted butter helps bind the crust together and adds richness—you want unsalted so you control the saltiness.
- Full-Fat Brick Cream Cheese: The star of the recipe—make sure it’s softened to room temp for the smoothest batter.
- Full-Fat Sour Cream: Adds moisture and keeps the cheesecake incredibly creamy and velvety.
- Pure Vanilla Extract: Just a touch to enhance the flavors.
- Freshly Squeezed Lemon Juice: Brings that subtle zing to balance the sweetness perfectly.
- Large Eggs: At room temperature so they blend smoothly without curdling the batter.
Variations
I love that this Cream Cheese Mini Cheesecakes Recipe is super adaptable—you can make it your own by adding flavors or experimenting with crust options. Feel free to get creative once you have the base down.
- Berry Swirl: Gently fold in fresh berry puree or swirl jam into the batter before baking; my family goes crazy for this fruity twist.
- Chocolate Crust: Swap graham cracker crumbs for crushed chocolate cookies for a richer crust experience.
- Lemon Zest: Add extra lemon zest to the filling for a bright, refreshing flavor that’s perfect in spring and summer.
- Dairy-Free Version: I’ve tried using vegan cream cheese and coconut sour cream for a dairy-free option; results were surprisingly good!
How to Make Cream Cheese Mini Cheesecakes Recipe
Step 1: Prepare the Crust and Preheat
Start by preheating your oven to 350°F (177°C) and lining your 12-count muffin pan with good-quality cupcake liners — they make cleanup a breeze and help keep the crust perfectly shaped. Mix the graham cracker crumbs, sugar, and melted butter until sandy and moist. I like to firmly press about a heaping tablespoon of this mixture into each liner — this step is key for a sturdy base that won’t crumble when you bite in. Pop them in the oven for around 6 minutes to set the crust before adding the filling. This little pre-bake really elevates the texture.
Step 2: Whip Up the Creamy Filling
Using a handheld or stand mixer (I always use my paddle attachment), beat the softened cream cheese and sugar on medium-high speed for about 2 full minutes — this is what gets your filling super silky, with no lumps. Then, add the sour cream, vanilla, and lemon juice, mixing just until combined. Now, with the mixer running at medium speed, add the eggs one at a time. The trick here is not to over-mix after adding eggs—you want everything smooth, but too much mixing can create cracks when baking. Trust me, this little detail saved my cheesecakes multiple times!
Step 3: Fill and Bake Your Mini Cheesecakes
Fill each liner all the way to the top with your luscious batter — it’s okay if the crust still feels warm. Now, here’s a trick I discovered: instead of the traditional water bath where the pan sits in water, place a roasting pan filled with a inch of boiling water on the bottom rack of your oven. Set the cheesecakes on the middle rack above it and bake for about 20 minutes. This steaming effect prevents cracking and sinking, and leaves the centers with a delicate jiggle you want in a perfect cheesecake. If you skip this, expect just a tiny bit more sinking, but still delicious.
Step 4: Cooling and Chilling
Once baked, set the pan on a cooling rack for about 45 minutes at room temp. Then transfer to the fridge to chill for at least 2 hours, or up to 24 hours if you have the patience — chilling really lets flavors meld and texture set. In a pinch, popping them in the freezer for one hour speeds this up nicely! If chilling for longer than 2 hours, loosely cover the cheesecakes to keep them fresh. From personal experience, I’ve found the texture is best if you don’t rush this step!
Pro Tips for Making Cream Cheese Mini Cheesecakes Recipe
- Room Temperature Ingredients: I always let my cream cheese, sour cream, and eggs sit out before mixing—it helps create a lump-free, silky batter.
- Don’t Overmix After Eggs: Over-beating once eggs are added incorporates too much air, which can cause cracks; just mix until combined.
- Press Crust Firmly: Pressing the graham crust firmly into liners ensures your minis hold together once baked—it’s a total game-changer.
- Use a Water Bath for Moisture: My “oven steam” method with hot water below keeps cheesecakes crack-free without soggy crusts like traditional baths sometimes cause.
How to Serve Cream Cheese Mini Cheesecakes Recipe
Garnishes
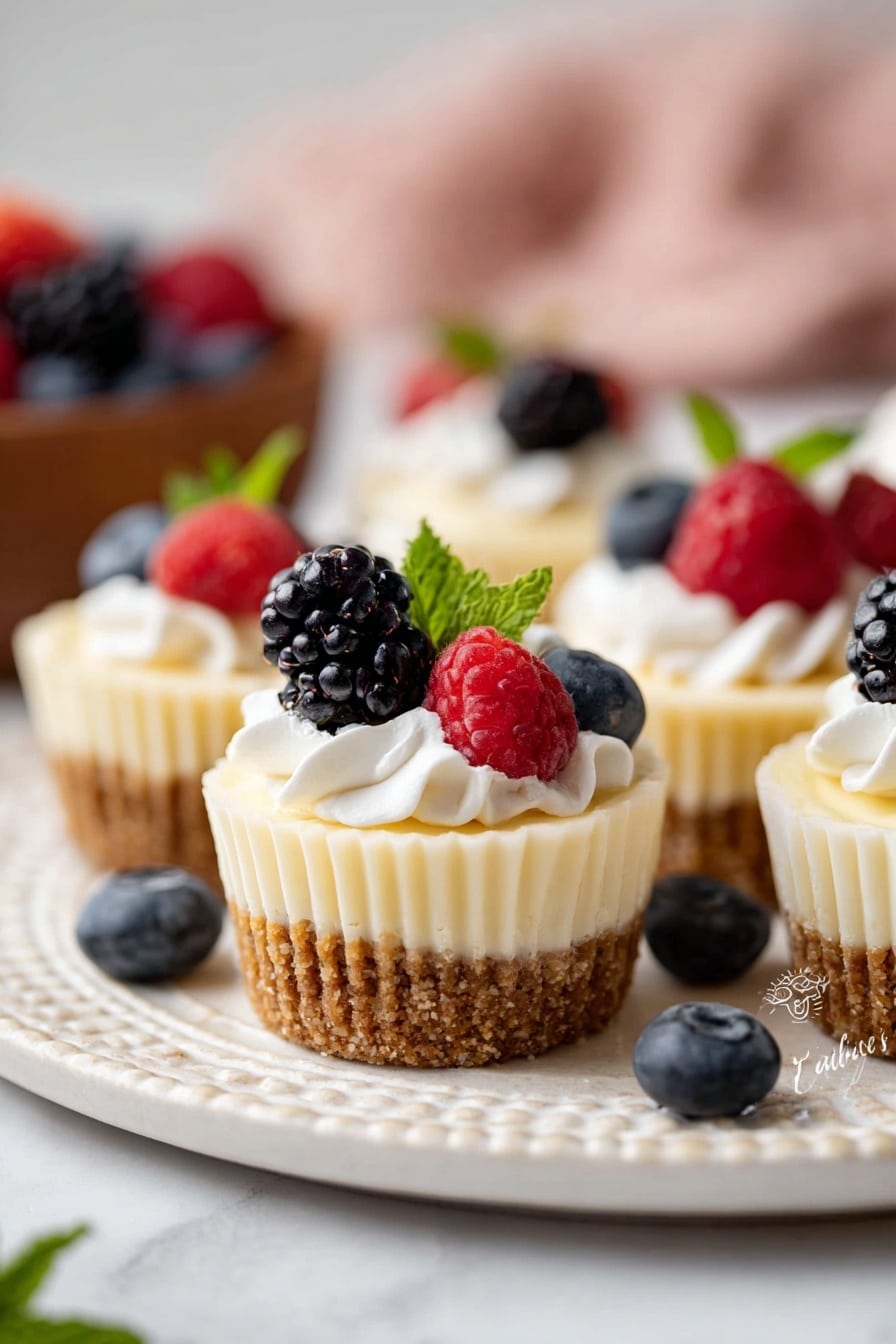
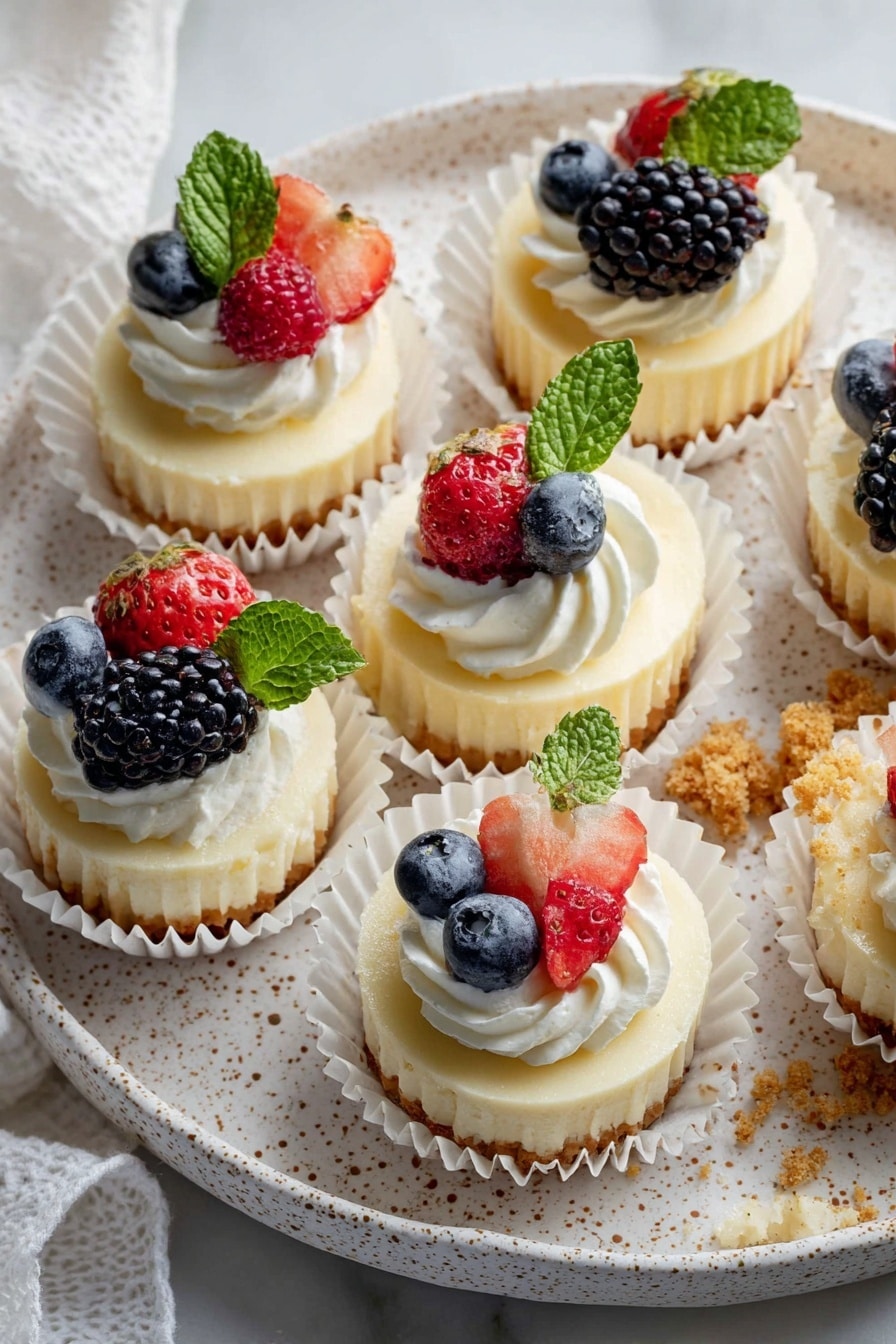
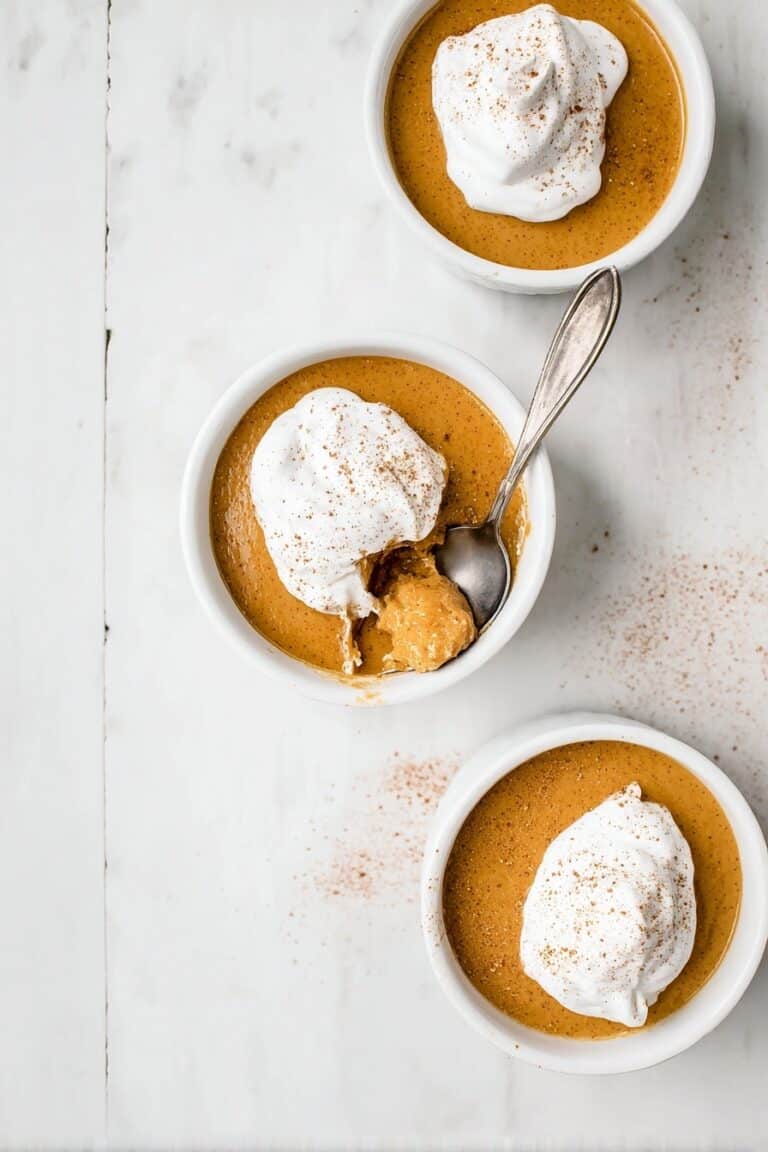
I like to keep things simple but elegant when serving. A small dollop of freshly whipped cream with a sprinkle of fresh berries (blueberries, raspberries, or sliced strawberries) and a sprig of mint takes these mini cheesecakes from tasty to show-stopper. Sometimes, I’ll drizzle a little berry compote or chocolate ganache for decadence. Trust me, these simple touches make a big impression without adding much work.
Side Dishes
Since these mini cheesecakes feel like dessert in itself, I often serve them alongside a light fruit salad or a crisp cup of coffee or tea. If you’re hosting a larger spread, a bowl of lemon sorbet or a fruit tart pairs beautifully to balance the creamy richness.
Creative Ways to Present
For parties or special occasions, I’ve piped whipped cream with a star tip around the edges to give them a fancy touch. Setting them on a tiered dessert stand or in pretty cupcake wrappers elevates the presentation instantly—makes guests feel like they’re indulging in something truly special. Also, topping with edible flowers is a fun, fresh idea I recently tried with rave reviews.
Make Ahead and Storage
Storing Leftovers
Once your mini cheesecakes are fully chilled, cover them loosely with plastic wrap or keep them in an airtight container in the fridge. They’ll stay fresh and delicious for up to 5 days — plenty of time to enjoy them little by little or share with friends.
Freezing
I’ve frozen these mini cheesecakes before by placing them in a single layer on a baking sheet, freezing until firm, then transferring to a freezer-safe container. They freeze well for up to 2 months. When you’re ready, just thaw overnight in the fridge and they’re as good as fresh—perfect for prepping ahead of a big event!
Reheating
Because cheesecakes are best served chilled, I avoid reheating, but if you want them slightly softer, let them sit at room temperature for 10-15 minutes before serving. This subtle warming unlocks flavors without losing that rich creamy texture.
FAQs
-
Can I use low-fat cream cheese for this Cream Cheese Mini Cheesecakes Recipe?
You can, but I recommend full-fat cream cheese for the best creamy texture and rich flavor. Low-fat versions tend to make the filling less smooth and might cause cracking or a less satisfying mouthfeel.
-
Why do my mini cheesecakes crack, and how can I prevent it?
Cracking usually happens when there’s too much air whipped into the batter or rapid temperature changes in the oven. To prevent this, don’t overmix after adding eggs, and use the water bath method I described to gently bake the cheesecakes with steam, which keeps them moist and crack-free.
-
Can I make these mini cheesecakes without cupcake liners?
Yes, but the liners make removal easier and help keep the crust intact. If you skip liners, make sure to grease your muffin pan well to prevent sticking.
-
How long do mini cheesecakes take to bake?
They bake for about 20 minutes at 350°F (177°C), until the edges are set and the centers have a slight jiggle. Overbaking can dry them out, so keep a close eye near the end.
-
Can I double this recipe for more servings?
Absolutely! Just double the ingredients and bake in multiple muffin pans as needed. The baking time should remain about the same, but watch for doneness as oven times may vary with quantity.
Final Thoughts
I absolutely love how this Cream Cheese Mini Cheesecakes Recipe has become a go-to in my kitchen. They’re simple to make, deliver that classic cheesecake flavor, and are perfect for sharing or treating yourself without leftovers piling up. When I first tried mini cheesecakes, I struggled with cracks and sinking centers, but thanks to the water bath trick and these tips, I’m proud to say these are reliably smooth and rich every time. I can’t wait for you to try them and make this recipe your own—enjoy every creamy, dreamy bite!
Print
Cream Cheese Mini Cheesecakes Recipe
- Prep Time: 20 minutes
- Cook Time: 20 minutes
- Total Time: 3 hours 15 minutes
- Yield: 12 mini cheesecakes
- Category: Dessert
- Method: Baking
- Cuisine: American
Description
These Mini Cheesecakes are a perfectly portioned, creamy dessert baked in a standard 12-count muffin pan. Featuring a buttery graham cracker crust and a smooth, rich cream cheese filling, they’re ideal for gatherings or personal indulgence. The recipe includes an optional water bath method to prevent cracking and sinking, ensuring a velvety texture and beautiful presentation. Easy to make and store, these cheesecakes can be garnished with whipped cream, berries, or mint for extra flair.
Ingredients
Crust
- 1 cup (120g) graham cracker crumbs (about 8 full sheet graham crackers)
- 2 Tablespoons (25g) granulated sugar
- 3 Tablespoons (43g) unsalted butter, melted
Filling
- 16 ounces (452g) full-fat brick cream cheese, softened to room temperature
- 1/2 cup (100g) granulated sugar
- 1/4 cup (60g) full-fat sour cream, at room temperature
- 1 teaspoon pure vanilla extract
- 1 teaspoon freshly squeezed lemon juice
- 2 large eggs, at room temperature
Instructions
- Prepare the oven and pan: Preheat the oven to 350°F (177°C). Line a standard 12-count muffin pan with cupcake liners to ensure easy removal and cleanup.
- Make the crust: In a medium bowl, combine graham cracker crumbs, granulated sugar, and melted butter until the mixture is sandy and evenly moistened. Firmly press about a heaping tablespoon of this crust mixture into each cupcake liner to form a base.
- Bake the crust: Place the muffin pan with the crusts into the preheated oven and bake for 6 minutes. This pre-baking helps set the crust before adding the filling.
- Mix the filling: Using a handheld or stand mixer with a paddle or whisk attachment, beat the room temperature cream cheese and granulated sugar on medium-high speed in a large bowl for about 2 minutes until smooth and creamy. Add the sour cream, lemon juice, and vanilla extract, beating until fully combined.
- Add eggs carefully: With the mixer running on medium speed, add the eggs one at a time, beating just until combined after each egg to avoid overmixing which can cause cracks or sinking.
- Fill the crusts: Divide the batter evenly among the prepared crust-lined muffin cups, filling each one to the top. Don’t worry if the crusts are still warm from baking.
- Optional water bath setup: To minimize sinking and cracking, boil a pot of water and pour about one inch of the boiling water into a large metal roasting pan (approximately 9×13 inches). Place this pan on the bottom rack of the oven. Immediately place the muffin pan with cheesecakes on the center rack, so the steam surrounds them without the pans touching the water.
- Bake the cheesecakes: Bake in the oven until the edges are set but centers still slightly jiggle when tapped, approximately 20 minutes.
- Cool and chill: Remove the pan from the oven and set it on a cooling rack. Allow cheesecakes to cool at room temperature for 45 minutes. Then refrigerate for at least 2 hours, or up to 24 hours, to fully set. To speed up chilling, place in the freezer for 1 hour.
- Optional decorating: For presentation, pipe whipped cream on top using a Wilton 1M tip and garnish with berries or fresh mint as desired. Whipped cream can be prepared and applied up to 24 hours ahead. Keep decorated cheesecakes refrigerated until serving.
- Storage: Store any leftover mini cheesecakes covered in the refrigerator for up to 5 days to maintain freshness.
Notes
- Use a standard 12-count muffin pan for perfect mini cheesecakes sized for portion control.
- For even smaller cheesecakes, use a mini muffin pan but adjust baking time accordingly (shorter bake).
- The optional water bath technique adds steam to prevent cracking and sinking but is not mandatory; skipping it is fine.
- Allow cheesecakes to come fully to room temperature before refrigerating to avoid condensation.
- Whipped cream toppings can be piped ahead and stored refrigerated for up to 24 hours.
- Store leftover cheesecakes in an airtight container in the refrigerator for up to 5 days.
Nutrition
- Serving Size: 1 mini cheesecake
- Calories: 280
- Sugar: 18g
- Sodium: 150mg
- Fat: 20g
- Saturated Fat: 12g
- Unsaturated Fat: 7g
- Trans Fat: 0g
- Carbohydrates: 18g
- Fiber: 0.5g
- Protein: 5g
- Cholesterol: 75mg


