
If you’re looking for a dessert that’s creamy, dreamy, and just a little bit nostalgic, then you’re going to adore this Cream Cheese Banana Pudding Recipe. It’s one of those recipes I keep coming back to because it’s simple yet feels special, and every bite is like a hug in a bowl. Whether you’re making it for a family dinner or just because you need a little sweet pick-me-up, this pudding will not disappoint. Keep reading—I’m sharing all my favorite tips to make sure it turns out perfectly every time!
Why You’ll Love This Recipe
- Rich and Creamy Texture: The cream cheese adds a velvety smoothness that makes this pudding irresistible.
- No-Cook Convenience: It comes together quickly without needing any baking or stovetop fuss.
- Nostalgic Flavor Combo: Classic Nilla wafers and bananas make this a beloved crowd-pleaser.
- Make-Ahead Friendly: You can prep it a few hours early, which means less stress when guests arrive.

Ingredients You’ll Need
I love how these few simple ingredients come together to create something that feels indulgent yet comforting. The cream cheese is the secret ingredient that makes the texture luxuriously creamy, while the instant pudding mix and sweetened condensed milk give it just the right level of sweetness and body. Fresh bananas and Nilla wafers tie it all together with classic flavors you can’t resist.
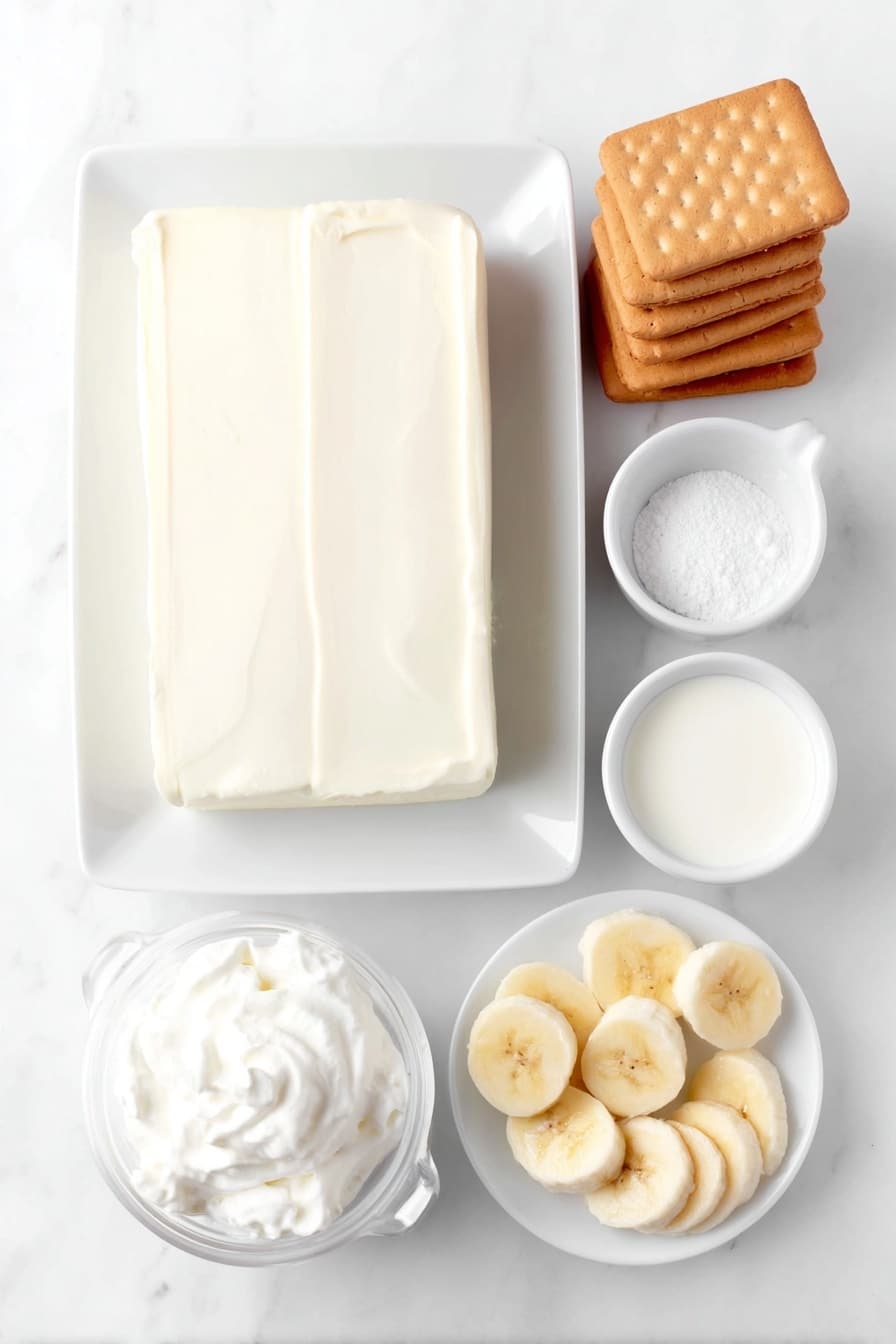
- Cream Cheese: Make sure it’s softened to room temperature for the smoothest blend.
- Sweetened Condensed Milk: Adds creamy sweetness; don’t substitute evaporated milk here.
- Instant Vanilla Pudding Mix: This gives the pudding structure and that classic vanilla flavor.
- Milk (2% or higher): Using richer milk enhances the texture—skim won’t give you the same creaminess.
- Vanilla Extract: A little boost of real vanilla makes a big difference.
- Whipped Topping (Cool Whip): Adds lightness and fluffiness to balance the richness.
- Nilla Wafers: These are the nostalgic crunch I keep coming back for.
- Bananas: Use ripe but firm bananas so they hold up well during layering.
Variations
One of the best things about this Cream Cheese Banana Pudding Recipe is how easy it is to customize. I often tweak it depending on what I have on hand or the occasion. You can switch out flavors, adjust sweetness, or add a crunchy twist—it’s all about making it your own.
- Use Chocolate Pudding: I tried swapping vanilla for chocolate once, and it was a game changer for my chocolate-loving family.
- Gluten-Free Version: Swap Nilla wafers for gluten-free cookies, and nobody will know the difference.
- Extra Fruit: Try adding strawberries or blueberries for a fresh burst—just layer them alongside the bananas.
- Salted Caramel Drizzle: I once topped it with a bit of salted caramel sauce for a grown-up twist that disappeared fast.
How to Make Cream Cheese Banana Pudding Recipe
Step 1: Whip the Cream Cheese Until Fluffy
Start by beating your softened cream cheese with an electric mixer on medium speed. The key here is to get it completely smooth and fluffy—no lumps allowed! This step ensures your pudding will be silky and light rather than dense. I like to scrape down the sides of my bowl a couple of times to make sure everything blends evenly.
Step 2: Add Your Sweet Ingredients and Mix
Next, pour in the sweetened condensed milk, instant pudding mix, milk, and vanilla extract. Mix everything again until it’s completely combined and smooth. You’ll notice the mixture thickening as the pudding mix dissolves. This base is luscious and sweet but balanced by the tang from the cream cheese.
Step 3: Fold in Half of the Whipped Topping
Now gently stir in half of the whipped topping with a spatula. Be careful not to overmix—you want to keep it airy so your pudding doesn’t turn too dense. This gives the dessert that light, fluffy mouthfeel that makes it impossible to stop eating.
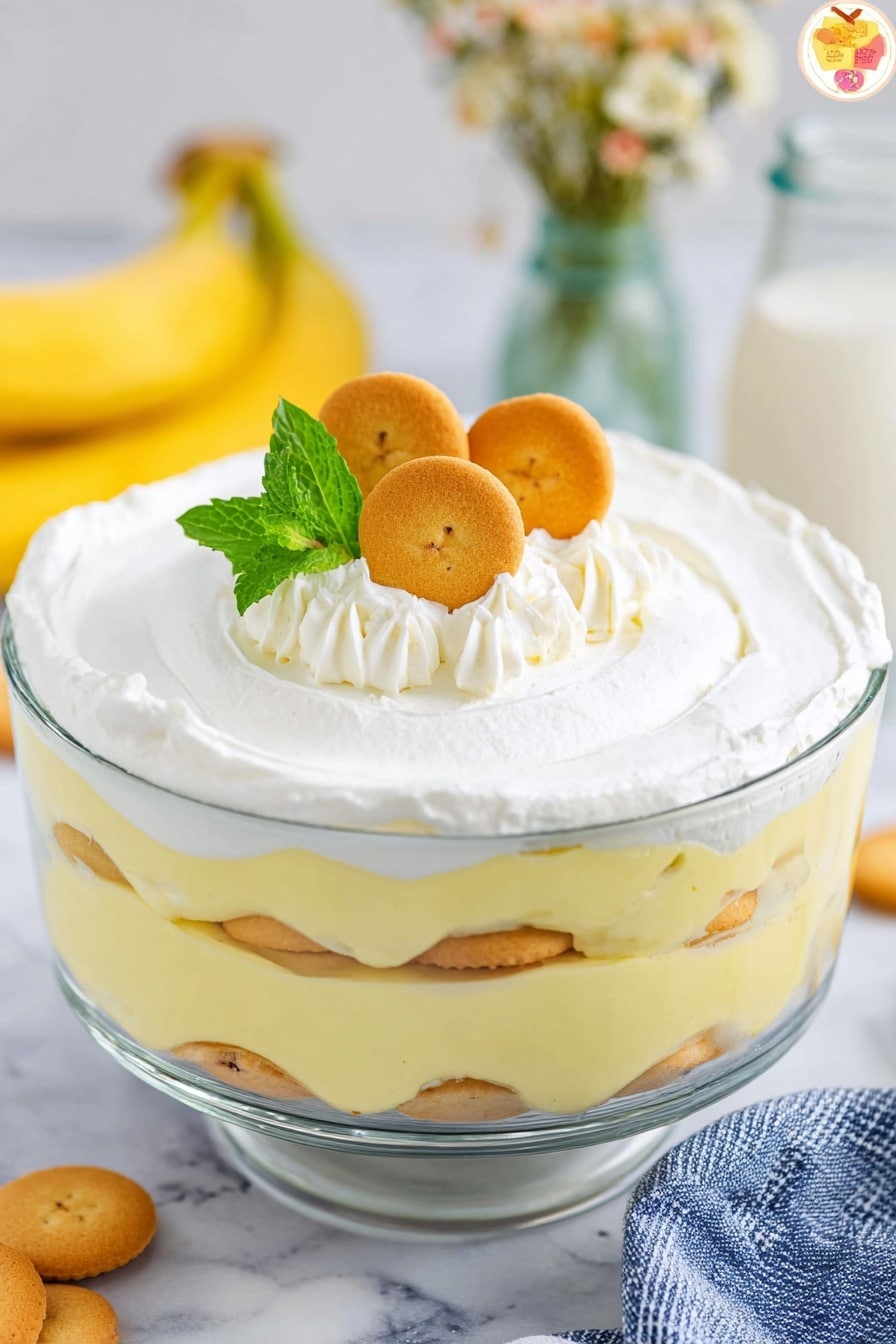
Step 4: Layer Your Pudding, Bananas, and Nilla Wafers
Time for the fun part! In a 9×13-inch dish, start with a layer of Nilla wafers, about a third of them to cover the bottom. Then add a single layer of sliced bananas, followed by a generous pour of one-third of your pudding mixture—spread it so it covers all the bananas. Repeat these layers two more times. This layering both looks gorgeous and delivers every flavor in every bite.
Step 5: Finish with Whipped Topping and Chill
Spread the remaining whipped topping evenly over the top. Cover your pudding tightly with plastic wrap and pop it in the fridge for at least 1-2 hours. This chilling time is crucial—it lets the pudding thicken up and the wafers soften just enough to become melt-in-your-mouth perfect without sogginess.
Pro Tips for Making Cream Cheese Banana Pudding Recipe
- Soften Cream Cheese Properly: Leaving cream cheese out for 30-60 minutes before beating helps it incorporate smoothly without lumps.
- Slice Bananas Just Before Layering: This prevents browning and keeps your pudding looking fresh and inviting.
- Don’t Skip the Chill Time: The pudding needs that rest period to develop its iconic texture—trust me, it’s worth the wait!
- Cover Tightly with Plastic Wrap: Press the wrap lightly onto the top surface to prevent a skin from forming on the pudding.
How to Serve Cream Cheese Banana Pudding Recipe
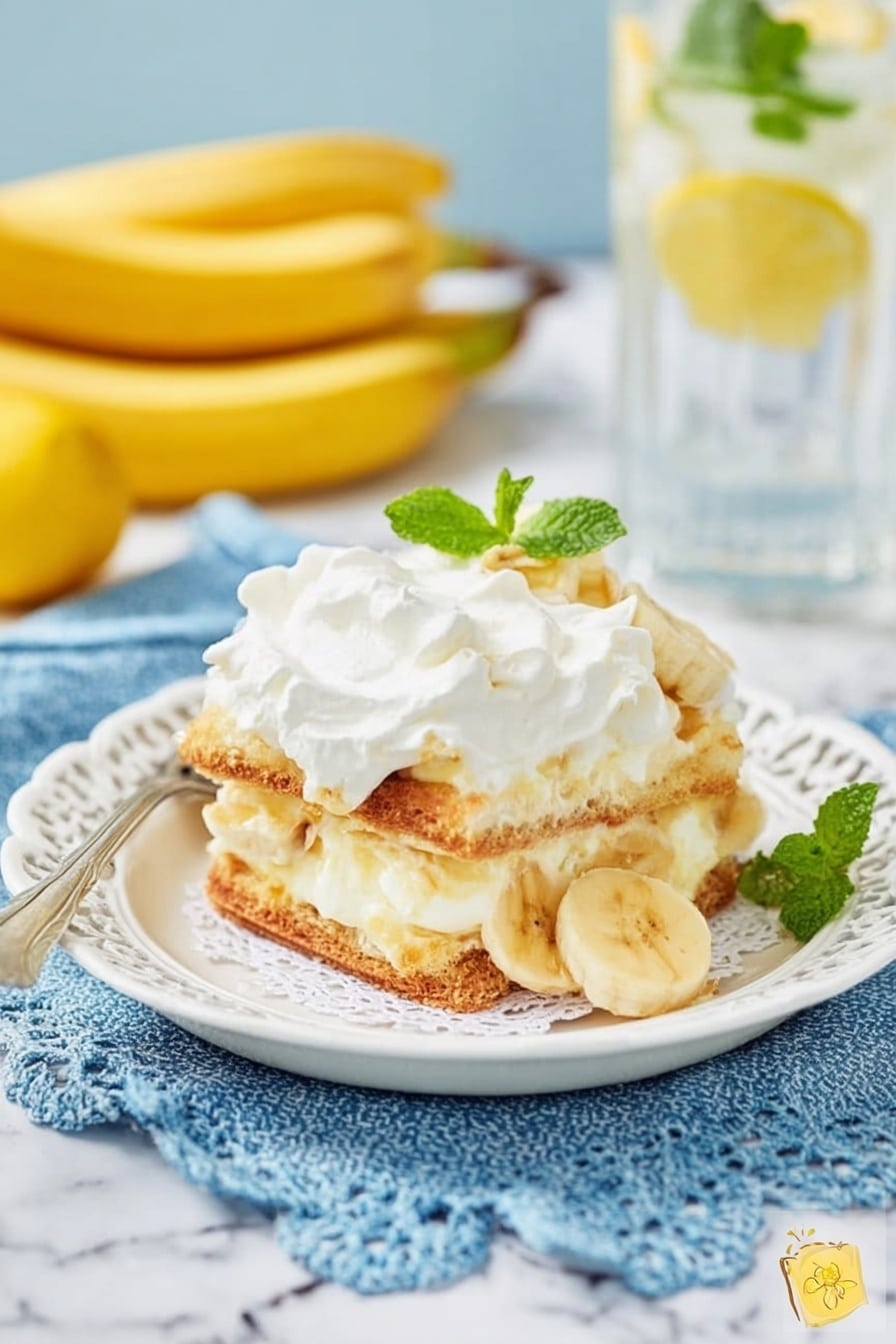
Garnishes
I usually sprinkle a few extra crushed Nilla wafers on top before serving for added crunch and a little visual wow factor. Sometimes I toss on a few banana slices or even a dusting of cinnamon for warmth and color. These small touches make the presentation feel a bit more special without any extra fuss.
Side Dishes
This pudding pairs beautifully with something light like a crisp green salad or even alongside savory dishes like fried chicken or barbecue. I’ve found it’s a great way to balance out richer meals and leave everyone feeling satisfied but not weighed down.
Creative Ways to Present
For parties, I love serving this pudding in individual glass jars or clear cups. It lets everyone see the beautiful layers and makes portioning easy. You can also layer it in a beautiful trifle bowl to wow your guests visually. Adding a drizzle of caramel or chocolate sauce on top can turn this everyday dish into something fancy for celebrations.
Make Ahead and Storage
Storing Leftovers
If you have leftovers (which might be wishful thinking in my house!), cover them tightly with plastic wrap and refrigerate. I usually eat leftover pudding within 2-3 days for best texture. The bananas may brown a bit over time, so eating it sooner is definitely better.
Freezing
I haven’t personally frozen this pudding because fresh bananas tend to get mushy when thawed, but if you want to freeze, I recommend leaving out the bananas and wafers, then adding fresh ones after thawing. Otherwise, the texture could change significantly.
Reheating
This dessert is best served cold, so reheating isn’t really a thing here. Just give it a good stir if it’s been stored, and enjoy it chilled straight from the fridge—it’s perfectly refreshing that way!
FAQs
-
Can I use homemade pudding instead of instant mix in this Cream Cheese Banana Pudding Recipe?
While homemade pudding tastes delicious, instant pudding mix is important here for thickening and setting the dessert quickly without cooking. Homemade pudding tends to be runnier and might make the layers too soft. However, if you want to experiment, try adding a thickening agent like gelatin for a firmer texture.
-
How long does this banana pudding last in the fridge?
I recommend enjoying the pudding within 2-3 days. After that, the bananas may start to brown and the texture can change. To keep it freshest, store covered and slice bananas just before layering when possible.
-
Can I make this recipe vegan or dairy-free?
It’s a bit tricky since cream cheese, condensed milk, and whipped topping all contain dairy. However, you can try dairy-free cream cheese and a nondairy whipped topping substitute, plus a vegan vanilla pudding mix or homemade pudding made from coconut milk. Just keep in mind the texture and flavor will differ somewhat.
-
Is it okay if my bananas brown a little before assembling?
It’s best to slice your bananas right before assembling to avoid browning, as that can affect the pudding’s visual appeal. A quick tip: if you must prep early, toss banana slices lightly with a bit of lemon juice to slow down browning.
-
Can I use a different type of cookie instead of Nilla wafers?
Absolutely! While Nilla wafers are classic, you can substitute with graham crackers, shortbread, or even gingersnaps for a flavor twist. Just keep in mind the texture and sweetness may vary.
Final Thoughts
This Cream Cheese Banana Pudding Recipe has become one of my go-to desserts whenever I want something that feels both special and comforting, without a ton of fuss. The creamy layers, the freshness of the bananas, and that nostalgic crunch from the wafers combine to make something truly crave-worthy. I hope you have as much fun making and eating this pudding as I do—it’s like a little slice of happiness in every spoonful. Next time you want to impress with a simple yet unforgettable dessert, give this recipe a try—you’ll thank me later!
Print
Cream Cheese Banana Pudding Recipe
- Prep Time: 25 minutes
- Cook Time: 0 minutes
- Total Time: 25 minutes
- Yield: 12 servings
- Category: Dessert
- Method: No-Cook
- Cuisine: American
Description
This luscious Banana Pudding recipe combines creamy layers of vanilla pudding, whipped topping, and softened cream cheese with fresh bananas and crunchy Nilla wafers. It’s an easy no-bake dessert perfect for gatherings or a comforting treat, allowing the flavors to meld together beautifully after chilling.
Ingredients
Filling
- 8 ounce block cream cheese, softened to room temperature
- 14 ounce can sweetened condensed milk
- 5 ounce package instant vanilla pudding mix (large box)
- 3 cups milk (2% or higher)
- 2 teaspoons vanilla extract
- 8 ounce tub whipped topping (Cool Whip), thawed (divided use)
Layers
- 11 ounce box Nilla wafers (divided use)
- 5-7 bananas, peeled and sliced (divided use)
Instructions
- Mix Cream Cheese: In a large bowl, beat the softened cream cheese with an electric mixer on medium speed until smooth and fluffy to create a creamy base.
- Add Wet Ingredients: Incorporate the sweetened condensed milk, instant vanilla pudding mix, milk, and vanilla extract into the cream cheese mixture. Mix well until all ingredients are fully combined and the pudding begins to thicken.
- Fold in Whipped Topping: Gently stir in half of the thawed whipped topping to maintain a light and fluffy texture within the pudding filling.
- Build Layers: In a trifle dish, large bowl or 9×13-inch baking dish, start by layering one-third of the Nilla wafers on the bottom. Follow with a single layer of sliced bananas, then pour one-third of the pudding mixture over the bananas to cover them completely.
- Repeat Layering: Repeat the layering process two more times, each time layering wafers, bananas, and pudding mixture in the same order to achieve three layers total.
- Top and Chill: Spread the remaining whipped topping evenly on the surface of the final pudding layer. Cover the dish with plastic wrap and refrigerate for at least 1 to 2 hours to allow the pudding to thicken and the wafers to soften, resulting in a creamy, cohesive dessert.
Notes
- This Banana Pudding is a no-cook dessert, making it quick and easy to prepare.
- Use fresh bananas for the best flavor and texture; ripe but firm bananas work best.
- Allowing the pudding to chill for at least 1-2 hours improves the texture as the wafers absorb moisture and soften.
- You can prepare this dessert a day ahead and keep it refrigerated for convenience.
- For an extra touch, garnish the top with a few crushed Nilla wafers or banana slices before serving.
Nutrition
- Serving Size: 1 serving
- Calories: 458 kcal
- Sugar: 54 g
- Sodium: 408 mg
- Fat: 14 g
- Saturated Fat: 8 g
- Unsaturated Fat: 5 g
- Trans Fat: 0 g
- Carbohydrates: 72 g
- Fiber: 1 g
- Protein: 10 g
- Cholesterol: 20 mg

