
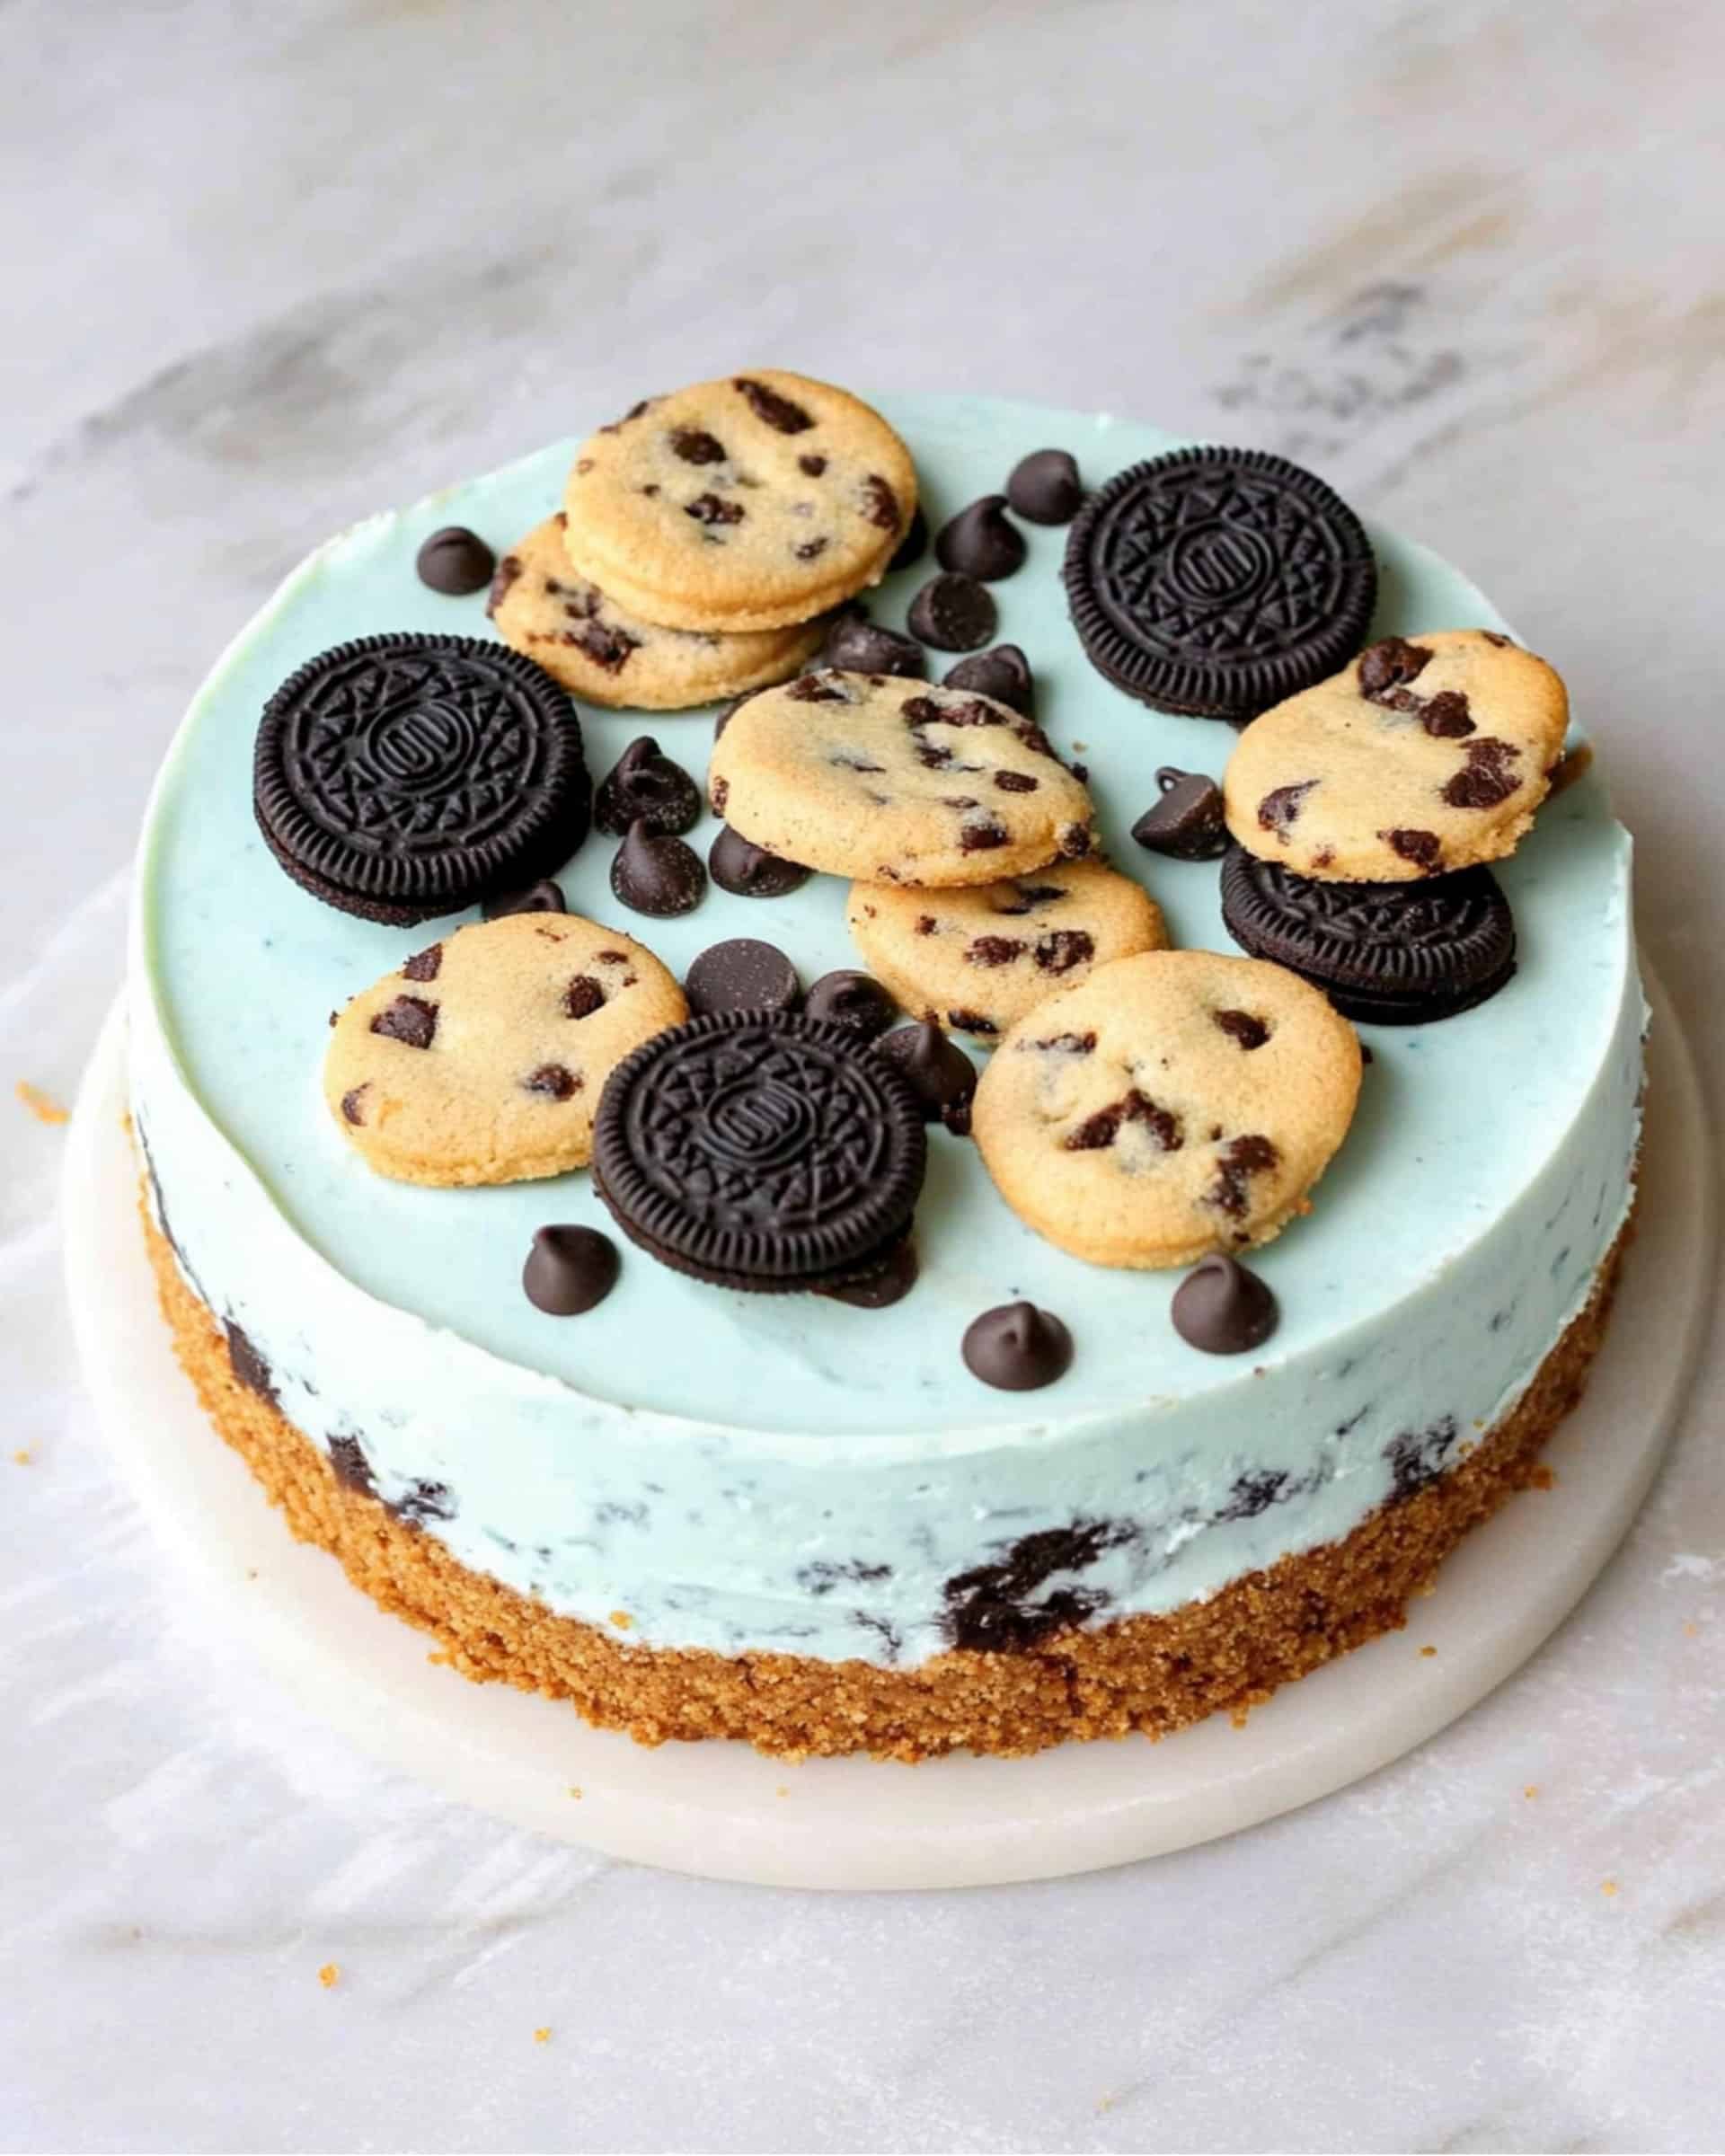
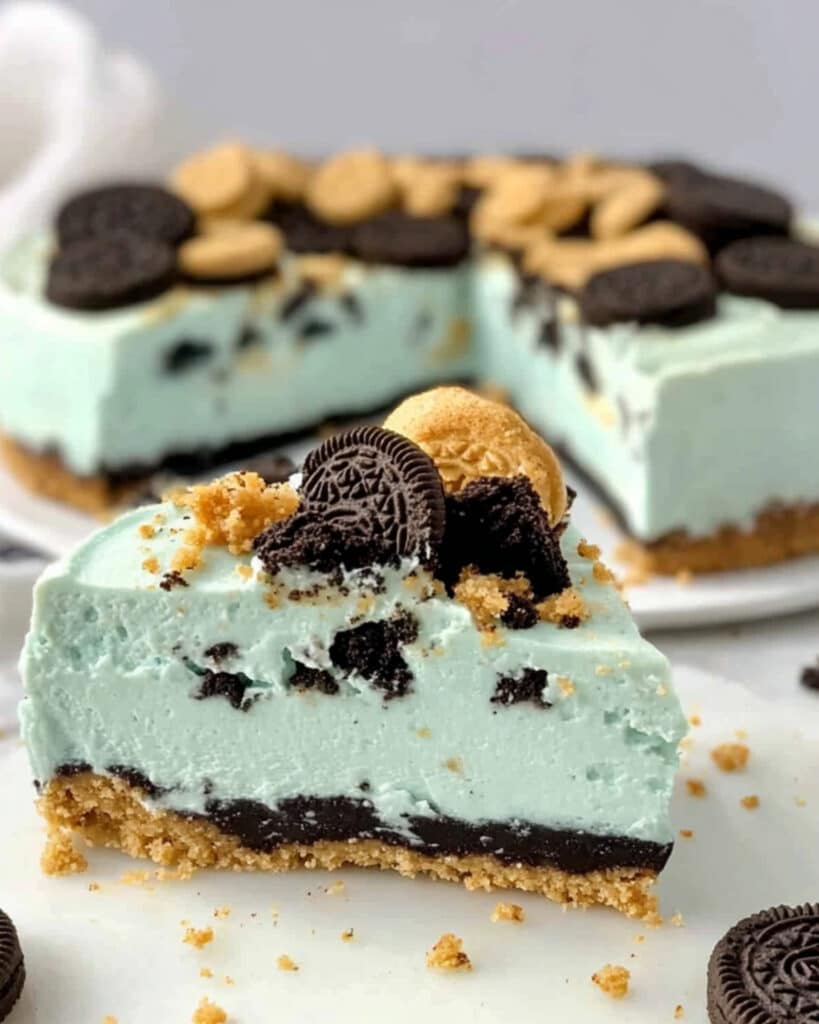
Looking for a show-stopping dessert that requires no oven, minimal effort, and always brings a smile? This Cookie Monster No Bake Cookie Cheesecake is sheer dessert joy. Layers of buttery graham cracker crust, velvety blue-tinted cheesecake, and a double dose of cookies—Oreos and Chips Ahoy—capture both nostalgia and whimsy. Every creamy, cookie-studded bite delivers just the right balance of crunch, sweetness, and playful color. Whether you’re feeding a crowd or treating yourself midweek, this cheesecake takes barely any time to assemble and is tailored for those busy nights when you crave celebration but not the hassle.
Why You’ll Love This Recipe
- Fuss-Free: Skip the oven entirely. All you need is a little mixing, layering, and chilling.
- Quick to Prepare: With just 15 minutes of hands-on time, this dessert comes together faster than you can order delivery.
- Fun and Festive: The Cookie Monster blue swirl, paired with whole and crushed cookies, makes this a playful treat everyone will love.
- Versatile and Forgiving: Prefer different cookies or want to tweak the filling? Go for it—this recipe works with whatever you have on hand.
- Perfect for Make-Ahead: It actually tastes better after chilling, making it ideal for prepping ahead for parties, birthdays, or cozy evenings in.

Ingredients You’ll Need
Here’s what makes this cheesecake so delightfully delicious and simple:
- Graham Cracker Crumbs: The classic cheesecake base—creates a sweet, slightly crunchy crust that holds everything together.
- Granulated Sugar: For just the right touch of sweetness in both crust and filling.
- Unsalted Butter: Melted and mixed with the crumbs for a rich, buttery foundation.
- Cream Cheese: The star of the show. Make sure it’s softened for the smoothest result.
- Vanilla Extract: Rounds out the fillings’ flavor—don’t skip it.
- Heavy Whipping Cream: Whipped for airy lightness, giving the filling a luscious, mousse-like texture.
- Blue Gel Food Coloring: It brings that iconic Cookie Monster pop—start with a drop or two, add more for a deeper blue.
- Mini Oreos & Mini Chips Ahoy: For classic cookie flavor, blend most into the filling and save a few beauties for the top. Don’t be afraid to chop, crumble, or press them in whole—texture is key here!
Tip: If you don’t have a springform pan, use a pie plate lined with parchment for easy removal.
Note: You’ll find the complete list of ingredients, along with their exact measurements, in the printable recipe card at the bottom of this post.
Variations
Want to riff on this recipe? There’s plenty of room for fun:
- Different Cookies: Swap in Biscoff, fudge stripes, or your favorite gluten-free cookies.
- Chocolate Crust: Use crushed Oreos (cream and all!) for the base instead of graham crackers for a richer twist.
- Swirl In More Flavor: Add mini chocolate chips, a ribbon of caramel sauce, or a spoonful of peanut butter to the filling.
- Individual Portions: Divide everything into cupcake liners for party-ready, personal cheesecakes.
How to Make Cookie Monster No Bake Cookie Cheesecake
Step 1: Make the Crust
Mix together graham cracker crumbs, a spoonful of sugar, and melted butter in a bowl. Pour into a springform pan and press down firmly using the back of a measuring cup. Packing is important for a sturdy base! Pop the pan in the freezer while you move on.
Step 2: Prepare the Cheesecake Filling
Cream softened cream cheese and sugar until completely smooth using a hand-held mixer. It should be fluffy with no lumps.
In a separate bowl (or stand mixer), whip the heavy whipping cream until stiff peaks form. This is what gives the cheesecake that dreamy, airy texture.
Gently fold the whipped cream, vanilla, and drops of blue food coloring into the cream cheese mixture. Start light—the color will intensify as you stir.
Now, sprinkle in most of the mini Oreos and Chips Ahoy. Lightly fold to distribute the cookie pieces throughout the filling.
Step 3: Assemble
Spoon the filling over the chilled crust and smooth out the top for a nice finish. Decorate with the remaining cookies, pressing them lightly into the top.
Step 4: Chill
Refrigerate the cheesecake for at least 12 hours, or overnight if possible. This is what sets the cheesecake and makes it sliceable.
For even easier slicing and perfect edges, freeze the cheesecake for 15-20 minutes before serving.
Pro Tips for Making the Recipe
- Soften Cream Cheese Completely: This prevents lumps and guarantees a silky filling.
- Don’t Overmix Once Cookies Are In: Stir just enough to evenly distribute—otherwise, the cookies may disintegrate and muddy the color.
- Use Gel Food Coloring: It’s more vibrant than liquid and won’t thin your filling.
- Chill Thoroughly: Give the cheesecake plenty of time in the fridge to set—it’s worth the wait.
How to Serve
This cheesecake looks striking on its own and is a guaranteed crowd-pleaser at parties. For extra fun:
- Top with whipped cream swirls or a drizzle of chocolate syrup.
- Pair with a glass of cold milk or a cup of strong coffee to balance the sweetness.
- Serve as a showpiece after a casual weeknight dinner or a centerpiece for celebrations—it’s versatile enough for both.
Make Ahead and Storage
Storing Leftovers
Keep any leftovers tightly covered in the refrigerator. The flavors meld and the texture stays creamy for up to 4 days.
Freezing
This cheesecake freezes beautifully. Slice, wrap each piece in plastic wrap, and freeze in an airtight container for up to 1 month. Thaw overnight in the fridge before serving—still cool, still dreamy.
Reheating
No reheating needed (and no oven, ever)—just serve chilled, right from the fridge, for best texture and flavor.
FAQs
-
Do I need to bake the crust at all?
No, that’s the brilliance of this recipe. The melted butter holds the graham cracker crumbs together once chilled; no oven time required.
-
Can I use store-bought whipped topping instead of whipping cream?
Yes, you can swap in whipped topping—just be aware the texture might be a bit sweeter and less airy, but it will still set up beautifully.
-
What if I don’t have a springform pan?
No problem. Line a regular cake pan or a deep dish pie plate with parchment for easy lifting. Your slices may not be as crisp, but the taste and fun remain.
-
Is it necessary to chill overnight?
Absolutely. The extended chill gives the filling time to firm up for neat slicing and full flavor—don’t cut the waiting time short if you want perfect results.
Final Thoughts
This Cookie Monster No Bake Cookie Cheesecake is the sort of recipe you’ll find yourself returning to again and again. It’s simple, playful, and endlessly adaptable—an unbaked delight that turns even ordinary days into occasions. Get creative, embrace the cookie chaos, and let dessert steal the show! Give this fun-loving cheesecake a try—you’ll be hooked from the very first bite.
Print
Cookie Monster No Bake Cookie Cheesecake Recipe
- Prep Time: 15 minutes
- Cook Time: 0 minutes
- Total Time: 15 minutes (plus 12 hours refrigeration)
- Yield: 8 servings
- Category: Desserts
- Method: No-cook
- Cuisine: American
- Diet: Vegetarian
Description
This Cookie Monster No Bake Cookie Cheesecake is a fun and decadent dessert featuring layers of sweet graham cracker crust and a creamy, blue-tinted cheesecake filling loaded with chunks of Oreo and Chips Ahoy cookies. Perfect for parties, birthdays, or any occasion when you want a show-stopping, cookie-packed treat—all without turning on the oven!
Ingredients
Crust
- 1 1/2 cups graham cracker crumbs
- 1/3 cup granulated sugar
- 6 tablespoons unsalted butter, melted
Filling
- 3 (8 ounce) packages cream cheese, softened
- 1/2 cup granulated sugar
- 2 teaspoons vanilla extract
- 1 cup heavy whipping cream
- 2-3 drops blue gel food coloring
- 2 (1-ounce) packages snack size Oreos
- 2 (1-ounce) packages snack size Chips Ahoy cookies
Instructions
- Prepare the Crust: In a bowl, mix together the graham cracker crumbs, granulated sugar, and melted butter until fully combined. Press the mixture firmly into the bottom and slightly up the sides of a 7-9 inch springform pan, using the bottom of a measuring cup to pack it tightly. Place the crust in the freezer while you prepare the filling.
- Make the Cheesecake Filling: Using a hand-held mixer, beat the softened cream cheese together with the granulated sugar until the mixture is completely smooth and creamy.
- Whip the Cream: In a stand mixer (or with a hand mixer and a chilled bowl), whip the heavy whipping cream until thick and stiff peaks form.
- Combine Mixtures: Stir the whipped cream, vanilla extract, and blue gel food coloring into the cream cheese mixture. Fold until smooth and evenly colored.
- Incorporate Cookies: Chop or break up most of the Oreos and Chips Ahoy cookies (reserving a small amount for topping). Gently fold the cookies into the cheesecake filling to distribute throughout.
- Assemble and Decorate: Pour the cheesecake filling over the prepared crust, smoothing the top with a spatula. Decorate the surface with the reserved Oreos and Chips Ahoy cookies.
- Chill: Refrigerate the cheesecake for at least 12 hours, or overnight, to set fully.
- For Easy Slicing (Optional): Before serving, place the cheesecake in the freezer for 15-20 minutes. This helps make removing the springform ring and slicing the cheesecake easier and cleaner.
Notes
- Use gel food coloring to achieve a vibrant blue color; liquid coloring can thin the mixture.
- Let your cream cheese fully soften for the smoothest filling.
- Decorate with extra cookies, sprinkles, or melted chocolate for extra fun.
- This cheesecake is rich—small slices go a long way.
- You can substitute cookie varieties to suit your preference.
Nutrition
- Serving Size: 1 slice (1/8 of cheesecake)
- Calories: 560
- Sugar: 27g
- Sodium: 390mg
- Fat: 37g
- Saturated Fat: 22g
- Unsaturated Fat: 13g
- Trans Fat: 0.8g
- Carbohydrates: 51g
- Fiber: 1g
- Protein: 7g
- Cholesterol: 120mg


