

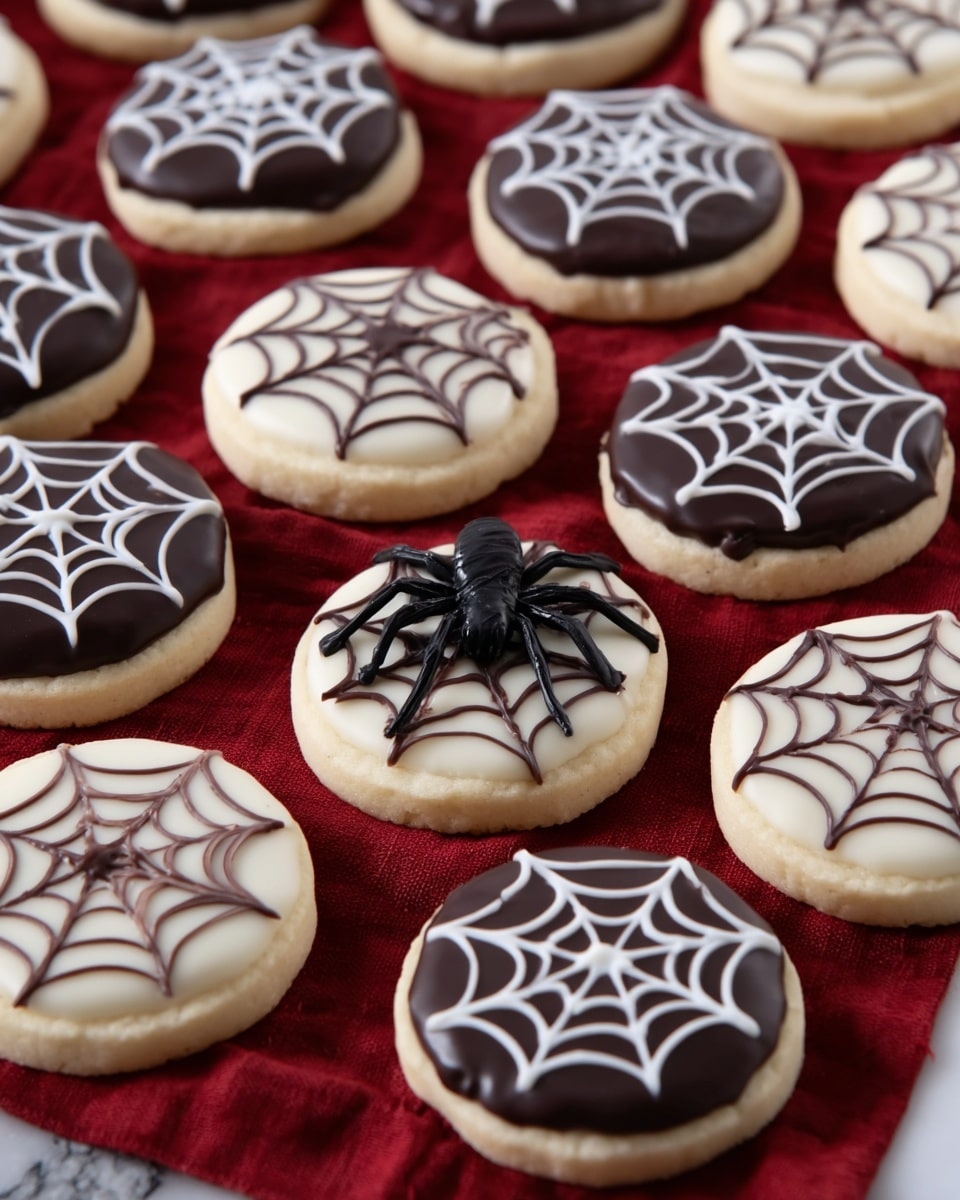
Halloween baking just got a whole lot more fun with my Cobweb Halloween Cookies Recipe. These spooky yet delicious cookies have become a hit in my house every October, and I can’t wait to share them with you. The perfect spooky decoration meets a rich, buttery cookie base — it’s a recipe that looks impressive but is surprisingly easy to pull off. Keep reading, and I’ll walk you through how to make these festive treats that your friends and family will rave about.
Why You’ll Love This Recipe
- Simple Yet Stunning: The cobweb design looks complex, but it’s easier than you think once you get the hang of it.
- Rich Flavor Combo: A buttery cookie blended with both chocolate and vanilla glazes makes every bite heavenly.
- Perfect for Halloween Parties: These cookies add festive flair and are great for sharing with kiddos and adults alike.
- Make Ahead Friendly: Bake them in advance and the icing holds up beautifully for stacking and storing.

Ingredients You’ll Need
These ingredients work together beautifully to create a cookie that’s soft yet sturdy enough for decorating. I recommend fresh butter for flavor, and the dual glazes are really what make the cobweb pattern pop.
- Butter: Using softened butter helps cream the dough easily and adds rich flavor.
- Shortening: This keeps the cookies soft and tender, balancing out the butter’s richness.
- Granulated Sugar: For sweetness and slight crispness on the edges.
- Egg: Binds everything together and gives structure.
- Vanilla Extract: Essential for that warm, inviting aroma and taste.
- All-Purpose Flour: The base of the cookies – be sure to measure properly for perfect texture.
- Baking Powder: Helps the cookies rise just a bit to stay soft but not cakey.
- Salt: Balances the sweetness and brings out all the flavors.
- Chocolate Chips: For the luscious chocolate glaze that contrasts the vanilla beautifully.
- Heavy Whipping Cream: Makes the chocolate glaze silky smooth.
- Powdered Sugar: The star of the vanilla glaze, giving it a smooth, sweet finish.
- Milk: Added to the vanilla glaze to get just the right spreadable consistency.
Variations
Though I love the classic chocolate and vanilla combo, these cookies are very versatile. Feel free to mix things up and make the recipe your own!
- Spiced Version: Add a dash of cinnamon or pumpkin pie spice to the cookie dough for a warm seasonal twist—I tried this last year and it was a total crowd-pleaser.
- Nut-Free Alternative: Use all butter and skip shortening if avoiding certain ingredients; the cookies still come out lovely and soft.
- Colorful Glazes: Tint the vanilla glaze orange or purple with food coloring to amp up the Halloween vibe in your decorations.
- Vegan Adaptation: Swap butter for plant-based margarine and egg for flax egg; I haven’t tested the glazes vegan-friendly yet, but the cookie base works well.
How to Make Cobweb Halloween Cookies Recipe
Step 1: Cream the Butter, Shortening, and Sugar
Start by softening your butter and shortening to room temp—it really helps with creaming. Beat them together with the sugar until the mixture looks fluffy and smooth; this usually takes about 2-3 minutes with a hand mixer. This step is key because it adds air for light cookies while ensuring they won’t be dense.
Step 2: Mix in the Egg and Vanilla
Add your egg and vanilla extract next and mix until fully combined. The egg acts as a binder, and the vanilla gives the cookies that cozy, familiar flavor that works beautifully with the Halloween theme.
Step 3: Combine Dry Ingredients Separately
In a separate bowl, whisk together the flour, baking powder, and salt. This ensures even distribution so you don’t end up with salty pockets or uneven rising in your cookies.
Step 4: Form the Dough and Shape Cookies
Slowly mix the dry ingredients into the wet mixture until just combined. Then, scoop out roughly 1.5 tablespoon-sized balls of dough and place them spaced on your parchment-lined baking sheet. Here’s a trick I learned: spray the bottom of a glass with non-stick spray before gently pressing down on each dough ball to form ¼-inch thick disks. It creates a smooth surface that’s perfect for decorating later.
Step 5: Bake and Cool
Bake at 350°F for 10-12 minutes, or until the edges just start to turn golden. Don’t overbake, or the cookies will get too crisp and harder to frost. Once out of the oven, let them cool a few minutes on the baking tray before transferring them to a wire rack to cool completely.
Step 6: Prepare the Chocolate Glaze
Warm the butter and heavy whipping cream in a microwave-safe bowl for 90 seconds. Stir in the chocolate chips and cover the bowl with a small plate to let the heat gently melt the chocolate for 5 minutes. Then whisk until smooth and glossy. I like to pour a few tablespoons of this glaze into a sandwich bag and snip a tiny corner—so much easier to pipe those neat circles for the cobweb design.
Step 7: Make the Vanilla Glaze
Melt butter and mix it with vanilla extract and powdered sugar. Add milk one tablespoon at a time until it’s smooth and spreadable but not too runny—this part is important for good control when piping. Scoop some vanilla glaze into another sandwich bag and cut the tip the same way.
Step 8: Create the Cobweb Design
This step is my favorite and it’s easier than it looks! Spoon about 1 tablespoon of one glaze (vanilla or chocolate) onto a cookie, then pipe the opposite glaze over it in concentric circles. Start small in the center and make 2-3 larger circles around it without touching the lines. Then, drag a toothpick from the center outwards, pulling the lines to make that classic spiderweb look. I found it easier to do 2–3 cookies at a time—icing sets quickly, so don’t rush or try to do too many at once!
Step 9: Let the Icing Set and Store
Allow the cookies to sit for a few minutes until the icing firms up. Once completely set, you can stack and store them in an airtight container, which is great for making them ahead to save time on party day.
Pro Tips for Making Cobweb Halloween Cookies Recipe
- Room Temp Ingredients: Always have your butter and shortening soft but not melted, which helps in creaming and smooth dough.
- Don’t Overbake: Pull the cookies out just as the edges turn golden to keep them soft enough to contrast the icing.
- Work in Small Batches: When decorating, adjust your pace so icing doesn’t set before you finish the cobweb design—it’s easier with a couple cookies at a time!
- Use Parchment Paper: Prevents sticking and makes cleanup a breeze—trust me, it’s worth it.
How to Serve Cobweb Halloween Cookies Recipe
Garnishes
I usually keep it simple with the chocolate and vanilla glazes, but sometimes a tiny candy eyeball in the center of the cobweb adds a quirky Halloween touch. I also love sprinkling a little edible glitter or orange sanding sugar around the edges for festive sparkle that kids adore.
Side Dishes
These cookies shine on their own, but pairing them with a hot cup of spiced apple cider or your favorite pumpkin spice latte elevates the experience. For gatherings, I serve them alongside a platter of mixed nuts and caramel apples for a full seasonal snack spread.
Creative Ways to Present
Try stacking the cookies in a clear glass jar with a festive ribbon, perfect for gifting or party décor. You can also place them on a tiered dessert tray alongside other Halloween treats, or arrange them like a spooky spider web on a platter by strategically placing black licorice ‘spiders’ around them – a fun and playful touch that never fails to impress!
Make Ahead and Storage
Storing Leftovers
I like to store leftover cookies in an airtight container at room temperature—just make sure the icing has fully set before stacking to prevent smudging. They stay fresh and tasty for up to 5 days, which is perfect if you want to spread out the Halloween snacking.
Freezing
These cookies freeze well. I freeze the plain cookies before glazing—just wrap them tightly in plastic wrap and pop them in a freezer bag. When you’re ready, thaw fully, then glaze fresh for best results. I haven’t tried freezing the iced ones because I want the decoration to look perfect, but the base cookies freeze beautifully.
Reheating
Since these are cookies, reheating isn’t usually needed for eating. But if you want to soften them a bit, just microwave one for 10-15 seconds. Avoid heating stacked glazed cookies to prevent melting. Just treat them gently, and they’ll stay delightful.
FAQs
-
Can I use a different type of chocolate for the glaze?
Absolutely! I typically use semi-sweet chocolate chips, but milk or dark chocolate can work too. Just be sure to adjust sweetness accordingly. If using baking chocolate, consider adding a bit of sugar or sweetener to balance the glaze flavor.
-
What’s the best way to make perfect cobweb designs without smudging?
My biggest tip is to work on just a few cookies at a time. The glaze sets fast, so doing one or two cookies’ icing before moving on to the next helps keep the lines crisp. Also, using sandwich bags with a tiny tip cut makes piping easier and more precise.
-
Can I make these cookies gluten-free?
You can try substituting the all-purpose flour with a 1:1 gluten-free blend. Just keep in mind that texture might differ slightly, so it’s best to test a small batch first. Sometimes adding a bit of xanthan gum helps with structure.
-
How far in advance can I make these cookies?
You can bake the cookies and store them uniced for up to a week, tightly wrapped. Glazed cookies can be stored for several days in an airtight container at room temperature. Just avoid stacking until the icing is fully set.
Final Thoughts
This Cobweb Halloween Cookies Recipe has become a seasonal staple in my kitchen, not just because they’re fun to decorate but because they taste amazing and bring smiles all around. Whether you’re new to cookie decorating or a seasoned pro, these cookies are a great project that won’t stress you out. Give them a try this fall—I promise once you nail that cobweb look, you’ll be hooked just like I was!
Print
Cobweb Halloween Cookies Recipe
- Prep Time: 20 minutes
- Cook Time: 10-12 minutes
- Total Time: 30-32 minutes
- Yield: 2 dozen cookies
- Category: Dessert
- Method: Baking
- Cuisine: American
Description
These Cobweb Halloween Cookies are festive, buttery sugar cookies topped with delicious chocolate and vanilla glazes crafted into a spooky spiderweb design perfect for Halloween celebrations. The cookies combine a soft, tender base with smooth, glossy icing for a fun and impressive treat that can be made ahead and stored easily.
Ingredients
Cookie Dough
- 1/2 cup butter, softened
- 1/2 cup shortening
- 3/4 cup granulated sugar
- 1 egg
- 1 tsp vanilla extract
- 2 1/2 cups all-purpose flour
- 1 tsp baking powder
- 1/2 tsp salt
Chocolate Glaze
- 2 cups chocolate chips
- 1 cup heavy whipping cream
- 1/2 cup butter
Vanilla Glaze
- 2 tbsp melted butter
- 1 tsp vanilla extract
- 2 cups powdered sugar
- 4-5 tbsp milk
Instructions
- Preheat and Prepare: Preheat your oven to 350°F (175°C) and line a baking sheet with parchment paper to prevent sticking and make cleanup easier.
- Cream Ingredients: In a large mixing bowl, cream together the softened butter, shortening, and granulated sugar until the mixture is smooth and fluffy. Then beat in the egg and vanilla extract until well combined.
- Mix Dry Ingredients: In a separate bowl, whisk together the all-purpose flour, baking powder, and salt to evenly distribute the leavening and salt throughout the flour.
- Combine Dough: Gradually add the dry ingredients to the wet butter mixture and mix until fully incorporated forming a soft dough.
- Form and Flatten Cookies: Scoop out approximately 1.5 tablespoons of dough per cookie and roll into balls. Place them spaced on the prepared baking sheet. Use the bottom of a glass sprayed with non-stick spray to gently flatten each dough ball to about 1/4 inch thickness.
- Bake Cookies: Bake in the preheated oven for 10 to 12 minutes until the edges are set and lightly golden. Let cookies cool on the baking sheet for a few minutes before transferring them to a cooling rack to cool completely.
- Make Chocolate Glaze: In a microwave-safe glass bowl, heat the butter and heavy cream together for 1 minute and 30 seconds. Add the chocolate chips and cover with a small plate. Let sit for 5 minutes, then whisk until smooth and shiny. Spoon 3-4 tablespoons into a small sandwich bag and cut a corner for piping.
- Make Vanilla Glaze: Melt the butter and mix in vanilla extract, powdered sugar, and enough milk to reach a smooth, spreadable consistency. Spoon 3-4 tablespoons into another small sandwich bag and cut a corner for piping.
- Create Cobweb Design: Spoon about 1 tablespoon of one glaze onto a cookie, then pipe the opposite glaze in concentric circles starting from the center outward without touching the previous ring. Use a toothpick to drag lines from the center to the edges through the circles creating a spiderweb effect. Work on 2-3 cookies at a time before icing sets. Alternate glaze colors for variety.
- Set and Store: Allow the icing to cool and set for several minutes. Store the decorated cookies in an airtight container. They can be made ahead of time and iced cookies can be stacked once fully set.
Notes
- Use non-stick spray on the bottom of your glass to flatten dough balls easily without sticking.
- Do not attempt to decorate too many cookies at once, as the icing sets quickly and can become difficult to manipulate.
- The cookies can be stored in an airtight container at room temperature for up to a week.
- If doubling the glaze recipe, prepare in separate batches to maintain smooth texture.
- These cookies freeze well before decorating; thaw and decorate before serving.
Nutrition
- Serving Size: 1 cookie
- Calories: 165
- Sugar: 12g
- Sodium: 85mg
- Fat: 9g
- Saturated Fat: 4g
- Unsaturated Fat: 4g
- Trans Fat: 0g
- Carbohydrates: 20g
- Fiber: 1g
- Protein: 2g
- Cholesterol: 25mg


