

If you’re looking for a showstopper dessert this holiday season, you absolutely have to try this Christmas Tree Vanilla Cake Recipe. This cake isn’t just delicious—it’s downright magical with its lush vanilla flavor and charming Christmas tree decorations that turn any gathering into a festive celebration. I love this recipe because it’s both fun to make and guaranteed to impress your family and friends. Trust me, once you try it, it’ll become a treasured holiday tradition!
Why You’ll Love This Recipe
- Festive and Fun Design: The ice cream cone trees covered in green vanilla buttercream make this cake a stunner at any holiday party.
- Buttery Vanilla Goodness: The cake’s moist texture and vanilla flavor are a crowd-pleaser every time.
- Easy to Follow: Even if baking isn’t your usual thing, the clear steps make this an accessible and enjoyable project.

Ingredients You’ll Need
Each ingredient in this Christmas Tree Vanilla Cake Recipe complements one another to create a beautifully balanced cake. From the creamy butter to the zing of vanilla, they all contribute to that perfect holiday bite. I’ll share little tips on picking or preparing these so you nail it the first time.

- All purpose flour: The backbone of your cake, providing structure. Always sift if you can for a lighter crumb.
- Granulated sugar: Sweetness that helps with the cake’s tender texture.
- Baking soda & baking powder: These leavening agents make sure your cake rises just right; don’t skip or substitute one for the other.
- Salt: Enhances all the flavors, even just a pinch makes a difference.
- Unsalted butter (for the cake): Use room temperature butter for smooth mixing and to avoid dense spots.
- Egg whites: They add lightness; whisk them gently so your cake stays fluffy.
- Sour cream: Adds moisture and a subtle tang that keeps the vanilla flavor bright.
- Vanilla extract: Make it real vanilla extract, not imitation—it transforms the whole cake!
- Whole milk: Balances the batter’s texture perfectly.
- Peppermint extract (optional): It’s a little festive surprise that adds a refreshing hint without overpowering.
- Confectioners sugar: For the silky-smooth vanilla buttercream frosting.
- Unsalted butter (for buttercream): Softened is key so your frosting whips up creamy and fluffy.
- Heavy whipping cream: Just a bit to get the frosting consistency spot on.
- Green food coloring: For those vibrant Christmas tree hues.
- Ice cream cones: The adorable base for your “trees”—easy to find and fun to decorate.
Variations
I love experimenting with this Christmas Tree Vanilla Cake Recipe by swapping flavors or adding extra festive touches. Feel free to get creative—it’s one of those cakes that really welcomes your personal spin!
- Peppermint Twist: I sometimes add peppermint extract to the frosting for a cool holiday vibe; it pairs amazingly with vanilla.
- Chocolate Lovers: You could tint the frosting brown or add cocoa powder to create chocolate “trees” instead of vanilla ones.
- Nutty Touch: Toasted chopped nuts sprinkled on the frosting add a nice crunch and festive flair.
- Gluten-Free Option: Using a gluten-free flour blend works well here if you have dietary needs.
How to Make Christmas Tree Vanilla Cake Recipe
Step 1: Whip Up Your Vanilla Cake Batter
Start by preheating your oven to 350°F (175°C) and prepping your baking pans. Combine the dry ingredients—flour, sugar, baking soda, baking powder, and salt—in a large bowl. In another bowl, cream the unsalted butter until it’s fluffy and smooth. Slowly add the egg whites, sour cream, vanilla extract, and milk, mixing gently to keep the batter light. Incorporate the dry mixture gradually, making sure not to overmix, which can toughen your cake. This step might seem simple, but the secret is to blend the ingredients just right to get that tender crumb.
Step 2: Bake and Cool Your Cake Layers
Pour your batter evenly into the prepared pans and bake for about 30-35 minutes or until a toothpick inserted in the center comes out clean. When I first tried this, I was eager to check too early—resist that urge! Let the cake cool completely to room temperature before frosting; otherwise, your buttercream will melt into a sticky mess, which we definitely want to avoid.
Step 3: Make the Dreamy Vanilla Buttercream
Beat unsalted butter at room temperature until light and fluffy. Gradually add confectioners sugar, vanilla extract, and just enough heavy whipping cream to get the frosting to a smooth, pipeable consistency. Add green food coloring for your tree frosting, mixing until it’s vibrant and uniform. This buttercream is where the magic really happens—it’s rich, creamy, and perfect for decorating your cake trees. Speaking from experience, using unsalted butter here gives you better control over sweetness and flavor.
Step 4: Assemble and Decorate Your Christmas Tree Cake
First, layer and frost your cooled cake to make a lovely cake base. Now, the fun part: take the ice cream cones and pipe generous swirls of your green buttercream all over them to mimic pine tree branches. Once your trees are ready, arrange them on top of your cake however you like. My family goes crazy for this step because it feels like crafting a winter wonderland right on our dessert plate!
Pro Tips for Making Christmas Tree Vanilla Cake Recipe
- Room Temperature Ingredients: Always bring butter, eggs, and milk to room temperature for the smoothest batter and frosting.
- Gentle Folding: Mix your dry and wet ingredients just enough to combine; overmixing can make the cake dense.
- Consistent Piping Pressure: When decorating your cone trees, maintain steady pressure to create even layers of frosting.
- Cooling the Cake Completely: Don’t rush to frost warm cake layers—patience here prevents messy melting frosting.
How to Serve Christmas Tree Vanilla Cake Recipe

Garnishes
I like to sprinkle a little edible glitter or some tiny silver dragees on the trees to give them extra sparkle—it’s like a snowy forest at dusk. Mini red candy “ornaments” also add a cheerful pop of color. These simple touches make the cake look extra festive and feel even more special.
Side Dishes
Chocolate-dipped strawberries or a fresh berry compote make excellent sides—it adds a fresh contrast to the rich vanilla cake. I also love pairing this dessert with a creamy eggnog or a peppermint mocha to keep with the holiday spirit.
Creative Ways to Present
For a fun twist, assemble smaller individual “tree cakes” on mini cones for each guest—makes for a delightful centerpiece and personalized treat. You can also use sprigs of fresh rosemary around the base for a pine-scented touch that looks gorgeous and smells amazing!
Make Ahead and Storage
Storing Leftovers
I recommend storing leftover cake pieces in an airtight container in the refrigerator to keep them fresh for up to 3 days. The frosting holds up well, but to avoid the cones getting soggy, keep any leftover trees separate until you’re ready to serve again.
Freezing
I’ve frozen both the cake layers and the buttercream in separate containers. Just thaw them overnight in the fridge and reassemble. Freezing the decorated cone trees is a bit tricky, so I usually make them fresh or store any extras in the fridge for a couple of days.
Reheating
Since this is a cold cake with rich buttercream, reheating isn’t necessary. However, if you want to warm slices slightly, I gently microwave them for 10-15 seconds—just enough to soften the cake without melting the frosting completely.
FAQs
-
Can I make the Christmas Tree Vanilla Cake Recipe without the peppermint extract?
Absolutely! The peppermint extract is optional and just adds a subtle festive note. If you prefer a classic vanilla flavor, feel free to leave it out—it won’t affect the overall deliciousness one bit.
-
What can I use instead of ice cream cones for the tree decorations?
If you can’t find ice cream cones, sugar cones or even waffle cone pieces work nicely. You could also pipe the buttercream into small tree shapes directly on parchment paper for a similar effect.
-
How do I prevent my frosting from melting when decorating?
Make sure your cake and cones are completely cool, and use room temperature butter in your frosting, not warm. If your kitchen is very warm, chilling the frosted cones for a few minutes can help set the buttercream before assembly.
-
Can I prepare parts of this cake the day before?
Definitely! Bake the cake layers and make the buttercream a day ahead. Store them separately in airtight containers. Assemble and decorate on the day you plan to serve for the freshest taste and look.
Final Thoughts
This Christmas Tree Vanilla Cake Recipe is truly one of my favorite holiday desserts because it combines simplicity with festive charm. Every time I make it, I feel like I’m sharing a little bit of joy and creativity with my loved ones. I can’t recommend it enough if you want a dessert that tastes incredible and also fills your home with Christmas cheer. Go ahead—give it a try and watch your family light up when you bring this winter wonderland to the table!
Print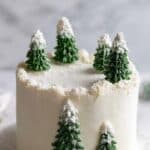
Christmas Tree Vanilla Cake Recipe
- Prep Time: 40 min
- Cook Time: 35 min
- Total Time: 75 min
- Yield: 8 slices
- Category: Dessert
- Method: Baking
- Cuisine: American
Description
This delightful Christmas Tree Cake features a tender vanilla-flavored cake layered with rich vanilla buttercream frosting. The cake is creatively shaped into festive Christmas trees using ice cream cones and adorned with vibrant green buttercream to resemble a winter wonderland centerpiece perfect for holiday celebrations.
Ingredients
Cake Ingredients
- 1 2/3 cups all purpose flour (213g)
- 1 cup granulated sugar (200g)
- 1/4 tsp baking soda (1g)
- 1 tsp baking powder (3g)
- 1/4 tsp salt (1g, heaping, optional)
- 3/4 cup unsalted butter (176g, room temperature)
- 3 egg whites
- 1/2 cup sour cream (120g)
- 1 tbsp vanilla extract (15mL)
- 1/2 cup whole milk (120mL)
- 1/2 tsp peppermint extract (optional, 2.5mL)
Buttercream Frosting
- 1.5 lb confectioners sugar (680g)
- 1 lb unsalted butter (454g)
- 1-2 tbsp heavy whipping cream (if needed for consistency)
- 1 tsp vanilla extract (5mL)
- 5 drops green food coloring (for the trees)
Decoration
- 12 ice cream cones
Instructions
- Prepare the Cake Batter: In a large bowl, whisk together the all purpose flour, granulated sugar, baking soda, baking powder, and salt until combined. In a separate bowl, cream the unsalted butter until smooth and fluffy using a mixer, then gradually add the egg whites, sour cream, vanilla extract, milk, and peppermint extract (if using), mixing well. Slowly incorporate the dry ingredients into the wet ingredients until a smooth batter forms.
- Bake the Cake Layers: Preheat the oven to 350°F (175°C). Grease and flour your baking pans or line them with parchment paper. Pour the batter evenly into the prepared pans and bake for approximately 35 minutes or until a toothpick inserted into the center comes out clean. Remove the cakes from the oven and allow them to cool completely on a wire rack.
- Prepare the Vanilla Buttercream Frosting: Using a mixer, beat the unsalted butter until creamy. Gradually add the confectioners sugar until well combined. Mix in the vanilla extract. If the frosting is too stiff, add heavy whipping cream one tablespoon at a time until the desired consistency is achieved. Separate a portion of the frosting and add green food coloring to it for decorating the Christmas trees.
- Assemble the Christmas Tree Cake: Once the cakes are fully cooled, cut them into shapes as needed to stack around the ice cream cones or slice them to create layers resembling Christmas trees. Use the vanilla buttercream to frost between layers and to adhere the cake pieces. Frost the entire cake with a layer of vanilla buttercream as the base.
- Decorate the Trees: Pipe or spread the green colored buttercream onto the ice cream cones to mimic pine trees. Place these decorated cones upright on the cake or as standalone decorations. Add any additional festive decorations or edible glitter as desired to complete the winter wonderland effect.
- Serve: Chill the cake briefly to set the frosting before slicing into 8 generous servings, perfect for sharing during holiday festivities.
Notes
- This cake delivers a moist vanilla flavor combined with a creamy vanilla buttercream that makes it a standout holiday dessert.
- Using ice cream cones shaped with green buttercream frosting creates a charming Christmas tree effect that doubles as decoration and dessert.
- For a peppermint twist, include the optional peppermint extract in the cake batter for a subtle festive hint.
- If frosting consistency is too stiff, a small amount of heavy cream helps achieve a smooth piping texture.
- Ensure the cake layers are fully cooled before frosting to prevent melting the buttercream.
Nutrition
- Serving Size: 1 slice
- Calories: 330 kcal
- Sugar: 31 g
- Sodium: 250 mg
- Fat: 17 g
- Saturated Fat: 5 g
- Unsaturated Fat: 10 g
- Trans Fat: 0 g
- Carbohydrates: 39 g
- Fiber: 0.5 g
- Protein: 3 g
- Cholesterol: 40 mg

