
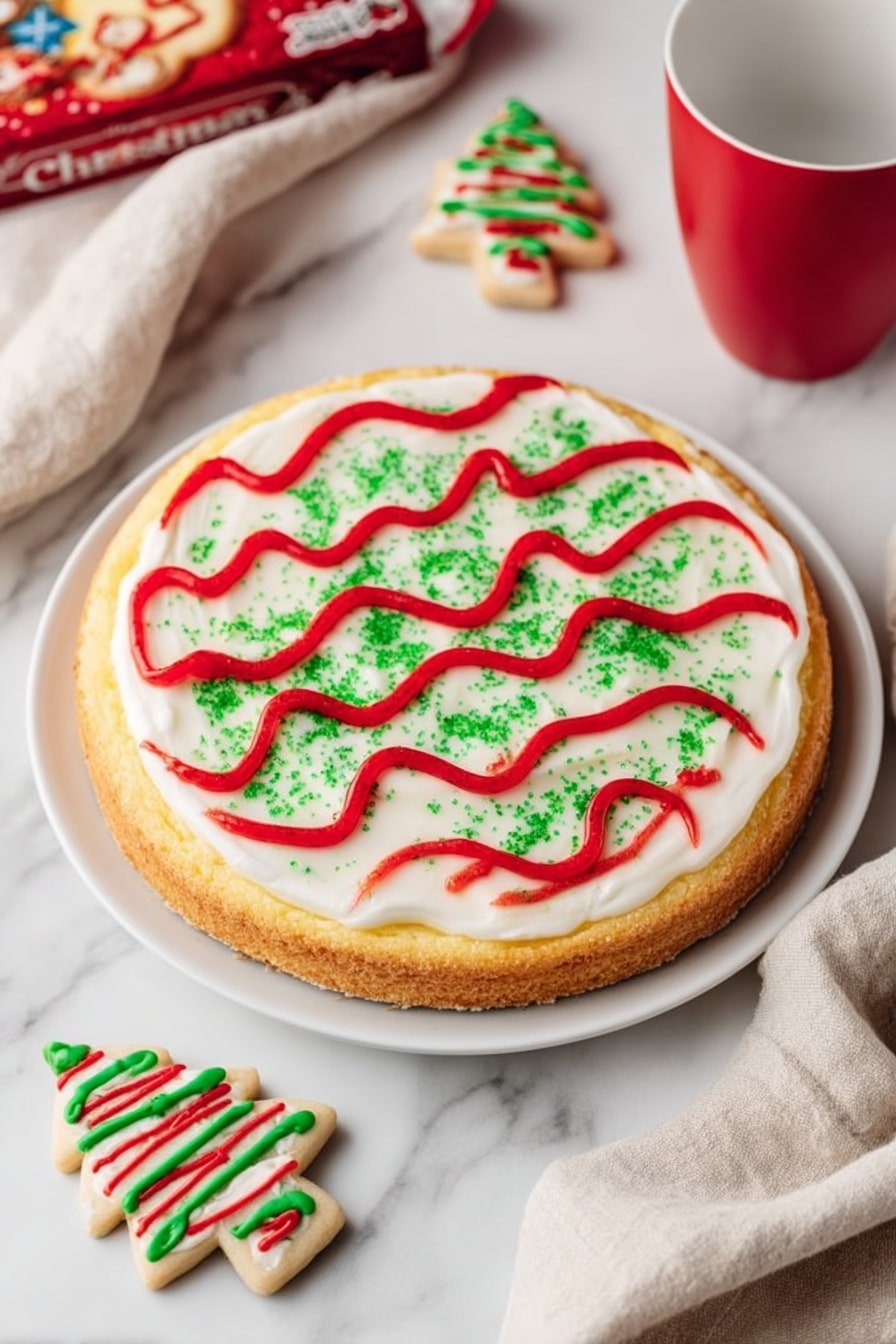
If you’re looking for a show-stopping dessert that captures all the festive feels of the season, you’re in for a treat with this Christmas Tree Cheesecake with Little Debbie Cakes Recipe. I absolutely love how this cheesecake turns out creamy and dreamy, with that nostalgic twist of those classic Little Debbie Christmas Tree Cakes baked right inside. Trust me, when I first tried this, it became an instant holiday favorite that my family just goes crazy for! Stick around, and I’ll walk you through every step so you can nail it too.
Why You’ll Love This Recipe
- Festive Flavors: Combines creamy cheesecake with nostalgic Christmas Tree Cakes for the ultimate holiday indulgence.
- Unique Presentation: The layered approach with white chocolate ganache and colorful decorations makes every slice picture-perfect.
- Family Favorite: Once you try it, you’ll find it’s perfect for holiday gatherings and a guaranteed crowd pleaser.
- Easy to Prep: Despite looking fancy, it’s straightforward, and I share my best tips to make it foolproof.

Ingredients You’ll Need
These ingredients come together to create an ultra-smooth cheesecake with a buttery Oreo crust and that fun surprise of Little Debbie Christmas Tree Cakes inside. I recommend using full-fat cream cheese and sour cream for the creamiest results—you won’t regret it!
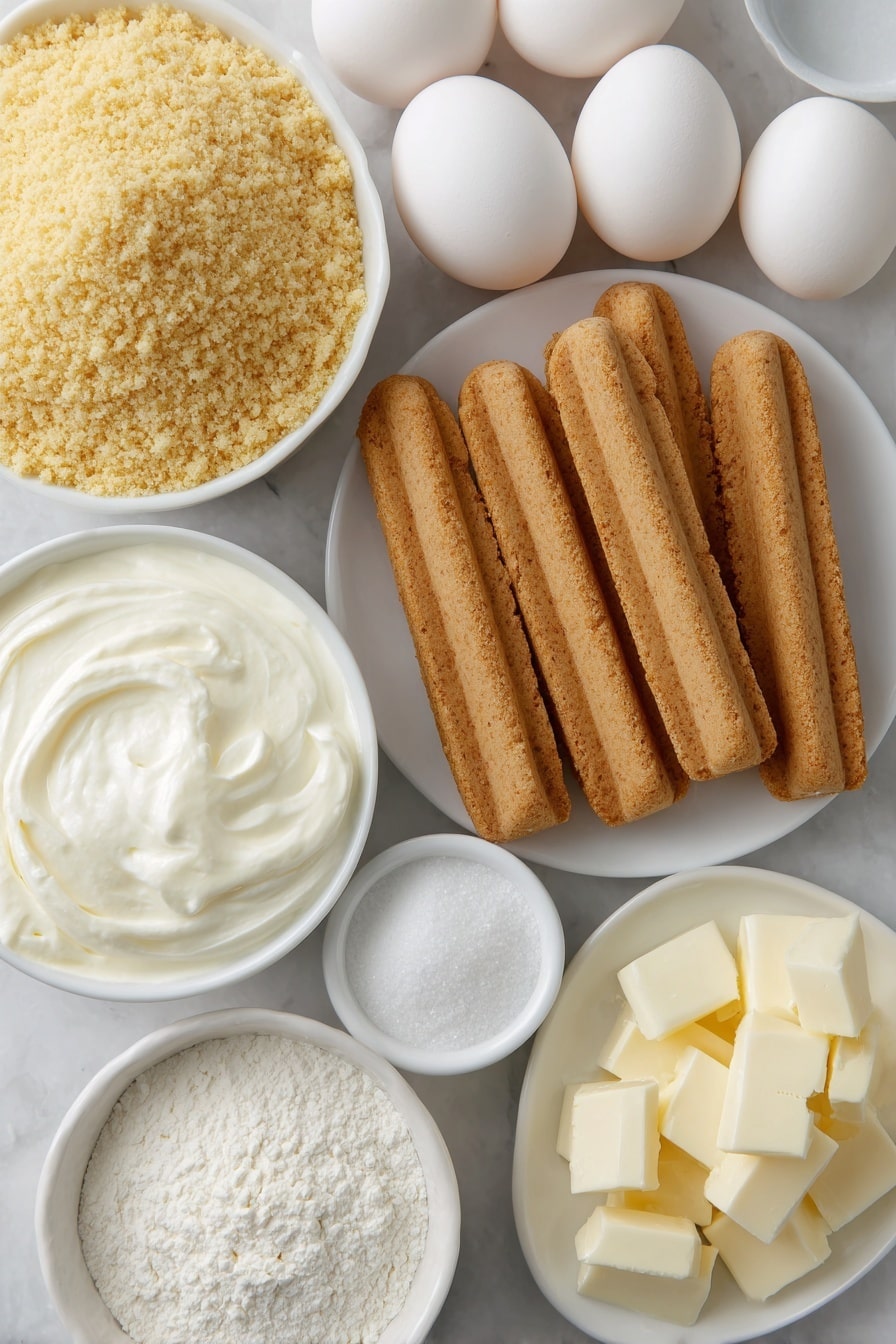
- Golden Oreos: Using the golden version adds a lovely buttery flavor to your crust that pairs so well with vanilla cheesecake.
- Salted butter: Melted to bind your crust perfectly and balance the sweetness.
- Full-fat cream cheese: Make sure it’s softened to room temperature for the smoothest batter.
- Granulated sugar: Classic sweetness without overpowering.
- All-purpose flour: Just a touch to help stabilize your cheesecake without affecting texture.
- Pure vanilla extract: Nothing beats real vanilla to elevate your cheesecake flavor.
- Full-fat sour cream: Adds tanginess and keeps the cheesecake incredibly creamy.
- Heavy cream: Used twice—for richness in the cheesecake and in the white chocolate ganache topping.
- Large eggs: Bind the cheesecake together; whip gently to avoid cracks.
- Little Debbie Christmas Tree Cakes: The star of the show, these little cakes add charm and an extra layer of sweetness.
- White chocolate: Melted into a luscious ganache for that elegant glazed look.
- Red decorating icing: Classic festive stripes that bring the Christmas Tree Cakes vibe to life!
- Green sprinkles: Just enough sparkle for a festive finishing touch.
Variations
One thing I love about the Christmas Tree Cheesecake with Little Debbie Cakes Recipe is how easy it is to tweak for your tastes or dietary needs. Feel free to get creative and make it truly yours.
- Gluten-Free Option: Swap the Golden Oreos with gluten-free cookies and use gluten-free flour if needed—I did this once for a friend, and it turned out just as delicious!
- Chocolate Lover’s Version: Add mini chocolate chips to the batter or drizzle melted dark chocolate along with the white chocolate ganache for a richer flavor.
- Minty Twist: Since it’s Christmas, add a teaspoon of peppermint extract or garnish with crushed candy canes for that festive flair.
- Dairy-Free Alternative: Use dairy-free cream cheese and coconut cream to make a similar version, swapping the Oreos for their dairy-free counterparts.
How to Make Christmas Tree Cheesecake with Little Debbie Cakes Recipe
Step 1: Make the Oreo Crust
Start by finely crushing about 2 cups of Golden Oreos—using a food processor speeds things up, but putting them in a sealed bag and crushing with a rolling pin works too! Mix the crumbs with 6 tablespoons of melted salted butter until the mixture resembles wet sand. Press this mixture evenly into the bottom of a springform pan. Press firmly to create a nice compact crust layer, then pop it into the fridge while you prepare the filling. Chilling helps keep the crust firm during baking.
Step 2: Whip Up Your Cream Cheese Batter
In a large bowl, beat 4 packages of softened full-fat cream cheese until smooth and fluffy. Gradually add 1 cup granulated sugar and 2 tablespoons all-purpose flour, mixing well. Then stir in 1 teaspoon of vanilla extract, ½ cup of full-fat sour cream (at room temp), and ¼ cup of heavy cream. Finally, carefully add 4 large eggs one at a time, mixing gently to avoid incorporating too much air—this helps prevent cracks.
Step 3: Layer in the Little Debbie Cakes
Here’s the fun part: slice 8 Little Debbie Christmas Tree Cakes in half horizontally. Pour a layer of cheesecake batter over the chilled crust, then arrange half of the sliced cakes on top. Add the remaining batter carefully, and then the remaining cake halves. This layering creates those delightful little pockets of cake baked into every slice—a festive surprise everyone will love!
Step 4: Bake and Cool Properly
Bake the cheesecake in a 325°F (163°C) oven for about 60 minutes or until the edges are set but the center still jiggles slightly. This texture is key to creamy cheesecake! Turn off the oven, leave the door slightly open, and let the cheesecake cool inside for an hour. This slow cooling helps prevent cracks. Afterward, chill the cheesecake in the fridge for at least 6 hours or overnight—patience here pays off in silky texture.
Step 5: Finish with White Chocolate Ganache and Decorations
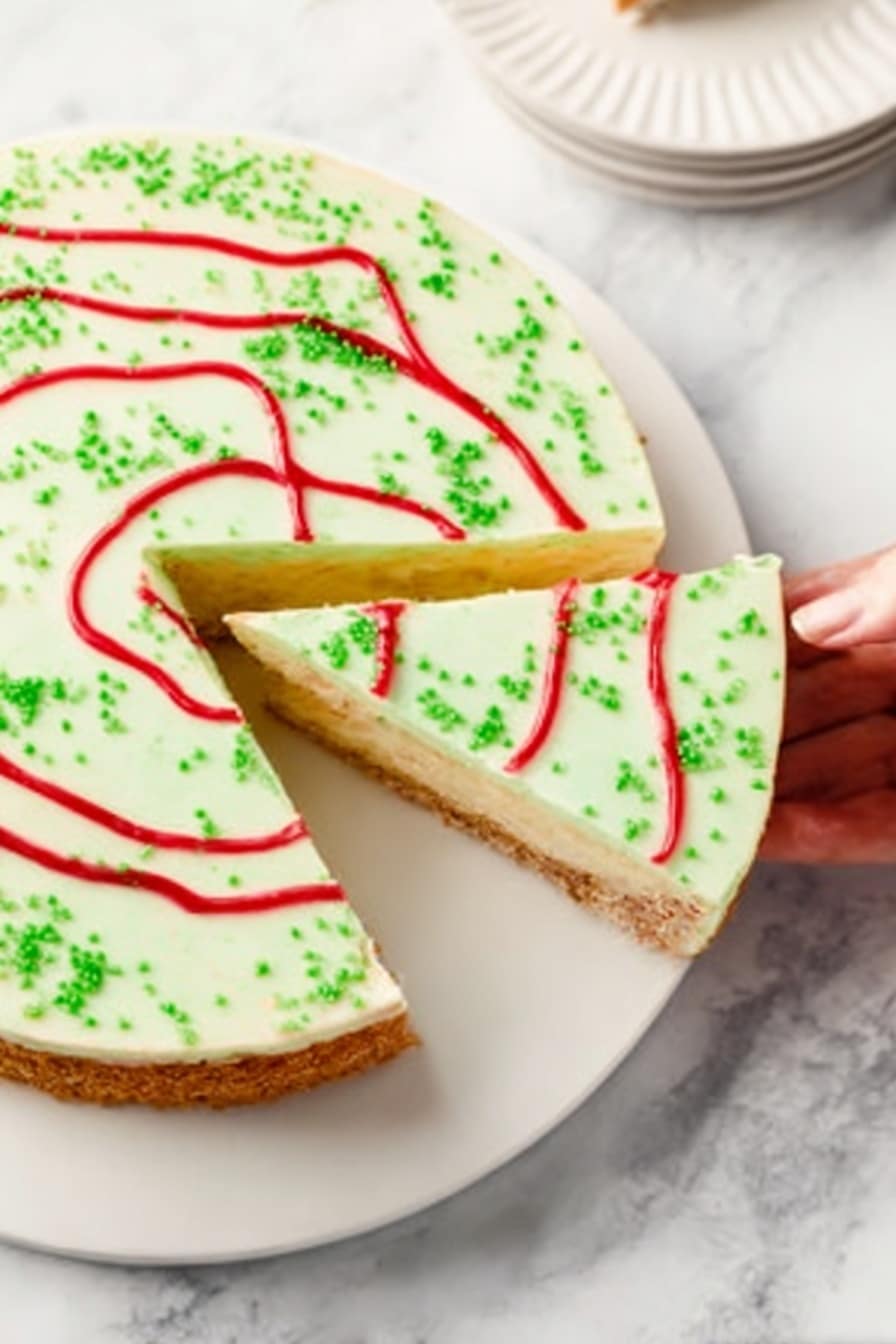
To make the ganache, gently melt 4 ounces of white chocolate with 2 tablespoons of heavy cream until smooth. Pour over the chilled cheesecake and smooth it out with a spatula. Then add those iconic red icing stripes and sprinkle on green sugar sprinkles to mimic the Christmas tree vibe. This step adds that perfect festive look and extra sweetness. Let it set in the fridge before serving.
Pro Tips for Making Christmas Tree Cheesecake with Little Debbie Cakes Recipe
- Room Temperature Ingredients: I always let the cream cheese and eggs come to room temp before mixing—it makes your batter velvety smooth and prevents lumps.
- Gentle Mixing: When adding eggs, mix on low speed and just until combined to avoid overbeating, which can cause cracks.
- Water Bath Magic: If you want to be extra careful, bake your cheesecake in a water bath wrapped in foil for even heat and to avoid cracking.
- Decorate After Chilling: I learned that the ganache and icing stick better when the cheesecake is well chilled—don’t rush this step!
How to Serve Christmas Tree Cheesecake with Little Debbie Cakes Recipe
Garnishes
I love topping the cheesecake with extra green sprinkles and a light dusting of powdered sugar for that snowy effect. Sometimes I add a few fresh cranberries or mint leaves for a pop of color and freshness that balances the sweetness beautifully.
Side Dishes
This cheesecake shines on its own, but if you want to go all out, pairing it with warm spiced cider or a scoop of vanilla bean ice cream makes for a cozy holiday dessert spread. Fresh fruit like sliced strawberries or raspberries adds a nice tart contrast too.
Creative Ways to Present
For my holiday parties, I’ve served this cheesecake on a rustic wooden board surrounded by pine sprigs and little ornaments—it instantly amps up the festive vibe. Another fun idea is to serve individual slices on mini dessert plates with a drizzle of chocolate sauce and a tiny decorated Christmas tree cake on the side for double the fun.
Make Ahead and Storage
Storing Leftovers
I usually wrap any leftovers tightly in plastic wrap and keep them refrigerated—this cheesecake stays creamy and fresh for up to 4 days. Just slice what you need and keep the rest chilled, making it perfect for making ahead of time and enjoying throughout the holidays.
Freezing
If you want to freeze it, I recommend freezing the cheesecake before adding the ganache and decorations. Wrap it securely in plastic wrap and foil, then thaw in the fridge overnight when ready to serve. I’ve tried freezing after decorating too, but I found the icing and sprinkles can lose their charm a bit.
Reheating
Since cheesecake is best enjoyed chilled, I don’t recommend reheating, but if you want to serve it slightly less cold, let your slice sit at room temperature for 15-20 minutes before enjoying. This softens up the flavors wonderfully without melting the ganache.
FAQs
-
Can I use regular Oreo cookies instead of Golden Oreos for the crust?
Yes, you absolutely can! Using regular Oreos will give your crust a richer chocolate flavor which pairs beautifully with the cheesecake, but the Golden Oreos lend a buttery note I personally love. Either way tastes delicious.
-
Do I need a water bath to bake this cheesecake?
While a water bath isn’t mandatory, it definitely helps prevent cracks and ensures even baking. If you’re worried about moisture, wrap your springform pan tightly in foil before placing it in a water bath. I sometimes skip this step but always do the slow cooling in the oven to avoid cracks.
-
Can I make this cheesecake ahead of time?
Definitely! In fact, I recommend making it a day in advance to allow plenty of chilling time. The flavors meld beautifully, and it’s easier to slice and decorate when the cheesecake is fully chilled.
-
What if I can’t find Little Debbie Christmas Tree Cakes?
You can substitute with any festive snack cakes or mini bundt cakes you like. The key is to choose something that won’t melt away during baking but adds a sweet, soft surprise inside. I’ve also used peppermint-flavored snack cakes for a fun twist!
Final Thoughts
This Christmas Tree Cheesecake with Little Debbie Cakes Recipe has become one of my go-to holiday desserts because it’s effortlessly festive, delicious, and just plain fun to make. I love sharing it with friends and family—it always brings smiles and the occasional “Wow, you made that?!” moment. If you want to impress without stress this season, give this recipe a try; I promise you’ll be coming back for seconds (and maybe even thirds!). Happy baking, my friend!
Print
Christmas Tree Cheesecake with Little Debbie Cakes Recipe
- Prep Time: 20 minutes
- Cook Time: 60 minutes
- Total Time: 7 hours 20 minutes
- Yield: 14 servings
- Category: Dessert
- Method: Baking
- Cuisine: American
Description
This Little Debbie Christmas Tree Cheesecake is a festive and creamy vanilla cheesecake featuring a crushed Golden Oreo crust, a rich cream cheese filling, and whole Little Debbie Christmas Tree snack cakes baked inside. It’s topped with a luscious white chocolate ganache, decorated with iconic red icing stripes, and sprinkled with green sugar for a merry holiday presentation. Perfect for Christmas gatherings, this dessert combines classic cheesecake indulgence with beloved seasonal treats.
Ingredients
Crust
- 2 cups finely crushed Golden Oreos (about 23-25 Oreos)
- 6 Tablespoons salted butter (melted)
Cheesecake Filling
- 4 (8-ounce) packages full-fat cream cheese (softened, 32 ounces total)
- 1 cup granulated sugar
- 2 Tablespoons all-purpose flour
- 1 teaspoon pure vanilla extract
- 1/2 cup full-fat sour cream (room temperature)
- 1/4 cup heavy cream
- 4 large eggs
Inserts and Topping
- 8 Little Debbie Christmas Tree Cakes
- 4 ounces white chocolate
- 2 Tablespoons heavy cream
- Red decorating icing
- Green sprinkles
Instructions
- Prepare the crust: Preheat your oven to 325°F (163°C). In a mixing bowl, combine the finely crushed Golden Oreos with the melted salted butter until the mixture resembles wet sand. Press this mixture evenly into the bottom of a 9-inch springform pan to form a firm crust. Set aside.
- Make the cheesecake batter: In a large bowl, beat the softened cream cheese with an electric mixer until smooth and creamy. Gradually add the granulated sugar, flour, and vanilla extract, mixing until fully incorporated. Add the sour cream and heavy cream, and blend until smooth. Finally, add the eggs one at a time, mixing on low speed just until combined after each addition to avoid overmixing.
- Assemble the cheesecake: Pour about half of the cheesecake batter over the prepared crust in the springform pan. Arrange the 8 Little Debbie Christmas Tree Cakes in a single layer evenly over the batter. Carefully pour the remaining cheesecake batter over the snack cakes, ensuring they are fully covered and the surface is smooth.
- Bake the cheesecake: Place the springform pan on the center rack of the preheated oven. Bake the cheesecake for about 60 minutes, or until the edges are set and the center slightly jiggles when gently shaken. Avoid overbaking to maintain a creamy texture.
- Cool and chill: Remove the cheesecake from the oven and allow it to cool to room temperature on a wire rack. Once cooled, refrigerate the cheesecake for at least 6 hours or overnight to set fully.
- Prepare the white chocolate ganache: In a small microwave-safe bowl, combine the white chocolate and 2 tablespoons of heavy cream. Microwave in 20-second intervals, stirring each time, until the white chocolate is melted and the mixture is smooth and glossy.
- Decorate the cheesecake: Remove the chilled cheesecake from the refrigerator and release it from the springform pan. Pour the white chocolate ganache evenly over the top of the cheesecake, allowing it to gently drip down the sides if desired. Using red decorating icing, pipe the iconic red icing stripes across the surface. Finally, sprinkle green sugar sprinkles over the top for a festive holiday look.
- Serve and enjoy: Slice the cheesecake into 14 servings and serve chilled. Enjoy this creamy, festive dessert perfect for holiday celebrations!
Notes
- This Christmas Tree Cheesecake combines creamy vanilla cheesecake with festive holiday snack cakes and decorative toppings for a show-stopping dessert centerpiece.
- Be careful not to overmix the batter once eggs are added to prevent cracking during baking.
- Refrigerate the cheesecake overnight for best texture and flavor.
- The red icing stripes and green sprinkles add a fun and festive touch that keeps the holiday spirit bright.
- Use a springform pan for easy removal and clean edges.
Nutrition
- Serving Size: 1 slice (approximate)
- Calories: 314 kcal
- Sugar: 29 g
- Sodium: 158 mg
- Fat: 17 g
- Saturated Fat: 8 g
- Unsaturated Fat: 7 g
- Trans Fat: 0.2 g
- Carbohydrates: 37 g
- Fiber: 0.4 g
- Protein: 4 g
- Cholesterol: 74 mg


