

If you’re anything like me and adore the combo of chocolate and peanut butter, then you absolutely need to try this Chocolate Peanut Butter Cottage Cheese Ice Cream Bars Recipe. It’s creamy, dreamy, and packs a bit of a protein punch thanks to the cottage cheese. Plus, these bars are a breeze to make—no ice cream maker required! Stick around because I’m sharing all my secrets to get these just right, so you’ll be loving every bite.
Why You’ll Love This Recipe
- Protein-packed & creamy: Cottage cheese adds creaminess and keeps it healthy with extra protein.
- No ice cream maker needed: You just blend, freeze, and dip—easy peasy.
- Chocolate & peanut butter bliss: This classic combo shines with a homemade crunchy chocolate coating.
- Customizable toppings: You can switch up nuts, sprinkles, or chocolate chips to make it your own.

Ingredients You’ll Need
These ingredients come together to create a luscious, smooth base with just the right amount of sweetness and flavor. I like shopping for natural peanut butter to keep the flavors pure and to avoid added sugars or oils.

- Cottage cheese: Use any variety you prefer; I like low-fat or full-fat for richer texture.
- Maple syrup: Adds natural sweetness; honey works too if you like.
- Vanilla extract: Gives that warm, inviting aroma.
- Salt: Just a dash to brighten all the flavors.
- Natural peanut butter: The star of the show; creamy or chunky, whatever you love.
- Cocoa powder: Use unsweetened for the best chocolate punch.
- Peanuts (chopped): For that irresistible crunch on the coating.
- Chocolate sprinkles: Adds a fun texture and extra chocolatey flair.
- Chocolate chips: Hu No Added Sugar chips are my go-to for melting without added junk.
Variations
What I love about this recipe is how easy it is to make your own tweaks and have it suit your cravings or diet. I often swap out toppings or experiment with alternative nut butters to keep things exciting.
- Nut-free version: Replace peanut butter with sunflower seed butter and swap peanuts for toasted pumpkin seeds; my niece loves this version!
- Extra indulgence: Add a swirl of caramel or fudge sauce inside before freezing for a surprise center.
- Vegan friendly: Use a dairy-free cottage cheese substitute or silken tofu, and maple syrup instead of honey.
- Mix-ins: Toss in mini dark chocolate chips right into the base for extra bite-worthy texture.
How to Make Chocolate Peanut Butter Cottage Cheese Ice Cream Bars Recipe
Step 1: Blend the creamy chocolate peanut butter base
Start by combining cottage cheese, cocoa powder, maple syrup, vanilla, and a dash of salt in your blender or Nutribullet cup. I use a high-speed blender to get it absolutely smooth, but an immersion blender works just as well. Blend until there are no lumps – this step is key to achieving that silky ice cream texture you’re craving. Trust me, smooth is better!
Step 2: Pour into popsicle molds and freeze
Once your mixture is silky and smooth, pour it evenly into popsicle molds. I’m obsessed with silicone molds because your bars pop right out without hassle. Insert the sticks, cover the mold, and freeze for at least 3-4 hours until they’re firm. Patience is key here, but trust me, it’s worth the wait!
Step 3: Prepare the chocolate dip
While the bars are freezing, melt your chocolate chips with a little coconut oil in a microwave-safe bowl. I zap mine for 30 seconds, stir gently, then microwave another 30 seconds and stir until super smooth. This double-microwave method keeps the chocolate glossy and prevents burning. Hint: Using natural, no added sugar chocolate really makes a difference in taste.
Step 4: Dip and decorate
When your bars are frozen solid, dip each one quickly into the melted chocolate, shake off any excess, then immediately dip into plates of chopped peanuts and chocolate sprinkles before the chocolate hardens. I always set mine on parchment paper while they set, and if I’m not eating them right away, straight back into the freezer they go. Pro tip: Work fast during this step before the dip hardens!
Pro Tips for Making Chocolate Peanut Butter Cottage Cheese Ice Cream Bars Recipe
- Blending thoroughly: I learned that blending longer helps avoid any grainy texture from the cottage cheese, making the bars super smooth.
- Chocolate dipping speed: When you dip bars in chocolate, be quick—otherwise the coating thickens too fast and becomes hard to coat evenly.
- Use silicone molds: They make popping the frozen bars out effortless, which avoids any breakage or mess.
- Let thaw before eating: If frozen more than a few hours, let the bars sit 5-10 minutes to soften up to that perfect creamy consistency.
How to Serve Chocolate Peanut Butter Cottage Cheese Ice Cream Bars Recipe

Garnishes
I usually stick with chopped peanuts and chocolate sprinkles because they add just the right amount of crunch and extra chocolatey goodness. Sometimes, I’ll sprinkle a pinch of flaky sea salt on top to elevate the flavors — it’s a game changer!
Side Dishes
These bars are pretty filling on their own, but if I’m serving them at a party, I like pairing them with fresh berries or sliced banana for a fresh and fruity contrast.
Creative Ways to Present
For a fun twist, I’ve dipped them in white chocolate instead of dark, then rolled them in crushed freeze-dried raspberries for a colorful stack that’s perfect for birthdays or weekend treats.
Make Ahead and Storage
Storing Leftovers
I keep leftovers tightly wrapped or in an airtight container in the freezer. This keeps them fresh and avoids freezer burn. Just make sure to place parchment or wax paper between bars if stacking.
Freezing
Freezing these bars works like a charm and actually improves the texture after a couple of hours. Just remember, don’t leave them too long—any longer than a day or two they start getting icy, so consume within that window for the best creamy texture.
Reheating
Since these are frozen treats, reheating isn’t really needed, but I like to let them thaw for 5-10 minutes on the counter before serving so they soften nicely and taste less like a popsicle and more like creamy ice cream.
FAQs
-
Can I use regular yogurt instead of cottage cheese?
You can, but the texture and protein content will differ. Cottage cheese provides a thicker, creamier base with more protein, making the bars less icy and more satisfying. Greek yogurt might be a better substitute if you don’t have cottage cheese on hand.
-
Is this recipe suitable for kids?
Absolutely! The natural sweetness from maple syrup and familiar flavors make it a kid-friendly treat. Just keep an eye on portions since it has nuts and chocolate.
-
Can I make these bars without the chocolate coating?
Yes, you can enjoy the bars plain or with just chopped peanuts sprinkled on top. However, the chocolate coating adds a wonderful crunchy texture and rich flavor that really makes these stand out.
-
How long do these bars last in the freezer?
For the best texture and flavor, eat within 2-3 days. After that, the bars can start to develop icy crystals that change the creamy texture.
Final Thoughts
I absolutely love how this Chocolate Peanut Butter Cottage Cheese Ice Cream Bars Recipe turns out every single time—it’s creamy, satisfying, and just the right balance of sweet and salty. When I first tried it, I was amazed at how simple it was to make such a healthy-ish treat with no fancy gadgets. I know you’re going to enjoy it just as much as my family does, and honestly, it’s the kind of dessert you’ll want to keep in your freezer for quick indulgences. Give it a whirl, and don’t forget to share your favorite variations with me!
Print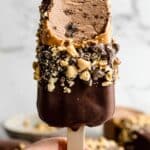
Chocolate Peanut Butter Cottage Cheese Ice Cream Bars Recipe
- Prep Time: 10 minutes
- Cook Time: 0 minutes
- Total Time: 4 hours 10 minutes
- Yield: 4 bars
- Category: Dessert
- Method: Freezing
- Cuisine: American
- Diet: Low Salt
Description
Delicious and creamy Chocolate Peanut Butter Cottage Cheese Ice Cream Bars that combine the richness of peanut butter and cocoa with the smoothness of cottage cheese. These no-churn, homemade ice cream bars are easy to prepare, requiring only blending and freezing, then dipped in a crunchy chocolate coating with chopped peanuts and sprinkles for an irresistible treat.
Ingredients
Ice Cream Base
- 1-1/4 cup cottage cheese (any variety)
- 2 tablespoons maple syrup (or honey)
- 1 teaspoon vanilla extract
- Dash of salt
- 1 tablespoon natural peanut butter
- 1 tablespoon cocoa powder
Coating & Toppings
- 1/2 cup chocolate chips (preferably Hu No Added Sugar)
- 2 tablespoons chopped peanuts
- 1 tablespoon chocolate sprinkles
- 1 tablespoon coconut oil
Instructions
- Prepare the Ice Cream Base: Combine the cottage cheese, cocoa powder, maple syrup, vanilla extract, natural peanut butter, and a dash of salt in a blender or Nutribullet cup. Blend until the mixture is completely smooth and creamy, ensuring no lumps remain.
- Freeze the Ice Cream Bars: Pour the smooth ice cream mixture into silicone popsicle molds, insert the popsicle sticks, and cover with the silicone lids. Place the molds in the freezer for 3-4 hours or until the bars are fully set and firm.
- Make the Chocolate Coating: In a microwave-safe bowl, combine the chocolate chips and coconut oil. Heat for 30 seconds, then stir gently. Repeat heating for another 30 seconds until the chocolate and oil mixture is fully melted and smooth.
- Dip and Decorate the Bars: Remove the frozen bars from the molds. Quickly dip each bar into the melted chocolate coating, allowing excess chocolate to drip off. Immediately roll or sprinkle the bars in chopped peanuts and chocolate sprinkles before the chocolate hardens.
- Set the Coating: Place the dipped bars on parchment paper to allow the coating to set. Enjoy immediately for a softer texture, or return to the freezer to firm up further. If frozen for too long, allow to thaw 5-10 minutes before eating for creamy consistency.
Notes
- To ensure easy removal from molds, use silicone popsicle molds as they are flexible and user-friendly.
- These ice cream bars may become icy if kept frozen too long; thaw slightly before serving for best texture.
- Maple syrup can be substituted with honey or preferred liquid sweetener.
- For a smoother chocolate coating, ensure chocolate chips and coconut oil are fully melted and combined.
- Use natural peanut butter without added sugars or oils for a healthier option.
Nutrition
- Serving Size: 1 bar
- Calories: 300 kcal
- Sugar: 18 g
- Sodium: 209 mg
- Fat: 16 g
- Saturated Fat: 8 g
- Unsaturated Fat: 3 g
- Trans Fat: 0 g
- Carbohydrates: 13 g
- Fiber: 5 g
- Protein: 11 g
- Cholesterol: 11 mg

