
If you’re on the hunt for a fun, easy, and absolutely delightful treat, my Chocolate Marshmallow Pops Recipe is going to be your new best friend in the kitchen. These little bites of joy are not only simple to make but also perfect for parties, cozy nights in, or just whenever you want to add a bit of whimsy to your day. Seriously, once you try this recipe, you’ll understand why my family goes crazy for them!
Why You’ll Love This Recipe
- Super Simple: It takes just minutes to whip up the chocolate coating and get your marshmallows ready — perfect for quick sweet fixes.
- Customizable Fun: You can play with different chocolate types and toppings to tailor each pop to your taste or the occasion.
- Kid-Friendly Activity: This recipe is a blast to make with kids — a great way to bond and share laughs while creating something tasty.
- Mess-Free Treat: Using lollipop sticks keeps things neat and makes eating way easier (plus, they look adorable!).

Ingredients You’ll Need
One of the best things about this Chocolate Marshmallow Pops Recipe is that it uses ingredients you likely have on hand or can find easily. The combo of gooey marshmallows and silky melted chocolate is a match made in dessert heaven.
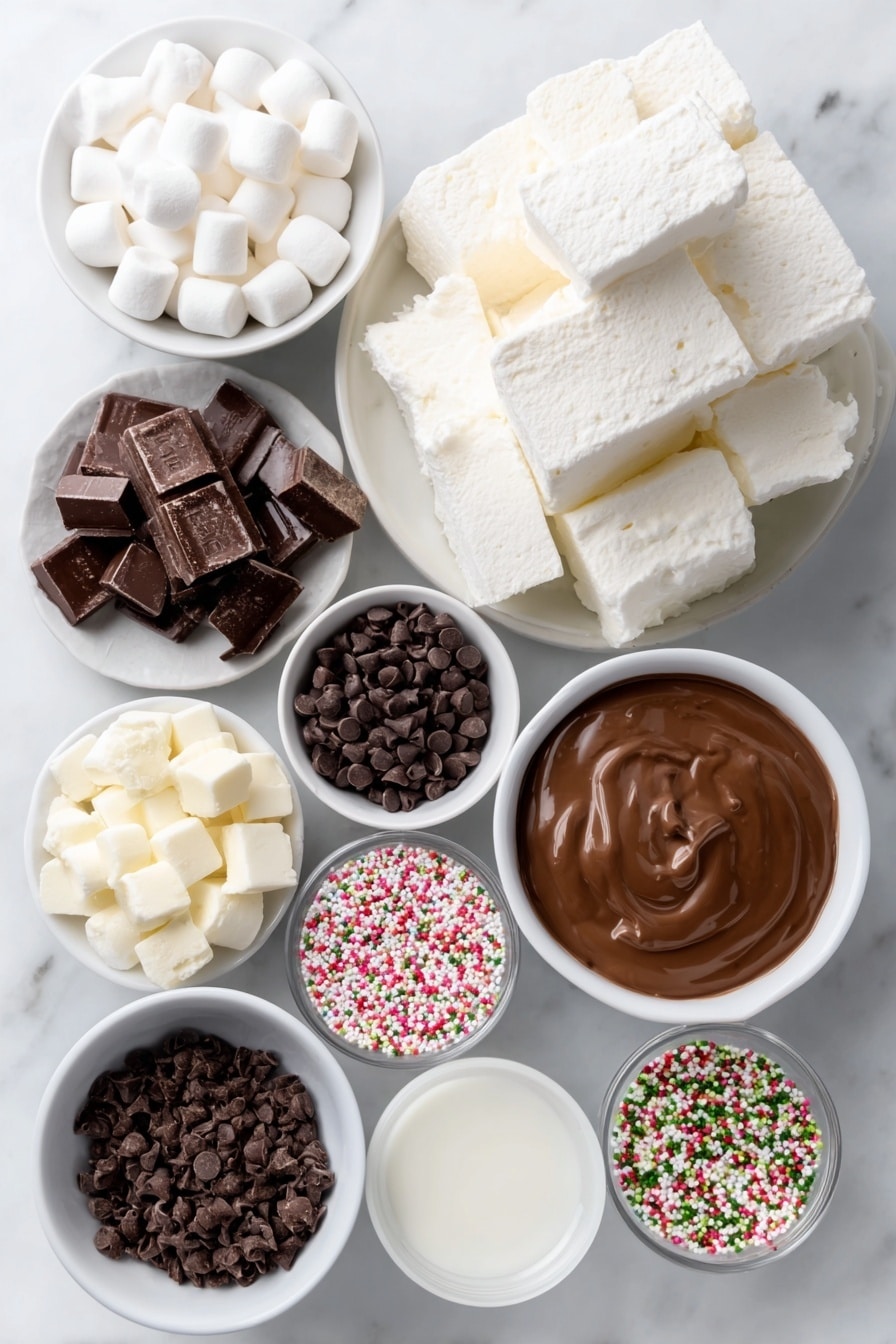
- Large marshmallows: I prefer using store-bought, but homemade ones can take this up a notch if you’re feeling adventurous.
- Chocolate candy melts: Pick milk, dark, or white chocolate depending on your mood—you can even mix and match!
- Lollipop sticks: These make handling the pops super easy and fun, and they’ll keep the chocolate intact as it sets.
- Sprinkles or decorative toppings: Think colorful sprinkles, crushed nuts, or even edible glitter for a special touch.
Variations
I’ve found that tweaking this Chocolate Marshmallow Pops Recipe is half the fun. Whether you want to fit in with dietary needs or just jazz things up for the holidays, these pops are a blank canvas waiting for your creativity.
- Use dark chocolate and sea salt: I love this grown-up twist—it takes the sweetness down a notch and adds a lovely sophistication.
- Add crushed peppermint candies: Around Christmas, these festive bits add crunch and holiday vibes that my family adores.
- Try vegan marshmallows and dairy-free chocolate: Works wonderfully for friends with dietary restrictions, and you won’t sacrifice taste.
- Dip in colored candy melts: Perfect for themed parties or birthdays—you can create rainbow pops that bring instant smiles.
How to Make Chocolate Marshmallow Pops Recipe
Step 1: Melt the Chocolate Gently
Start by placing your chocolate candy melts in a microwave-safe bowl. Heat them on 50% power for 1 minute, then give them a good stir. This is key—stirring keeps the chocolate smooth and helps it melt evenly without burning. Continue heating in 30-second bursts at half power, stirring well between each, until the chocolate is silky and fully melted. This slow approach avoids that grainy texture and prevents the chocolate from becoming unworkable, which I learned the hard way!
Step 2: Prep Your Marshmallows
While the chocolate melts, take your marshmallows and carefully push a lollipop stick right into one of the flat sides. You want it to sit snugly without poking all the way through the other side—this helps keep the pop sturdy when dipping. I like to line them up on a plate as I go so there’s no scrambling later.
Step 3: Get Your Toppings Ready
Sprinkles, crushed nuts, or whatever fun toppings you like should be placed in small bowls for easy access. Having these ready to go means you can sprinkle the pops right after dipping without any stressed fumbling, especially if kids are helping!
Step 4: Dip, Decorate, and Set
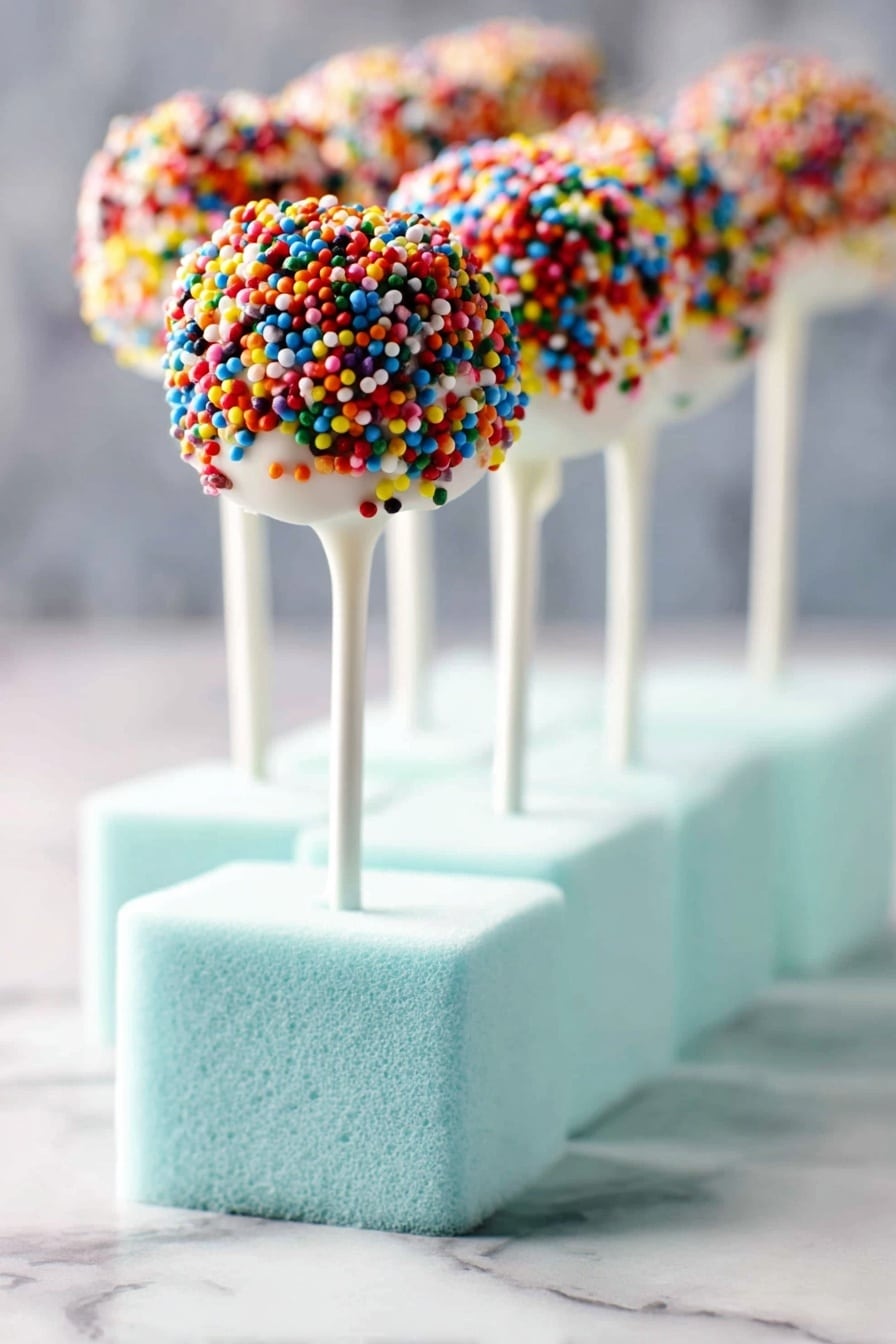
Dip the top of each marshmallow into the melted chocolate, allowing excess to drip back into the bowl. Wait about 10 seconds so the chocolate isn’t too wet, then sprinkle generously with your chosen toppings. The trick I discovered is to sprinkle by hand or gently tap on a spoon to avoid smashing the coating. Stick each pop into foam blocks or place on a wax-paper lined sheet pan stick-side up to let them set, which takes about 30 minutes. No rushing this part—you want the chocolate fully firm for the best bite.
Pro Tips for Making Chocolate Marshmallow Pops Recipe
- Use quality candy melts: I’ve found that good quality melts give a smoother, more professional-looking finish.
- Don’t skip stirring: Stirring between microwave intervals prevents overheating and keeps the chocolate glossy.
- Work quickly with toppings: Chocolate sets fast, so have your decorations ready to sprinkle immediately after dipping.
- Avoid pops sticking: Using florist’s foam or styrofoam blocks keeps pops separated and protects the delicate chocolate from smudges.
How to Serve Chocolate Marshmallow Pops Recipe

Garnishes
Personally, I love using a rainbow sprinkle mix because it adds vibrant color and crunch—plus, it’s like a tiny celebration on each pop. For a winter twist, crushed peppermint or edible glitter make these pops sparkle beautifully. The key is choosing garnishes that contrast the chocolate, so they pop visually and texturally.
Side Dishes
These marshmallow pops are sweet enough to stand alone, but I sometimes pair them with a simple cup of hot cocoa or mulled cider to elevate the cozy vibe. For parties, a fruit platter or small cheese board balances the sweets beautifully and keeps things fresh.
Creative Ways to Present
For birthday parties or baby showers, I’ve arranged these pops standing upright in a decorated mason jar filled with colored sugar—it’s like edible art! Wrapping each pop in cellophane tied with a cute ribbon makes them thoughtful party favors or gift treats, adding an extra touch of love to your presentation.
Make Ahead and Storage
Storing Leftovers
I keep leftover Chocolate Marshmallow Pops in an airtight container at room temperature to preserve that perfect marshmallow softness and chocolate crunch. They last best for 2-3 days this way, but honestly, they rarely stick around that long in my house!
Freezing
Freezing works surprisingly well if you want to prep in advance. I wrap each pop individually in plastic wrap, then place them in a freezer-safe container. When ready to enjoy, just thaw at room temperature for about 20 minutes. I find freezing can slightly alter the marshmallow texture, so I reserve this method for when I’m short on time but still want those pops on hand.
Reheating
No need to heat these up! Chocolate marshmallow pops taste best at room temp, so if you’ve frozen them, just let them thaw naturally. If the chocolate looks dull after thawing, a quick blast (5-10 seconds) with a hairdryer on low heat can bring back the shine without melting the marshmallow.
FAQs
-
Can I use regular chocolate instead of candy melts for this Chocolate Marshmallow Pops Recipe?
Absolutely! You can use quality chocolate bars or chips, but I recommend tempering it properly or mixing in a little coconut oil to achieve a smooth, shiny coating that sets well on the marshmallows.
-
How do I prevent the chocolate from cracking once it sets?
Chocolate cracks if it cools too quickly or if it’s too thickly applied. To avoid this, dip quickly, allow excess chocolate to drip off before setting, and avoid refrigeration—room temperature setting works best for gentle drying.
-
Can I make this recipe dairy-free or vegan?
Yes! Use vegan marshmallows and dairy-free chocolate melts, which are commonly available now. The process remains the same and the result is just as delicious.
-
What’s the best way to store these pops if I’m making them for a party?
Store them in an airtight container in a cool, dry place away from direct sunlight. Setting them on foam blocks or plates lined with wax paper helps maintain their shape until serving.
Final Thoughts
This Chocolate Marshmallow Pops Recipe has become one of my favorite go-to treats because it combines simplicity with endless fun. Whether you’re crafting these with your kids, prepping for a party, or just craving a sweet pick-me-up, these pops deliver smiles every time. I highly recommend giving them a try—you might just find yourself making them again (and again) like I do!
Print
Chocolate Marshmallow Pops Recipe
- Prep Time: 5 minutes
- Cook Time: 5 minutes
- Total Time: 40 minutes
- Yield: 20 marshmallow pops
- Category: Dessert
- Method: No-Cook
- Cuisine: American
- Diet: Vegetarian
Description
Delight in these fun and easy Chocolate-Covered Marshmallow Pops, perfect for parties or a sweet treat anytime. Soft marshmallows dipped in rich, melted chocolate and decorated with colorful sprinkles create a festive and delicious snack that kids and adults will love.
Ingredients
Marshmallows
- 20 large marshmallows, store bought or homemade
Chocolate Coating
- 1 10-ounce bag chocolate candy melts (milk, white, or dark chocolate)
Extras
- Lollipop sticks
- Sprinkles or other decorative toppings of choice
Instructions
- Melt the chocolate: Place chocolate candy melts in a microwave-safe bowl. Heat on 50% power for 1 minute, then stir well. Continue heating on 50% power at 30-second intervals, stirring between each, until the chocolate is fully melted but not overheated to avoid it becoming unworkable.
- Prepare marshmallow pops: Insert lollipop sticks into the center of one flat side of each marshmallow. Ensure they sit firmly without piercing through the other side.
- Set up toppings and workstation: Pour sprinkles or decorative toppings into small bowls. Line a sheet pan with waxed paper or prepare a block of styrofoam or florist’s foam to stand the pops upright for setting.
- Dip and decorate marshmallows: Dip the marshmallow tops into the melted chocolate, letting excess drip back into the bowl. After about 10 seconds, sprinkle the desired toppings onto the chocolate-coated marshmallows using hands or a spoon.
- Allow chocolate to set: Stick the marshmallow pops upright into styrofoam blocks or place on the lined sheet pan stick side up. Let them sit for approximately 30 minutes until the chocolate has fully set.
Notes
- This recipe is a fun kitchen activity that results in a sweet and decorative treat perfect for family gatherings or celebrations.
Nutrition
- Serving Size: 2 pops
- Calories: 27
- Sugar: 4.6 g
- Sodium: 6.4 mg
- Fat: 0.3 g
- Saturated Fat: 0.3 g
- Unsaturated Fat: 0 g
- Trans Fat: 0 g
- Carbohydrates: 6.3 g
- Fiber: 0 g
- Protein: 0.2 g
- Cholesterol: 0.1 mg


