
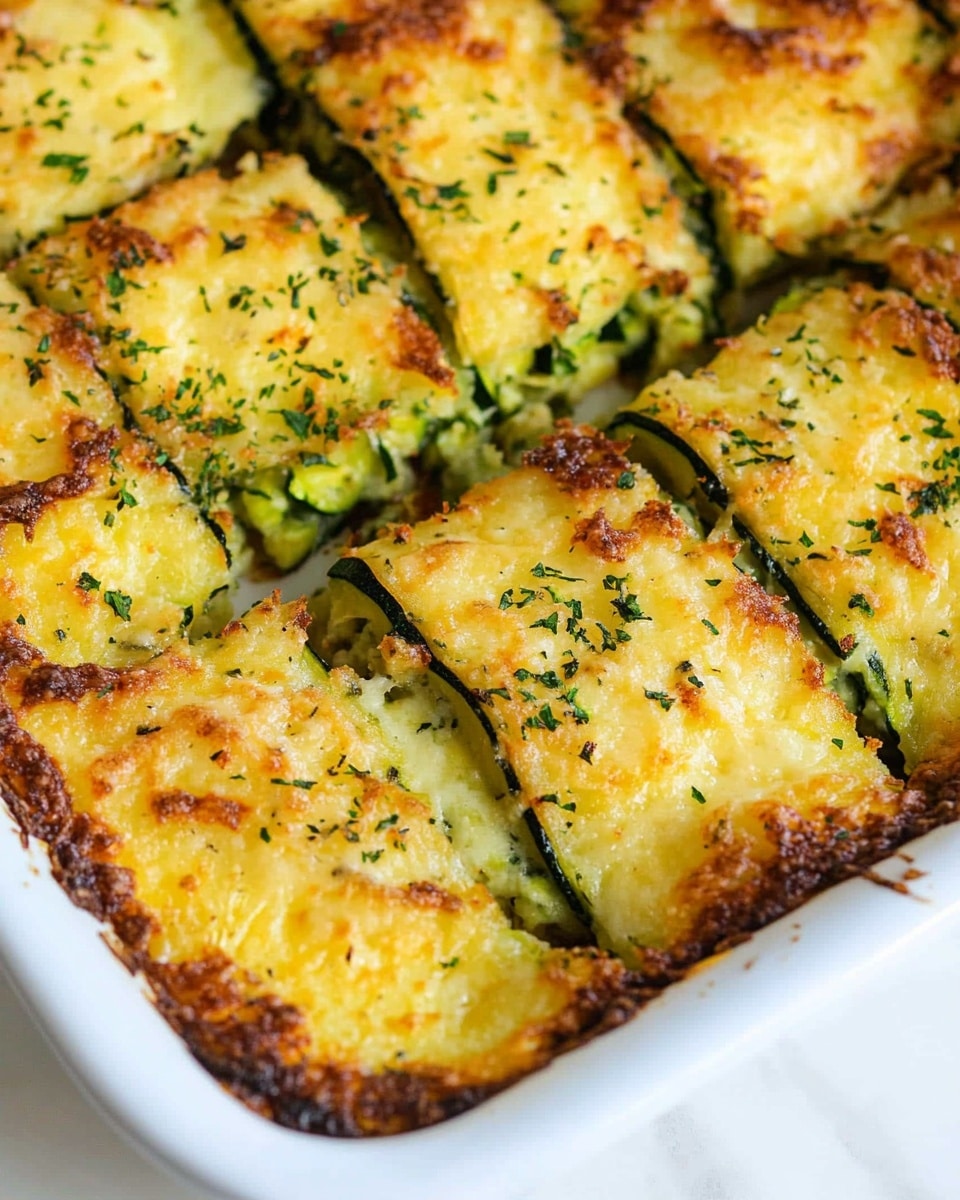
Oh, I absolutely love sharing this Cheesy Zucchini Breadsticks Recipe with friends—and honestly, it’s one of those surprisingly simple dishes that feels fancy but takes minimal effort. The perfect blend of zucchini’s fresh moisture with melty mozzarella and sharp Parmesan cheese means you get breadsticks that are crispy on the outside, tender on the inside, and packed with cheesy goodness. It’s a fantastic way to sneak some veggies into a snack or side dish, especially when you want something comforting but not too heavy.
Whenever I make these cheesy zucchini breadsticks, they disappear fast at my family gatherings or casual weeknight dinners. You’ll find that they’re delightfully versatile—great alongside a hearty soup, or just dipped in marinara sauce while binge-watching your favorite shows. Plus, this Cheesy Zucchini Breadsticks Recipe is a wonderful option if you want a gluten-light alternative without sacrificing any of that ooey-gooey cheese magic.
Why You’ll Love This Recipe
- Simple Ingredients: Uses just a handful of pantry staples and fresh zucchini—easy to source and quick to prepare.
- Great Veggie Hack: Perfect way to sneak veggies into your meal without anyone feeling deprived or noticing.
- Versatile Snack or Side: Works wonderfully as an appetizer, side dish, or even a quick snack with your favorite dip.
- Kid-Approved & Family Favorite: This recipe won over my picky eaters and has become a staple at home.

Ingredients You’ll Need
The magic of this Cheesy Zucchini Breadsticks Recipe starts with simple, fresh ingredients that come together to create those cheesy, satisfying breadsticks. When shopping, try to get firm zucchini and freshly grated cheeses for the best melt and flavor.
- Zucchini: Fresh and firm zucchini gives moisture and texture; draining is crucial to avoid soggy breadsticks.
- Mozzarella Cheese: Freshly grated mozzarella melts beautifully and adds that classic stretchy texture.
- Parmesan Cheese: Adds a wonderful sharp, nutty flavor that complements mozzarella perfectly.
- Egg: Acts as a binder to hold all the ingredients together—don’t skip it!
- Garlic Salt: Brings a subtle savory depth that amps up the flavor without overpowering.
- Fresh Parsley (optional): Adds a pop of color and a fresh herbal note for garnish.
Variations
I love how adaptable this Cheesy Zucchini Breadsticks Recipe is—feel free to tweak it based on what you have or who you’re feeding. Experimenting keeps it fun and personalized, which always makes the kitchen experience more enjoyable.
- Add Herbs: Sometimes, I toss in some dried oregano or basil into the mixture for an Italian twist that brings even more flavor.
- Spicy Kick: If you like heat, sprinkle some red pepper flakes or mix in a little finely chopped jalapeño to the zucchini before baking.
- Cheese Swap: I’ve also tried swapping half the mozzarella for sharp cheddar or smoked gouda for a more intense cheese profile.
- Make it Gluten-Free Friendly: This recipe naturally avoids flour, but make sure your seasoning mix doesn’t contain any hidden gluten.
How to Make Cheesy Zucchini Breadsticks Recipe
Step 1: Prep and Drain the Zucchini
First things first: grate the zucchini and place it in a colander to sit for 10 to 15 minutes. This step is critical because zucchini holds a lot of water and you don’t want soggy breadsticks! After resting, wrap it in a clean kitchen towel or a few layers of paper towels, then squeeze hard to remove as much liquid as you can. I learned this trick after a few failed attempts at soggy, floppy breadsticks—once you do this, your texture improves drastically.
Step 2: Mix the Ingredients
In a large bowl, combine the drained zucchini with a third of the mozzarella cheese, the beaten egg, and garlic salt. Mix everything thoroughly until it’s fully incorporated. This mixture should stick together a bit—if it feels too loose, double-check you squeezed out the zucchini well enough. Don’t worry if it seems wet at first; baking will firm it up nicely.
Step 3: Shape and Bake the Base
Line a rimmed baking sheet with parchment paper and spread your zucchini mixture out evenly into a rectangle about a quarter-inch thick. I find using a rubber spatula helps get the edges nice and tidy. Bake this base at 450°F for about 15 minutes, until the edges are golden brown and it has set—you’ll want it to hold together but still be tender inside. Patience here pays off in texture.
Step 4: Add Cheese and Finish Baking
Once your base is baked, sprinkle the remaining mozzarella and Parmesan cheese evenly over the top. Lower the oven temperature to 425°F and pop it back in for another 10 minutes or until the cheese is bubbly and golden brown. This finishing step gives you that irresistible cheesy crust on top that everyone will fight over!
Step 5: Garnish and Serve
After it comes out of the oven, sprinkle some freshly chopped parsley on top if you like a fresh herbal note and a bit of color. Then slice it into sticks and dig in! I often serve these right away—they’re best warm when the cheese is still delightfully gooey.
Pro Tips for Making Cheesy Zucchini Breadsticks Recipe
- Drain Thoroughly: Don’t rush squeezing out zucchini water; too much moisture is the top reason for mushy breadsticks.
- Use Fresh Cheese: Freshly grated mozzarella melts better than pre-shredded varieties coated with anti-caking agents.
- Even Thickness: Spread your mixture evenly for consistent cooking—thin spots can get too crisp.
- Don’t Skip the Second Bake: The final baking with cheese is what creates that irresistible golden, bubbly finish.
How to Serve Cheesy Zucchini Breadsticks Recipe
Garnishes
I always reach for fresh chopped parsley—it brightens the rich cheese and adds a splash of green that makes the breadsticks look as good as they taste. Sometimes a pinch of crushed red pepper flakes or a dusting of extra Parmesan on top right out of the oven adds a nice touch too.
Side Dishes
My go-to pairing is a warm bowl of marinara sauce or even a creamy garlic dip for dunking. If you’re looking for a meal, these breadsticks complement soups like tomato basil or minestrone beautifully—and they also go well with fresh salads or grilled chicken for a simple dinner.
Creative Ways to Present
For parties, I like serving these breadsticks upright in a tall glass or mason jar with a side bowl of dip on the tray. It makes grabbing them easier and looks super inviting. For a cozy night, I stack them on a rustic wooden board sprinkled with fresh herbs and some lemon wedges for a hint of brightness.
Make Ahead and Storage
Storing Leftovers
I usually store leftover breadsticks in an airtight container in the fridge for up to 3 days. Before refrigerating, I let them cool completely to avoid condensation which can make them soggy. When ready to eat, they still taste great reheated!
Freezing
If you want to freeze these, I recommend slicing them into sticks first, then placing parchment paper between layers in a freezer-safe container or bag. They freeze beautifully for up to a month. When ready, thaw overnight in the fridge for best results.
Reheating
To reheat and keep that crispy outside edge, I pop the breadsticks in a 375°F oven for 8–10 minutes. This brings back their fresh-baked texture better than microwaving, which tends to make them chewy or soggy.
FAQs
-
Can I use frozen zucchini for the Cheesy Zucchini Breadsticks Recipe?
Fresh zucchini is best for this recipe because it holds up better in both texture and moisture control. Frozen zucchini releases much more water when thawed, making drainage even more critical and potentially leading to soggy breadsticks. If you must use frozen, thaw thoroughly and squeeze out excess liquid very well.
-
Is this Cheesy Zucchini Breadsticks Recipe gluten-free?
Yes! Since this recipe doesn’t use any flour or wheat ingredients, it’s inherently gluten-free. Just double-check your seasonings and Parmesan label to ensure there are no hidden gluten additives if you’re cooking for someone with gluten intolerance or celiac disease.
-
Can I make this recipe vegan or dairy-free?
Switching to a vegan or dairy-free version will require substituting the cheeses and egg. You could try vegan mozzarella and Parmesan alternatives, and use a flax egg as a binder. Keep in mind the texture and flavor will change, so experiment in small batches to get it right.
-
How do I prevent the breadsticks from falling apart?
Removing as much moisture as possible from the zucchini and including the egg as a binder are key to holding these breadsticks together. Also, be gentle when spreading the mixture and slicing after baking to keep the structure intact.
Final Thoughts
This Cheesy Zucchini Breadsticks Recipe has become one of my all-time favorites because it’s a delicious way to combine healthy veggies with indulgent cheese in a bite-sized, shareable form. I genuinely recommend giving it a try—you might be surprised how quick and satisfying it is to make, and I bet it will become a go-to snack or side in your kitchen too. Trust me, once you nail the moisture step and get that perfect golden crust, you’ll wonder why you didn’t make these sooner!
Print
Cheesy Zucchini Breadsticks Recipe
- Prep Time: 20 minutes
- Cook Time: 25 minutes
- Total Time: 45 minutes
- Yield: 6 servings
- Category: Appetizer
- Method: Baking
- Cuisine: American
- Diet: Low Fat
Description
These Cheesy Zucchini Breadsticks are a delicious and healthy twist on traditional breadsticks. Made primarily with fresh grated zucchini, mozzarella, and Parmesan cheese, they are perfect as a snack, appetizer, or side dish. Baked until golden and bubbly, they offer a crispy edge with a soft, cheesy center. Garnish with fresh parsley for a touch of color and freshness.
Ingredients
Main Ingredients
- 3 cups zucchini, grated
- 1 cup mozzarella cheese, grated and divided
- 1/3 cup Parmesan cheese, grated
- 1 egg, beaten
- 1 teaspoon garlic salt
- Fresh parsley, finely chopped, for garnish (optional)
Instructions
- Preheat oven: Preheat your oven to 450°F (232°C) and line a rimmed baking sheet with parchment paper to ensure easy removal and cleanup.
- Drain zucchini: Place the grated zucchini in a colander and let it sit for 10-15 minutes to release excess moisture. Then, use a clean kitchen towel or paper towels to squeeze out as much water as possible to prevent soggy breadsticks.
- Mix ingredients: In a large mixing bowl, combine the drained zucchini, 1/3 cup of the grated mozzarella, the beaten egg, and garlic salt. Mix thoroughly until all ingredients are well combined.
- Shape the dough: Spread the zucchini mixture evenly onto the prepared baking sheet, smoothing it into a rectangle about 1/4 inch thick using a rubber spatula.
- First bake: Bake the zucchini base at 450°F for about 15 minutes or until the edges start to turn golden brown.
- Add cheese topping: Remove the baking sheet from the oven and evenly sprinkle the remaining mozzarella and Parmesan cheese over the top of the baked zucchini base.
- Second bake: Reduce the oven temperature to 425°F (218°C) and return the baking sheet to the oven. Bake for an additional 10 minutes, or until the cheese on top is bubbly and golden brown.
- Garnish and serve: If desired, sprinkle the breadsticks with freshly chopped parsley for added color and flavor. Cut into sticks and serve warm. Enjoy!
Notes
- Be sure to squeeze out as much liquid from the grated zucchini as possible to ensure the breadsticks hold together well.
- You can substitute garlic salt with garlic powder and a pinch of regular salt if preferred.
- For a sharper flavor, try using aged Parmesan cheese.
- These breadsticks are best served fresh and warm but can be reheated in the oven for a few minutes to regain crispiness.
Nutrition
- Serving Size: 1 serving (about 1/6 of recipe)
- Calories: 140
- Sugar: 2g
- Sodium: 380mg
- Fat: 7g
- Saturated Fat: 3.5g
- Unsaturated Fat: 2.5g
- Trans Fat: 0g
- Carbohydrates: 9g
- Fiber: 2g
- Protein: 10g
- Cholesterol: 55mg


