

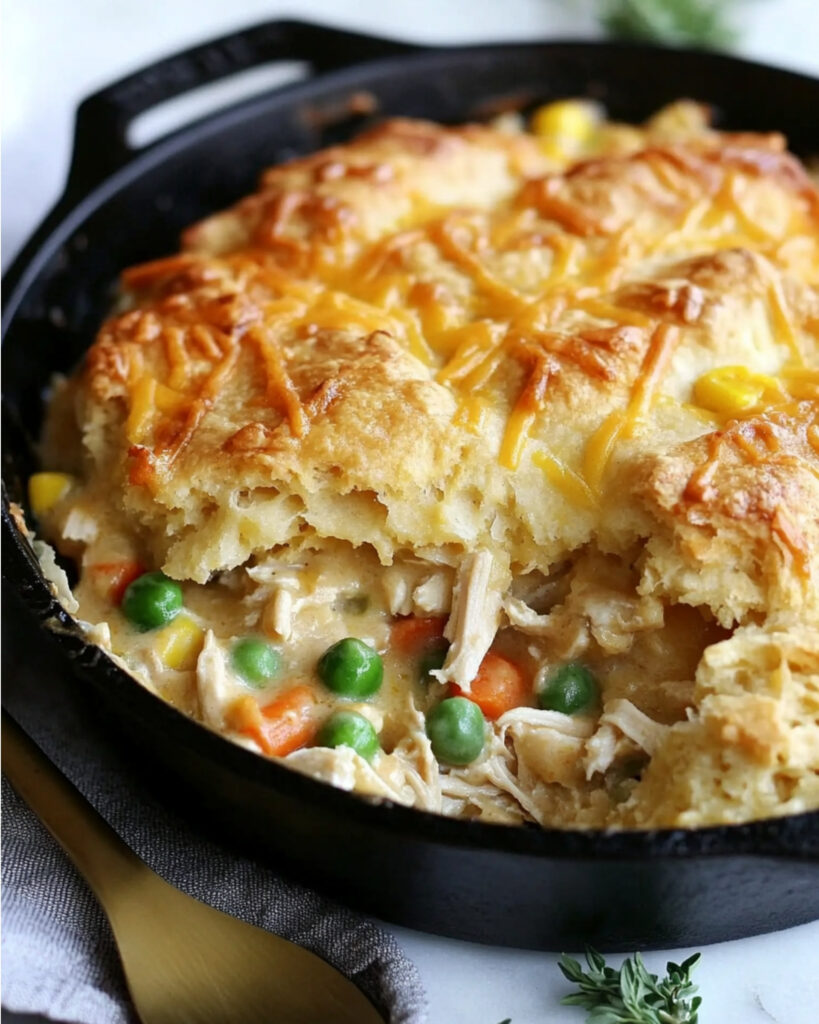
This Cheesy Biscuit Topped Chicken Pot Pie transforms a classic comfort dish into something truly spectacular. Imagine a creamy, savory chicken filling bubbling away under a blanket of cheesy, garlic-flecked biscuits that bake up golden and fluffy. Ready in just 30 minutes, this one-skillet wonder brings together convenience and homemade flavor for those evenings when you want something heartwarming without hours in the kitchen.
Why You’ll Love This Recipe
- Quick Comfort Food: This pot pie delivers all the cozy satisfaction of a traditional version but takes just 30 minutes from start to finish—perfect for weeknight cravings!
- One-Skillet Wonder: Everything cooks in a single skillet, meaning less cleanup and more time to enjoy your delicious creation.
- Crowd-Pleaser: Those cheesy biscuits on top will have everyone fighting for seconds. Trust me, this dish has converted even the pickiest eaters at my table.
- Customizable: The base recipe is fantastic as is, but you can easily adapt it to whatever ingredients you have on hand—making it a perfect “clean out the fridge” dinner option.

Ingredients You’ll Need
- Cream of chicken soup: The shortcut base that creates that rich, velvety sauce without hours of simmering. It’s the secret to getting this on the table quickly!
- Frozen mixed vegetables: These time-savers bring color, nutrition, and flavor without any chopping. I find the classic carrots, peas, corn, and green bean mix works beautifully.
- Black pepper: Just a touch brings warmth and depth to balance the creamy elements.
- Soy sauce: This surprising ingredient adds that perfect umami note that makes people wonder what your secret is.
- Shredded cooked chicken: Use rotisserie chicken to make this truly weeknight-friendly, or plan ahead with meal-prepped chicken.
- Self-rising flour: The foundation of our biscuit topping—White Lily makes exceptionally tender biscuits, but any self-rising flour will work.
- Vegetable shortening: Creates those flaky layers that make a proper Southern biscuit so irresistible.
- Milk: Brings the biscuit dough together and adds richness. Keep some extra on hand in case your dough feels too dry.
- Salt: Enhances all the flavors in the biscuit topping.
- Garlic powder: Infuses the biscuits with savory flavor that perfectly complements the filling.
- Dried chives: Optional but recommended for little bursts of color and mild onion flavor.
- Sharp cheddar cheese: Don’t skimp here—the sharpness cuts through the richness of the dish and creates the most incredible golden, bubbling topping.
Note: You’ll find the complete list of ingredients, along with their exact measurements, in the printable recipe card at the bottom of this post.
Variations
Want to make this recipe your own? Here are some delicious twists to try:
Switch Up the Protein
Swap the chicken for leftover turkey after Thanksgiving, or use ham for a different flavor profile. For a seafood version, try adding some cooked shrimp or crabmeat instead of chicken.
Play with the Vegetables
Replace the frozen mixed vegetables with whatever fresh or frozen vegetables you prefer. Mushrooms, leeks, asparagus, or broccoli can add wonderful new dimensions.
Make It Herby
Add fresh herbs like thyme, rosemary, or sage to the filling for a more aromatic pot pie. Fresh parsley or dill folded into the biscuit dough creates a bright, garden-fresh flavor.
Creamier Filling
For an extra indulgent pot pie, add 1/4 cup of heavy cream or cream cheese to the filling mixture. It creates an even richer, more velvety texture.
How to Make Cheesy Biscuit Topped Chicken Pot Pie
Step 1: Prepare the Filling
Preheat your oven to 450°F. Place your 10.25″ skillet over medium heat and add the undiluted cream of chicken soup along with the frozen mixed vegetables. Stir frequently until the mixture becomes bubbly, then continue cooking for 5-8 minutes until the vegetables reach your preferred tenderness. Stir in the black pepper and soy sauce, then gently fold in the shredded chicken. The mixture will be quite full, so handle carefully. Remove the skillet from heat and set aside.
Step 2: Make the Biscuit Topping
In a large bowl, add your self-rising flour and cut in the vegetable shortening using two forks or a pastry blender. Work the mixture until the crumbs reach the size of small peas—this creates those heavenly flaky layers. Add the milk, salt, garlic powder, dried chives, and shredded cheddar cheese, stirring until just combined. The dough should feel soft but not sticky. If it seems too dry, add a touch more milk, a tablespoon at a time.
Step 3: Top and Bake
Drop the biscuit dough by heaping spoonfuls on top of your chicken mixture, distributing it evenly across the surface. Don’t worry about covering every inch—those gaps allow steam to escape and create wonderful crispy edges on your biscuits. Place your skillet on a rimmed baking sheet or pizza pan (to catch any potential overflow) and bake for 10-12 minutes, until the filling bubbles vigorously around the edges and the biscuits turn a beautiful golden brown.
Pro Tips for Making the Recipe
- Cold Ingredients: Keep your shortening and milk cold until you’re ready to use them. Cold ingredients make for flakier, more tender biscuits.
- Don’t Overmix: When making the biscuit topping, stir just until ingredients come together. Overmixing develops gluten, which leads to tough biscuits.
- Cast Iron Magic: A well-seasoned cast iron skillet conducts heat beautifully for this dish, creating perfect browning on the biscuits and helping the filling bubble evenly.
- Rest Before Serving: Allow the pot pie to rest for about 5 minutes after removing from the oven. This helps the filling set slightly, making it easier to serve and less likely to burn eager mouths.
How to Serve
This one-pot wonder is a complete meal on its own, but here are some serving suggestions to make dinner even more special:
Simple Sides
A fresh green salad with a light vinaigrette provides a perfect contrast to the richness of the pot pie. Try arugula with lemon dressing or a classic Caesar.
Beverage Pairings
For a family meal, cold milk complements the savory flavors beautifully. For adult gatherings, try a crisp white wine like Chardonnay or a light-bodied Pinot Noir.
Finishing Touches
A sprinkle of fresh herbs like parsley or thyme just before serving adds a pop of color and freshness. For extra decadence, drizzle a little melted butter over the hot biscuits.
Make Ahead and Storage
Storing Leftovers
Store any leftover pot pie in an airtight container in the refrigerator for up to 3 days. The biscuit topping will soften somewhat but will still be delicious.
Freezing
You can freeze this dish either before or after baking. For unbaked pot pie, prepare the filling and cool completely before topping with the biscuit dough. Wrap tightly with plastic wrap and aluminum foil, then freeze for up to 3 months. For baked leftovers, portion into individual containers and freeze for up to 2 months.
Reheating
For the best texture, reheat refrigerated leftovers in a 350°F oven for about 15-20 minutes, or until heated through. If reheating from frozen, add an extra 15-20 minutes to the cooking time, covering with foil for the first half to prevent excessive browning. Microwave reheating works in a pinch, but the biscuits won’t retain their crusty exterior.
FAQs
-
Can I use pre-made biscuit dough instead of making my own?
Absolutely! While homemade biscuits have a special flavor and texture, refrigerated biscuit dough makes a fine substitute when you’re really pressed for time. Simply cut each biscuit in half or quarters before arranging them on top of the filling to ensure they cook through properly.
-
What can I use instead of cream of chicken soup?
If you prefer to avoid canned soup, make a simple white sauce instead. Melt 4 tablespoons of butter, whisk in 4 tablespoons of flour until smooth, then gradually add 2 cups of chicken broth and 1/2 cup of milk. Season with salt, pepper, and a pinch of thyme, then use this as your base.
-
How can I make this recipe gluten-free?
Replace the self-rising flour with a gluten-free baking mix, and ensure your cream of chicken soup is gluten-free (several brands offer this option). Add 1 1/2 teaspoons of baking powder and 1/4 teaspoon of xanthan gum to help with texture.
-
Can I prep this dish ahead of time?
Yes! You can prepare the filling up to two days ahead and store it in the refrigerator. When ready to serve, reheat the filling in your skillet until bubbly, then prepare the biscuit topping fresh and proceed with baking. The biscuits will have the best texture when made just before baking.
Final Thoughts
This Cheesy Biscuit Topped Chicken Pot Pie combines the best of both worlds—the comfort of homestyle cooking with the convenience modern life demands. It’s become my go-to recipe when I need something guaranteed to please everyone at the table without keeping me in the kitchen all evening. The golden, cheesy biscuits rising above that creamy, savory filling create a meal that feels like Sunday dinner any day of the week. Give it a try the next time you’re craving comfort food—I promise it’ll earn a permanent spot in your dinner rotation!
Print
Cheesy Biscuit Topped Chicken Pot Pie Recipe
- Prep Time: 20 minutes
- Cook Time: 10 minutes
- Total Time: 30 minutes
- Yield: 6 servings
- Category: Main-course
- Method: Baking
- Cuisine: American
Description
This Cheesy Biscuit Topped Chicken Pot Pie combines creamy chicken filling with a golden, cheesy biscuit topping for the ultimate comfort food dish. Packed with tender shredded chicken, mixed vegetables, and flaky homemade biscuits, this one-pan recipe is both hearty and satisfying, making it perfect for family dinners or cozy evenings at home.
Ingredients
For the filling:
- 2 (10.75-ounce) cans cream of chicken soup
- 2 cups frozen mixed vegetables
- 1/8 teaspoon black pepper
- 1 tablespoon soy sauce
- 4 cups shredded cooked chicken
For the biscuits:
- 2 cups White Lily self-rising flour
- 1/4 cup vegetable shortening
- 3/4 cups milk
- 1/2 teaspoon salt
- 1/2 teaspoon garlic powder
- 1 tablespoon dried chives (optional)
- 1 cup shredded sharp cheddar cheese
Instructions
- Preheat Oven and Prepare Filling:
Preheat your oven to 450°F. In a 10.25″ skillet over medium heat, combine the cream of chicken soup, undiluted, with the frozen mixed vegetables. Heat the mixture until it starts bubbling, stirring frequently. Allow it to cook for 5-8 minutes or until the vegetables are cooked to your preference. Stir in the black pepper and soy sauce before gently folding in the shredded chicken. Carefully remove the skillet from heat as it will be full. - Prepare Biscuit Dough:
In a large bowl, combine the flour and vegetable shortening. Use two forks or a pastry blender to cut the shortening into the flour until the mixture resembles coarse crumbs about the size of peas. Add the milk, salt, garlic powder, dried chives, and shredded cheese to the mixture. Stir gently until just combined. The dough should be soft; if needed, add a small amount of additional milk to achieve the desired consistency. - Assemble and Bake:
Drop spoonfuls of the biscuit dough evenly over the top of the chicken mixture. To prevent potential spills, place the skillet on a rimmed baking sheet or pizza pan. Bake in the preheated oven for 10-12 minutes, or until the chicken mixture is bubbly and the biscuits are golden brown.
Notes
- For added richness, you can substitute half-and-half for milk in the biscuit recipe.
- Feel free to customize the vegetables to your taste—peas, carrots, and corn work wonderfully.
- If you don’t have self-rising flour, you can make it using 2 cups all-purpose flour, 1 tablespoon baking powder, and 1 teaspoon salt.
- This recipe reheats well! Store leftovers in an airtight container in the refrigerator for up to 3 days.
Nutrition
- Serving Size: 1 portion
- Calories: 415
- Sugar: 4g
- Sodium: 910mg
- Fat: 19g
- Saturated Fat: 7g
- Unsaturated Fat: 10g
- Trans Fat: 0g
- Carbohydrates: 32g
- Fiber: 3g
- Protein: 26g
- Cholesterol: 78mg


