
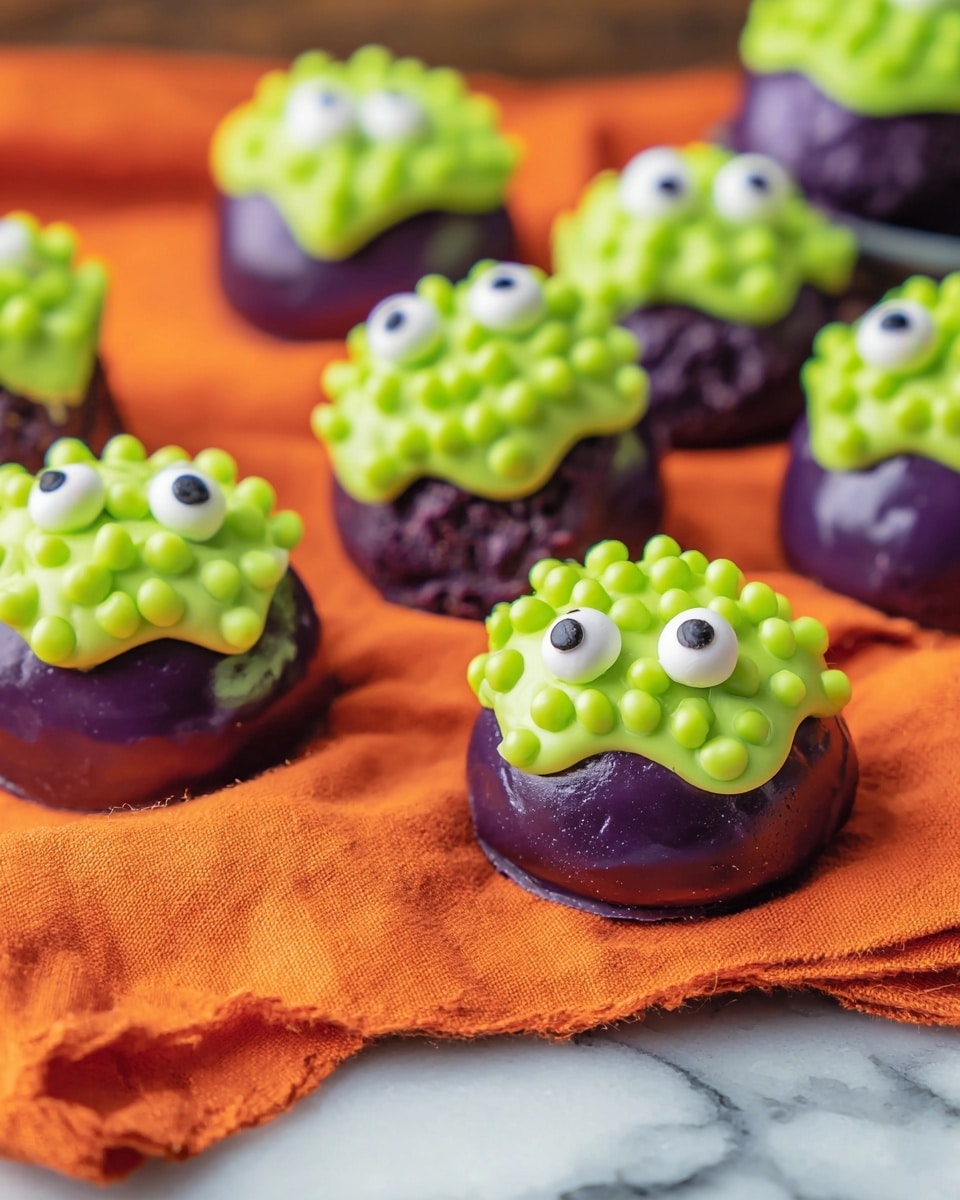
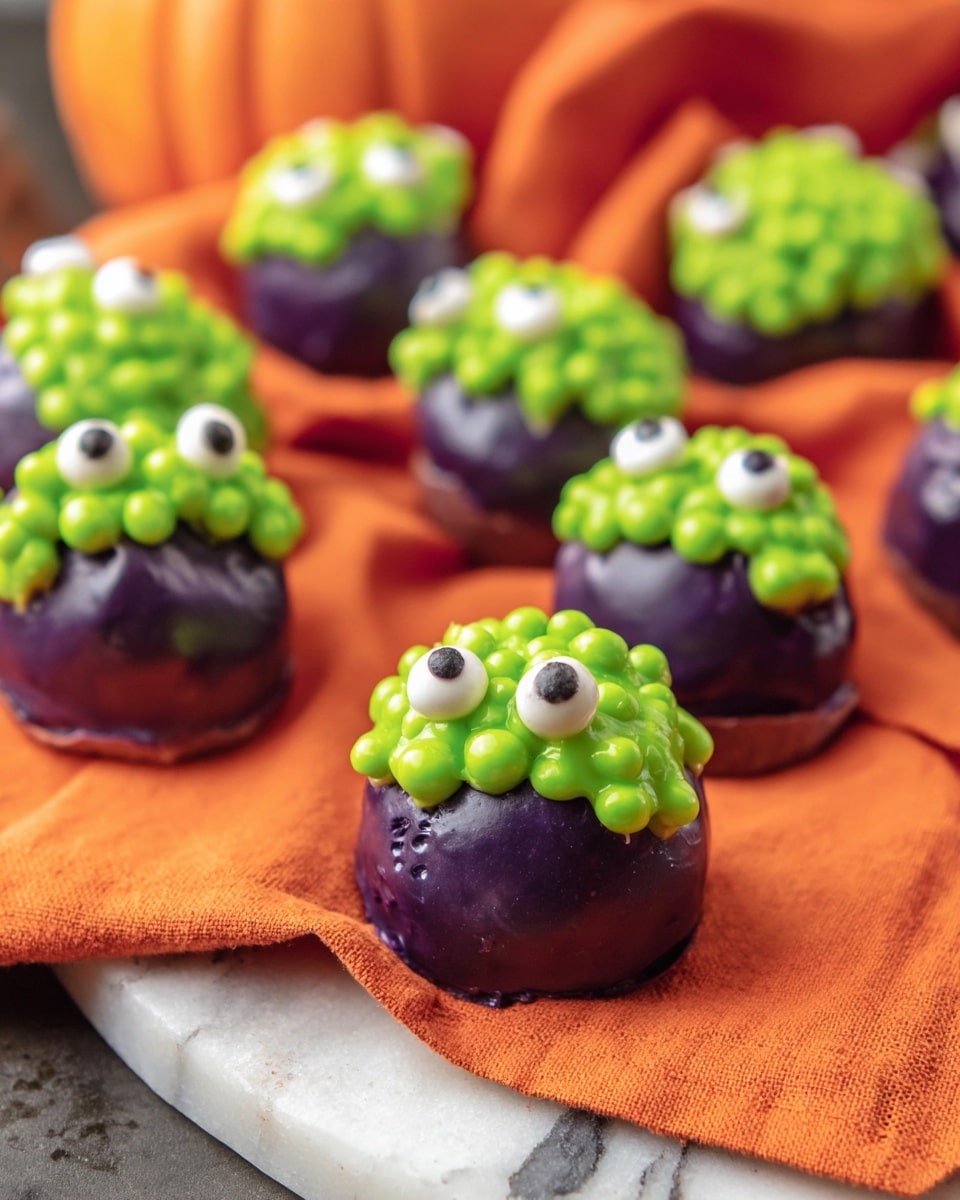
If you’re on the hunt for a playful and spooky treat that’s just as delicious as it is fun, you’re going to want to try this Cauldron Oreo Balls Recipe. I absolutely love how these little cauldrons pop with color and flavor, making them perfect for Halloween parties or anytime you want to impress your crew with a cute, no-bake dessert. Plus, they’re surprisingly simple to make, so stick with me — I’ll walk you through it step by step!
Why You’ll Love This Recipe
- Festive & Fun: These Oreo balls look like mini cauldrons bubbling with magic — perfect for Halloween or themed parties.
- No-Bake Simplicity: No oven needed, so it’s easy and quick, even if you’re not a seasoned baker.
- Kids Love Helping: Rolling the colorful dough and decorating is a blast for little helpers.
- Customizable Colors & Toppings: With food coloring and different sprinkles, you can get creative and make these uniquely yours.

Ingredients You’ll Need
This Cauldron Oreo Balls Recipe uses ingredients that blend creamy, sweet, and crunchy textures perfectly. You’ll want good-quality cream cheese and fun colored candy melts for that real eye-catching effect.
- Vanilla sandwich cookies: Crushed into fine crumbs, these are the base of your cauldrons—classic Oreo flavors work great!
- Cream cheese: Softened to make the mixture smooth, lending a rich, tangy creaminess.
- Green and purple food coloring: These colors bring your cauldrons to life with a spooky vibe.
- Black candy melts: To coat the balls and give that signature cauldron look.
- Light green candy melts: For piping on the “bubbling” effect on top.
- Green pearl sprinkles: Adds a fun textured fizz on the top, just like bubbling potion bubbles.
- Candy eyes and Halloween sprinkles (optional): Great for extra spooky decoration and character!
Variations
I love mixing things up with this recipe depending on the occasion or who I’m serving it to. Feel free to tweak the colors or toppings to suit your mood or theme — the Cauldron Oreo Balls Recipe is super flexible.
- Spooky Swirls: I once mixed in a bit of orange food coloring along with green for a more traditional Halloween color swirl — it was a hit with the kids!
- Dairy-Free Option: Swap cream cheese for a dairy-free spreadable cheese and use vegan candy melts to make it allergy-friendly.
- Flavor Boost: Add a drop of peppermint or almond extract to the cream cheese mixture for a subtle flavor twist that refreshes your palate.
- Mini Cauldrons: Make smaller versions for bite-sized nuggets that are perfect for party platters or classroom treats.
How to Make Cauldron Oreo Balls Recipe
Step 1: Crush and Prep Your Cookie Base
Start by crushing your vanilla sandwich cookies into fine crumbs. I usually use a ziplocked bag and a rolling pin because it’s easy and quick. If you have a food processor, even better – just pulse until you get a fine crumb. Line a baking sheet with parchment paper so you’ll have a place to rest your cauldrons when they’re formed. This setup makes the whole process less messy.
Step 2: Mix the Cream Cheese and Cookie Crumbs
In a large bowl, combine the cookie crumbs with the softened cream cheese. I like to use an electric hand mixer here — it helps achieve a smooth, creamy mixture without lumps. Split this mixture into two separate bowls, then add green food coloring to one and purple to the other. This part is fun because you get to watch the colors swirl and come alive.
Step 3: Shape Your Cauldrons
Take a teaspoon from each color and gently roll them together, swirling the purple and green colors to create that magical witchy effect. Then, take about half a teaspoon of the filling and roll it into a ball, flatten it slightly, and place it on top of the bigger ball—this makes the “cauldron lid.” Arrange each finished cauldron on your lined baking sheet for freezing.
Step 4: Freeze Until Firm
Pop the tray in your freezer for at least an hour, or overnight if you have the time. This step is crucial as it firms up your cauldrons and makes dipping them in chocolate a breeze. Believe me, skipping this makes the coating messier.
Step 5: Coat Your Cauldrons in Black Chocolate
Now for the fun part! Melt the black candy melts either in a double boiler or microwave-safe bowl, heating in 30-second intervals and stirring until smooth. Dip each frozen cauldron carefully, ensuring it’s fully coated. Place them back on the parchment-lined tray to set—this takes about an hour at room temperature.
Step 6: Add the Bubbling Effect
Melt the light green candy melts the same way and pour into a ziplocked bag. Snip off a tiny corner to create a piping bag, then drizzle green “bubbles” on top so they drip over the edge. Before the chocolate sets, sprinkle on green pearls—these little bubbles make all the difference. If you like, add candy eyes or Halloween sprinkles to give your cauldrons extra personality!
Pro Tips for Making Cauldron Oreo Balls Recipe
- Use Room Temperature Cream Cheese: This helps you blend the cream cheese with the cookie crumbs easily without lumps.
- Freeze Thoroughly Before Dipping: If you dip them too soon, the balls can lose their shape and mess up your chocolate coating.
- Don’t Overheat Candy Melts: Melt in short bursts and stir frequently to avoid thickening or seizing.
- Pipe Quickly for Best Effect: Drizzle the green candy melts right after melting, so they flow easily and look like real bubbling cauldrons.
How to Serve Cauldron Oreo Balls Recipe
Garnishes
I personally love adding candy eyes for that extra creepy crawl vibe—it gets a lot of smiles! Sometimes I’ll sprinkle some edible glitter to give them a magical shimmer too. The green pearl sprinkles are non-negotiable for me because they create that perfect potion-bubbling look.
Side Dishes
These Cauldron Oreo Balls are sweet enough on their own, but pairing them with hot chocolate or a simple pumpkin spice latte really sets the mood. I’ve also served them alongside a fruit platter for a nice balance of flavors.
Creative Ways to Present
For Halloween parties, I like to arrange these on a black platter with some dry ice around for that smoky, mystical effect. You could also place them in mini cauldron bowls or nestle them on top of green shredded paper “grass” to mimic a bubbling witch’s brew.
Make Ahead and Storage
Storing Leftovers
After making these, I store leftovers covered in an airtight container in the fridge. They keep well for up to 5 days, and honestly, they usually disappear quicker than that! Make sure they’re in a single layer or separated with parchment paper so they don’t stick together.
Freezing
If you want to make these ahead of a party, they freeze beautifully. I wrap them individually in plastic wrap and then place them in a freezer-safe container. When you’re ready to serve, thaw them in the fridge overnight to keep that fresh, fudgy texture.
Reheating
Reheating isn’t really necessary since these are best served chilled, but if you want softer centers, you can let them sit at room temp for about 10-15 minutes before serving. Just avoid microwaving as the chocolate shell can melt unevenly.
FAQs
-
Can I use chocolate sandwich cookies instead of vanilla in this Cauldron Oreo Balls Recipe?
Absolutely! Chocolate sandwich cookies work just as well and give you a richer, more chocolatey base. Just keep in mind that the colored cream cheese filling might not show as vibrantly against the darker crumbs.
-
What can I substitute for cream cheese if I’m dairy-free?
You can use dairy-free cream cheese alternatives or even coconut cream to get a similar creamy texture. Pick a brand with a mild flavor to keep the taste balanced.
-
How do I prevent the candy melts from seizing while melting?
Heat your candy melts in short intervals (15-30 seconds) and stir thoroughly in between. Avoid any water getting into the bowl as moisture causes seizing. Using a silicone spatula helps for smooth stirring.
-
Can I make these without freezing first?
Freezing is key to maintaining the shape and making dipping easier, so I don’t recommend skipping it. If you’re short on time, freeze at least 30 minutes, but an hour or longer is best.
-
How long do Cauldron Oreo Balls last?
Stored in the fridge in an airtight container, they last for up to 5 days. Beyond that, the cream cheese mixture can lose its freshness and the cookie texture softens significantly.
Final Thoughts
This Cauldron Oreo Balls Recipe is one of those little kitchen gems I discovered when I wanted to bring a Halloween party to life without stress. The colorful swirl, the glossy chocolate coating, and the fun “bubbling” garnish never fail to impress guests—big or small. Give it a try for your next get-together, or anytime you need a quick sweet treat with a magical twist. Trust me, once you make these, you’ll find yourself craving them year-round!
Print
Cauldron Oreo Balls Recipe
- Prep Time: 20 minutes
- Cook Time: 0 minutes
- Total Time: 1 hour 20 minutes
- Yield: 30 pieces
- Category: Dessert
- Method: No-Cook
- Cuisine: American
- Diet: Vegetarian
Description
These festive Cauldron Oreo Balls combine crushed vanilla sandwich cookies and cream cheese, swirled with vibrant green and purple food coloring, then coated in black candy melts for a spooky Halloween treat. Topped with green candy melts and sprinkles to mimic bubbling cauldrons, they are perfect for holiday parties and celebrations.
Ingredients
Base
- 14.3 oz vanilla sandwich cookies, crushed
- 8 oz cream cheese, softened
- Green food coloring
- Purple food coloring
Coating
- 12 oz black candy melts
- 1 cup light green candy melts
Toppings
- Green pearl sprinkles
- Candy eyes (optional)
- Halloween sprinkles (optional)
Instructions
- Prep: Start by crushing the vanilla sandwich cookies into fine crumbs using a ziplock bag and rolling pin or a food processor. Line a baking sheet with parchment paper and set aside.
- Make Batter: In a large bowl, combine the cookie crumbs and softened cream cheese. Use an electric hand mixer to blend into a smooth mixture. Divide this mixture evenly into two bowls. Add green food coloring to one bowl and purple food coloring to the other, mixing each until the colors are fully incorporated.
- Shape Cauldrons: Take a teaspoon-sized portion from each colored mixture and gently swirl them together then roll into a ball. Then, take about half a teaspoon of the filling and roll it into a smaller ball, flatten it, and place it on top of the larger ball to create the cauldron rim. Place each formed cauldron on the parchment-lined baking tray.
- Freeze: Place the tray in the freezer for 1 hour or up to overnight to firm the balls.
- Melt Black Candy Melts: Melt the black candy melts either in a double boiler or microwave-safe bowl in 30-second intervals, stirring between, until smooth.
- Dip Cauldrons: Carefully dip each frozen cauldron into the melted black candy, fully coating them. Return to the parchment paper-lined tray to allow the coating to set.
- Melt Green Candy Melts: Melt the light green candy melts using the same method and pour into a ziplock bag. Snip a small hole from one corner for piping.
- Decorate: Pipe the green candy melts onto the top of each cauldron, letting it drip off the edges to appear like bubbling liquid. Immediately sprinkle green pearls on top to mimic bubbles. Add candy eyes or Halloween sprinkles as desired.
- Set and Serve: Allow the chocolate coating to set completely at room temperature or in the fridge for about an hour. Serve and enjoy your spooky Halloween treats!
Notes
- Store leftovers in an airtight container in the refrigerator for up to 5 days to keep them fresh.
- For best results, use full-fat cream cheese to aid in mixture consistency.
- If you prefer a smoother coating, temper the candy melts before dipping.
- Be gentle when swirling colors to maintain a visually appealing marbled effect.
- Use parchment paper to prevent sticking when melting and setting candy melts.
Nutrition
- Serving Size: 1 piece
- Calories: 110
- Sugar: 10g
- Sodium: 65mg
- Fat: 6g
- Saturated Fat: 3.5g
- Unsaturated Fat: 2g
- Trans Fat: 0g
- Carbohydrates: 13g
- Fiber: 0.5g
- Protein: 1.2g
- Cholesterol: 10mg


